

How Do You Do Rest Integration | Step-by-Step Methodology
source link: https://dzone.com/articles/how-do-you-do-rest-integration-step-by-step-method
Go to the source link to view the article. You can view the picture content, updated content and better typesetting reading experience. If the link is broken, please click the button below to view the snapshot at that time.

How Do You Do Rest Integration | Step-by-Step Methodology
How do you do REST API integration the right way? Here's a brief overview of the things to consider and clarify before even starting the first line of code.
Join the DZone community and get the full member experience.
Join For FreeWhen you need two or more applications and services to exchange data between them on a regular basis, REST integration (or REST API integration) is one method that slowly but steadily gains the status as the new and preferred standard.
But as with any other project where you need to connect apps and web services via API, integrating REST requires good preparation and a solid methodology to avoid project delays, development overhead, and too many errors. So, how do you do REST integration the right way? Well, in this article, we explore exactly this topic, offering you a step-by-step guide of all the things you need to consider and clarify before you even start working on the code.
Step 1: Do Your Due Diligence
I’m sure you already know that no two REST APIs are the same, so even before you start thinking about data flows – meaning how exactly you plan to move datasets between applications and web services – you need to establish whether REST API integration is feasible in the first place and make a rough estimation of how much time you need to plan for it.
There is one thing you should check upfront: Does the application you want to integrate with providing good documentation? Solid documentation is the backbone of any automation project using APIs; in fact, it can be considered one of the characteristics of a good API. Ideally, it should provide you with detailed information on how to format your requests, what kind of endpoints are available, what endpoints you need to evoke this or that business process (e.g. payment processing), give you plenty of code examples, and much, much more. Without it, integrating REST will be challenging and resource-intensive.
An example of such great documentation is the VTEX REST API reference; saying that it is excellent is an understatement. Unfortunately, for many, many API documents this is not the case, but this is a different story.
Step 2: List the Key Elements of Your Rest Integration
Before you even start drafting a strategy for connecting various data objects, you should sort out some other important aspects of the process of REST API integrations. It’s a good idea to set up a checklist so that you know what information you need to gather up front. This checklist should answer questions such as:
- Are there any restrictions on the payload
- What are the provided authentication methods
- What is the allowed number of requests per unit time
- Is there SSL certificate validation
- What are the traffic encryption requirements
- Are there any specific headers that a request should contain
- Does the vendor provide a test server or any other way to perform a test request, and how do you get access to that
Now let’s go over some aspects in more detail.
Authentication Methods
REST APIs have several methods of authentication, but with APIs for business software applications and web services such as CRM or Accounting, you will most likely find two: API Key and OAuth (2.0). Authentication with API Key is pretty straightforward; some applications provide a default API Key and API Token, others, like VTEX digital commerce platform, allow you to set up separate API keys for each REST integration:
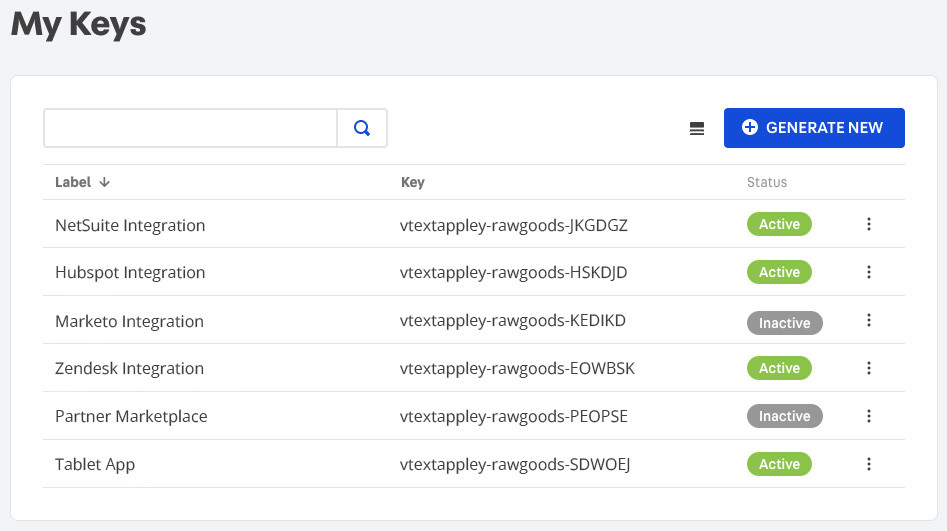
REST API Key example from VTEX. Source: Zoho CRM
OAuth (2.0) can be a bit more complex as it has different sets of mechanisms for granting secure access. Authorization code is mostly used for server-side and mobile web applications; the so-called Implicit authorization flow (when the client retrieves an access token directly) is usually found in the web, desktop, and mobile applications and services that don’t include any server component; logging in with a Username and Password is another common mechanism; and the Client Credentials method is intended for server-to-server authentication, where users can specify their credentials in the client application.
In practice, many applications allow you to create the so-called OAuth Clients that will allow the users and developers to easily authenticate themselves with a respective application.
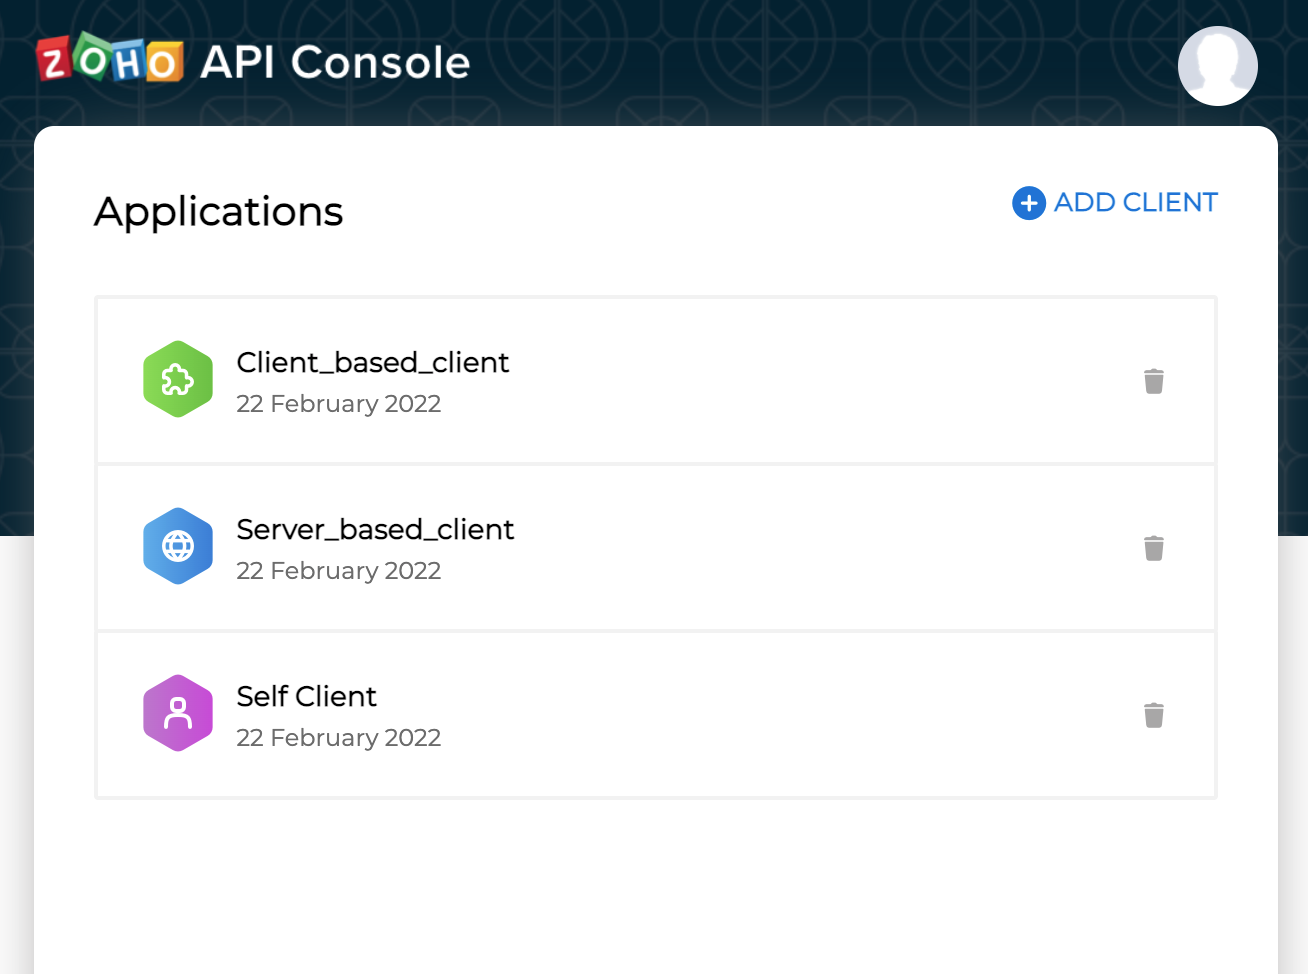
OAuth Client example from Zoho CRM. Source: Zoho CRM
In addition to clarifying how to grant access to the respective applications, you should also think about how long you’ll need the authentication instance to run. In other words, will the data exchange need to be open all of the time or only on occasion?
Rest Integration: How Much Data and When
When planning your REST API integration, consider how much in volume, how often, and at what intervals data must be transferred. In order to save their own resources, most REST APIs pose a limit on how often an API can be called or how much data can be transferred per day. Similarly, some business processes are “satisfied” when data is delivered in batches once a day; for others such as lead routing, the timely data update is critical. This means that the amount of data to be transferred must be balanced against the rate of data transfer allowed and the time expectation for accessibility and availability of data.
This requires combining the project requirements with the capabilities and the provided resources of the respective REST APIs. You may start by requesting an exact list of business processes that should be automated through your project. If necessary, talk to other departments, e.g. with salespeople, directly. This way, you’ll get a good overview of how much data, when, and how often should ideally flow between the applications and web services in question. Then check the respective REST API documentation or get in touch with their technical support to find out how much data, when, and how often you will be allowed to transfer, and then work from there to find a well-balanced compromise.
Data Inconsistencies
When integrating data, you will encounter all kinds of data inconsistencies and discrepancies. The irregular naming of data objects (‘customer’ vs ‘client’) or data objects that are custom (‘payments’ vs ‘firstpaymentofthemonth’) are the most obvious ones, but it can be even more banal: one application captures date and time in the format such as “Tue Feb 15 2022 14:16:19 GMT+0000”, whereas the other app accepts only the ISO 8601 format.
Without checking and amending date and time formats first, your REST integration will produce errors in the best-case scenario or completely false data in the worst-case scenario where for example “November 5th” will become “May 11th”.
So, be sure to set up a checklist of all possible aspects and elements that might be different and result in critical errors: date & time format, field size limitations, clothing size standards, currency values, and so on.
HTTP Request Methods
REST APIs use specific HTTP protocol request types to perform the Create, Read, Update and Delete (CRUD) operations. The most commonly used methods are Post, Get, Put and Delete methods, although there are a few more. These methods define the intent of your data flow: When you send data to another application, this application will need to know what’s your intention behind it. Do you want to create a new record, update an existing one, or delete a record?
You can also introduce the so-called UPSERT function. This one combines the methods of ‘Post’ and ‘Put’ (or ‘Create’ and ‘Update’), checking whether a certain record, usually specified by ID, is available and updating it if it is, or creating a new one if it isn’t. Many modern enterprise integration platforms feature this method as well. The advantage of ‘Upsert’ is that it helps avoid or at least limit duplicating data and/or losing critical data records.
Also, good API documentation should give you a clear overview of what method goes with what API endpoint. For example, VTEX clearly states that to remove all items from a shopping cart, you should use the POST method together with the URI https://{mystore}.{myvtex}.com.br/api/checkout/pub/orderForm/{orderFormId}/items/removeAll, whereas to update a shopping cart, you’ll use PATCH with https://{mystore}.{myvtex}.com.br/api/checkout/pub/orderForm/{orderFormId}/items.
If the HTTP request methods are not clearly defined in the respective REST API documentation, you will need to get in touch with their technical team and sort out this question upfront.
Create a REST Integration Specifics Overview
Ideally, after you did your research and clarified the points listed above, you should end up with a good overview of what each respective API can do and how. It might be a good idea to put all that information in one table for future reference. Here is an example of such an overview:
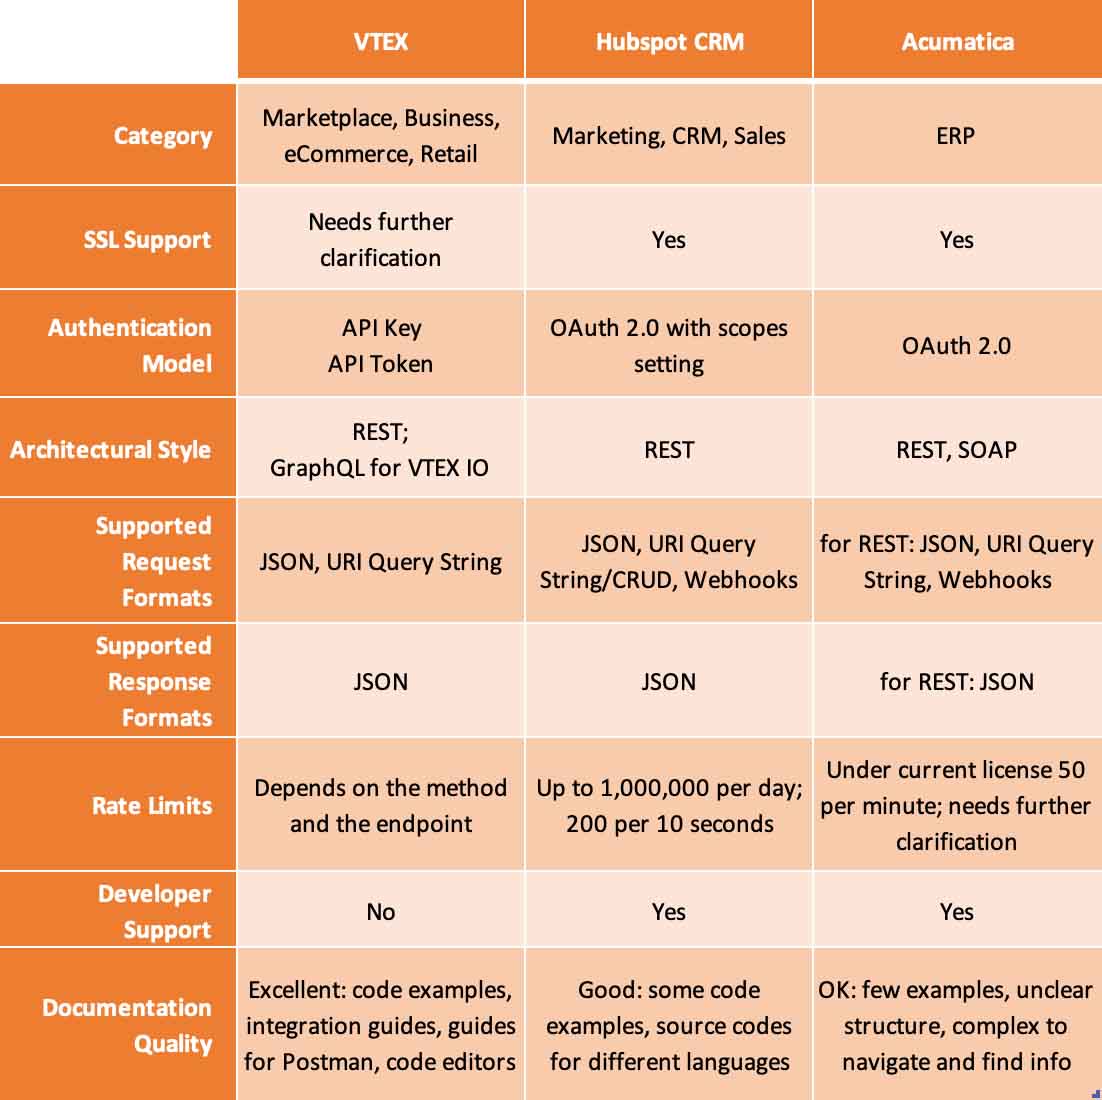
Integrating REST – project overview example
Those pieces of information that you weren’t able to find on your own will need to be clarified with the support of the respective application. For example, if you know that your current license will allow you to make only 50 requests per minute but the business process you need to automate might require slightly more, you can discuss how to get access to more resources without actually upgrading the whole software license; maybe the vendor will allow buying an additional set of requests.
Step 3: Visualize Data Mapping and Transformation
Once you’ve sorted out the key aspects that can affect the success of your REST API integration project at the very early stages, it’s highly recommended to develop a visualization of the data objects you will need to map. This will not only bring more structure to your project and help others – your teammates, non-technical colleagues, consultants – understand what you’re doing or have done, but it will also give you a clear understanding of how much data transformation needs to be performed.
I have already written about Data Mapping Best Practices before, so if you would like to learn more about it, you’re more than welcome to check out that article. In short, this phase can be divided into two stages. The first one is logical data mapping, which is rather a high-level, conceptual phase of the project, where you can bring in non-technical people such as your colleagues from accounting or sales. Next, it is followed by physical data mapping, which gets down to a precise correlation of every data object in question.
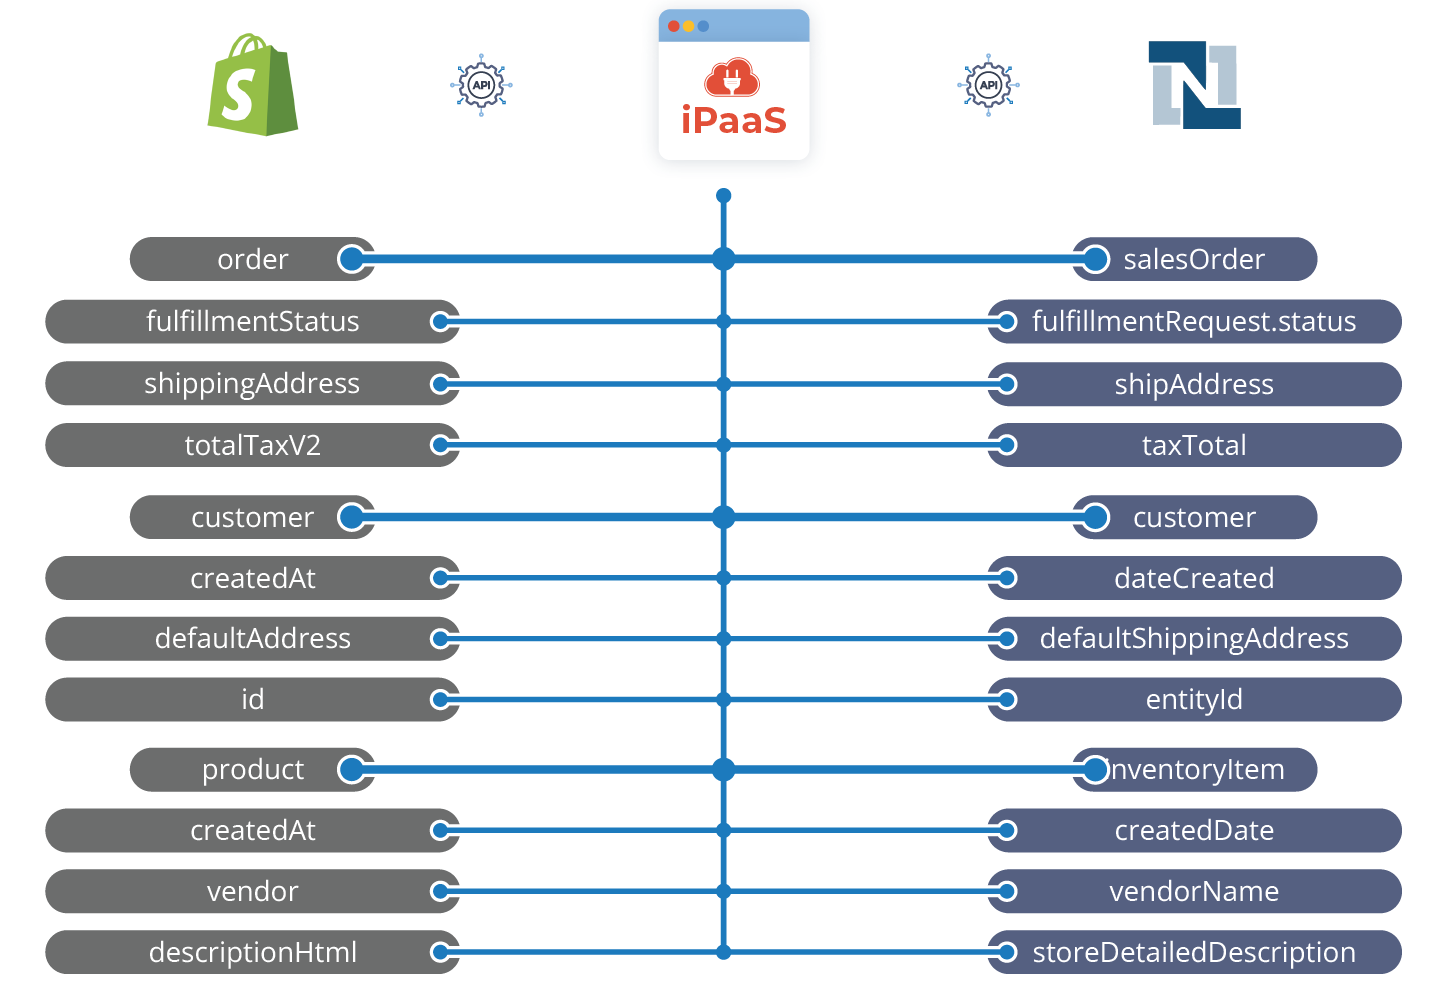
Physical data mapping example
The image above is, no doubt, rather a fancy representation of how you can perform the physical mapping. In practice, it can be as simple as using an Excel or a Google Spreadsheet where you put your source application on one side and the destination application on the other, listing not only the object or field names but also other key pieces of information such as:
- object or field IDs,
- the respective data type of each object,
- maximum field length,
- is the respective object/field required or not, and so on
One important thing to do when working on data mapping is to eliminate or at least limit any confusion in terminology. For example, the word ‘approval’ may mean, or rather, cover entirely different processes depending on the application vendor. Over time, it might even make sense to create some kind of a glossary for most common terms.
Step 4: Do a Test REST Integration With Postman
Once you’ve gathered all the supporting information you could find and set up a mapping plan, you may take an extra step and run a test with a specific business process, e.g. executing an order fulfillment, on Postman, – with the specifications of a corresponding REST API, checking the most common use cases with various datasets. In other words, you would simulate what the application will do later automatically.
You’d be surprised but such a test run can reveal up to 70 percent of documentation inaccuracies at the very early stages of the REST integration development. For example, the documentation said that a certain endpoint will accept JSON whereas, in reality, it expects form data. Or the rules for field validation are specified incorrectly.
You can then collect the errors you received and if you find no obvious reason for them, send them to the developers of the respective REST API for further clarification and correction.
Of course, using Postman is just one option out of several. Maybe you can get access to a test server with API or there is a mechanism that allows sending test requests to the production server.
Conclusion
It sure IS a lot of work. But the more time you’ll spend with planning and preparation, the easier and smoother the actual development will be. Quoting Confucius:
“Success depends upon previous preparation, and without such preparation there is sure to be failure.”
Confucius
Another strategy you might want to consider is using middleware such as iPaaS. A modern enterprise integrations platform is built around the concept of APIs, providing tools that are simple to set up and configure for API-based communication with applications and web services, be it REST or SOAP. With iPaaS middleware, at least you won’t need to perform such extensive research to understand how you can connect to a respective API because this has already been done for you.
Of course, make no mistake – you will still be required to understand the specifics of the business process you’re implementing through your project, but even mapping between different data objects is often simplified through a user-friendly interface with a drop-down menu, where you only need to select the respective data object. Plus it allows easier flow management due to centralized monitoring and logging systems.
Recommend
About Joyk
Aggregate valuable and interesting links.
Joyk means Joy of geeK