

LayerZero跨链协议开发入门
source link: http://blog.hubwiz.com/2022/04/04/layerzero-tutorial/
Go to the source link to view the article. You can view the picture content, updated content and better typesetting reading experience. If the link is broken, please click the button below to view the snapshot at that time.

LayerZero是一个Omnichain互操作协议,专为轻量级消息跨链传递设计。 在这个教程中,我们将使用 LayerZero 构建一个简单的跨链消息传输合约,并使用默认的 UA 配置。 本教程假设你了解如何使用Solidity Hardhat。
用熟悉的语言学习 以太坊DApp开发 : Java | Php | Python | .Net / C# | Golang | Node.JS | Flutter / Dart
1、LayerZero概述
首先,让我们大致了解一下 LayerZero。LayerZero 是一个 Omnichain 互操作协议,专为跨链传递轻量级消息而设计。 LayerZero 在无需信任的环境下实现真实且有保证的消息传递。该协议被实施为一组高效、不可升级的智能合约。
LayerZero的官方测试链端节点地址如下:
✅ Rinkeby - chainId: 10001 - endpoint: 0x79a63d6d8BBD5c6dfc774dA79bCcD948EAcb53FA
✅ Binance Smart Chain - chainId: 10002 - endpoint: 0x6Fcb97553D41516Cb228ac03FdC8B9a0a9df04A1
✅ Fuji (Avalanche testnet) - chainId: 10006 - endpoint: 0x93f54D755A063cE7bB9e6Ac47Eccc8e33411d706
✅ Mumbai (Polygon testnet) - chainId: 10009 - endpoint: 0xf69186dfBa60DdB133E91E9A4B5673624293d8F8
✅ Arbitrum (Rinkeby testnet) - chainId: 10010 - endpoint: 0x4D747149A57923Beb89f22E6B7B97f7D8c087A00
✅ Optimism (Kovan testnet) - chainId: 10011 - endpoint: 0x72aB53a133b27Fa428ca7Dc263080807AfEc91b5
✅ Fantom (testnet) - chainId: 10012 - endpoint: 0x7dcAD72640F835B0FA36EFD3D6d3ec902C7E5acf
Layzero的主链端节点可以在官方文档查看。
2、创建Hardhat项目
创建一个空目录并进入该目录,运行npm init并按照其说明创建一个 npm 项目。一旦hardhat项目准备就绪, 运行:
npm install --save-dev hardhat
在项目文件夹中运行npx hardhat来创建hardhat项目:

我们可以选择 Create an advanced sample project 为演示创建一个hardhat项目。
要发送跨链消息,合约将使用端节点在源链调用send()方法,然后在目标链调用lzReceive()方法接收消息。 为了使用它,我们需要从 LayerZero 库 中导入接口。
3、创建Solidity合约
创建合约文件LayerZeroDemo1.sol:
//SPDX-License-Identifier: MIT
pragma solidity ^0.8.9;
pragma abicoder v2;
import "../interfaces/ILayerZeroEndpoint.sol";
import "../interfaces/ILayerZeroReceiver.sol";
import "hardhat/console.sol";
contract LayerZeroDemo1 is ILayerZeroReceiver {
    event ReceiveMsg(
        uint16 _srcChainId,
        address _from,
        uint16 _count,
        bytes _payload
    );
    ILayerZeroEndpoint public endpoint;
    uint16 public messageCount;
    bytes public message;
    constructor(address _endpoint) {
        endpoint = ILayerZeroEndpoint(_endpoint);
    }
    function sendMsg(
        uint16 _dstChainId,
        bytes calldata _destination,
        bytes calldata payload
    ) public payable {
        endpoint.send{value: msg.value}(
            _dstChainId,
            _destination,
            payload,
            payable(msg.sender),
            address(this),
            bytes("")
        );
    }
    function lzReceive(
        uint16 _srcChainId,
        bytes memory _from,
        uint64,
        bytes memory _payload
    ) external override {
        require(msg.sender == address(endpoint));
        address from;
        assembly {
            from := mload(add(_from, 20))
        }
        if (
            keccak256(abi.encodePacked((_payload))) ==
            keccak256(abi.encodePacked((bytes10("ff"))))
        ) {
            endpoint.receivePayload(
                1,
                bytes(""),
                address(0x0),
                1,
                1,
                bytes("")
            );
        }
        message = _payload;
        messageCount += 1;
        emit ReceiveMsg(_srcChainId, from, messageCount, message);
    }
    // Endpoint.sol estimateFees() returns the fees for the message
    function estimateFees(
        uint16 _dstChainId,
        address _userApplication,
        bytes calldata _payload,
        bool _payInZRO,
        bytes calldata _adapterParams
    ) external view returns (uint256 nativeFee, uint256 zroFee) {
        return
            endpoint.estimateFees(
                _dstChainId,
                _userApplication,
                _payload,
                _payInZRO,
                _adapterParams
            );
    }
}
合约从源链向目标链发送一条消息,我们需要用端点地址构造它,并且需要两个接口:ILayerZeroEndpoint和ILayerZeroReceiver。
自定义函数sendMsg()封装了endpoint.send(…),这将在目标链上触发对lzReceive()的调用。
源链调用endpoint.send(…)后,接收链上会自动调用重载的lzReceive函数。
自定义函数estimateFees()封装了endpoint.estimateFees(…),该函数将返回跨链消息的费用。
4、在不同的链上部署合约
首先为 Fantom 测试链创建部署脚本:
const hre = require("hardhat");
async function main() {
  const LayerZeroDemo1 = await hre.ethers.getContractFactory("LayerZeroDemo1");
  const layerZeroDemo1 = await LayerZeroDemo1.deploy(
    "0x7dcAD72640F835B0FA36EFD3D6d3ec902C7E5acf"
  );
  await layerZeroDemo1.deployed();
  console.log("layerZeroDemo1 deployed to:", layerZeroDemo1.address);
}
main().catch((error) => {
  console.error(error);
  process.exitCode = 1;
});
在 Fantom 测试网上部署合约:
npx hardhat run scripts/deploy_testnet.js --network testnet
然后为 Mumbai测试链创建部署脚本:
const hre = require("hardhat");
async function main() {
  const LayerZeroDemo1 = await hre.ethers.getContractFactory("LayerZeroDemo1");
  const layerZeroDemo1 = await LayerZeroDemo1.deploy(
    "0xf69186dfBa60DdB133E91E9A4B5673624293d8F8"
  );
  await layerZeroDemo1.deployed();
  console.log("layerZeroDemo1 deployed to:", layerZeroDemo1.address);
}
main().catch((error) => {
  console.error(error);
  process.exitCode = 1;
});
在Mumbai测试链部署合约:
npx hardhat run scripts/deploy_mumbai.js --network mumbai
在成功部署两个合约后,我们得到了合约地址:
- Mumbai测试链:0x37587469690CC37EE19Ff6163ce7275BB1b17d3b
- Phantom测试链:0xD67D01D6893cC4a2E17557765987d41E778fadca
5、测试跨链消息传递
为 Mumbai 创建一个 javascript 测试脚本:
const hre = require("hardhat");
const { ethers } = require("ethers");
async function main() {
  const LayerZeroDemo1 = await hre.ethers.getContractFactory("LayerZeroDemo1");
  const layerZeroDemo1 = await LayerZeroDemo1.attach(
    "0x37587469690CC37EE19Ff6163ce7275BB1b17d3b"
  );
  const count = await layerZeroDemo1.messageCount();
  const msg = await layerZeroDemo1.message();
  console.log(count);
  console.log(ethers.utils.toUtf8String(msg));
}
main().catch((error) => {
  console.error(error);
  process.exitCode = 1;
});
该脚本将合约实例附加到我们前面部署的合约地址:0x37587469690CC37EE19Ff6163ce7275BB1b17d3b。 脚本将读取合约中的消息计数和最后一条消息,现在返回的是0和空字符串。
使用hardhat运行脚本:
npx hardhat run scripts/demo1_mumbai.js --network mumbai

接下来为 Fantom 测试网创建一个 javascript 测试脚本:
const { formatBytes32String } = require("ethers/lib/utils");
const { ethers } = require("ethers");
const hre = require("hardhat");
async function main() {
  const LayerZeroDemo1 = await hre.ethers.getContractFactory("LayerZeroDemo1");
  const layerZeroDemo1 = await LayerZeroDemo1.attach(
    "0xD67D01D6893cC4a2E17557765987d41E778fadca"
  );
  const fees = await layerZeroDemo1.estimateFees(
    10009,
    "0x37587469690CC37EE19Ff6163ce7275BB1b17d3b",
    formatBytes32String("Hello LayerZero"),
    false,
    []
  );
  console.log(ethers.utils.formatEther(fees[0].toString()));
  await layerZeroDemo1.sendMsg(
    10009,
    "0x37587469690CC37EE19Ff6163ce7275BB1b17d3b",
    formatBytes32String("Hello LayerZero"),
    { value: ethers.utils.parseEther("1") }
  );
}
main().catch((error) => {
  console.error(error);
  process.exitCode = 1;
});
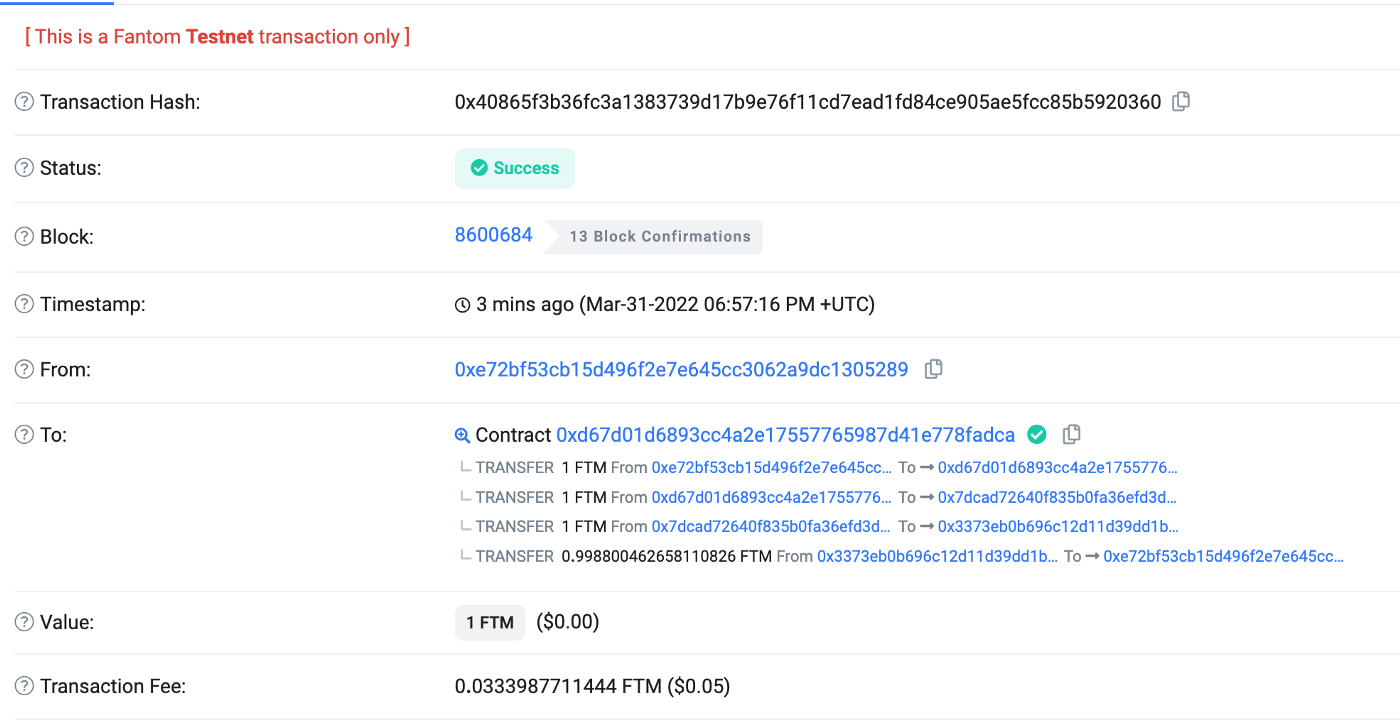
Fantom 测试网测试脚本将合约实例附加到地址0xD67D01D6893cC4a2E17557765987d41E778fadca。 它会从 Fantom 测试网向Mumbai测试链上的合约(地址:0x37587469690CC37EE19Ff6163ce7275BB1b17d3b) 发送一条消息“Hello LayerZero” ,并获得用于演示目的的估算费用。最后它会发送带有费用的消息, 为简单起见,发送值为 1FTM。如果源交易比传递的金额便宜,它将把额外的金额退还到我们传递的地址 _refundAddress。
使用Hardhat运行脚本:
npx hardhat run scripts/demo1_testnet.js --network testnet
脚本完成后,我们可以在 FTMScan 测试网中搜索交易,该合约调用 LayerZero 端点0xd67d01d6893cc4a2e17557765987d41e778fadca
再次运行 Mumbai 测试脚本,控制台将打印:

任务完成,Mumbai测试链合约收到Fantom测试链发来的消息,增加计数器。 LayerZero 使整个过程变得非常简单。
6、结束语
Layzero官网文档请访问这里。本教程的源码可以从Github下载。
原文链接:LayerZero Tutorial for Beginners
汇智网翻译整理,转载请标明出处
Recommend
About Joyk
Aggregate valuable and interesting links.
Joyk means Joy of geeK