

Pagination for a User-Friendly Django App
source link: https://realpython.com/django-pagination/
Go to the source link to view the article. You can view the picture content, updated content and better typesetting reading experience. If the link is broken, please click the button below to view the snapshot at that time.

Pagination in the Wild
Before you try your hand at building your own pagination flows with Django, it’s worth looking around to spot pagination in action. Pagination is so common on bigger websites that you’ve most likely experienced it in one form or another when browsing the Internet.
What Pagination Is
Pagination describes the practice of distributing your website’s content across multiple consecutive pages instead of serving it on a single page. If you visit shopping sites, blogs, or archives, you’re likely to encounter paginated content.
On GitHub, you’ll find paginated content on Django’s pull requests page. When you reach the bottom of the page, you can navigate to other pages:
Imagine how crowded the bottom of the page would be if all the page numbers were displayed. What’s more, consider how long the page would take to load if all the issues were displayed at once instead of being spread over 615 pages.
You could even argue that having page numbers is unnecessary. How could anybody know which issue is on which page? For that reason, some sites ditch page numbers entirely and give you a condensed form of pagination.
The PyCoder’s Weekly Newsletter paginates its archive with Previous and Next buttons. This type of pagination lets you conveniently browse through all newsletter issues:
Underneath the Subscribe button, you see the pagination controls for navigating to the previous and next issues. Thanks to this pagination technique, you’re able hop from one newsletter issue to another instead of selecting issues from the archive one by one.
You can also see pagination in action when you’ve got more than one hundred objects in your Django admin interface. To access more content, you have to click another page number:
Instead of showing a list of all 3,776 items, the Django admin divides the content into 38 pages. Again, imagine how overwhelming the Django admin interface would be if all the content were presented in one giant table!
But pagination is not only used in the front-end design of websites. It’s also very common to paginate the content of API responses. The Random User API is one of many REST APIs that give you the option of paginating the response:
By adding a results=2 parameter, you tell the Random User API that you only want two results per response.
With the page parameter, you can navigate to a specific page of these paginated responses.
Note: Do you have any interesting examples of websites or APIs that use pagination? Share them with the community in the comments below!
Once you know what pagination is, you’ll probably notice it often while surfing the Web. In thinking about implementing pagination in your projects, it’s worth taking a closer look at when to use pagination and when not to use it.
When to Use Pagination
Pagination is a great way to divide content into smaller chunks. The examples above highlight that it’s a common practice on the Internet. This is rightfully so, as paginating your content has plenty of advantages:
Pagination can be helpful in structuring the content of your website, and it can improve your website’s performance. Still, paginating your content isn’t always the best choice. There are situations where it can be better not to paginate your content. Read on to learn more about when you’d be better off not using pagination.
When Not to Use Pagination
There are many advantages to using pagination. But it’s not always the best choice. Depending on your use case, you might want to decide against using pagination for your user interface. You should consider the potential drawbacks to pagination:
With a long list of benefits as well as an equally long list of drawbacks, you may be wondering when you should use pagination. Often it comes down to the amount of content and the user experience that you want to provide.
Here are two questions that you can ask yourself to help decide whether or not you should use pagination:
If you’re still on the fence, then the convenience of implementing pagination with Django may be a convincing argument for you.
In the next section, you’ll learn how Django’s built-in Paginator class works.
Django’s Built-in Paginator
Django has a Paginator class that comes built in and ready to use.
Perhaps you have a project on the go, and you’d like to try out the pagination implementations in the following sections with your app as your base.
No problem!
However, if you want to follow the step-by-step code examples in this tutorial, then you can download the source code for the Django Python wiki project from the Real Python materials repository:
Get Source Code: Click here to get the source code that you’ll use to implement Django pagination.
This wiki project contains an app called terms.
For now, the app’s only purpose is to show all the Python keywords.
In the next section, you’ll get a short overview of this sample project, which you’ll use as the basis for the pagination in this tutorial.
If you want to learn about the concept of Django pagination in general without using the provided sample project, then you can skip ahead to Exploring the Django Paginator in the Django Shell.
Preparing Your Sample Django Project
The pagination examples in this tutorial will work with any Django project.
But for the purposes of this tutorial, you’ll be working in a Python wiki.
So that you can follow along closely, it’s worth downloading the Python wiki Django sample project from the link above.
To set up the Python wiki project, first follow the instructions in the accompanying README.md file.
The Python wiki sample project contains an app named terms, which includes a Keyword model:
 1# terms/models.py
 2
 3from django.db import models
 4
 5class Keyword(models.Model):
 6    name = models.CharField(max_length=30)
 7
 8    def __str__(self):
 9        return self.name
The Keyword model consists of the name character field only.
The string representation of a Keyword instance with the primary key 1 would be Keyword object (1) by default.
When you add the .__str__() method, the name of Keyword is shown instead.
The Python wiki project already contains migration files. To work with your database, you must run the project’s migrations. Select your operating system below and use your platform-specific command accordingly:
(venv) C:\> python manage.py migrate
After you’ve applied all migrations, your database contains the tables that your Django project requires. With the database tables in place, you can start adding content. To populate your project’s database with the list of all the Python keywords, move into the folder of your Django project and start the Django shell:
(venv) C:\> python manage.py shell
Using the Django shell is a great way to interact with your Django project. You can conveniently try out code snippets and connect to the back-end without a front-end. Here, you programmatically add items to your database:
 1>>> import keyword
 2>>> from terms.models import Keyword
 3>>> for kw in keyword.kwlist:
 4...     k = Keyword(name=kw)
 5...     k.save()
 6...
First, you import Python’s built-in keyword module in line 1.
Afterward, you import the Keyword model from the terms app.
In line 3, you loop through Python’s keyword list.
Finally, you create a Keyword class instance with the keyword string and save it to the database.
Note: The variable names in the code block above are similar and hard to read. This is acceptable for smaller tasks in an interactive interpreter. When you want to write Python code that lasts, it’s a good idea to think of better variable names.
To verify that your database contains the Python keywords, list them in the Django shell:
>>> from terms.models import Keyword
>>> Keyword.objects.all()
<QuerySet [<Keyword: False>, <Keyword: None>, <Keyword: True>, ... ]>
When you import the Keyword model from your terms app, you can list all the items in your database.
The database entries are all thirty-five Python keywords, arranged in the order that they were added to the database.
Your Python wiki project also contains a class-based view to show you all the keywords on one page:
# terms/views.py

from django.views.generic import ListView
from terms.models import Keyword

class AllKeywordsView(ListView):
    model = Keyword
    template_name = "terms/base.html"
This view returns all database entries of the Keyword model.
As a subclass of Django’s generic ListView, it expects a template named keyword_list.html.
However, by setting the .template_name attribute to "terms/base.html", you tell Django to look for the base template instead.
The other Django templates that you’ll discover in this tutorial will extend the base.html template shown above.
Note: If you want to follow along closely, make sure that you didn’t skip the above step of populating the database.
Once you have the sample project in place, then you can run Django’s built-in web server:
(venv) C:\> python manage.py runserver
When your development web server is running, visit http://localhost:8000/all.
This page displays all the Python keywords in one continuous list.
Later you’ll create views to paginate this list with the help of Django’s Paginator class.
Read on to learn how the Django paginator works.
Exploring the Django Paginator in the Django Shell
Before you take a look at the Django paginator in detail, make sure that you’ve populated your database and entered the Django shell, as shown in the previous section.
The Django shell is perfect for trying out commands without adding code to your codebase.
If you haven’t already, start by importing the Keyword model:
>>> from terms.models import Keyword
>>> from django.core.paginator import Paginator
>>> keywords = Keyword.objects.all().order_by("name")
>>> paginator = Paginator(keywords, per_page=2)
First, you import the Paginator class.
Then you create a variable for your Django QuerySet named keywords.
Because you don’t filter the query set, keywords will contain all Python keywords that you listed in the previous section.
Remember that Django’s QuerySets are lazy:
The act of creating a
QuerySetdoesn’t involve any database activity. You can stack filters together all day long, and Django won’t actually run the query until theQuerySetis evaluated. (Source)
In the example above, you created a query set for all the items in a database table. So when you hit the database with Django’s paginator at some point, you’re requesting a subset of your database’s content. That way, pagination can speed up your Django app tremendously when you need to serve huge amounts of data from a database.
Note: Pagination only makes sense when the database actively handles it. If you only perform pagination in memory on the back-end, then it won’t solve the bottleneck of querying the database.
The built-in Django Paginator class communicates which page to request and how many rows to get from the database. Depending on which database management system you’re using, it’ll translate to a slightly different SQL dialect.
Strictly speaking, the database does the paging, and Django only requests a page number and offset. The Python and MySQL Database tutorial gives you a practical introduction to best practices when building database-heavy applications.
It’s also important that you add some ordering to the query set.
When you order your Python keywords by name, then you’ll receive them in alphabetical order.
Otherwise, you may get inconsistent results in your keywords list.
When initializing your Paginator class, you pass in keywords as the first argument.
As the second argument, you must add an integer that defines how many items you want to show on a page.
In this case, it’s two.
That means you want to display two items per page.
The Django Paginator class accepts four arguments.
Two of them are required:
Argument Required Explanation
object_list
✅
Usually a Django QuerySet, but it can be any sliceable object with a .count() or .__len__() method, like a list or a tuple.
per_page
✅
Defines the number of items that you want to display on each page.
orphans
Declares the minimum number of items that you allow on the last page. If the last page has equal or fewer items, then they’ll be added to the previous page. The default value is 0, which means you can have a last page with any item count between one and the value you set for per_page.
allow_empty_first_page
Has a default value of True. If object_list is empty, then you’ll get one empty page. Set allow_empty_first_page to False to raise an EmptyPage error instead.
Once you’ve created your Paginator, then you can access its attributes.
Head back to the Django shell to see the paginator in action:
>>> paginator.count
35
>>> paginator.num_pages
18
>>> paginator.page_range
range(1, 19)
>>> paginator.ELLIPSIS
"…"
The .count attribute of your Paginator class is the length of the object_list that you passed in.
Remember that you wanted the paginator to show two items per page.
The first seventeen pages will contain two items each.
The last page will contain one only item.
This makes eighteen pages total, as displayed by paginator.num_pages.
Since looping through your pages is a common task, the Django Paginator class provides you with the .page_range iterator directly as an attribute.
In the last line, you use the .ELLIPSIS attribute.
This attribute comes in handy when you’re not showing the whole page range to the user in the front-end.
You’ll see it in action in one of the examples later in this tutorial.
The Django Paginator class has four attributes:
Attribute Explanation
.ELLIPSIS
The string displayed when you don’t show the whole page range. The default value is an ellipsis (…).
.count
The total count of items across all pages. This is the length of your object_list.
.num_pages
The total number of pages.
.page_range
A range iterator of page numbers. Note that this iterator is 1-based and therefore starts with page number one.
Besides the attributes, the Paginator class contains three methods.
Two of them look pretty similar at first glance.
Start with the .get_page() method:
>>> paginator.get_page(4)
<Page 4 of 18>
>>> paginator.get_page(19)
<Page 18 of 18>
>>> paginator.get_page(0)
<Page 18 of 18>
With .get_page(), you can access pages of Paginator directly.
Note that pages in a Django paginator are indexed starting at one rather than zero.
When you pass in a number outside of the page range, .get_page() returns the final page.
Now try the same with the .page() method:
>>> paginator.page(4)
<Page 4 of 18>
>>> paginator.page(19)
Traceback (most recent call last):
  ...
django.core.paginator.EmptyPage: That page contains no results
>>> paginator.page(0)
Traceback (most recent call last):
  ...
django.core.paginator.EmptyPage: That page number is less than 1
Just like with .get_page(), you can access pages directly with the .page() method.
Remember that pages are indexed starting at one rather than zero.
The key difference from .get_page() is that if you pass in a number outside of the page range, then .page() raises an EmptyPage error.
So using .page() allows you to be strict when a user requests a page that doesn’t exist.
You can catch the exception in the back-end and return a message to the user.
Note: When you set allow_empty_first_page to False and your object_list is empty, then .get_page() will raise an EmptyPage error as well.
With .get_page() and .page(), you can acess a page directly.
Besides these two methods, Django’s Paginator contains a third method, called .get_elided_page_range():
>>> paginator.get_elided_page_range()
<generator object Paginator.get_elided_page_range at 0x1046c3e60>
>>> list(paginator.get_elided_page_range())
[1, 2, 3, 4, "…", 17, 18]
The .get_elided_page_range() method returns a generator object.
When you pass that generator object into a list() function, you display the values that .get_elided_page_range() yields.
First, you pass no arguments in.
By default, .get_elided_page_range() uses number=1, on_each_side=3, and on_ends=2 as arguments.
The yielded list shows you page 1 with its following three neighbors: 2, 3, and 4.
After that, the .ELLIPSIS string is shown to suppress all pages until the two last pages.
There are no pages before page 1, so only pages after it are elided.
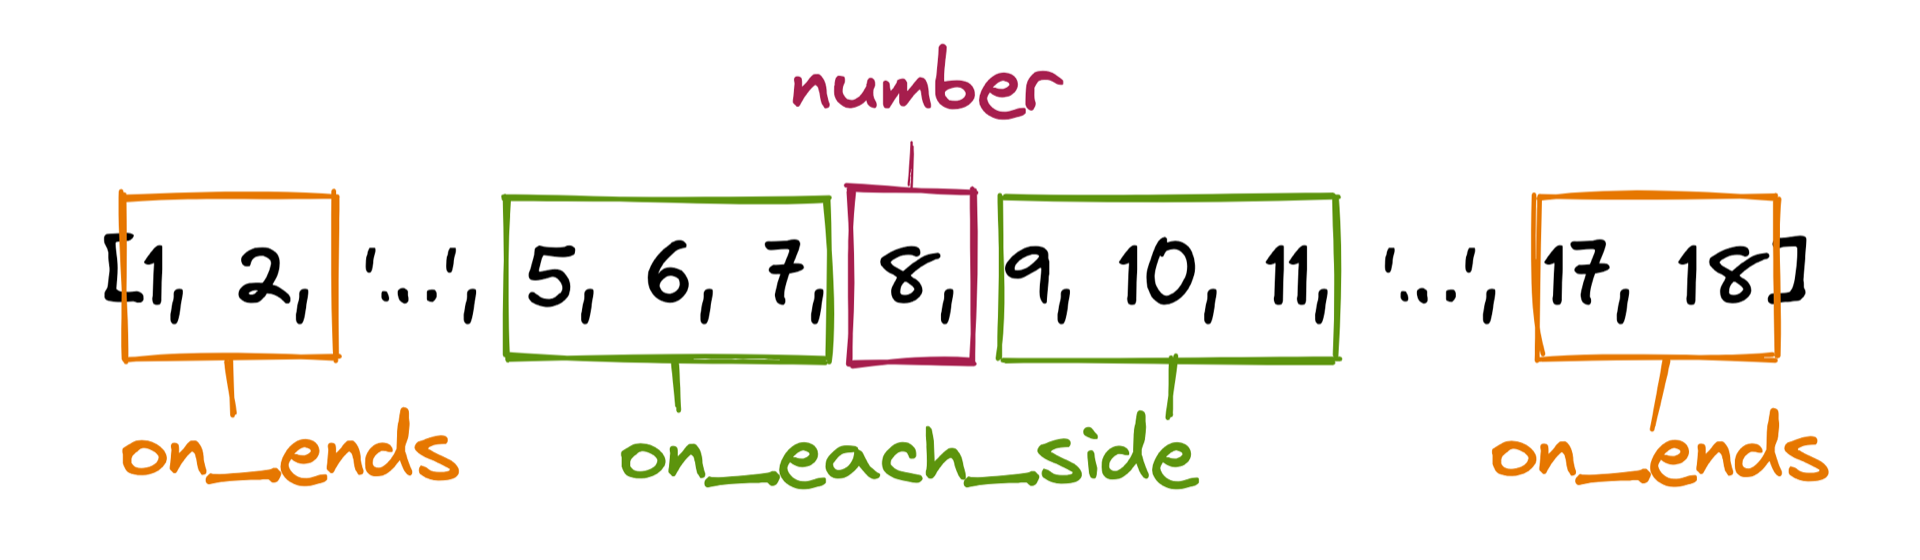
That’s why a number that’s toward the middle of the page range showcases the capabilities of .get_elided_page_range() better:
>>> list(paginator.get_elided_page_range(8))
[1, 2, "…", 5, 6, 7, 8, 9, 10, 11, '…', 17, 18]
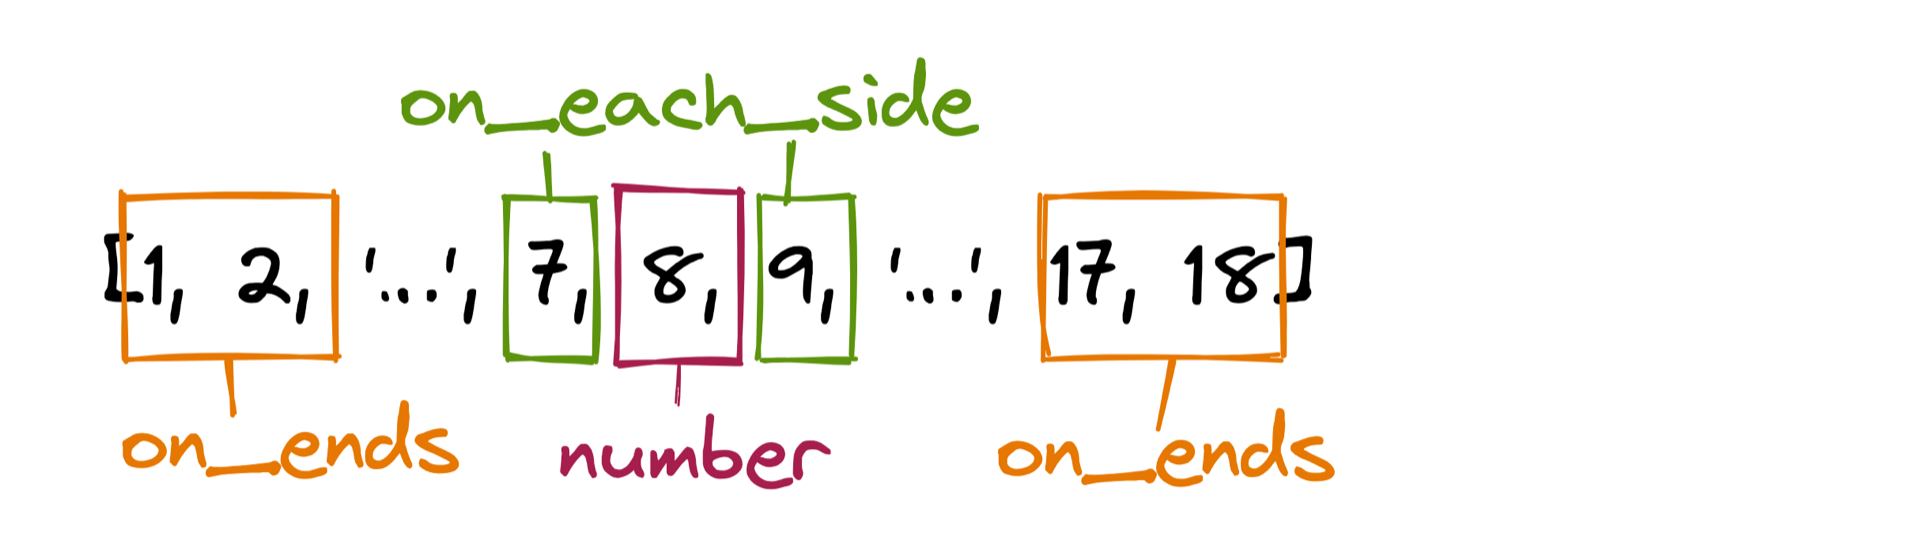
>>> list(paginator.get_elided_page_range(8, on_each_side=1))
[1, 2, "…", 7, 8, 9, "…", 17, 18]
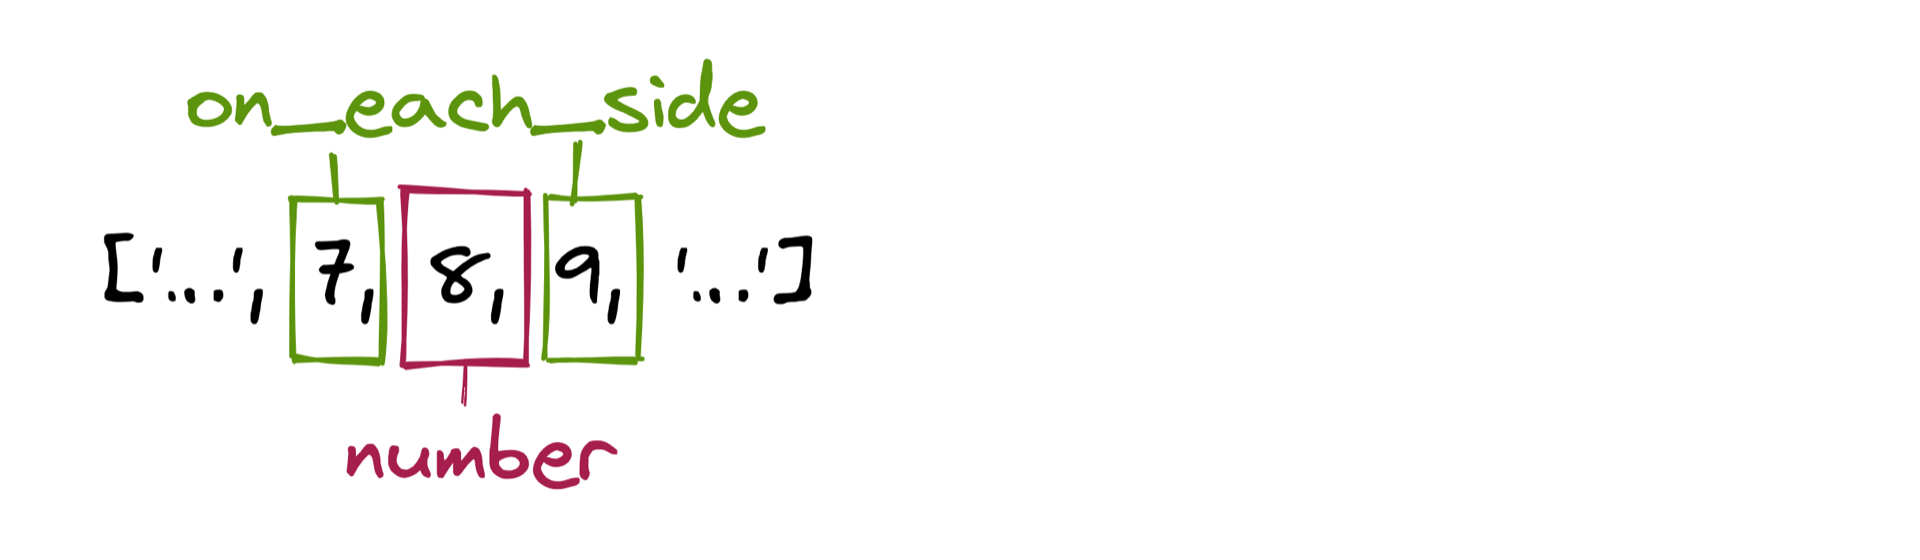
>>> list(paginator.get_elided_page_range(8, on_each_side=1, on_ends=0))
["…", 7, 8, 9, "…"]
Notice how on each side of 8, there are now three neighbors plus an ellipsis (…) and the first or last two pages.
When you set on_each_side to 1, then 7 and 9 are the only neighbors displayed.
These are the pages immediately before and after page 8.
Finally, you set on_ends to 0, and the first and last pages get elided, too.
To better understand how .get_elided_page_range() works, revisit the output from above with some annotation:
Arguments Annotated Output
number=8
number=8on_each_side=1
number=8on_each_side=1on_ends=0
Trying out Django’s Paginator class in the Django shell gave you a first impression of how pagination works.
You got your feet wet by learning about the attributes and methods of Django’s Paginator.
Now it’s time to dive in and implement pagination workflows in your Django views.
Using the Django Paginator in Views
Investigating the Django paginator in the Django shell is an excellent way to understand how the Django paginator behaves. However, using pagination in your Django views will reveal how powerful the Django paginator can be in structuring your content.
Django has two kinds of views: class-based views and function-based views. Both take a web request and return a web response. Class-based views are a good choice for generic views, like showing a list of database items.
While preparing your sample Django project, you already learned about AllKeywordsView.
This class-based view returned all the keywords on one page, without paginating them.
But you can paginate a class-based view in Django by adding the .paginate_by attribute to your view class:
 1# terms/views.py
 2
 3from django.views.generic import ListView
 4from terms.models import Keyword
 5
 6class KeywordListView(ListView):
 7    paginate_by = 5
 8    model = Keyword
When you add the .paginate_by attribute to your view class in line 7, you limit the number of objects that each page shows.
In this case, you’ll show five objects per page.
Django also adds .paginator and .page_obj attributes to .context of the view’s response.
Also, the ListView expects a template whose name consists of the model’s name in lowercase, followed by a _list suffix.
Otherwise you’d have to define a .template_name attribute in the class.
In the next section, you’ll work with a template named keyword_list.html, so there’s no need to add the .template_name attribute to KeywordListView.
In class-based views, adding the .paginator, .page_obj, and .context attributes happens under the hood.
When you write a function-based view, you have to add them yourself.
Update your views.py file to see both views side by side:
 1# terms/views.py
 2
 3from django.core.paginator import Paginator
 4from django.shortcuts import render
 5
 6from terms.models import Keyword
 7
 8# ...
 9
10def listing(request, page):
11    keywords = Keyword.objects.all().order_by("name")
12    paginator = Paginator(keywords, per_page=2)
13    page_object = paginator.get_page(page)
14    context = {"page_obj": page_object}
15    return render(request, "terms/keyword_list.html", context)
This function-based view does almost exactly what the class-based view above does. But you have to define the variables explicitly.
In line 3, you import Paginator for your use.
You instantiate the Paginator class in line 12 with your keywords list and the per_page argument set to 2.
So far, listing() contains the same functionality as KeywordListView.
In line 13, you enhance the listing() view.
You create page_object with paginator.get_page().
The page variable that you’re passing in is available as a URL parameter.
Later in this tutorial, you’ll learn how to leverage the page parameter by implementing it within your URL definitions.
Finally, in line 15, you call the render() function with request, the template that you want to render, and a context dictionary.
The context dictionary contains the page_obj value with "page_obj" as the key.
You could name the key differently, but when you call it page_obj, you can use the same keyword_list.html template that your class-based view expects.
Both KeywordListView and listing() need templates to render their context.
You’ll create this template and the URLs to access the views later in this tutorial.
Before you do, stick around in views.py for a bit to investigate how a paginated API endpoint works.
Responding With Paginated Data
Paginating your response is also a common practice when you design an API. When creating an API with Django, you can use frameworks like the Django REST framework. But you don’t need external frameworks to build an API. In this section, you’ll create a Django API endpoint without the Django REST framework.
The function body of the API view is similar to the listing() view that you created in the previous section.
To spice things up, you’ll implement more functionality so that your users can customize the API response with their GET request:
 1# terms/views.py
 2
 3from django.core.paginator import Paginator
 4from django.http import JsonResponse
 5
 6from terms.models import Keyword
 7
 8# ...
 9
10def listing_api(request):
11    page_number = request.GET.get("page", 1)
12    per_page = request.GET.get("per_page", 2)
13    startswith = request.GET.get("startswith", "")
14    keywords = Keyword.objects.filter(
15        name__startswith=startswith
16    )
17    paginator = Paginator(keywords, per_page)
18    page_obj = paginator.get_page(page_number)
19    data = [{"name": kw.name} for kw in page_obj.object_list]
20
21    payload = {
22        "page": {
23            "current": page_obj.number,
24            "has_next": page_obj.has_next(),
25            "has_previous": page_obj.has_previous(),
26        },
27        "data": data
28    }
29    return JsonResponse(payload)
There are a few things going on, so study the most significant lines in detail:
- Line 4 imports
JsonResponse, which will be the return type oflisting_api. - Line 10 defines the view function named
listing_api, which receivesrequest. - Line 11 sets
page_numberto the value of thepageGET parameter or defaults to1. - Line 12 sets
per_pageto the value of theper_pageGET parameter or defaults to2. - Line 13 sets
startswithto the value of thestartswithGET parameter or defaults to an empty string. - Line 14 creates
keywords, which is aQuerySetthat contains either all the keywords or the ones that start with the letters thatstartswithcontains. - Lines 17 and 18 create
Paginatorand aPageinstance. - Line 19 creates a list with dictionaries that contain the Python keyword names.
- Line 121 defines the
payloaddictionary with the data that you want to send to the user. - Line 29 returns
payloadas a JSON-encoded response.
With listing_api(), you created a function-based view as a flexible API endpoint.
When a user sends a request to listing_api() without any GET parameters, then JsonResponse responds with the first page and your first two keywords.
You also provide the flexibility to return fine-grained data to the user when they provide parameters.
The only piece that your Django JSON API endpoint is missing is a URL that it’s connected to. Time to fix that!
Implementing Pagination URL Parameters
In the previous sections, you created three views that respond with paginated data: a KeywordListView class, a listing() function-based view, and an API endpoint named listing_api().
To access your views, you must create three URLs:
 1# terms/urls.py
 2
 3from django.urls import path
 4from . import views
 5
 6urlpatterns = [
 7    # ...
 8    path(
 9        "terms",
10        views.KeywordListView.as_view(),
11        name="terms"
12    ),
13    path(
14        "terms/<int:page>",
15        views.listing,
16        name="terms-by-page"
17    ),
18    path(
19        "terms.json",
20        views.listing_api,
21        name="terms-api"
22    ),
23]
You add a path to each corresponding view to the urlpatterns list.
At first glance, it may seem odd that only listing contains a page reference.
Don’t the other views work with paginated data as well?
Remember that only your listing() function accepts a page parameter.
That’s why you refer to a page number with <int:page> as a URL pattern in line 14 only.
Both KeywordListView and listing_api() will work solely with GET parameters.
You’ll access your paginated data with your web requests without the need for any special URL patterns.
The terms URL and the terms-by-page URL both rely on templates that you’ll explore in the next section.
On the other hand, your terms-api view responds with a JSONResponse and is ready to use.
To access your API endpoint, you must first start the Django development server if it’s not already running:
(venv) C:\> python manage.py runserver
When the Django development server is running, then you can head to your browser and go to http://localhost:8000/terms.json:
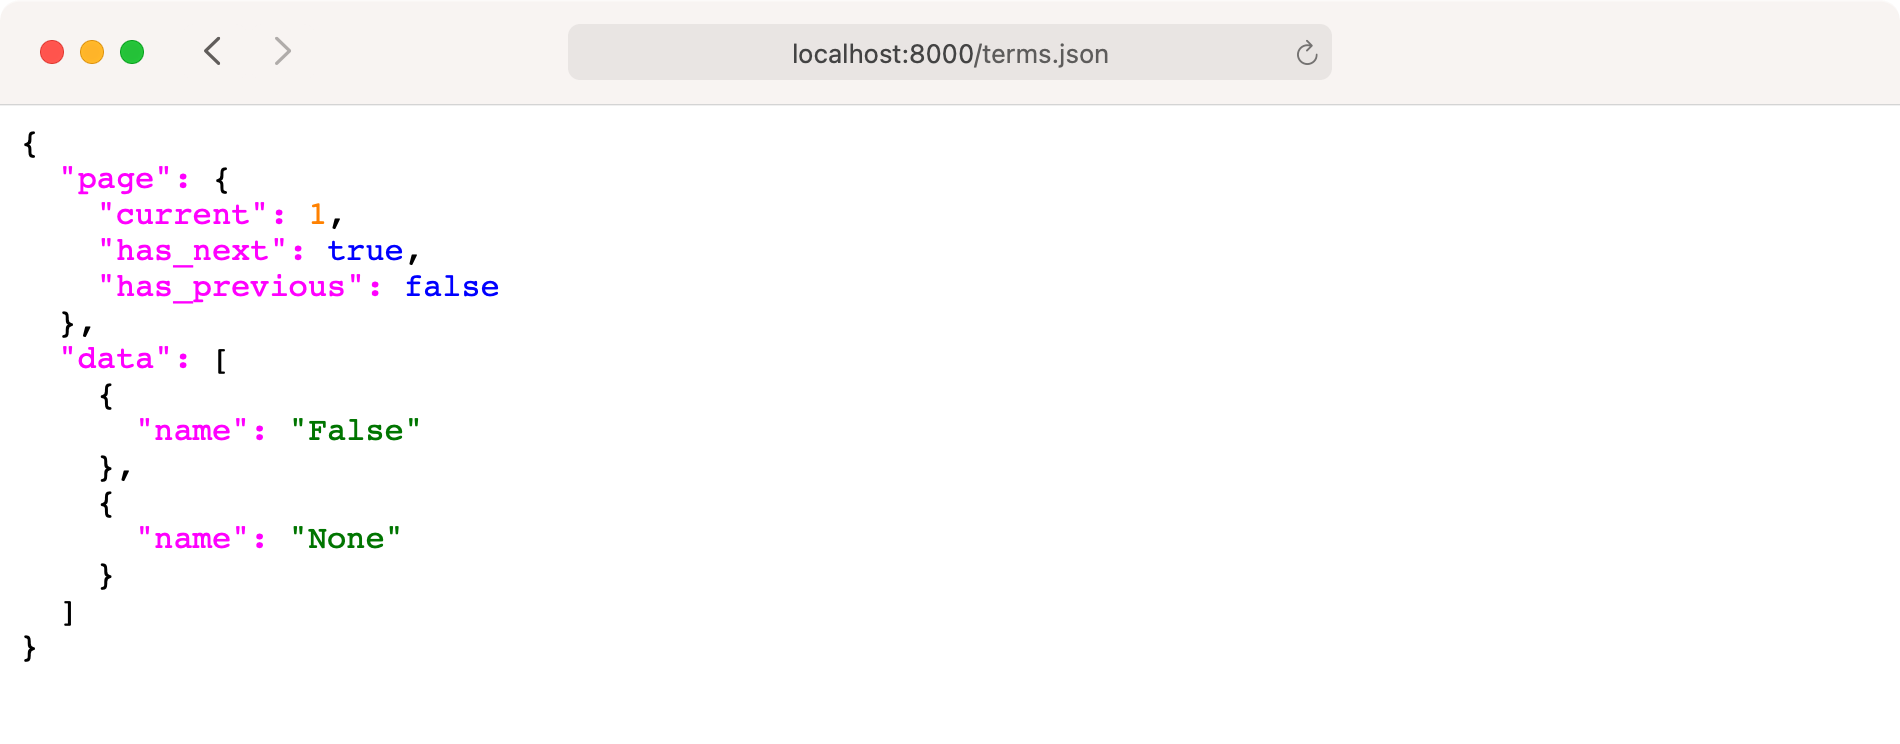
When you visit http://localhost:8000/terms.json without adding any GET parameters, you’ll receive the data for the first page.
The returned JSON object contains information about the current page that you’re on and specifies whether there’s a previous or next page.
The data object contains a list of the two first keywords, False and None.
Note: Your browser may display the JSON response as unformatted text. You can install a JSON formatter extension for your browser to render JSON responses nicely.
Now that you know there’s a page after page one, you can head over to it by visiting http://localhost:8000/terms.json?page=2:
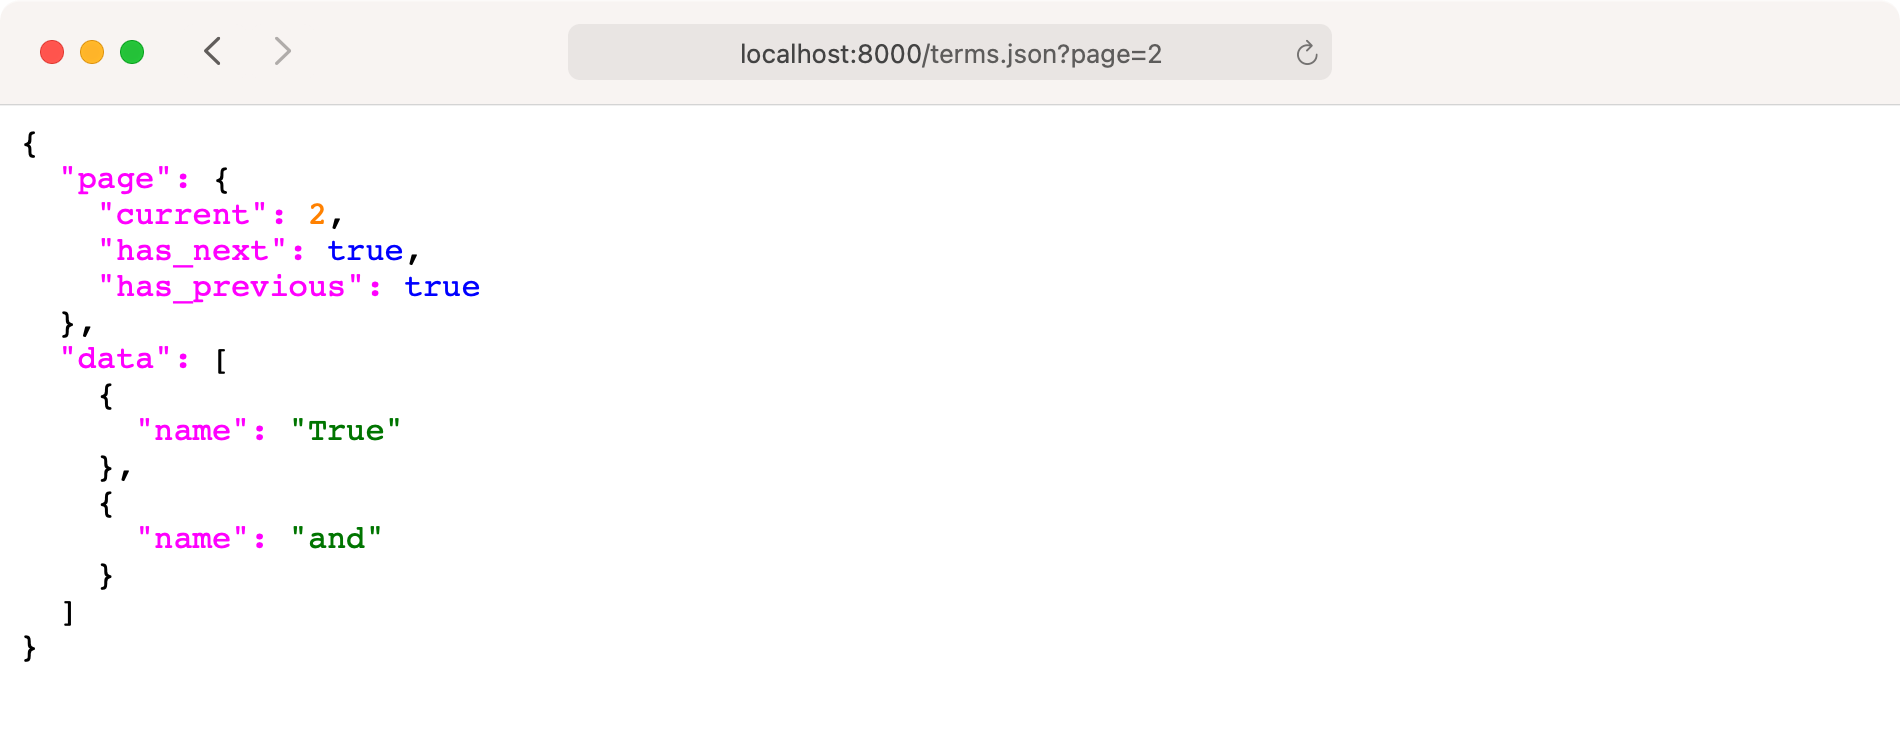
When you add ?page=2 to the URL, you’re attaching a GET parameter named page with a value of 2.
On the server side, your listing_api view checks for any parameters and recognizes that you specifically ask for page two.
The JSON object that you get in return contains the keywords of the second page and tells you that there’s a page before and another after this page.
You can combine GET parameters with an ampersand (&).
A URL with multiple GET parameters can look like http://localhost:8000/terms.json?page=4&per_page=5:
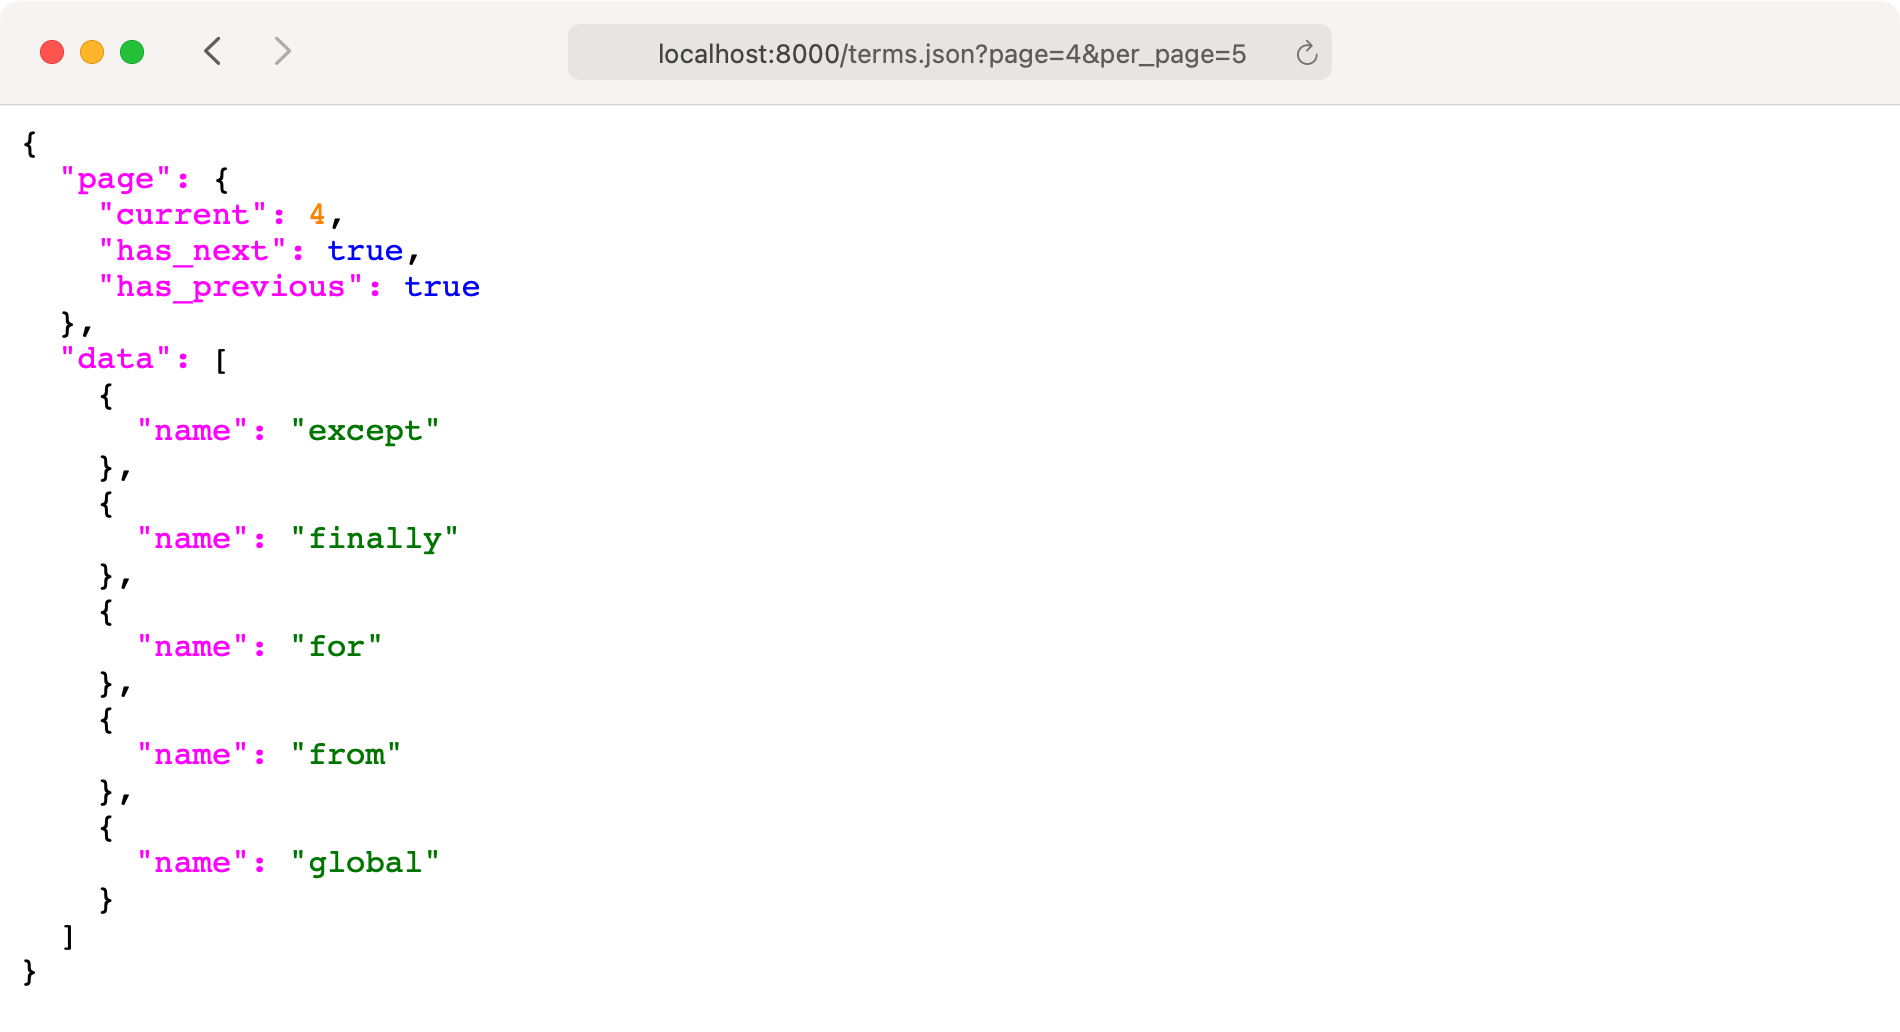
You chain the page GET parameter and the per_page GET parameter this time.
In return, you get the five keywords on page four of your dataset.
In your listing_api() view, you also added the functionality to look for a keyword based on its first letter.
Head to http://localhost:8000/terms.json?startswith=i to see this functionality in action:
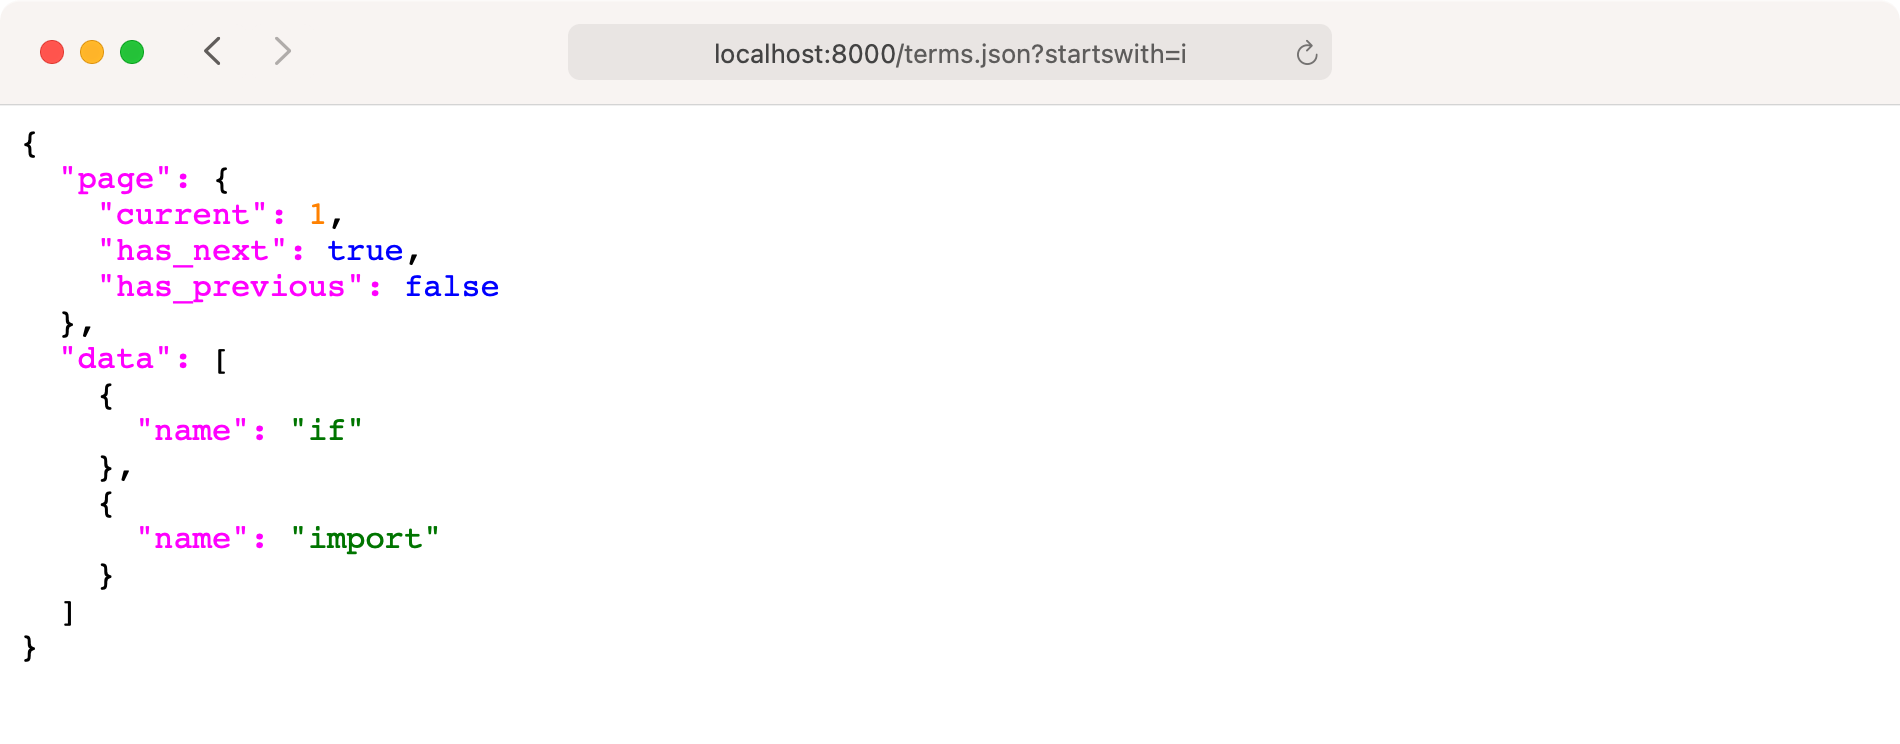
By sending the startswith GET parameter with the value i, you’re looking for all keywords that start with the letter i.
Notice that has_next is true.
That means there are more pages that contain keywords starting with the letter i.
You can make another request and pass along the page=2 GET parameter to access more keywords.
Another approach would be to add a per_page parameter with a high number like 99.
This would ensure that you’ll get all matched keywords in one return.
Go on and try out different URL patterns for your API endpoint. Once you’ve seen enough raw JSON data, head to the next section to create some HTML templates with variations of pagination navigation.
Recommend
About Joyk
Aggregate valuable and interesting links.
Joyk means Joy of geeK