

如何在Angular中实现REST API调用
source link: https://www.fly63.com/article/detial/11300
Go to the source link to view the article. You can view the picture content, updated content and better typesetting reading experience. If the link is broken, please click the button below to view the snapshot at that time.

扫一扫分享
我们在使用angular框架构建Web应用时,往往离不开各种REST api的调用。这次,我将针对该话题和您展开深入讨论。当然,由于会涉及到一定的代码级讨论,因此您可能需要对HTTP、html、TypeScript、以及Angular框架有所了解。下面,先让我们来简单浏览一下Angular框架中的服务和依赖注入的相关知识。
什么是Angular服务?
在真实的应用场景中,多个组件需要从外部源访问数据。而由Typescript类编写的Angular服务,往往可以为此充当单一的、可重用的数据访问点。我们通过在可注入服务类(injectable service class)中定义好此类处理任务,就能够让任何组件轻松地访问到这些已定义的任务。
什么是依赖注入?
作为一种设计模式,Angular的依赖注入 (Dependency Injection,DI) 可被用于为各个组件提供所需的各项依赖性服务。例如,当组件需要将某项任务委托给某个服务时,我们就可以将该服务注入到组件中,让组件能够顺利地访问到该服务类。为此,我们需要在服务类中使用@Injectable()装饰器(decorator),并允许Angular将其作为依赖项,注入到组件中的元数据(metadata)上。
Angular中的REST API调用
假设我们需要一个REST API来管理诸如:创建、更新和删除博客等操作。那么,让我们来看看该如何用它在MongoDB数据库中插入博客的内容。
调用REST API的第一步是在Angular CLI中输入如下命令:
ng generate service RESTAPIService它会在现有项目的/src/app文件夹中,创建一个TypeScript类--RESTAPIService。接着,您可以将如下TypeScript代码添加到对应的样板文件(boilerplate)中。
TypeScript
import { Injectable } from '@angular/core';
import { HttpClient, HttpHeaders } from '@angular/common/http'

@Injectable({
  providedIn: 'root'
})
export class RESTAPIService {

  constructor(private http: HttpClient) { }

  httpOptions = {
    headers: new HttpHeaders({
      'Content-Type': 'application/json'
    })
  };

  postBlog(blog: any) {
    let url = "http://localhost:3000/blogs";
    return this.http.post(url, blog, this.httpOptions);
  }
}
如上代码段所示,@Injectable()装饰器会使得Angular项目中的RESTAPIService满足DI要求。而元数据providedIn: 'root'指定了RestAPIService在所有组件中都是可见的。提供者对象(provider object)可以在该服务本身的元数据中被指定,或者是在任何特定的模块及组件中被注册。若要在任何特定的模块或组件中注册它,我们则需要分别使用@NgModule()或@Component()装饰器。
该服务通过注入一个内置依赖项HttpClient,来与服务器进行通信。HttpClient服务会利用observable,向服务器发起HTTP请求。在使用HttpClient之前,我们需要在根模块AppModule中导入Angular的HttpClientModule。
HttpHeader类可以表示HTTP请求的各个标头配置选项。针对该博客的插入操作,我们需要添加带有application/json值的Content-Type。它会将博客内容指定为JSON格式。在postBlog()方法中,作为参数被接收的博客内容,将使用HTTP的POST方法,被发送到REST API的URI--http://localhost:3000/blogs处。服务器端会处理请求,并在MongoDB数据库中插入各种JSON文档。下图展示了用于收集博客内容的Angular表单,可能包含的博客标题、片段和正文字段。

在Angular中,双向数据绑定可被用于从Angular表单处收集用户的输入。属性指令[(ngModel)]实现了双向绑定,以便在模板驱动的 Angular表单 中,读取和写入用户的输入值。有关此类双向数据绑定的具体内容,请参见 AngularDocs 。
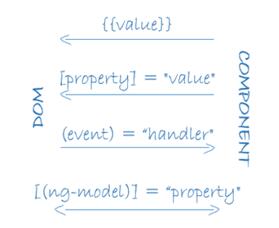
事件绑定主要被用于绑定各个事件处理器,以便处理由用户操作引发的事件。针对本例中的博客插入操作,每当用户单击提交按钮时,就会触发并执行saveBlog()方法。
<form name="blogForm" action="" method="POST">
  <table>
    <tr>
      <td colspan="2"><h1>Post New Blog</h1></td>
      <td></td></tr>
    <tr>
      <td><label>Enter Title</label></td>
      <td><input type="text" name="title" [(ngModel)]="title" placeholder="Enter Blog Title here ...."></td>
    </tr>
    <tr>
      <td><label>Blog Snippet</label></td>
      <td><input type="text" name="snippet" [(ngModel)]="snippet" placeholder="Enter Blog Snippet here ...."></td>
    </tr>
    <tr>
      <td><label>Blog Body</label></td>
      <td><textarea name="body" [(ngModel)]="body" placeholder="Enter Blog Body here ...."></textarea></td>
    </tr>
    <tr>
      <td align="center" colspan="4">
        <button type="submit" value="Submit" (click)="saveBlog()">Submit</button>
      </td>
    </tr>
  </table>
</form>
如上述代码段所示,TypeScript类会使用DI技术,在组件中注入RESTAPIService。它从本地项目目录中导入服务,并将其实例化为构造函数参数。
saveBlog()方法则会从TypeScript变量(包括:标题、片段和正文)中读取用户的输入数据,并构造出一个JSON对象--blog。它使用服务中定义的postBlog方法,并订阅由Httpclient服务返回的可观察对象,来跟踪HTTP请求的状态。如果它成功地完成了相关操作,用户就会被导航到ViewBlogs路由处,并被呈现博客内容的列表。而如果出现了某个错误,它会在控制台上显示一条错误消息。
import { Component, OnInit } from '@angular/core';
import { RESTAPIService } from '../restapidata.service';
import { Router } from "@angular/router"

@Component({
  selector: 'app-postblog',
  templateUrl: './postblog.component.html',
  styleUrls: ['./postblog.component.css']
})
export class PostblogComponent implements OnInit {

  title = ''  snippet = ''  body = ''

  constructor(private service: RESTAPIService, private router: Router) { }

  ngOnInit(): void {
  }

  saveBlog() {

    let blog = {      title: this.title,      snippet: this.snippet,      body: this.body    };

    this.service.postBlog(blog).subscribe({
      error: (err) => { console.error(err) },
      complete: () => { this.router.navigate(['viewblogs']) }
    });
  }
}
上文向您概述了如何使用Angular框架进行REST API调用的简单过程。如果您是对此类技术感兴趣的Web开发者,可以在理解基本原理的基础上,通过上面介绍的代码段,去使用Angular发起REST API调用。
原文标题: How to Make a REST API Call in Angular ,作者:Muhammad Imran
Recommend
About Joyk
Aggregate valuable and interesting links.
Joyk means Joy of geeK