

How to Install UVdesk Helpdesk System on Rocky Linux 8
source link: https://www.howtoforge.com/how-to-install-uvdesk-helpdesk-system-on-rocky-linux-8/
Go to the source link to view the article. You can view the picture content, updated content and better typesetting reading experience. If the link is broken, please click the button below to view the snapshot at that time.

How to Install UVdesk Helpdesk System on Rocky Linux 8
UVdesk is an open-source Saas-based helpdesk system for companies to interact with their customers and offer round-the-clock support. Its features include tickets management, knowledgebase support, canned replies, and automatic ticket generation based on emails. Uvdesk's capabilities can be extended using external modules. You can automate certain actions based on specific triggers to improve your workflow.
In this tutorial, you will learn how to install Uvdesk on a Rocky Linux 8 based server using Nginx, MySQL and PHP.
Prerequisites
-
A server running Rocky Linux 8.
-
A domain name for the helpdesk pointing to the server. For our tutorial, we will use the
uvdesk.example.comdomain. -
A non-root based user with sudo privileges.
-
Make sure everything is updated.
$ sudo dnf update
-
Install basic utility packages. Some of them may already be installed.
$ sudo dnf install wget curl nano unzip yum-utils -y
Step 1 - Configure Firewall
The first step is to configure the firewall. Rocky Linux uses Firewalld Firewall. Check the firewall's status.
$ sudo firewall-cmd --state
running
The firewall works with different zones, and the public zone is the default one that we will use. List all the services and ports active on the firewall.
$ sudo firewall-cmd --permanent --list-services
It should show the following output.
cockpit dhcpv6-client ssh
Allow HTTP and HTTPS ports.
$ sudo firewall-cmd --permanent --add-service=http
$ sudo firewall-cmd --permanent --add-service=https
Recheck the status of the firewall.
$ sudo firewall-cmd --permanent --list-services
You should see a similar output.
cockpit dhcpv6-client http https ssh
Reload the firewall to enable the changes.
$ sudo firewall-cmd --reload
Step 2 - Install Nginx
Rocky Linux ships with an older version of Nginx. You need to download the official Nginx repository to install the latest version.
Create and open the /etc/yum.repos.d/nginx.repo file for creating the official Nginx repository.
$ sudo nano /etc/yum.repos.d/nginx.repo
Paste the following code in it.
[nginx-stable]
name=nginx stable repo
baseurl=http://nginx.org/packages/centos/$releasever/$basearch/
gpgcheck=1
enabled=1
gpgkey=https://nginx.org/keys/nginx_signing.key
module_hotfixes=true

[nginx-mainline]
name=nginx mainline repo
baseurl=http://nginx.org/packages/mainline/centos/$releasever/$basearch/
gpgcheck=1
enabled=0
gpgkey=https://nginx.org/keys/nginx_signing.key
module_hotfixes=true
Save the file by pressing Ctrl + X and entering Y when prompted.
Install Nginx.
$ sudo dnf install nginx
Verify the installation.
$ nginx -v
nginx version: nginx/1.20.2
Enable the Nginx service.
$ sudo systemctl enable nginx
Step 3 - Install PHP and extensions
For our tutorial, we need to install the latest version of PHP using Remi's repository. The first step is to grab the Epel repository.
$ sudo dnf install epel-release
Next, install the Remi repository.
$ sudo dnf install https://rpms.remirepo.net/enterprise/remi-release-8.rpm
Check for available PHP streams.
$ dnf module list php -y
Last metadata expiration check: 0:00:12 ago on Fri 03 Dec 2021 09:39:32 AM UTC.
Rocky Linux 8 - AppStream
Name                Stream                 Profiles                                 Summary
php                 7.2 [d]                common [d], devel, minimal               PHP scripting language
php                 7.3                    common [d], devel, minimal               PHP scripting language
php                 7.4                    common [d], devel, minimal               PHP scripting language

Remi's Modular repository for Enterprise Linux 8 - x86_64
Name                Stream                 Profiles                                 Summary
php                 remi-7.2               common [d], devel, minimal               PHP scripting language
php                 remi-7.3               common [d], devel, minimal               PHP scripting language
php                 remi-7.4               common [d], devel, minimal               PHP scripting language
php                 remi-8.0               common [d], devel, minimal               PHP scripting language
php                 remi-8.1               common [d], devel, minimal               PHP scripting language

Hint: [d]efault, [e]nabled, [x]disabled, [i]nstalled
The default version is 7.2. Enable Remi's PHP 8.0 repository.
$ sudo dnf module reset php
$ sudo dnf module enable php:remi-8.0
Next, install PHP and its extensions required by UVDesk.
$ sudo dnf install php-fpm php-mbstring php-xml php-curl php-mysqlnd php-zip php-cli php-intl php-bcmath php-gd php-tokenizer php-imap php-pear php-mailparse
Verify the installation.
$ php --version
PHP 8.0.16 (cli) (built: Feb 15 2022 21:34:32) ( NTS gcc x86_64 )
Copyright (c) The PHP Group
Zend Engine v4.0.16, Copyright (c) Zend Technologies
Step 4 - Install and Configure MySQL Server
We will use MySQL database to store the data. Rocky Linux's Appstream repository ships with the latest version of MySQL.
Install MySQL.
$ sudo dnf install mysql-server
Enable and start the MySQL service.
$ sudo systemctl enable mysqld --now
Secure MySQL installation.
$ sudo mysql_secure_installation
For the first step, you will be asked if you want to set up the Validate Password Plugin, which you can use to test the strength of your MySQL password. Choose Y to proceed. You will be asked to choose the password validation level in the next step. Choose 2 which is the strongest level and will require your password to be at least eight characters long and include a mix of uppercase, lowercase, numeric and special characters.
Securing the MySQL server deployment.

Connecting to MySQL using a blank password.

VALIDATE PASSWORD COMPONENT can be used to test passwords
and improve security. It checks the strength of password
and allows the users to set only those passwords which are
secure enough. Would you like to setup VALIDATE PASSWORD component?

Press y|Y for Yes, any other key for No: Y

There are three levels of password validation policy:

LOW    Length >= 8
MEDIUM Length >= 8, numeric, mixed case, and special characters
STRONG Length >= 8, numeric, mixed case, special characters and dictionary                  file

Please enter 0 = LOW, 1 = MEDIUM and 2 = STRONG: 2
You will be asked to choose a root password in the next step. Choose a strong password that fulfills the requirements of the password validation plugin. In the next step, you will be asked whether to continue with the chosen password. Press y to continue.
Please set the password for root here.

New password:

Re-enter new password:

Estimated strength of the password: 100
Do you wish to continue with the password provided?(Press y|Y for Yes, any other key for No) : Y
Press Y and then ENTER key for all the following prompts to remove anonymous users and the test database, disable root logins and load the newly set rules.
...
Remove anonymous users? (Press y|Y for Yes, any other key for No) : Y
Success.
...
Disallow root login remotely? (Press y|Y for Yes, any other key for No) : Y
Success.
...
Remove test database and access to it? (Press y|Y for Yes, any other key for No) : Y
 - Dropping test database...
Success.
 - Removing privileges on test database...
Success.
Reloading the privilege tables will ensure that all changes
made so far will take effect immediately.
...
Reload privilege tables now? (Press y|Y for Yes, any other key for No) : Y
Success.
All done!
Enter the MySQL shell. Enter your root password to continue.
$ mysql -u root -p
Create uvdesk user. Make sure the password meets the requirements set before.
mysql> CREATE USER 'uvdesk'@'localhost' IDENTIFIED BY 'Your_password2';
Create uvdeskdb database.
mysql> CREATE DATABASE uvdeskdb;
Grant the user privileges on the uvdeskdb database.
mysql> GRANT ALL PRIVILEGES ON uvdeskdb.* TO 'uvdesk'@'localhost';
Exit the Shell.
mysql> exit
Step 5 - Download UVdesk
Download the latest stable version of UVdesk.
$ wget https://cdn.uvdesk.com/uvdesk/downloads/opensource/uvdesk-community-current-stable.zip
Unzip the downloaded file.
$ unzip uvdesk-*.zip
Move the extracted directory to /var/www/uvdesk location.
$ sudo mv uvdesk-community-v1.0.18 /var/www/uvdesk
Switch to the UVdesk's directory.
$ cd /var/www/uvdesk
Open the environment file (.env) for editing.
$ sudo nano .env
Find the line APP_ENV=dev and change it to the following.
APP_ENV=prod
Save the file by pressing Ctrl + X and entering Y when prompted.
Change the ownership of the root directory to the Nginx user.
$ sudo chown -R nginx:nginx /var/www/uvdesk
Step 6 - Configure SELinux Permissions
Use SELinux's chcon command to change the file security context for the web content being served from the /var/www/uvdesk directory.
$ sudo chcon -t httpd_sys_content_t /var/www/uvdesk -R
$ sudo chcon -t httpd_sys_rw_content_t /var/www/uvdesk -R
Configure SELinux to allow network connections for the UVDesk.
$ sudo setsebool -P httpd_can_network_connect on
Step 7 - Install and Configure SSL
To install an SSL certificate using Let's Encrypt, we need to download the Certbot tool. We need the Epel repository to install Certbot, but we can skip this step since we installed it earlier in the tutorial.
Install Certbot.
$ sudo dnf install certbot
Generate an SSL certificate.
$ sudo certbot certonly --standalone --agree-tos --no-eff-email --staple-ocsp --preferred-challenges http -m [email protected] -d uvdesk.example.com
The above command will download a certificate to the /etc/letsencrypt/live/uvdesk.example.com directory on your server.
Generate a Diffie-Hellman group certificate.
$ sudo openssl dhparam -out /etc/ssl/certs/dhparam.pem 2048
Create a challenge web root directory for Let's Encrypt auto-renewal.
$ sudo mkdir -p /var/lib/letsencrypt
Create a Cron Job to renew the SSL. It will run every day to check the certificate and renew if needed. For that, first, create the file /etc/cron.daily/certbot-renew and open it for editing.
$ sudo nano /etc/cron.daily/certbot-renew
Paste the following code.
#!/bin/sh
certbot renew --cert-name uvdesk.example.com --webroot -w /var/lib/letsencrypt/ --post-hook "systemctl reload nginx"
Save the file by pressing Ctrl + X and entering Y when prompted.
Change the permissions on the task file to make it executable.
$ sudo chmod +x /etc/cron.daily/certbot-renew
Step 8 - Configure Nginx and PHP
Configure PHP-FPM
Open the file /etc/php-fpm.d/www.conf.
$ sudo nano /etc/php-fpm.d/www.conf
We need to set the Unix user/group of PHP processes to nginx. Find the user=www-data and group=www-data lines in the file and change them to nginx.
...
; Unix user/group of processes
; Note: The user is mandatory. If the group is not set, the default user's group
;       will be used.
; RPM: apache user chosen to provide access to the same directories as httpd
user = nginx
; RPM: Keep a group allowed to write in log dir.
group = nginx
...
Save the file by pressing Ctrl + X and entering Y when prompted.
Enable and Start the PHP service.
$ sudo systemctl enable php-fpm --now
Change the group of the PHP sessions directory to Nginx.
$ sudo chgrp -R nginx /var/lib/php/session
Configure Nginx
Create and open the file /etc/nginx/conf.d/uvdesk.conf for editing.
$ sudo nano /etc/nginx/conf.d/uvdesk.conf
Paste the following code in it.
server {
    listen       443 ssl http2;
    listen       [::]:443 ssl http2;
    server_name  uvdesk.example.com;

    access_log  /var/log/nginx/uvdesk.access.log;
    error_log   /var/log/nginx/uvdesk.error.log;

	# SSL
    ssl_certificate      /etc/letsencrypt/live/uvdesk.example.com/fullchain.pem;
    ssl_certificate_key  /etc/letsencrypt/live/uvdesk.example.com/privkey.pem;
    ssl_trusted_certificate /etc/letsencrypt/live/uvdesk.example.com/chain.pem;
    ssl_session_timeout  5m;
    ssl_session_cache shared:MozSSL:10m;
    ssl_session_tickets off;
    ssl_protocols TLSv1.2 TLSv1.3;
    ssl_prefer_server_ciphers on;
    ssl_ciphers ECDHE-ECDSA-AES128-GCM-SHA256:ECDHE-RSA-AES128-GCM-SHA256:ECDHE-ECDSA-AES256-GCM-SHA384:ECDHE-RSA-AES256-GCM-SHA384:ECDHE-ECDSA-CHACHA20-POLY1305:ECDHE-RSA-CHACHA20-POLY1305:DHE-RSA-AES128-GCM-SHA256:DHE-RSA-AES256-GCM-SHA384;
    ssl_ecdh_curve X25519:prime256v1:secp384r1:secp521r1;
    ssl_stapling on;
    ssl_stapling_verify on;
    ssl_dhparam /etc/ssl/certs/dhparam.pem;
    resolver 8.8.8.8;

    root /var/www/uvdesk/public;
    index index.php;

    location / {
        try_files $uri $uri/ /index.php?$args;
    }

    # Pass PHP Scripts To FastCGI Server
    location ~ \.php$ {
        fastcgi_split_path_info ^(.+\.php)(.*)$;
        fastcgi_pass unix:/run/php-fpm/www.sock; # Depends On The PHP Version
        fastcgi_index index.php;
        fastcgi_param SCRIPT_FILENAME $document_root$fastcgi_script_name;
        fastcgi_param PATH_INFO $fastcgi_path_info;
        include fastcgi_params;
        try_files $uri =404;
    }
}

# enforce HTTPS
server {
    listen       80;
    listen       [::]:80;
    server_name  uvdesk.example.com;
    return 301   https://$host$request_uri;
}
Notice the root directory to be used in the Nginx configuration is /var/www/uvdesk/public/ and not /var/www/uvdesk/.
Save the file by pressing Ctrl + X and entering Y when prompted once finished.
Open the file /etc/nginx/nginx.conf for editing.
$ sudo nano /etc/nginx/nginx.conf
Add the following line before the line include /etc/nginx/conf.d/*.conf;.
server_names_hash_bucket_size 64;
Save the file by pressing Ctrl + X and entering Y when prompted.
Verify the Nginx configuration file syntax.
$ sudo nginx -t
nginx: the configuration file /etc/nginx/nginx.conf syntax is ok
nginx: configuration file /etc/nginx/nginx.conf test is successful
Start the Nginx service.
$ sudo systemctl start nginx
Step 9 - Install UVdesk
Launch the URL https://uvdesk.example.com in your browser, and you will get the following screen.
Click the Let's Begin button to start the installation process. The installer will check for PHP settings and file permissions on the next page.
Click Proceed to continue. You will be asked to fill in the database details on the next page. Enter the data as configured in step 4.
Click Proceed to continue. Next, you will be asked to create a super administrator account. Fill in your details.
Click Proceed to continue. Next, you will be asked to configure the website by giving a name to the Member and Customer Panel prefixes. These prefixes are used in the website URLs.
Click Proceed to continue. You will reach the final installation page.
Click Install Now to begin the installation. Once finished, you will get the following screen.
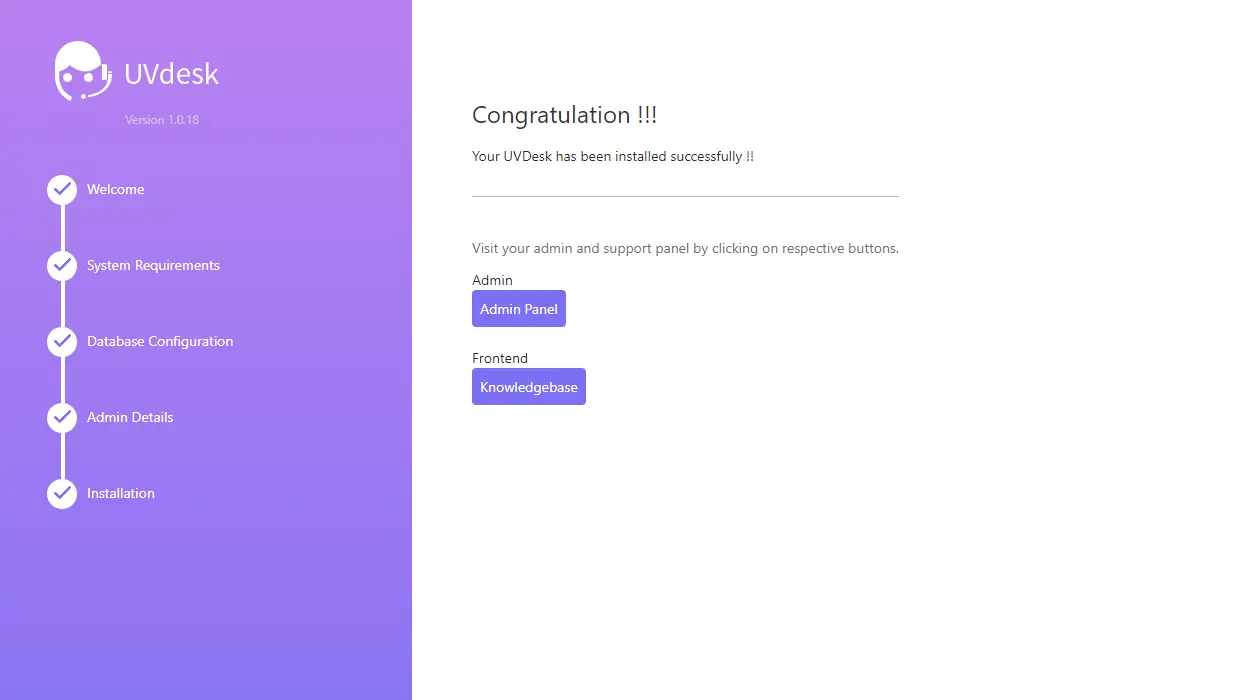
You can access the admin panel and the frontend website through the links given. Your UVDesk installation is ready to use.
Conclusion
You have installed the UVdesk Helpdesk system on a Rocky Linux 8 based server using Nginx, MySQL and PHP. If you have any questions, post them in the comments below.
Recommend
About Joyk
Aggregate valuable and interesting links.
Joyk means Joy of geeK