
4

通过 docker 在局域网安装 dnsmasq 教程
source link: https://hellodk.cn/post/815
Go to the source link to view the article. You can view the picture content, updated content and better typesetting reading experience. If the link is broken, please click the button below to view the snapshot at that time.

新换了一个路由器,tplink ax10200,路由器本身不错,但是固件比较简陋,没有域名解析的能力。

现在想在局域网内部署域名解析服务,dnsmasq 是一个不错的选择,比起 adguard home 要轻量。由于路由器 ssh 功能都无法开启,所以只能在局域网中寻找其他设备了,而且 7 x 24h working 的设备最好。那就 nas 了,在 nas 上通过 docker 安装一个 dnsmasq 即可解决问题。
选定镜像 jpillora/dnsmasq:latest。
1. 拉取镜像
docker pull jpillora/dnsmasq:latest2. 配置 dnsmasq 主配置文件
在宿主机创建文件 /docker/data/dnsmasq/dnsmasq.conf(文件路径由你定义),并填入以下内容
# dnsmasq config, for a complete example, view the website in the next line# http://oss.segetech.com/intra/srv/dnsmasq.conf# listen-address=127.0.0.1,172.17.0.3server=114.114.114.114server=119.29.29.29server=223.5.5.5server=223.6.6.6server=8.8.8.8server=8.8.4.4server=180.76.76.76server=1.1.1.1# do not use hosts nameserversno-resolvstrict-order# dns resolve log#log-queries# domain and ip mapaddress=/nas.to/192.168.1.130address=/hdk.to/192.168.1.118address=/dh.to/192.168.1.120#address=/2.nas.to/192.168.1.1313. 运行、启动容器
docker run -d \ --name dnsmasq \ --restart always \ -p 53:53/udp \ -p 8085:8080 \ -v /docker/data/dnsmasq/dnsmasq.conf:/etc/dnsmasq.conf \ --log-opt "max-size=100m" \ -e "HTTP_USER=admin" \ -e "HTTP_PASS=123456" \ jpillora/dnsmasq:latest- 这个镜像
jpillora/dnsmasq:latest是一个基于 web 的简单的 dnsmasq 项目,可以通过 http basic 认证在局域网内管理 dnsmasq 配置 - dns 查询默认走 udp:53 端口,需要映射宿主机的 53 端口到容器,也就是
-p 53:53/udp - web 端口容器内默认是 8080,宿主机上看情况选定端口,比如我设定了 8085,也就是
-p 8085:8080 - 两个
-e的环境变量设置就是设置 http basic 认证的用户名和密码
容器正常运行的时候,通过 http://192.168.1.130:8085 来访问,用户名 admin,密码 123456。在设置了 nas 这台设备域名是 nas.to 之后也可以使用 http://nas.to:8085 来登录
4. 路由器上设置 dns
在路由器的 lan dhcp 中配置首选 dns 服务器地址是 nas 的 ip 地址,比如我这是 192.168.1.130
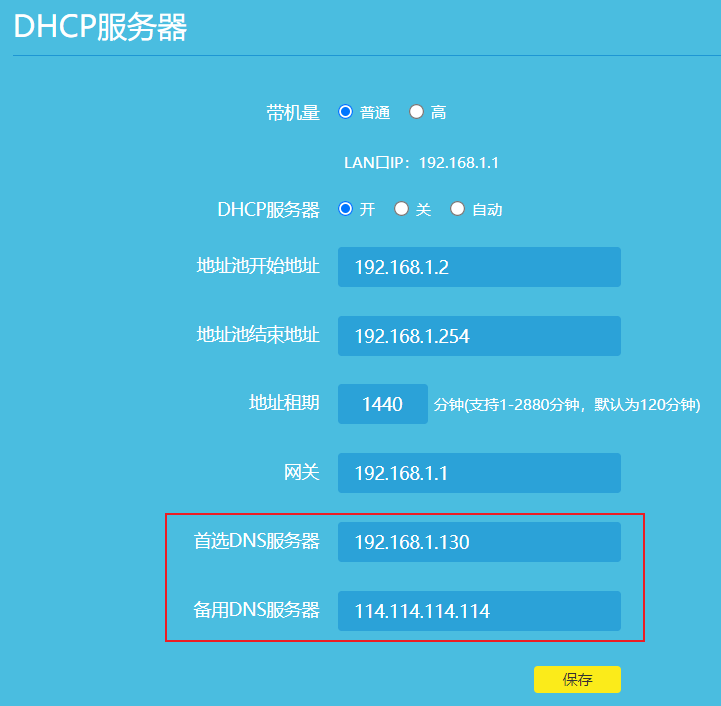
备用 DNS 建议设置成公网 DNS,防止 nas 这台设备 down 机导致 dns 服务挂掉
局域网内的 dns 查询服务器现在已是那台 nas: 192.168.1.130
nslookup www.baidu.comServer: UnKnownAddress: 192.168.1.130Non-authoritative answer:Name: www.wshifen.comAddresses: 104.193.88.77 104.193.88.123Aliases: www.baidu.com www.a.shifen.com根据域名 dh.to ping 内网设备
ping dh.toPinging dh.to [192.168.1.120] with 32 bytes of data:Reply from 192.168.1.120: bytes=32 time=50ms TTL=64Reply from 192.168.1.120: bytes=32 time=6ms TTL=64Reply from 192.168.1.120: bytes=32 time=5ms TTL=64Reply from 192.168.1.120: bytes=32 time=6ms TTL=64Ping statistics for 192.168.1.120: Packets: Sent = 4, Received = 4, Lost = 0 (0% loss),Approximate round trip times in milli-seconds: Minimum = 5ms, Maximum = 50ms, Average = 16ms部署成功。
关于这个项目的 dnsmasq 主配置文件的完整 example,请点击:http://oss.segetech.com/intra/srv/dnsmasq.conf
6. 相关链接
Recommend
About Joyk
Aggregate valuable and interesting links.
Joyk means Joy of geeK