

Using SingleStoreDB as a JSON Document Database
source link: https://dzone.com/articles/using-singlestoredb-as-a-json-document-database
Go to the source link to view the article. You can view the picture content, updated content and better typesetting reading experience. If the link is broken, please click the button below to view the snapshot at that time.

Abstract
Continuing our series on the multi-model capabilities of SingleStoreDB, we'll discuss SingleStoreDB's support for JSON data in this article.
We'll build a small inventory system to model an online store that sells various electronic equipment. This example is derived from an excellent tutorial available on DigitalOcean. We'll apply that tutorial to SingleStoreDB, and we'll see that it is effortless to store, retrieve and query JSON data using SingleStoreDB. We'll also build a quick visual front-end to our inventory system using Laravel and PHP.
The SQL scripts and PHP code files used in this article are available on GitHub.
Introduction
Previously, we discussed using SingleStoreDB for Time Series data and Geospatial data, and we'll now continue our discussion on the multi-model capabilities of SingleStoreDB by focussing on JSON data.
JSON is a popular data format today and can be extremely useful for applications that need to capture information about objects that may vary in their attributes. JSON would be particularly useful for applications such as e-commerce, where we may be storing a range of products that have quite different characteristics from each other. We'll look at some examples of this shortly.
To begin with, we need to create a free Managed Service account on the SingleStore website. At the time of writing, the Managed Service account from SingleStore comes with $500 of Credits. This is more than adequate for the case study described in this article.
Create Database Tables
In our SingleStore Managed Service account, let's use the SQL Editor to create a new database. Call this e_store, as follows:
CREATE DATABASE IF NOT EXISTS e_store
DEFAULT CHARACTER SET utf8
DEFAULT COLLATE utf8_general_ci;
We'll also create the brands, categories and products tables, as follows:
USE e_store;

CREATE TABLE brands (
     id INT UNSIGNED NOT NULL AUTO_INCREMENT,
     name VARCHAR(250) NOT NULL,
     PRIMARY KEY(id)
);

CREATE TABLE categories (
     id INT UNSIGNED NOT NULL AUTO_INCREMENT,
     name VARCHAR(250) NOT NULL,
     PRIMARY KEY(id)
);

CREATE TABLE products (
     id INT UNSIGNED NOT NULL AUTO_INCREMENT,
     name VARCHAR(250) NOT NULL,
     brand_id INT UNSIGNED NOT NULL,
     category_id INT UNSIGNED NOT NULL,
     attributes JSON NOT NULL,
     PRIMARY KEY(id),
     INDEX CATEGORY_ID(category_id ASC),
     INDEX BRAND_ID(brand_id ASC)
);
There is a one-to-many (1:m) relationship between brands and products and between categories and products. The design could be improved but is sufficient for illustrating the main focus of this article, which is the JSON support.
We can see that the products table has a JSON column called attributes. By using NOT NULL on the attributes column, SingleStoreDB will raise an error if there is an attempt to store invalid JSON.
Populate Database Tables
Let's now populate the tables. First, the brands table:
INSERT INTO brands (name) VALUES
('Samsung'),
('Nokia'),
('Canon');
Next, the categories table:
INSERT INTO categories (name) VALUES
('Television'),
('Mobile Phone'),
('Camera');
Finally, the products table.
Televisions
First, let's load the data for Televisions:
-- Televisions
INSERT INTO products (name, brand_id, category_id, attributes) VALUES
('Prime', '1', '1', '{"screen" : "50 inch", "resolution" : "2048 x 1152 pixels", "ports" : {"hdmi" : 1, "usb" : 3}, "speakers" : {"left" : "10 watt", "right" : "10 watt"}}'),
('Octoview', '1', '1', '{"screen" : "40 inch", "resolution" : "1920 x 1080 pixels", "ports" : {"hdmi" : 1, "usb" : 2}, "speakers" : {"left" : "10 watt", "right" : "10 watt"}}'),
('Dreamer', '1', '1', '{"screen" : "30 inch", "resolution" : "1600 x 900 pixels", "ports" : {"hdmi" : 1, "usb" : 1}, "speakers" : {"left" : "10 watt", "right" : "10 watt"}}'),
('Bravia', '1', '1', '{"screen" : "25 inch", "resolution" : "1366 x 768 pixels", "ports" : {"hdmi" : 1, "usb" : 0}, "speakers" : {"left" : "5 watt", "right" : "5 watt"}}'),
('Proton', '1', '1', '{"screen" : "20 inch", "resolution" : "1280 x 720 pixels", "ports" : {"hdmi" : 0, "usb" : 0}, "speakers" : {"left" : "5 watt", "right" : "5 watt"}}');
If we examine the JSON data, we can see that there is nesting. For example:
{
   "screen" : "50 inch",
   "resolution" : "2048 x 1152 pixels",
   "ports" : {
      "hdmi" : 1,
      "usb" : 3
   },
   "speakers" : {
      "left" : "10 watt",
      "right" : "10 watt"
   }
}
SingleStoreDB can handle nested JSON data with ease.
Mobile Phones
Next, let's load the data for Mobile Phones:
-- Mobile Phones
INSERT INTO products (name, brand_id, category_id, attributes) VALUES
('Desire', '2', '2', JSON_BUILD_OBJECT("network",
        JSON_ARRAY_PUSH_STRING('["GSM", "CDMA", "HSPA"]', 'EVDO'),
        "body",
        "5.11 x 2.59 x 0.46 inches",
        "weight",
        "143 grams",
        "sim",
        "Micro-SIM",
        "display",
        "4.5 inches",
        "resolution",
        "720 x 1280 pixels",
        "os",
        "Android Jellybean v4.3"
    )
),
('Passion', '2', '2', JSON_BUILD_OBJECT("network",
        JSON_ARRAY_PUSH_STRING('["GSM", "CDMA"]', 'HSPA'),
        "body",
        "6.11 x 3.59 x 0.46 inches",
        "weight",
        "145 grams",
        "sim",
        "Micro-SIM",
        "display",
        "4.5 inches",
        "resolution",
        "720 x 1280 pixels",
        "os",
        "Android Jellybean v4.3"
    )
),
('Emotion', '2', '2', JSON_BUILD_OBJECT("network" ,
        JSON_ARRAY_PUSH_STRING('["GSM", "CDMA"]', 'EVDO'),
        "body",
        "5.50 x 2.50 x 0.50 inches",
        "weight",
        "125 grams",
        "sim",
        "Micro-SIM",
        "display",
        "5.00 inches",
        "resolution",
        "720 x 1280 pixels",
        "os",
        "Android KitKat v4.3"
    )
),
('Sensation', '2', '2', JSON_BUILD_OBJECT("network",
        JSON_ARRAY_PUSH_STRING('["GSM", "HSPA"]', 'EVDO'),
        "body",
        "4.00 x 2.00 x 0.75 inches",
        "weight",
        "150 grams",
        "sim",
        "Micro-SIM",
        "display",
        "3.5 inches",
        "resolution",
        "720 x 1280 pixels",
        "os",
        "Android Lollipop v4.3"
    )
),
('Joy', '2', '2', JSON_BUILD_OBJECT("network",
        JSON_ARRAY_PUSH_STRING('["CDMA", "HSPA"]', 'EVDO'),
        "body",
        "7.00 x 3.50 x 0.25 inches",
        "weight",
        "250 grams",
        "sim",
        "Micro-SIM",
        "display",
        "6.5 inches",
        "resolution",
        "1920 x 1080 pixels",
        "os",
        "Android Marshmallow v4.3"
    )
);
In this case, rather than using JSON directly, we are building the JSON structure for storage using the JSON_BUILD_STORAGE function. We also have an array structure that we are creating using JSON_ARRAY_PUSH_STRING. An example of the JSON structure would look as follows:
{
   "body" : "5.11 x 2.59 x 0.46 inches",
   "display" : "4.5 inches",
   "network" : [
      "GSM",
      "CDMA",
      "HSPA",
      "EVDO"
   ],
   "os" : "Android Jellybean v4.3",
   "resolution" : "720 x 1280 pixels",
   "sim" : "Micro-SIM",
   "weight" : "143 grams"
}
Cameras
Finally, let's load the data for Cameras:
-- Cameras
INSERT INTO products (name, brand_id, category_id, attributes) VALUES
('Explorer', '3', '3', '{"sensor_type" : "CMOS", "processor" : "Digic DV III", "scanning_system" : "progressive", "mount_type" : "PL", "monitor_type" : "LCD"}'),
('Runner', '3', '3',   '{"sensor_type" : "CMOS", "processor" : "Digic DV II",  "scanning_system" : "progressive", "mount_type" : "PL", "monitor_type" : "LED"}'),
('Traveler', '3', '3', '{"sensor_type" : "CMOS", "processor" : "Digic DV II",  "scanning_system" : "progressive", "mount_type" : "PL", "monitor_type" : "LCD"}'),
('Walker', '3', '3',   '{"sensor_type" : "CMOS", "processor" : "Digic DV I",   "scanning_system" : "progressive", "mount_type" : "PL", "monitor_type" : "LED"}'),
('Jumper', '3', '3',   '{"sensor_type" : "CMOS", "processor" : "Digic DV I",   "scanning_system" : "progressive", "mount_type" : "PL", "monitor_type" : "LCD"}');
In this case, we have no nesting or arrays but a flat JSON structure. For example:
{
   "sensor_type" : "CMOS",
   "processor" : "Digic DV III",
   "scanning_system" : "progressive",
   "mount_type" : "PL",
   "monitor_type" : "LCD"
}
From these examples, we can see that we may need to store our JSON data in various ways, and the structure of the data may vary depending upon the attributes we wish to store. SingleStoreDB can handle these different requirements and comes with a wide range of JSON functions that can help.
Example Queries
Now that our data are safely inside SingleStoreDB, let's look at ways to query that data.
First, let's see what SingleStoreDB returns for the attributes column using JSON_GET_TYPE:
SELECT JSON_GET_TYPE(attributes)
FROM products;
The result should be:
+---------------------------+
| JSON_GET_TYPE(attributes) |
+---------------------------+
| object                    |
| object                    |
| object                    |
| object                    |
| object                    |
| object                    |
| object                    |
| object                    |
| object                    |
| object                    |
| object                    |
| object                    |
| object                    |
| object                    |
| object                    |
+---------------------------+
15 rows selected
All the rows are JSON objects.
Now let's find any Televisions that have one or more USB port(s) and one or more HDMI port(s):
SELECT * FROM products
WHERE category_id = 1
AND attributes::ports::usb > 0
AND attributes::ports::hdmi > 0;
Notice that we can use the double-colon (::) to specify a path to the specific attribute we are interested in. The output should be:
+----+----------+----------+-------------+-------------------------+
| id |   name   | brand_id | category_id |                         |
+----+----------+----------+-------------+-------------------------+
| 2  | Octoview | 1        | 1           | {"ports":{"hdmi":1,"usb"|
| 1  | Prime    | 1        | 1           | {"ports":{"hdmi":1,"usb"|
| 3  | Dreamer  | 1        | 1           | {"ports":{"hdmi":1,"usb"|
+----+----------+----------+-------------+-------------------------+
3 rows selected
Next, let's try some update operations. First, we'll create a new attribute called body_color for Televisions, as follows:
UPDATE products
SET attributes::$body_color = 'red'
WHERE category_id = 1;
If we check the attributes, we should see that body_color has been added:
+------------------------------------------------------------------+
|                                                        attributes|
+------------------------------------------------------------------+
| {"body_color":"red","ports":{"hdmi":1,"usb":2},"resolution":"1920|
| {"body_color":"red","ports":{"hdmi":1,"usb":0},"resolution":"1366|
| {"body_color":"red","ports":{"hdmi":0,"usb":0},"resolution":"1280|
| {"body_color":"red","ports":{"hdmi":1,"usb":3},"resolution":"2048|
| {"body_color":"red","ports":{"hdmi":1,"usb":1},"resolution":"1600|
+------------------------------------------------------------------+
5 rows selected
Next, let's add a chipset for Mobile Phones, as follows:
UPDATE products
SET attributes::$chipset = 'Qualcomm'
WHERE category_id = 2;
If we check the attributes, we should see that chipset has been added:
+------------------------------------------------------------------+
|                                                                  |
+------------------------------------------------------------------+
| {"body":"6.11 x 3.59 x 0.46 inches","chipset":"Qualcomm","display|
| {"body":"5.50 x 2.50 x 0.50 inches","chipset":"Qualcomm","display|
| {"body":"7.00 x 3.50 x 0.25 inches","chipset":"Qualcomm","display|
| {"body":"5.11 x 2.59 x 0.46 inches","chipset":"Qualcomm","display|
| {"body":"4.00 x 2.00 x 0.75 inches","chipset":"Qualcomm","display|
+------------------------------------------------------------------+
5 rows selected
We can also update the existing value of the chipset to a new value, as follows:
UPDATE products
SET attributes::$chipset = 'Qualcomm Snapdragon'
WHERE category_id = 2;
If we check the attributes, we should see that chipset has been updated:
+------------------------------------------------------------------+
|                                                                  |
+------------------------------------------------------------------+
| {"body":"5.11 x 2.59 x 0.46 inches","chipset":"Qualcomm Snapdrago|
| {"body":"4.00 x 2.00 x 0.75 inches","chipset":"Qualcomm Snapdrago|
| {"body":"6.11 x 3.59 x 0.46 inches","chipset":"Qualcomm Snapdrago|
| {"body":"5.50 x 2.50 x 0.50 inches","chipset":"Qualcomm Snapdrago|
| {"body":"7.00 x 3.50 x 0.25 inches","chipset":"Qualcomm Snapdrago|
+------------------------------------------------------------------+
5 rows selected
We can also delete attributes. For example, we know from the data that we created earlier that we have a mount_type for Cameras. We could delete this as follows:
UPDATE products
SET attributes = JSON_DELETE_KEY(attributes, 'mount_type')
WHERE category_id = 3;
If we check the attributes, we should see that mount_type has been deleted:
+------------------------+
| attributes::mount_type |
+------------------------+
|                        |
|                        |
|                        |
|                        |
|                        |
+------------------------+
5 rows selected
We can also write more complex operations. For example, here we are checking the os attribute using the LIKE operator. In our database, we have two Mobile Phones with the Jellybean OS.
DELETE FROM products
WHERE category_id = 2
AND attributes::$os LIKE '%Jellybean%';
After running the above command, we should have three Mobile Phones in our database:
+----+-----------+----------+-------------+------------------------+
| id |   name    | brand_id | category_id |                        |
+----+-----------+----------+--------------------------------------+
| 8  | Emotion   | 2        | 2           | {"body":"5.50 x 2.50 x |
| 10 | Joy       | 2        | 2           | {"body":"7.00 x 3.50 x |
| 9  | Sensation | 2        | 2           | {"body":"4.00 x 2.00 x |
+----+-----------+----------+-------------+------------------------+
3 rows selected
SingleStoreDB supports an extensive set of functions that can be used with JSON data. The documentation also contains further details and examples.
Bonus: Visualization Using Laravel and PHP
Running the commands in the previous sections using the SQL Editor in our Managed Service account is a great way to test our code and quickly view the results. However, we can go a step further and build a simple web interface that allows us to see the data and perform some Create, Read, Update and Delete (CRUD) operations. In this first application development iteration, we'll focus mainly on Read, Delete and partial Update. We'll build a complete solution in the future.
We'll delete the existing database and recreate it to have the original dataset.
We'll build our web interface using Laravel and PHP and use the following software:
sudo apt install php7.4-cli
sudo apt install php-xml
sudo apt install php-mysql
We'll also need to install Composer, and we'll follow the instructions on the download page. Once Composer has been downloaded, we'll move it to the bin directory:
sudo mv composer.phar /usr/local/bin/composerNext, we'll create a project called e-store, as follows:
composer create-project laravel/laravel e-storeand then change to the project directory:
cd e-storeWe'll now edit the .env file in the e-store directory:
DB_CONNECTION=mysql
DB_HOST=<TO DO>
DB_PORT=3306
DB_DATABASE=e_store
DB_USERNAME="admin"
DB_PASSWORD="<TO DO>"
The <TO DO> for DB_HOST and DB_PASSWORD should be replaced with the values obtained from the SingleStore Managed Service when creating a cluster. Note also the use of double-quotes (") for DB_USERNAME and DB_PASSWORD.
Create Files
A quick way to generate all the files we need is as follows:
php artisan make:model -a Brand
php artisan make:model -a Category
php artisan make:model -a Product
For each of Brand, Category and Product, we obtain:
- A migration, in
database/migrations - A model in
app/Models - A controller, in
app/Http/Controllers - A seeder, in
database/seeders
Migrations (database/migrations)
We'll edit the Brand migration file, so that we have:
    public function up()
    {
        Schema::create('brands', function (Blueprint $table) {
            $table->id();
            $table->string('name');
            $table->timestamps();
        });
    }
the Category migration file, so that we have:
    public function up()
    {
        Schema::create('categories', function (Blueprint $table) {
            $table->id();
            $table->string('name');
            $table->timestamps();
        });
    }
and the Product migration file, so that we have:
    public function up()
    {
        Schema::create('products', function (Blueprint $table) {
            $table->id();
            $table->string('name');
            $table->unsignedInteger('brand_id');
            $table->unsignedInteger('category_id');
            $table->json('attributes');
            $table->timestamps();
            // indexes
            $table->index('brand_id');
            $table->index('category_id');
        });
    }
Models (app/Models)
We'll edit the Brand model file, so that we have the 1:m relationship with Product:
class Brand extends Model
{
    use HasFactory;
    // A brand has many products
    public function products(){
        return $this->hasMany('Product')
    }
}
the Category model file, so that we have the 1:m relationship with Product:
class Category extends Model
{
    use HasFactory;
    // A category has many products
    public function products(){
        return $this->hasMany('Product')
    }
}
and the Product model file so that we can access the JSON data by casting the attributes to an array and the relationships with Brand and Category:
class Product extends Model
{
    use HasFactory;
    public $timestamps = false;
    // Cast attributes JSON to array
    protected $casts = [
        'attributes' => 'array'
    ];
    // Each product has a brand
    public function brand(){
        return $this->belongsTo('Brand');
    }
    // Each product has a category
    public function category(){
        return $this->belongsTo('Category');
    }
    protected $fillable = ['name', 'brand_id', 'category_id', 'attributes'];
}
Controllers (app/Http/Controllers)
For this first iteration of the web application, let's focus on the ProductController.
index()
We need to retrieve all the product data for the products index page and ensure that we have each product's brand name and category name. This will require joins across the respective tables. We'll also control the output by showing just five records per page using simplePaginate().
    public function index()
    {
        $products = Product::select('products.*', 'brands.name as brand_name', 'categories.name as category_name')
           ->join('brands', 'brands.id', '=', 'products.brand_id')
           ->join('categories', 'categories.id', '=', 'products.category_id')
           ->orderBy('products.id')
           ->simplePaginate(5);
       return view('admin.index', compact('products'));
    }
show()
To show a single product, we'll perform a query similar to the query for index() but we'll use first() to get an individual product record.
    public function show(Product $product)
    {
        $one_product = Product::select('products.*', 'brands.name as brand_name', 'categories.name as category_name')
           ->join('brands', 'brands.id', '=', 'products.brand_id')
           ->join('categories', 'categories.id', '=', 'products.category_id')
           ->where('products.id', $product->id)
           ->first();
        return view('admin.show', compact('one_product'));
    }
edit()
To edit an existing product, we'll need to find the product to edit, and we'll also need to get all the brands and categories to be offered in drop-down menus if the user wishes to change these product attributes.
    public function edit($id)
    {
        $product = Product::findOrFail($id);
        $brands = Brand::orderBy('id')->get();
        $categories = Category::orderBy('id')->get();
        return view('admin.edit', compact('product', 'brands', 'categories'));
    }
update()
We'll allow updates to the product name, brand and category but not the JSON attributes in this first application development iteration.
    public function update(Request $request, $id)
    {
        $updateProduct = $request->validate([
            'name' => 'required|max:255',
            'brand_id' => 'required|numeric',
            'category_id' => 'required|numeric',
        ]);
        Product::whereId($id)->update($updateProduct);
        return redirect('/products')->with('success', 'Product has been updated');
    }
destroy()
We can remove a product very easily by just using delete().
    public function destroy($id)
    {
        $product = Product::findOrFail($id);
        $product->delete();
        return redirect('/products')->with('success', 'Product has been deleted');
    }
Routes (routes/web.php)
In the web.php file in the routes directory, we'll add the following:
Route::resource(
    'products',
     ProductController::class
);

Route::resource(
    'brands',
    BrandController::class
);

Route::resource(
    'categories',
    CategoryController::class
);
Views (resources/views/admin)
The three blade files for the index page, show page, and edit page can be found on GitHub. We'll have code for formatting the data using HTML and PHP for presentation and partial editing in those files.
Run the Code
We'll run the application from the e-store directory, as follows:
php artisan serveIn a web browser, we'll enter the following:
http://localhost:8000/productsThe output should be similar to Figure 1:
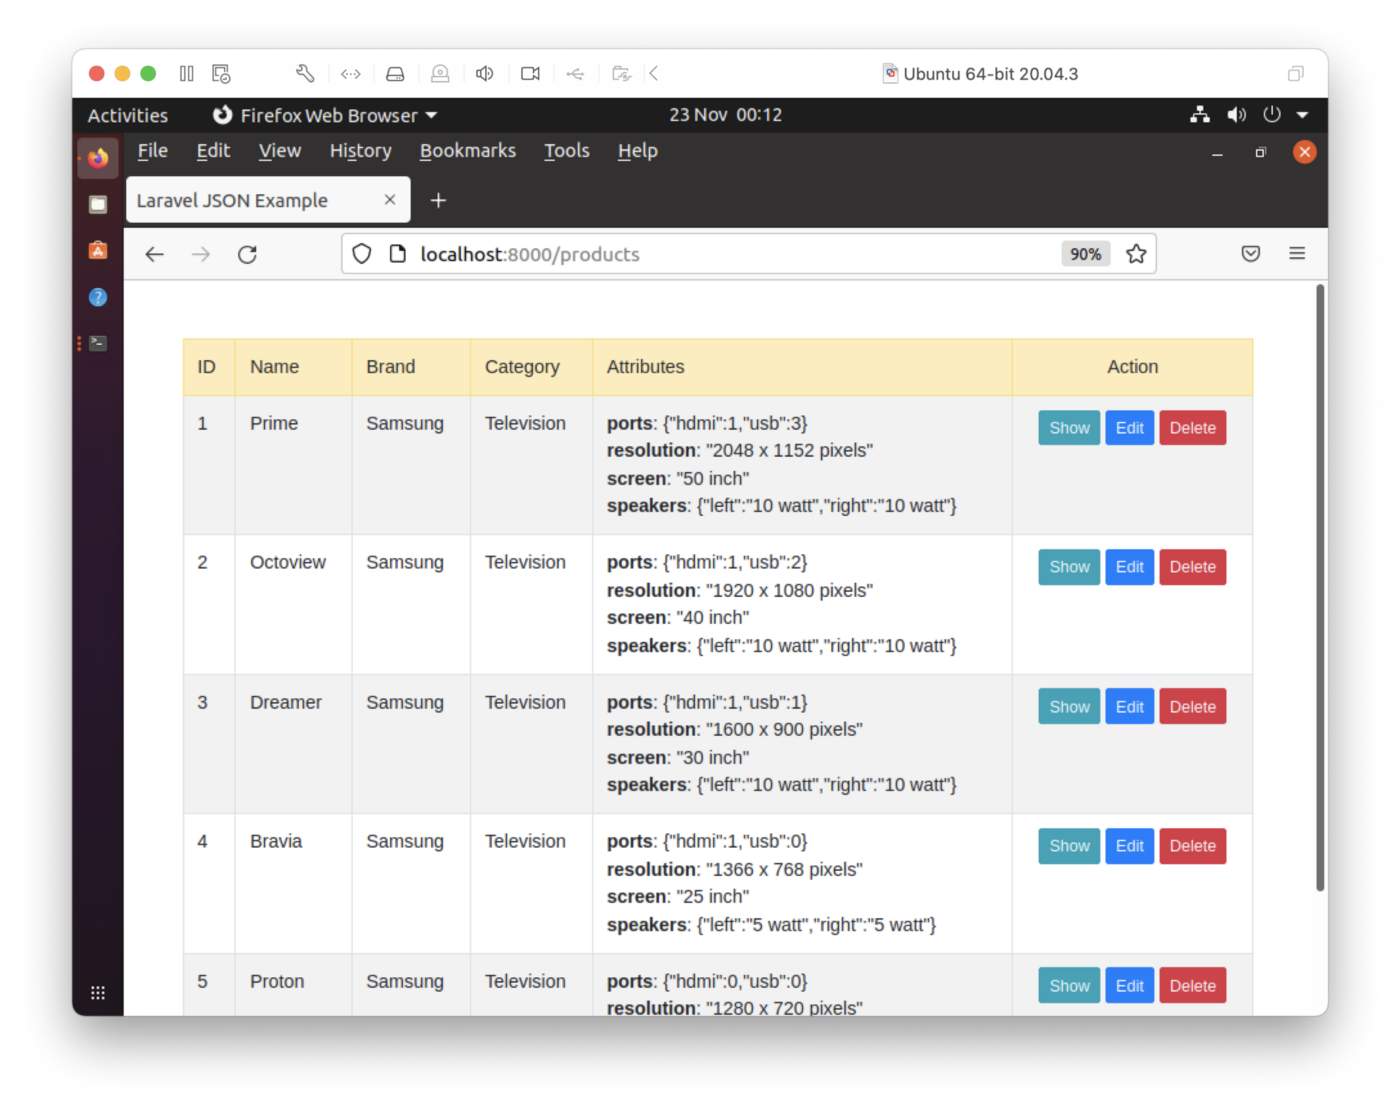
Figure 1. Index Page.
We can see the Brand and Category data correctly displayed for each product. The attributes in JSON format need an improved presentation, but we can see these correctly in this first iteration. If we select Show, we can view the details about a product on a single page, as shown in Figure 2.

Figure 2. Show Individual Product.
From the index page, if we select Edit, we can edit the product, as shown in Figure 3.
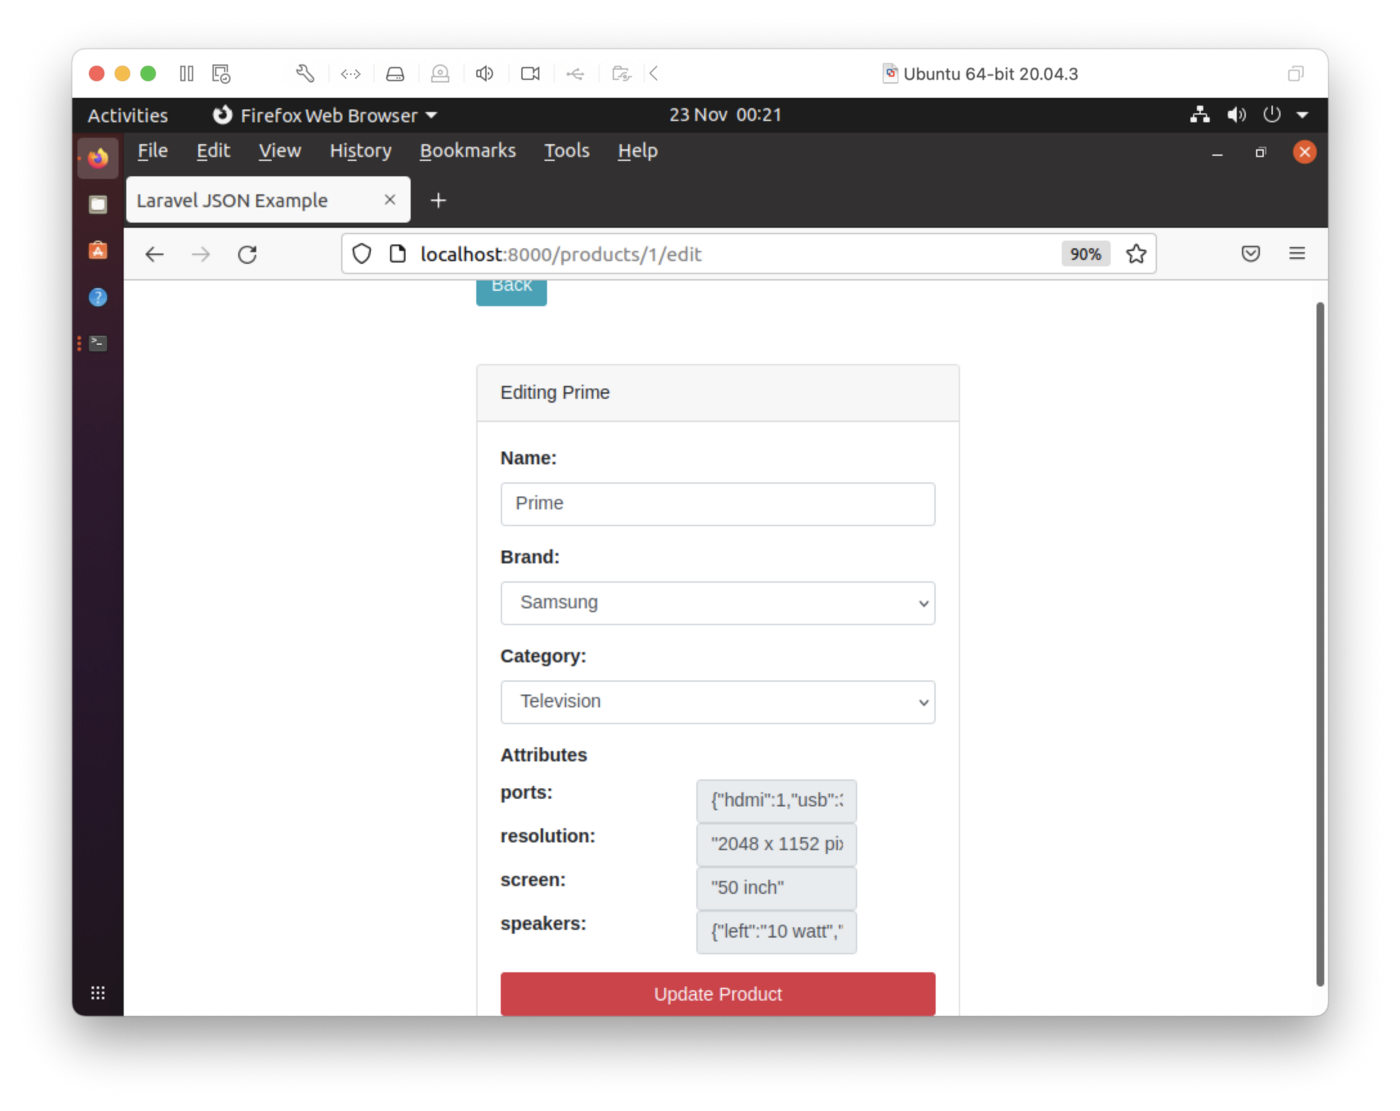
Figure 3. Edit Product.
We can fully edit the name and change the Brand and Category. The JSON is not editable in this first iteration.
Finally, if we select Delete from the index page, we can remove a product from the database. In Figure 4, the product with ID 1 has been deleted. We can confirm this by checking SingleStoreDB through the SQL Editor in our Managed Service account.
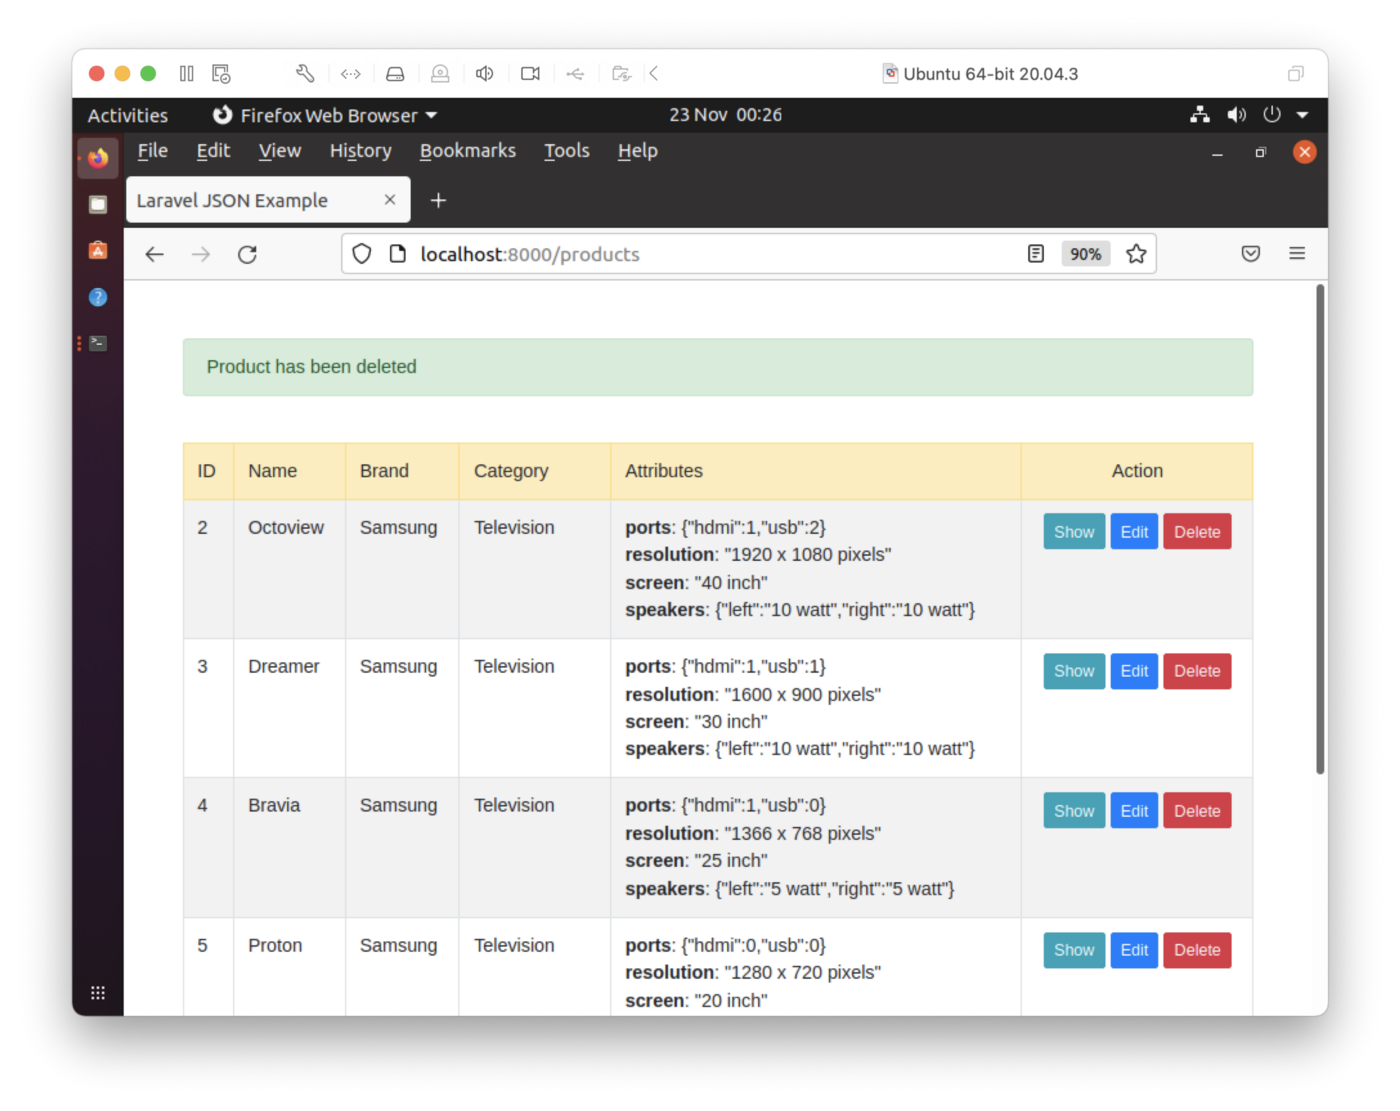
Figure 4. Delete Product.
Client-Side Handling of JSON for Different Products
One of the challenges we face for data entry and update of the JSON on the client-side is that the structure is variable for each of the three different products. One solution proposed in the original DigitalOcean tutorial is to create a specific web page for each product type. This would be a good solution for a small number of products. However, if we were storing tens or hundreds of different products, this would not be viable.
The JSON data may be flat, it may be nested, and it may have arrays. We could deal with this by applying a solution proposed on Stackoverflow, using recursion to determine the nodes and leaves to output the JSON structure correctly. We can demonstrate this using the following example:
<?php
// https://stackoverflow.com/questions/14006609/php-recursion-print-all-elements-of-a-multidimensional-array-with-keys
function pretty_dump($arr, $d=1){
    if ($d==1) echo "<pre>";    // HTML Only
    if (is_array($arr)){
        foreach($arr as $k=>$v){
            for ($i=0;$i<$d;$i++){
                echo "\t";
            }
            if (is_array($v)){
                echo $k." : ".PHP_EOL;
                pretty_dump($v, $d+1);
            } else {
                echo $k." : ".$v.PHP_EOL;
            }
        }
    }
    if ($d==1) echo "</pre>";   // HTML Only
}

$television_json = '{"screen" : "50 inch", "resolution" : "2048 x 1152 pixels", "ports" : {"hdmi" : 1, "usb" : 3}, "speakers" : {"left" : "10 watt", "right" : "10 watt"}}';

$mobile_phone_json = '{"body" : "5.11 x 2.59 x 0.46 inches", "display" : "4.5 inches", "network" : ["GSM", "CDMA", "HSPA", "EVDO"], "os" : "Android Jellybean v4.3", "resolution" : "720 x 1280 pixels", "sim" : "Micro-SIM", "weight" : "143 grams"}';

$camera_json = '{"sensor_type" : "CMOS", "processor" : "Digic DV III", "scanning_system" : "progressive", "mount_type" : "PL", "monitor_type" : "LCD"}';

$television_array = json_decode($television_json, true);

$mobile_phone_array = json_decode($mobile_phone_json, true);

$camera_array = json_decode($camera_json, true);

echo "Television:";

pretty_dump($television_array);

echo "Mobile Phone:";

pretty_dump($mobile_phone_array);

echo "Camera:";

pretty_dump($camera_array);
?>
The result should be:
Television:
        screen : 50 inch
        resolution : 2048 x 1152 pixels
        ports :
                hdmi : 1
                usb : 3
        speakers :
                left : 10 watt
                right : 10 watt

Mobile Phone:
        body : 5.11 x 2.59 x 0.46 inches
        display : 4.5 inches
        network :
                0 : GSM
                1 : CDMA
                2 : HSPA
                3 : EVDO
        os : Android Jellybean v4.3
        resolution : 720 x 1280 pixels
        sim : Micro-SIM
        weight : 143 grams

Camera:
        sensor_type : CMOS
        processor : Digic DV III
        scanning_system : progressive
        mount_type : PL
        monitor_type : LCD
This gives us all the correct keys and values.
Summary
In this article, we have seen that SingleStoreDB can manage JSON data of varying complexity with ease. It supports a wide range of functions that can be used with JSON data, and we have used a number of these functions in this article. Furthermore, we have seen that we can use SQL queries that combine operations on both Relational and JSON data. Finally, we have built a simple web interface to our database system using Laravel and PHP that enables us to explore the data and make some modifications.
Recommend
About Joyk
Aggregate valuable and interesting links.
Joyk means Joy of geeK