

知识分享—设计计算器的UI界面
source link: https://os.51cto.com/article/703001.html
Go to the source link to view the article. You can view the picture content, updated content and better typesetting reading experience. If the link is broken, please click the button below to view the snapshot at that time.


我们的智能手机内都会存有一些系统自带的软件,这些软件内存占用不大,它们作为一种轻量化的应用在日常生活中被我们使用。在这些系统自带的软件中,计算器是我们能经常接触的,而笔者注意到,计算器的UI界面简洁美观,交互元素齐全,于是萌生了在DevEco Studio中自己设计计算器的UI界面的想法。
一般情况下,一个计算器的UI界面由显示台和按键区组成。显示台可以通过一个不含子组件的容器组件实现,而按键区则需要用到Table布局(即表格布局)。
Table布局与其他布局形式的差别在于,它能通过表格的方式来划分子组件。而让按键区通过表格布局的方式来排布数目繁多的按键,则可以有效减少页面布局的复杂程度。Table布局通常带有的属性如下:

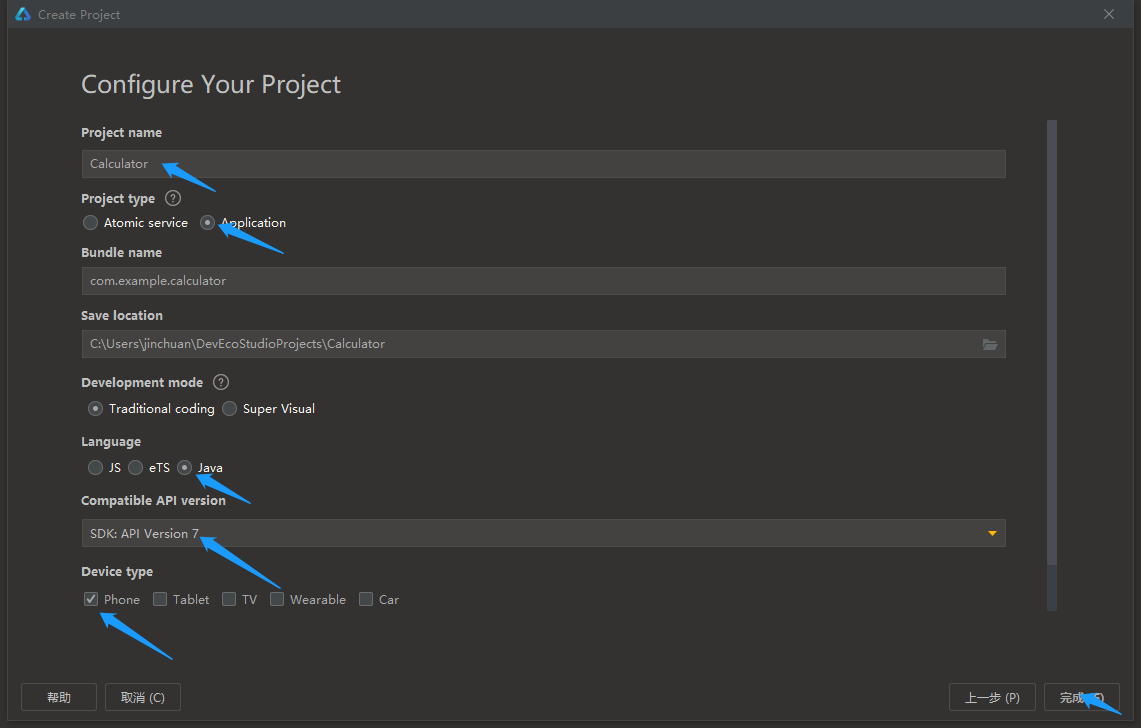
首先,我们选择Empty Ability,创建一个新的Java工程;
设计显示台
打开entry>src>main>java>resources>base>layout>ability_main_xml,将DirectionalLayout换成DependentLayout,并删除文件自带的文本内容为“Hello World”的Text组件,之后加入一个容器组件和一个Button组件;
<?xml version="1.0" encoding="utf-8"?>
<DependentLayout                                           //将DirectionalLayout改为DependentLayout
    xmlns:ohos="http://schemas.huawei.com/res/ohos"
    ohos:height="match_parent"
    ohos:width="match_parent"
    ohos:alignment="center"
    ohos:orientation="vertical">
    <DirectionalLayout                              //设置不含子组件的容器组件(这里以DiretionalLayout为例)
        ohos:background_element="gray"        //背景色设为灰色
        ohos:height="295vp"
        ohos:width="match_parent"
        ohos:id="$+id:box"/>                 //设置id号
    <Button                                          //设置一个无点击效果的按钮组件
        ohos:below="$id:box"                    //使该组件处在id号为“box”的组件的正下方
        ohos:height="35vp"
        ohos:width="match_parent"
        ohos:id="$+id:board"                        //设置id号
        ohos:background_element="white"/>

</DependentLayout>
设置按键区中按键的背景元素
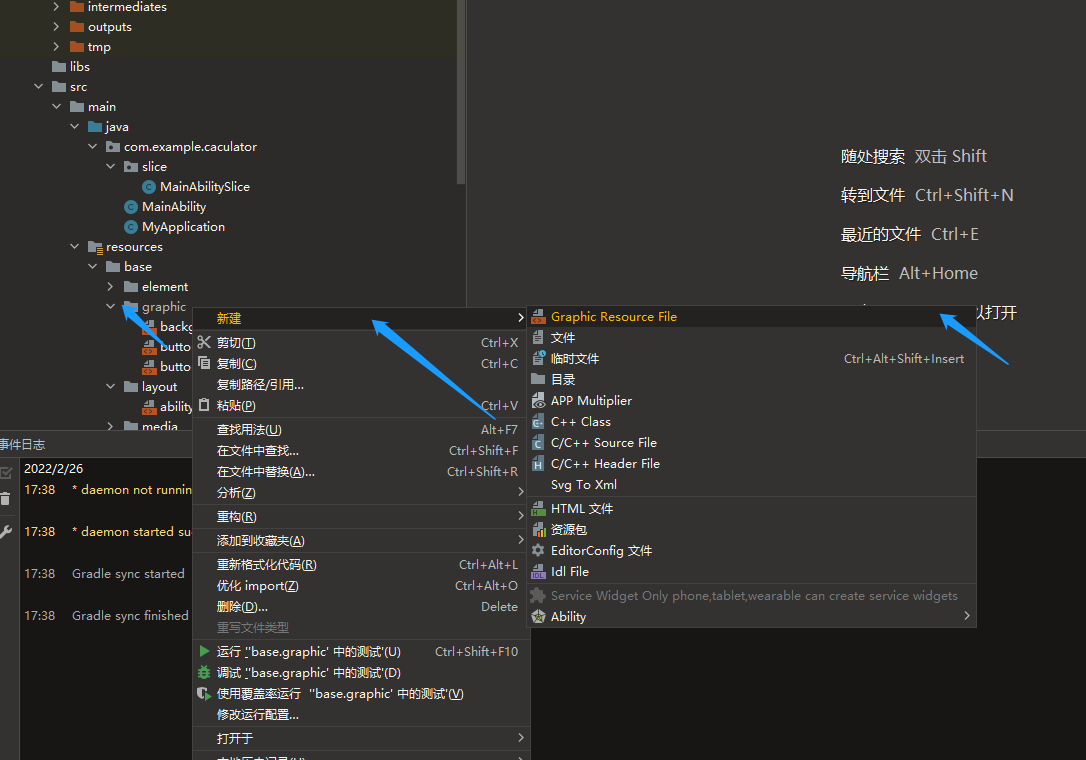
打开entry>src>main>java>resources>base>graphic,右击graphic,新建两个Graphic_Resource_File,其中一个命名为button,另一个命名为buttonspecial;
打开新建的button.xml,将文件中的代码改为如下代码:
<?xml version="1.0" encoding="utf-8"?>
<shape
    xmlns:ohos="http://schemas.huawei.com/res/ohos"
    ohos:shape="oval">     //将Button的形状设置为圆形
    <solid
        ohos:color="black"/>   //将Button的背景色设置为黑色
</shape>
再打开新建的buttonspecial.xml,将文件中的代码改为如下代码:
<?xml version="1.0" encoding="utf-8"?>
<shape
    xmlns:ohos="http://schemas.huawei.com/res/ohos"
    ohos:shape="oval">    //将Button的形状设置为圆形
    <solid
        ohos:color="green"/>    //将Button的背景色设置为绿色
</shape>
这样之后,按键的背景元素就设计好了;
设计按键区
打开entry>src>main>java>resources>base>layout>ability_main_xml,添加TableLLayout,使TableLayout内的组件能以4x5的表格形式排布;
 <TableLayout                        //设置Table布局
        ohos:below="$id:board"      //使TableLayout处在id号为“board”的组件的正下方
        ohos:height="match_parent"
        ohos:width="match_parent"
        ohos:row_count="5"                  //设置行数
        ohos:column_count="4">          //设置列数

</TableLayout>
接着,在TableLayout内加入20个Button组件。其中,前19个Button组件的背景引用button.xml内所定义的Button背景(背景色为黑色),而最后一个Button组件的背景则引用buttonspecial.xml内所定义的背景(背景色为绿色)。代码如下:
<Button
            ohos:height="80vp"
            ohos:width="80vp"
            ohos:background_element="$graphic:button"
            ohos:text="C"
            ohos:text_color="white"
            ohos:text_size="30vp"
            ohos:margin="5vp"/>
        <Button
            ohos:height="80vp"
            ohos:width="80vp"
            ohos:background_element="$graphic:button"
            ohos:text="del"
            ohos:text_color="white"
            ohos:text_size="30vp"
            ohos:margin="5vp"/>
        <Button
            ohos:height="80vp"
            ohos:width="80vp"
            ohos:background_element="$graphic:button"
            ohos:text="%"
            ohos:text_color="white"
            ohos:text_size="30vp"
            ohos:margin="5vp"/>
        <Button
            ohos:height="80vp"
            ohos:width="80vp"
            ohos:background_element="$graphic:button"
            ohos:text="/"
            ohos:text_color="white"
            ohos:text_size="30vp"
            ohos:margin="5vp"/>
        <Button
            ohos:height="80vp"
            ohos:width="80vp"
            ohos:background_element="$graphic:button"
            ohos:text="7"
            ohos:text_color="white"
            ohos:text_size="30vp"
            ohos:margin="5vp"/>
        <Button
            ohos:height="80vp"
            ohos:width="80vp"
            ohos:background_element="$graphic:button"
            ohos:text="8"
            ohos:text_color="white"
            ohos:text_size="30vp"
            ohos:margin="5vp"/>
        <Button
            ohos:height="80vp"
            ohos:width="80vp"
            ohos:background_element="$graphic:button"
            ohos:text="9"
            ohos:text_color="white"
            ohos:text_size="30vp"
            ohos:margin="5vp"/>
        <Button
            ohos:height="80vp"
            ohos:width="80vp"
            ohos:background_element="$graphic:button"
            ohos:text="X"
            ohos:text_color="white"
            ohos:text_size="35vp"
            ohos:margin="5vp"/>
        <Button
            ohos:height="80vp"
            ohos:width="80vp"
            ohos:background_element="$graphic:button"
            ohos:text="4"
            ohos:text_color="white"
            ohos:text_size="30vp"
            ohos:margin="5vp"/>

        <Button
            ohos:height="80vp"
            ohos:width="80vp"
            ohos:background_element="$graphic:button"
            ohos:text="5"
            ohos:text_color="white"
            ohos:text_size="30vp"
            ohos:margin="5vp"/>
        <Button
            ohos:height="80vp"
            ohos:width="80vp"
            ohos:background_element="$graphic:button"
            ohos:text="6"
            ohos:text_color="white"
            ohos:text_size="30vp"
            ohos:margin="5vp"/>

        <Button
            ohos:height="80vp"
            ohos:width="80vp"
            ohos:background_element="$graphic:button"
            ohos:text="—"
            ohos:text_color="white"
            ohos:text_size="30vp"
            ohos:margin="5vp"/>
        <Button
            ohos:height="80vp"
            ohos:width="80vp"
            ohos:background_element="$graphic:button"
            ohos:text="1"
            ohos:text_color="white"
            ohos:text_size="30vp"
            ohos:margin="5vp"/>
        <Button
            ohos:height="80vp"
            ohos:width="80vp"
            ohos:background_element="$graphic:button"
            ohos:text="2"
            ohos:text_color="white"
            ohos:text_size="30vp"
            ohos:margin="5vp"/>
        <Button
            ohos:height="80vp"
            ohos:width="80vp"
            ohos:background_element="$graphic:button"
            ohos:text="3"
            ohos:text_color="white"
            ohos:text_size="30vp"
            ohos:margin="5vp"/>

        <Button
            ohos:height="80vp"
            ohos:width="80vp"
            ohos:background_element="$graphic:button"
            ohos:text="+"
            ohos:text_color="white"
            ohos:text_size="55vp"
            ohos:margin="5vp"/>
        <Button
            ohos:height="80vp"
            ohos:width="80vp"
            ohos:background_element="$graphic:button"
            ohos:text="Exit"
            ohos:text_color="white"
            ohos:text_size="30vp"
            ohos:margin="5vp"/>
        <Button
            ohos:height="80vp"
            ohos:width="80vp"
            ohos:background_element="$graphic:button"
            ohos:text="0"
            ohos:text_color="white"
            ohos:text_size="30vp"
            ohos:margin="5vp"/>
        <Button
            ohos:height="80vp"
            ohos:width="80vp"
            ohos:background_element="$graphic:button"
            ohos:text="."
            ohos:text_color="white"
            ohos:text_size="30vp"
            ohos:margin="5vp"/>
        <Button
            ohos:height="80vp"
            ohos:width="80vp"
            ohos:background_element="$graphic:buttonspecial"
            ohos:text="="
            ohos:text_color="white"
            ohos:text_size="55vp"
            ohos:margin="5vp"/>
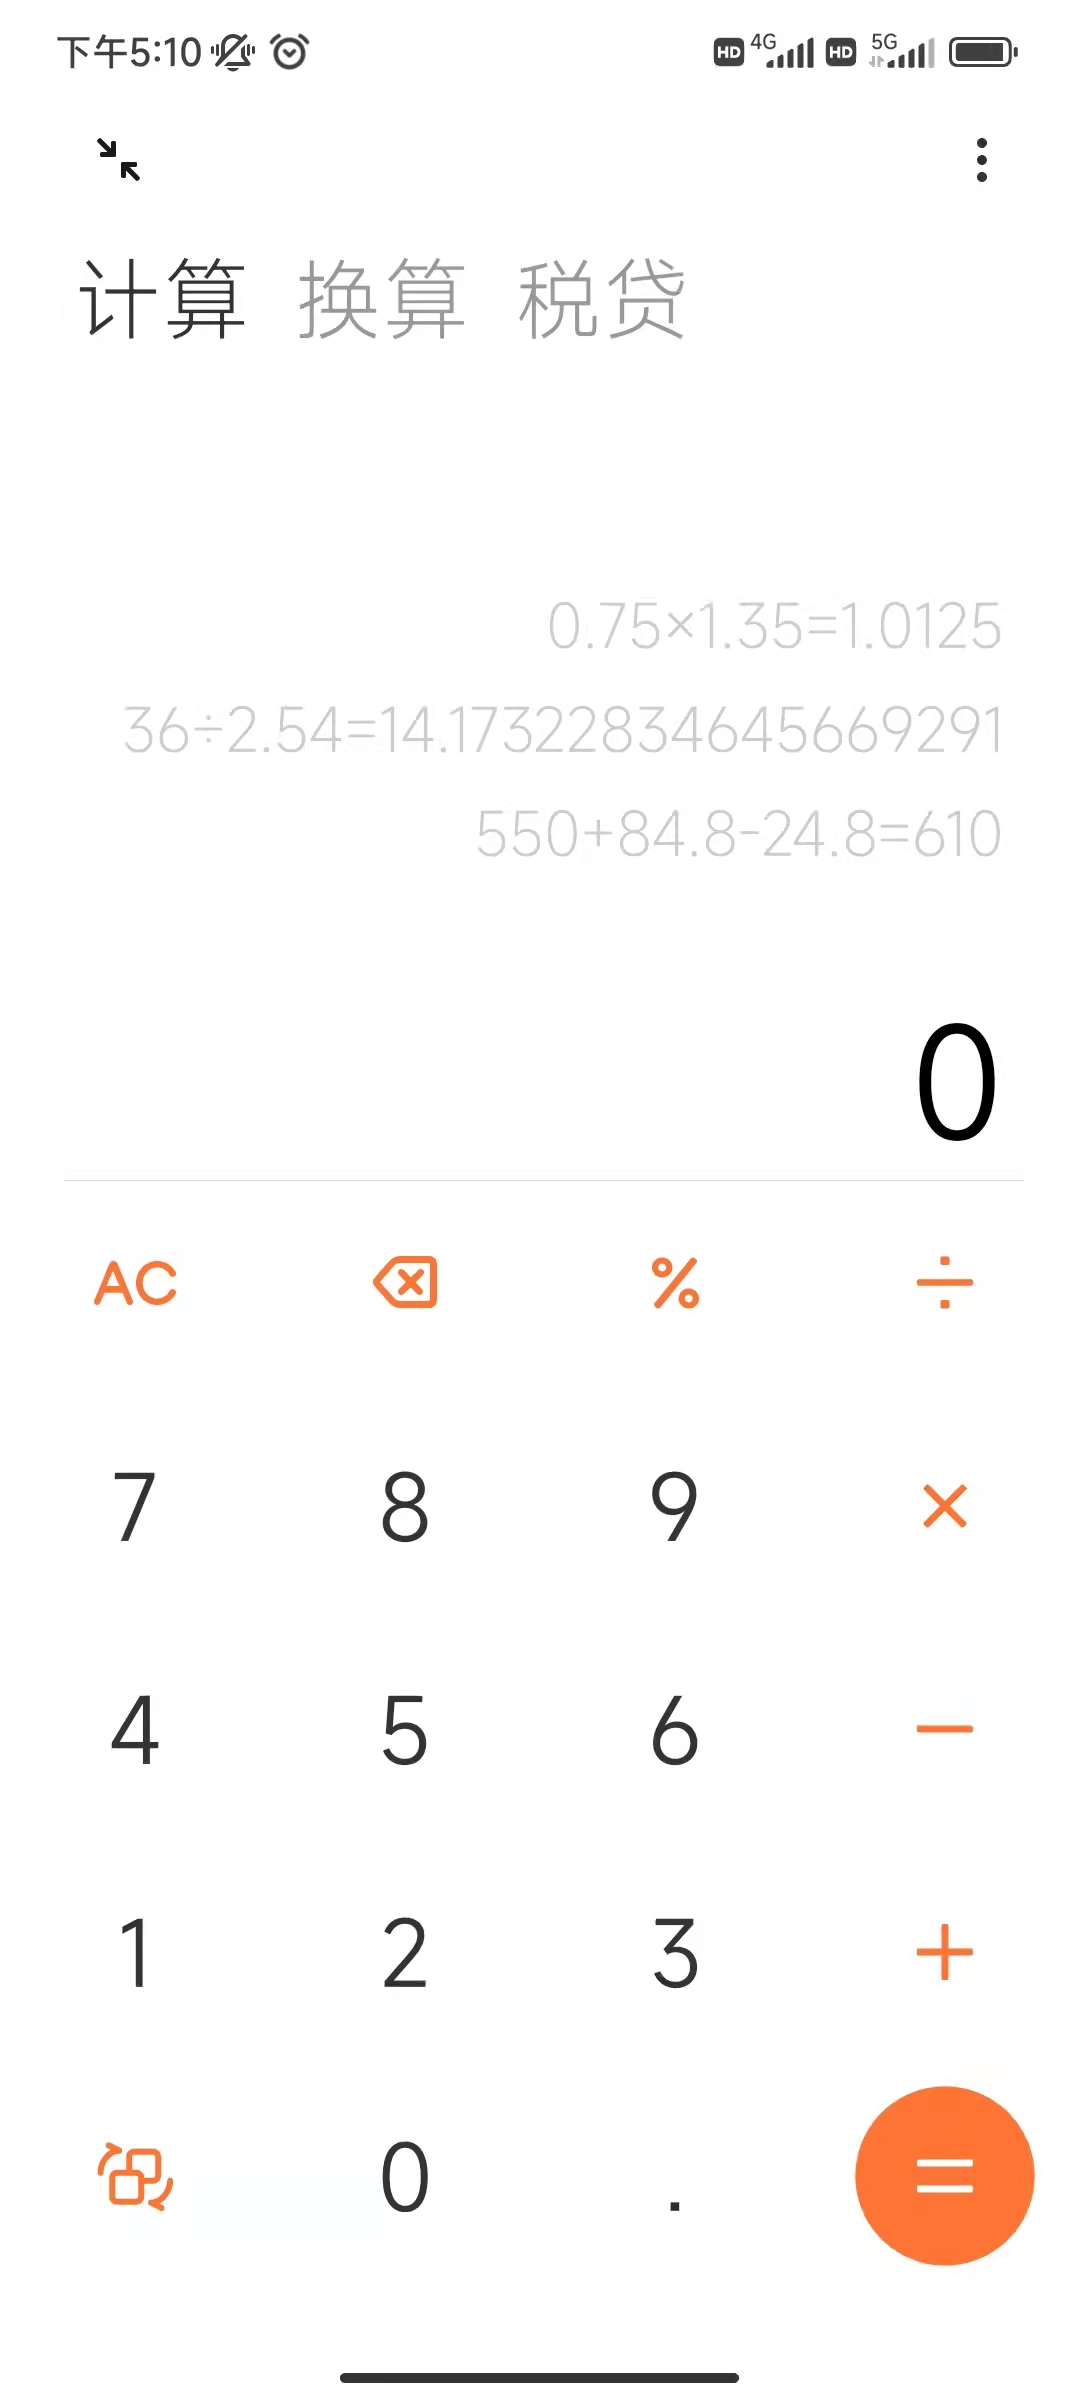
最后,打开Previewer查看效果。一个计算器的UI界面就诞生了。

本期的知识分享在这就告一段落了。


 分享到微信
分享到微信  分享到微博
分享到微博Recommend
About Joyk
Aggregate valuable and interesting links.
Joyk means Joy of geeK