

使用托管服务网格实现应用在多集群中的 GitOps 全自动化渐进式发布
source link: https://www.servicemesher.com/blog/202003-gitops-progressive-delivery-with-asm/
Go to the source link to view the article. You can view the picture content, updated content and better typesetting reading experience. If the link is broken, please click the button below to view the snapshot at that time.

使用托管服务网格实现应用在多集群中的 GitOps 全自动化渐进式发布 · Service Mesh|服务网格中文社区
本文是基于阿里云托管服务网格 ASM 完成应用在多集群环境中全自动化渐进式发布的 GitOps 实践。
阿里云服务网格(Alibaba Cloud Service Mesh,简称 ASM)提供了一个全托管式的服务网格平台,兼容于社区 Istio 开源服务网格,用于简化服务的治理,包括服务调用之间的流量路由与拆分管理、服务间通信的认证安全以及网格可观测性能力,从而极大地减轻开发与运维的工作负担。ASM的架构示意图如下:
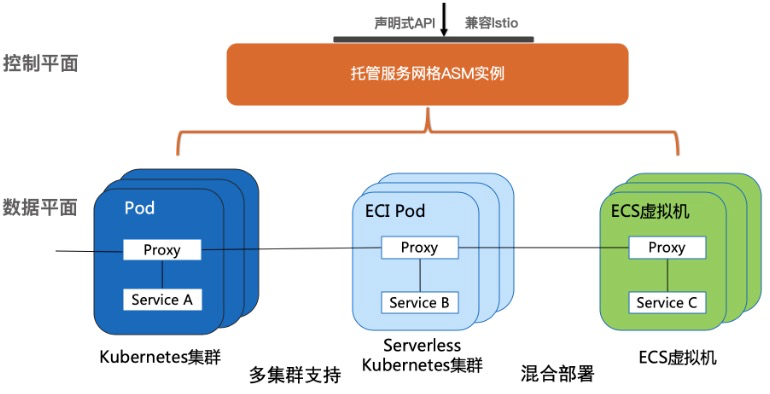
ASM 定位于混合云、多云、多集群、非容器应用迁移等核心场景中,构建托管式统一的服务网格能力,能够为阿里云用户提供以下功能: * 一致的管理方式 以一致的方式来管理运行于 ACK 托管 Kubernetes 集群、专有 Kubernetes 集群、ServerlessKubernetes 集群、混合云或多云场景下的接入集群上的应用服务,从而提供一致的可观测性和流量控制 * 统一的流量管理 支持容器或者虚拟机混合环境下统一的流量管理 * 控制平面核心组件托管化 托管控制平面的核心组件,最大限度地降低用户资源开销和运维成本
ArgoCD
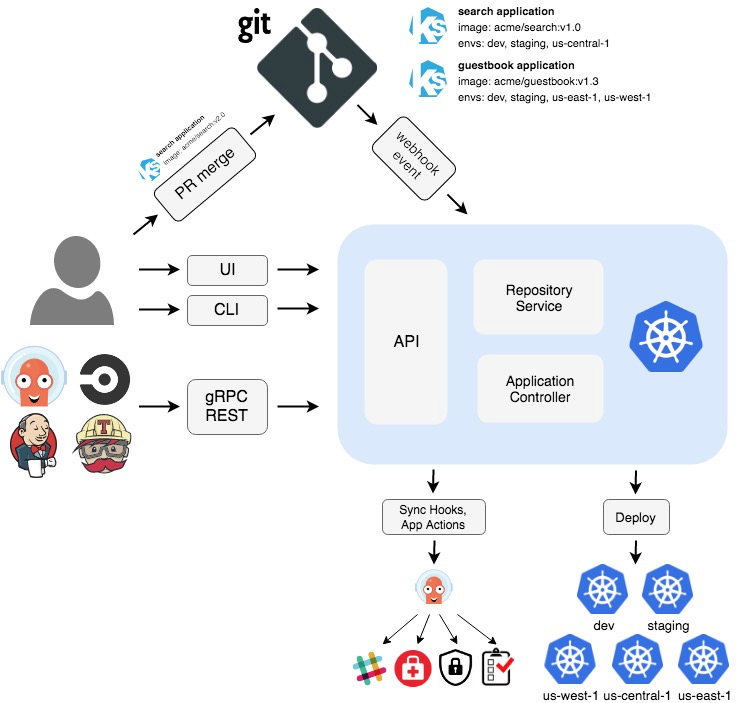
ArgoCD 是一个用于持续交付的Kubernetes配置管理工具。Argo CD 遵循 GitOps 模式,监听当前运行中应用的状态并与 Git Repository 中声明的状态进行比对,并自动将更新部署到环境中。 ArgoCD 的架构示意图如下:
Flagger
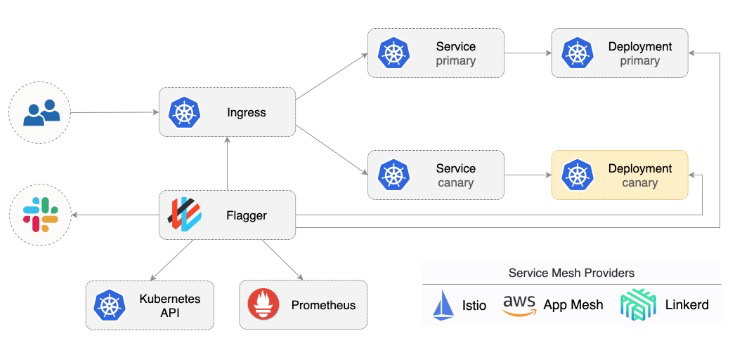
Flagger 是一个用于全自动化渐进式完成应用发布的 Kubernetes Operator,它通过分析 Prometheus 收集到的监控指标并通过 Istio 或 App Mesh 等流量管理技术或工具完成应用的渐进式发布。架构示意图如下:
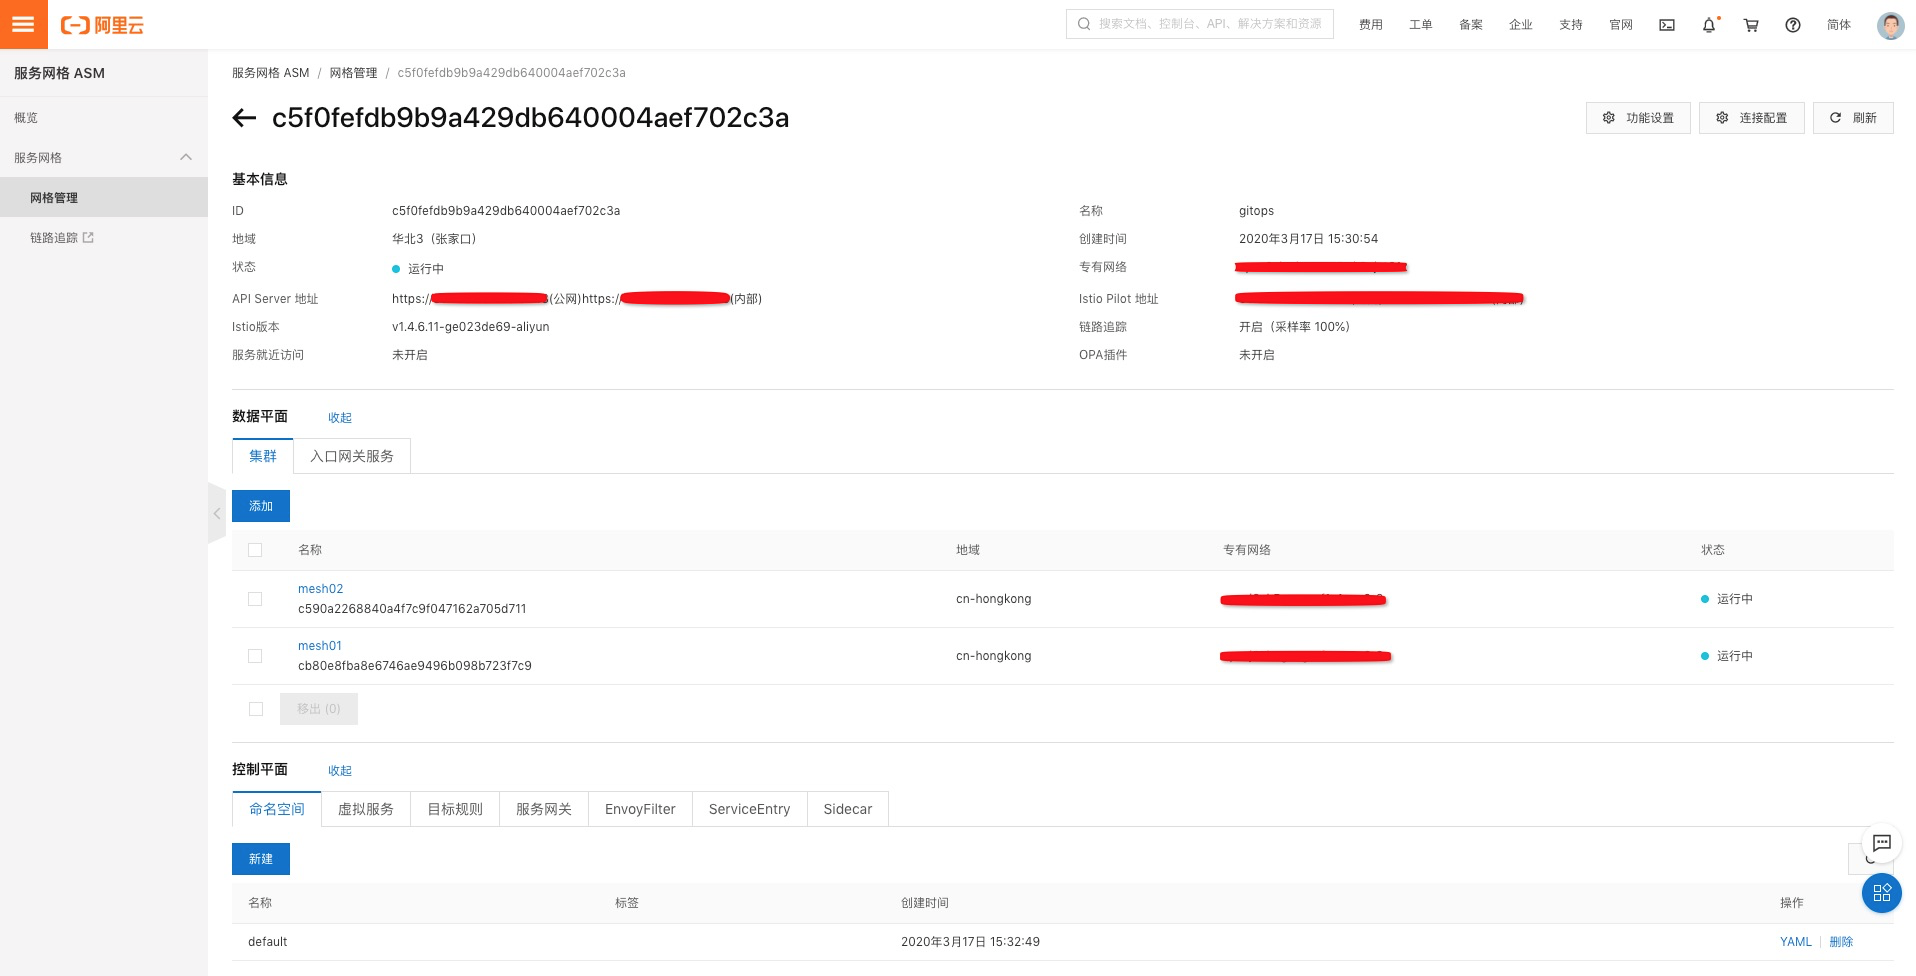
创建 ASM 实例
参考 ASM 帮助文档创建 ASM 实例并添加 mesh01 和 mesh02 2个 ACK 集群:
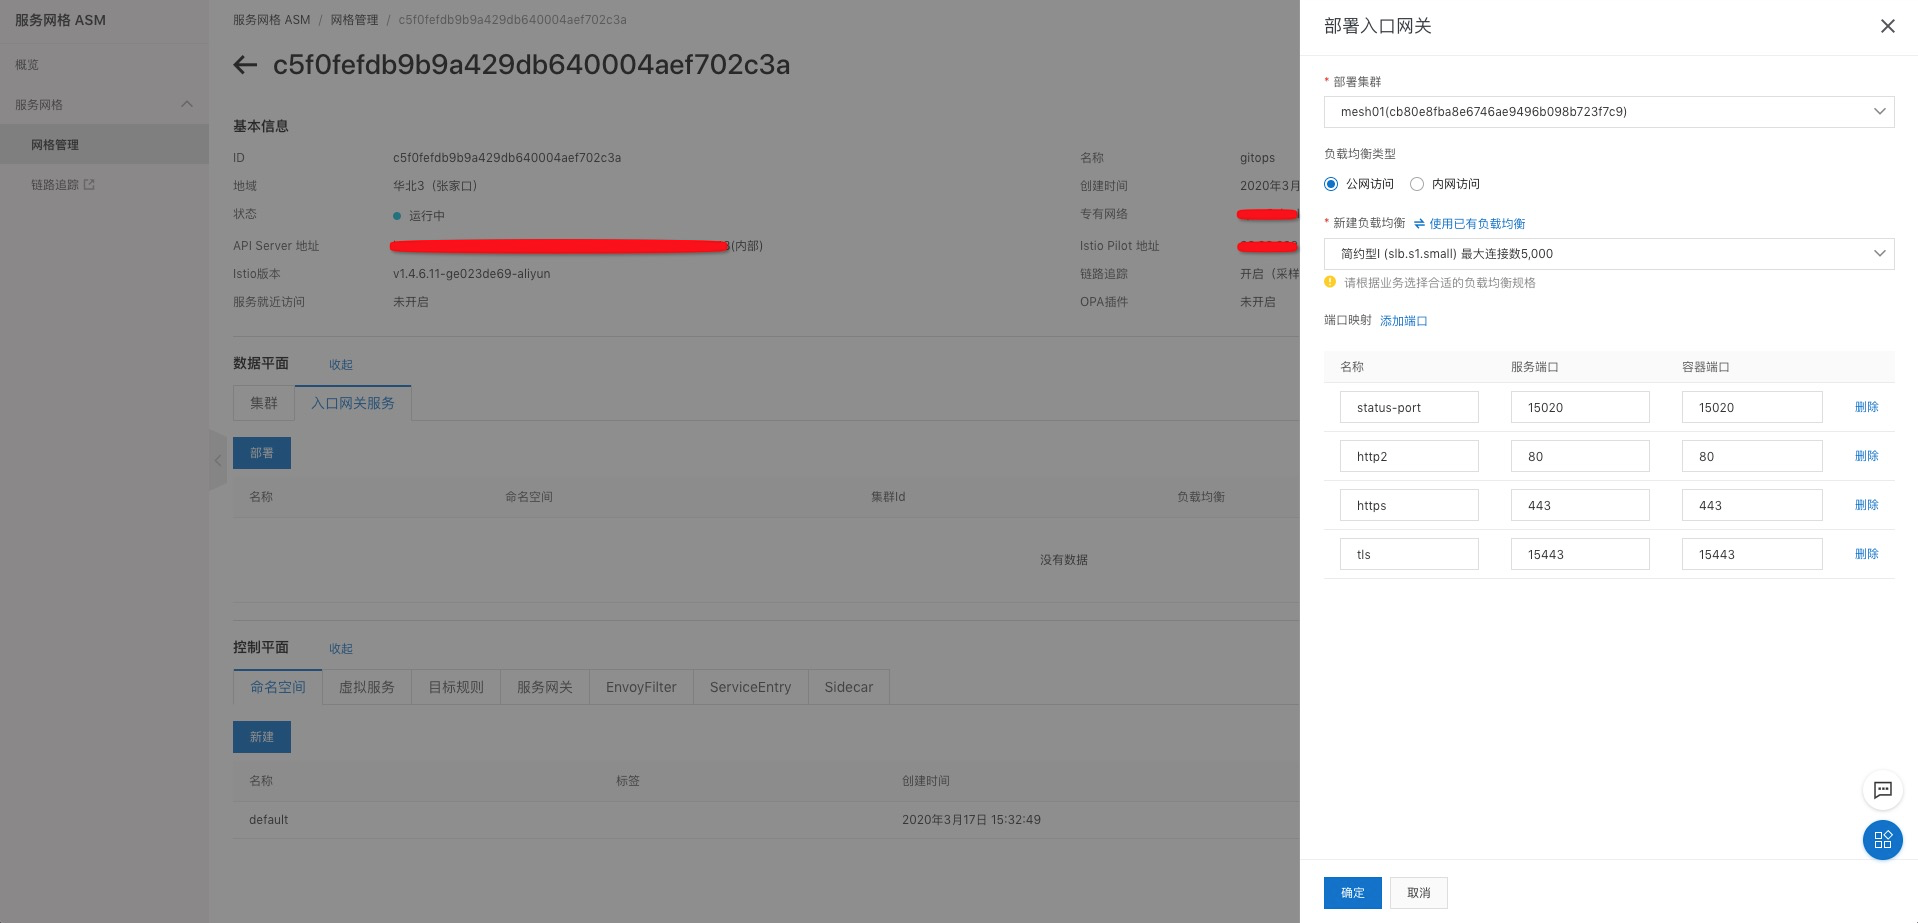
部署入口网关服务到 mesh01 集群:

在控制平面创建一个命名空间 test :

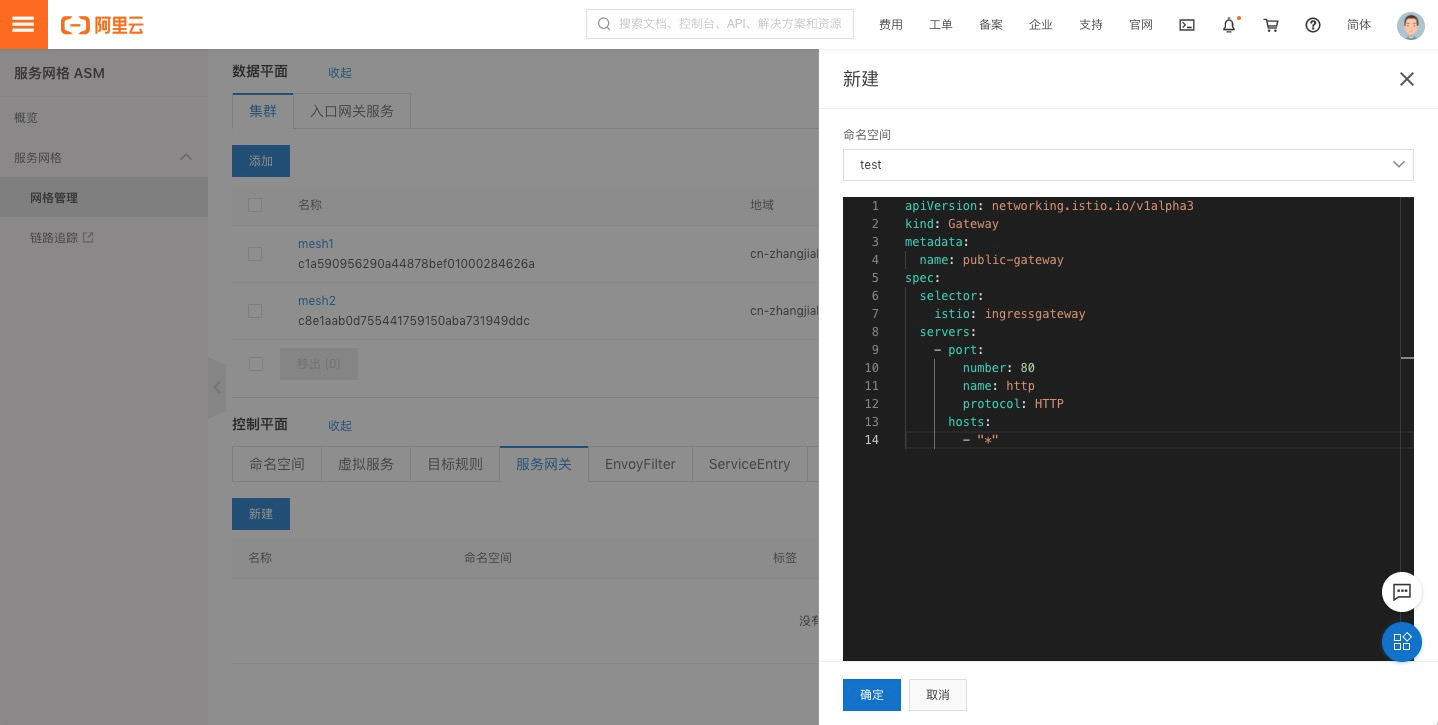
在控制平面创建一个 Gateway :
apiVersion: networking.istio.io/v1alpha3
kind: Gateway
metadata:
  name: public-gateway
  namespace: istio-system
spec:
  selector:
    istio: ingressgateway
  servers:
    - port:
        number: 80
        name: http
        protocol: HTTP
      hosts:
        - "*"

部署 Flagger
分别在 mesh1 和 mesh2 2个ACK集群上按照以下步骤部署 Flagger 及其它相关组件:
部署 Prometheus
$ kubectl apply -k github.com/haoshuwei/argocd-samples/flagger/prometheus/
部署Flagger
使用 ASM 实例的 kubeconfig 创建 secret:
$ kubectl -n istio-system create secret generic istio-kubeconfig --from-file kubeconfig
$ kubectl -n istio-system label secret istio-kubeconfig  istio/multiCluster=true
helm 安装 Flagger:
$ helm repo add flagger https://flagger.app
$ helm repo update
$ kubectl apply -f https://raw.githubusercontent.com/weaveworks/flagger/master/artifacts/flagger/crd.yaml
$ helm upgrade -i flagger flagger/flagger --namespace=istio-system --set crd.create=false --set meshProvider=istio --set metricsServer=http://prometheus:9090 --set istio.kubeconfig.secretName=istio-kubeconfig --set istio.kubeconfig.key=kubeconfig
部署 Grafana
$ helm upgrade -i flagger-grafana flagger/grafana --namespace=istio-system --set url=http://prometheus:9090
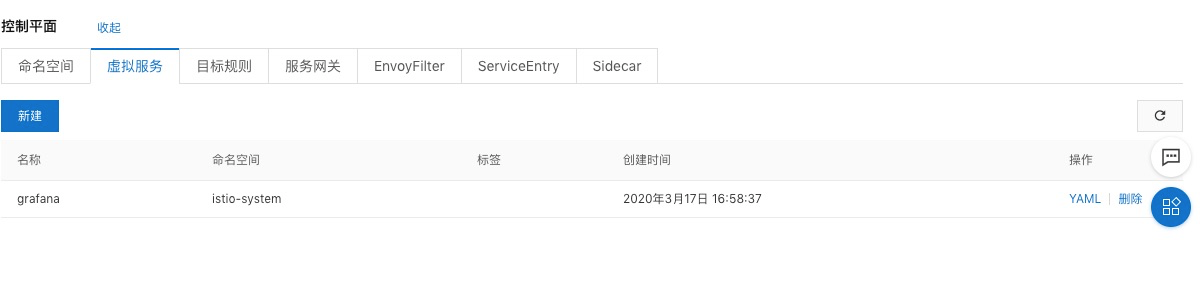
我们可以在 ASM 实例的控制面板上创建 Grafana 服务的虚拟服务来供外部访问:
apiVersion: networking.istio.io/v1alpha3
kind: VirtualService
metadata:
  name: grafana
  namespace: istio-system
spec:
  hosts:
    - "grafana.istio.example.com"
  gateways:
    - public-gateway.istio-system.svc.cluster.local
  http:
    - route:
        - destination:
            host: flagger-grafana
访问服务:
创建命名空间并添加标签
$ kubectl create ns test
$ kubectl label namespace test istio-injection=enabled
部署 ArgoCD
我们可以选择任意一个 ACK 集群部署 ArgoCD 部署 ArgoCD Server:
$ kubectl create namespace argocd
$ kubectl apply -n argocd -f https://raw.githubusercontent.com/argoproj/argo-cd/stable/manifests/install.yaml
部署 ArgoCD CLI:
$ VERSION=$(curl --silent "https://api.github.com/repos/argoproj/argo-cd/releases/latest" | grep '"tag_name"' | sed -E 's/.*"([^"]+)".*/\1/')
$ curl -sSL -o /usr/local/bin/argocd https://github.com/argoproj/argo-cd/releases/download/$VERSION/argocd-linux-amd64
$ chmod +x /usr/local/bin/argocd
获取和修改登录密码:
$ kubectl get pods -n argocd -l app.kubernetes.io/name=argocd-server -o name | cut -d'/' -f 2
$ argocd login ip:port
$ argocd account update-password
访问服务:

GitOps 流程完成应用全自动化渐进式发布
ArgoCD 添加集群并部署应用
在这个示例中,我们将会把示例应用 podinfo 部署到 mesh02 集群,把 loadtester 测试应用部署到 mesh01 集群,统一部署在 test 命名空间下。
添加 Git Repository https://github.com/haoshuwei/gitops-demo.git到 ArgoCD:
$ argocd repo add https://github.com/haoshuwei/argocd-samples.git--name argocd-samples
repository 'https://github.com/haoshuwei/argocd-samples.git' added
$ argocd repo list
TYPE  NAME         REPO                                          INSECURE  LFS    CREDS  STATUS      MESSAGE
git   argocd-samples  https://github.com/haoshuwei/argocd-samples.git  false     false  false  Successful
使用 kubeconfig添加 mesh01 和 mesh02 2个集群到 ArgoCD:
$ argocd cluster add mesh01 --kubeconfig=mesh01
INFO[0000] ServiceAccount "argocd-manager" created in namespace "kube-system"
INFO[0000] ClusterRole "argocd-manager-role" created
INFO[0000] ClusterRoleBinding "argocd-manager-role-binding" created
$ argocd cluster add mesh02 --kubeconfig=mesh02
INFO[0000] ServiceAccount "argocd-manager" created in namespace "kube-system"
INFO[0000] ClusterRole "argocd-manager-role" created
INFO[0000] ClusterRoleBinding "argocd-manager-role-binding" created
$ argocd cluster list |grep mesh
https://xx.xx.xxx.xx:6443       mesh02   1.16+    Successful
https://xx.xxx.xxx.xx:6443      mesh01   1.16+    Successful
部署应用 podinfo 到 mesh02 集群:
$ argocd app create --project default --name podinfo --repo https://github.com/haoshuwei/argocd-samples.git --path flagger/podinfo --dest-server https://xx.xx.xxx.xx:6443 --dest-namespace test --revision latest --sync-policy automated
以上命令行做的事情是创建一个应用 podinfo,这个应用的 Git Repository 源是 https://github.com/haoshuwei/gitops-demo.git 项目 flagger/podinfo 子目录下的文件,分支为 latest,应用部署到 https://xx.xx.xxx.xx:6443 集群的 test 命名空间下,应用的同步策略是 automated。
flagger/podinfo 子目录下包括4个编排文件 deployment.yaml hpa.yaml kustomization.yaml 和 canary.yaml,其中 canary.yaml 文件就是我们这个示例中完成应用全自动化渐进式金丝雀发布的核心编排文件,内容如下:
apiVersion: flagger.app/v1beta1
kind: Canary
metadata:
  name: podinfo
  namespace: test
spec:
  targetRef:
    apiVersion: apps/v1
    kind: Deployment
    name: podinfo
  progressDeadlineSeconds: 60
  autoscalerRef:
    apiVersion: autoscaling/v2beta1
    kind: HorizontalPodAutoscaler
    name: podinfo
  service:
    port: 9898
    gateways:
    - public-gateway.istio-system.svc.cluster.local
    hosts:
    - app.istio.example.com
    trafficPolicy:
      tls:
        # use ISTIO_MUTUAL when mTLS is enabled
        mode: DISABLE
  analysis:
    interval: 30s
    threshold: 10
    maxWeight: 50
    stepWeight: 5
    metrics:
    - name: request-success-rate
      threshold: 99
      interval: 30s
    - name: request-duration
      threshold: 500
      interval: 30s
    webhooks:
      - name: load-test
        url: http://loadtester.test/
        timeout: 5s
        metadata:
          cmd: "hey -z 1m -q 10 -c 2 http://podinfo-canary.test:9898/"
canary.yaml 文件中定义了以下几个关键部分
spec:
  targetRef:
    apiVersion: apps/v1
    kind: Deployment
    name: podinfo
  progressDeadlineSeconds: 60
  autoscalerRef:
    apiVersion: autoscaling/v2beta1
    kind: HorizontalPodAutoscaler
    name: podinfo
以上字段表示这个 canary 资源会监听和引用名为 podinfo 的 Deployments 资源和 HorizontalPodAutoscaler 资源。
service:
    port: 9898
    gateways:
    - public-gateway.istio-system.svc.cluster.local
    hosts:
    - app.istio.example.com
    trafficPolicy:
      tls:
        # use ISTIO_MUTUAL when mTLS is enabled
        mode: DISABLE
以上字段表示 canary 资源会在 ASM 控制面板自动为 podinfo 应用创建虚拟服务,名字也是 podinfo。
analysis:
    interval: 30s
    threshold: 5
    maxWeight: 50
    stepWeight: 5
    metrics:
    - name: request-success-rate
      threshold: 99
      interval: 30s
    - name: request-duration
      threshold: 500
      interval: 30s
    webhooks:
      - name: load-test
        url: http://loadtester.test/
        timeout: 5s
        metadata:
          cmd: "hey -z 1m -q 10 -c 2 http://podinfo-canary.test:9898/"
以上字段表示我们在发布新版本 podinfo 应用时,要先对新版本应用做一些测试和分析,
interval: 30s, 每隔30s测试一次
threshold: 5, 失败次数超过5次则认为失败
maxWeight: 50, 流量权重最大可以切换到50
stepWeight: 5, 每次增加权重为5
metrics中定义了2种指标,
request-success-rate 请求成功率不能小于99
request-duration RT均值不能大于500ms
用来生成测试任务的则定义在 webhooks 字段。
部署测试应用 loadtester 到 mesh01 集群:
$ argocd app create --project default --name loadtester --repo https://github.com/haoshuwei/argocd-samples.git --path flagger/charts/loadtester --dest-server https://xx.xxx.xxx.xx:6443 --dest-namespace test --revision latest --sync-policy automated
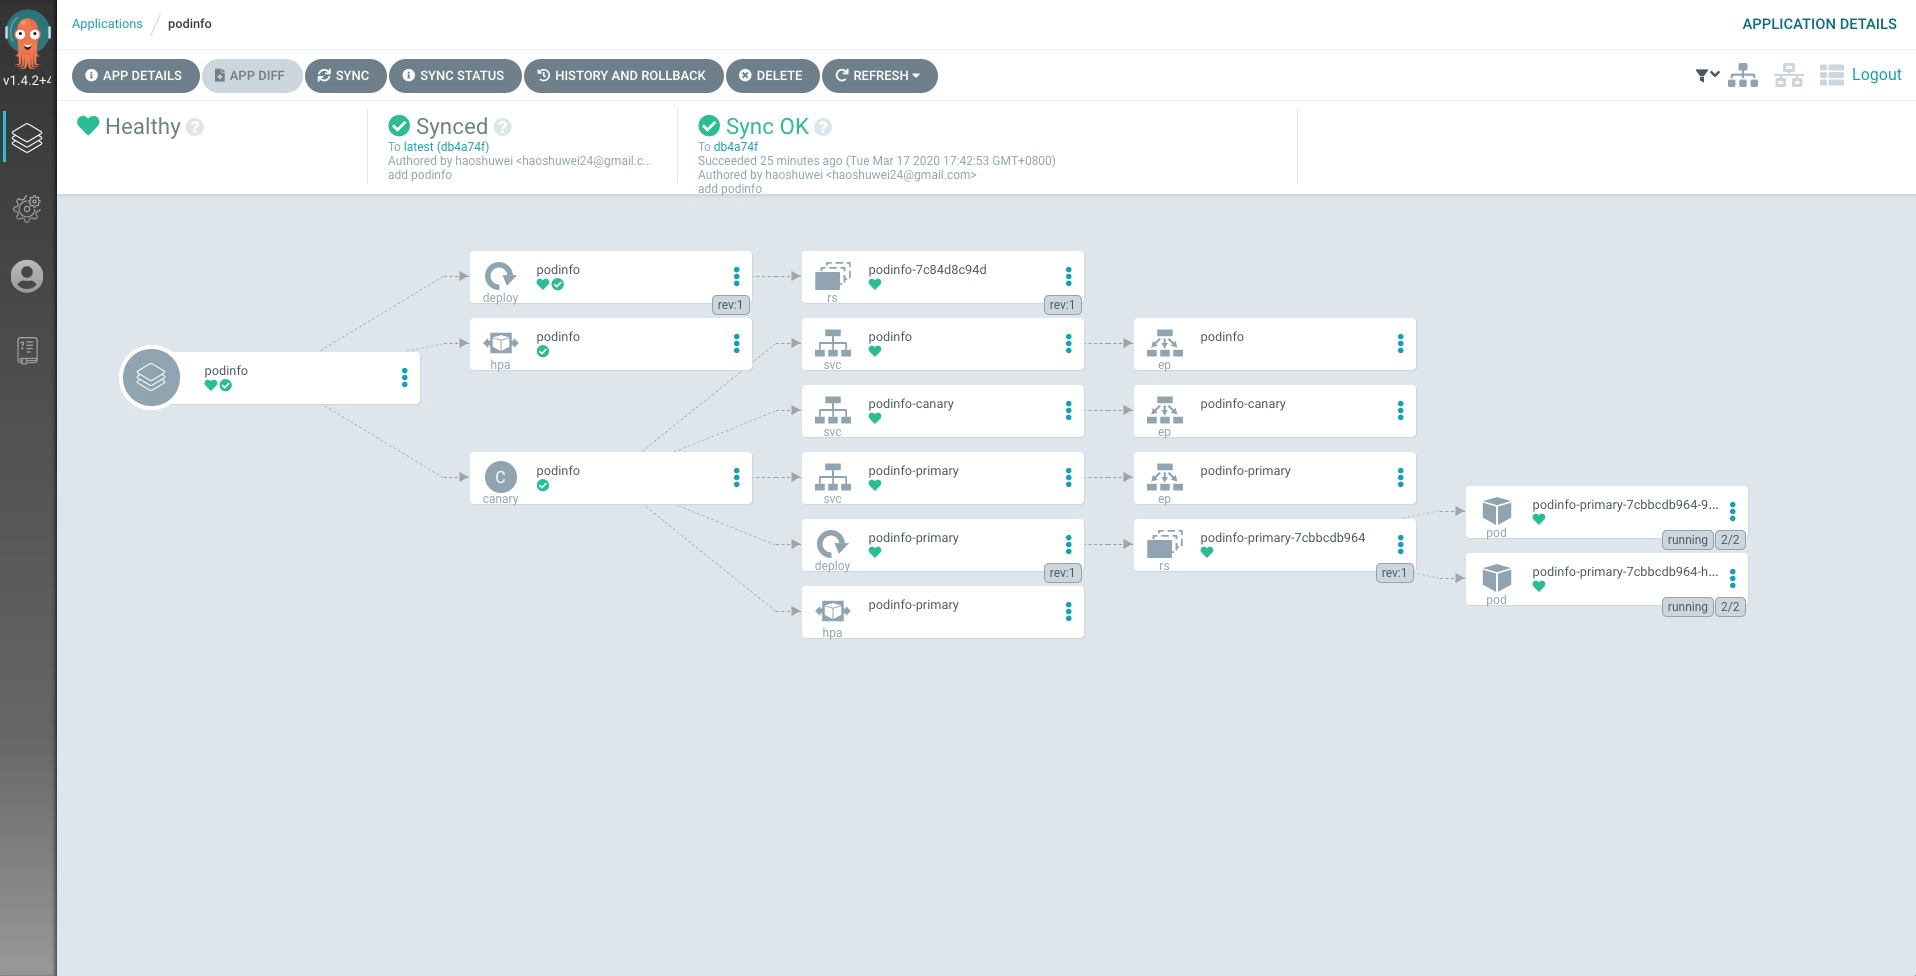
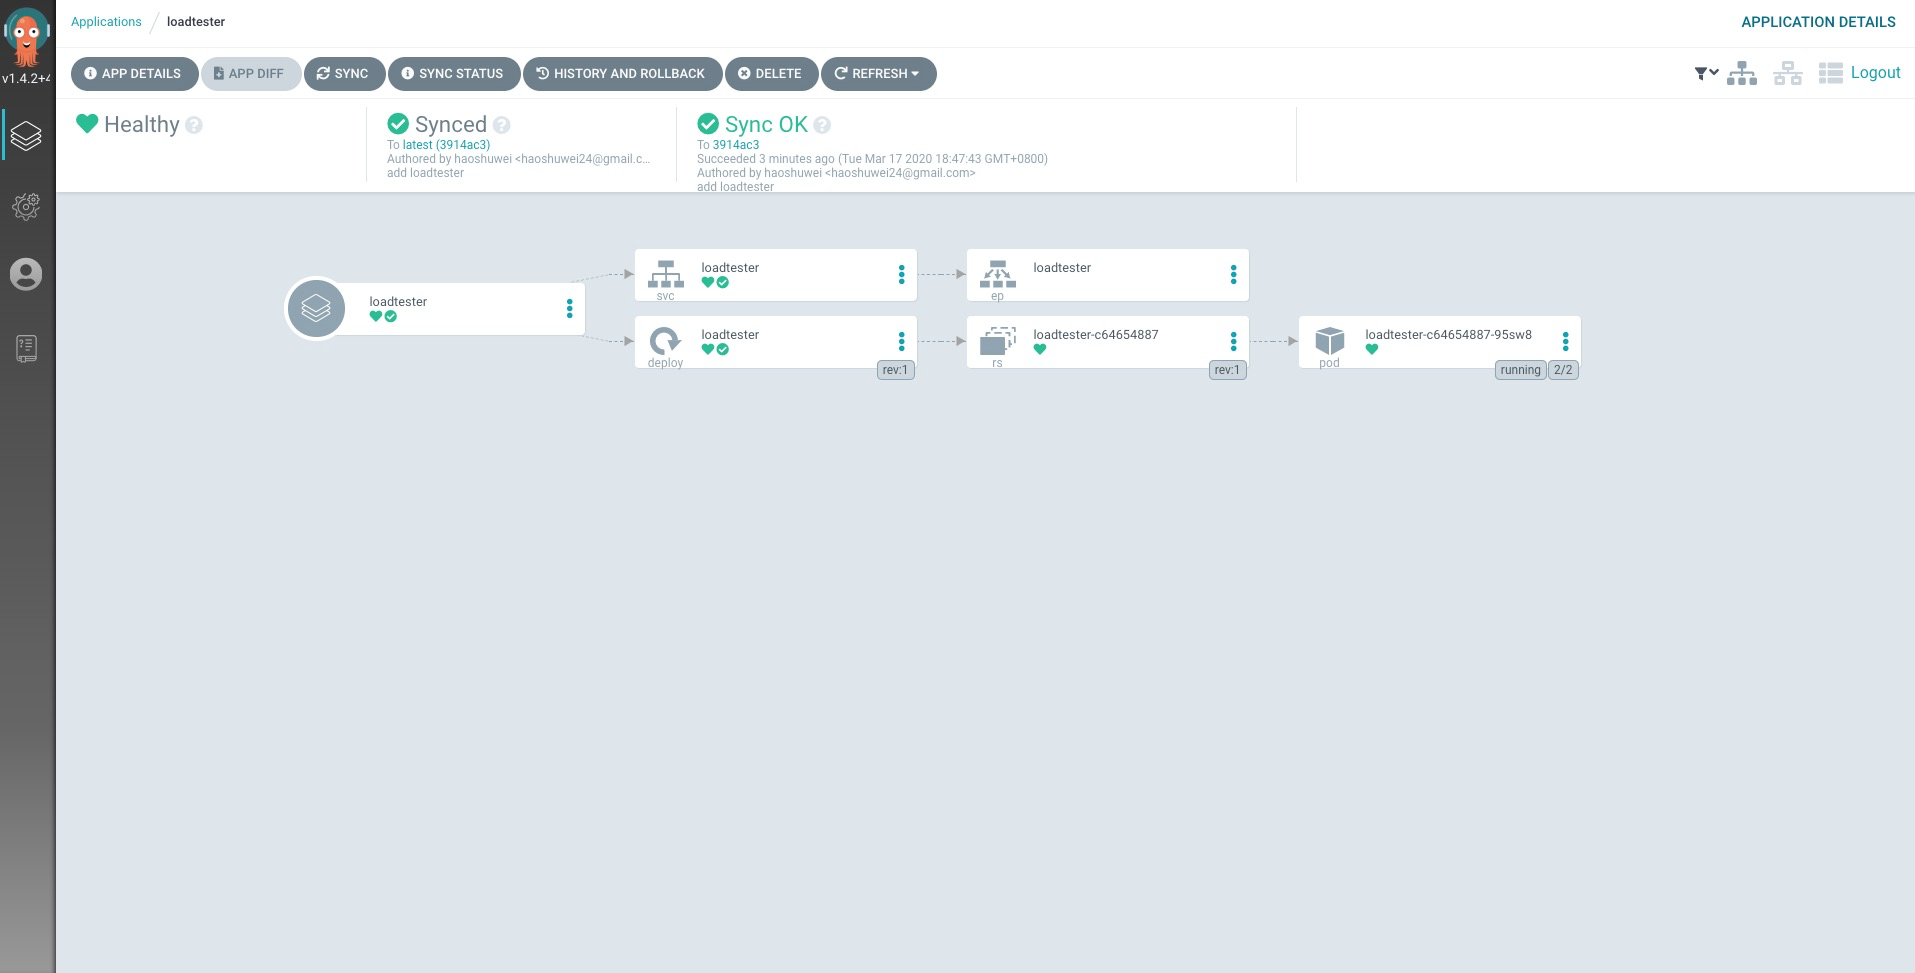
以上应用创建完成后,由于我们设置的 sync 策略为自动部署,所以应用会自动部署到 mesh01 和 mesh02 集群中,我们可以在 ArgoCD 页面上查看应用详细信息:
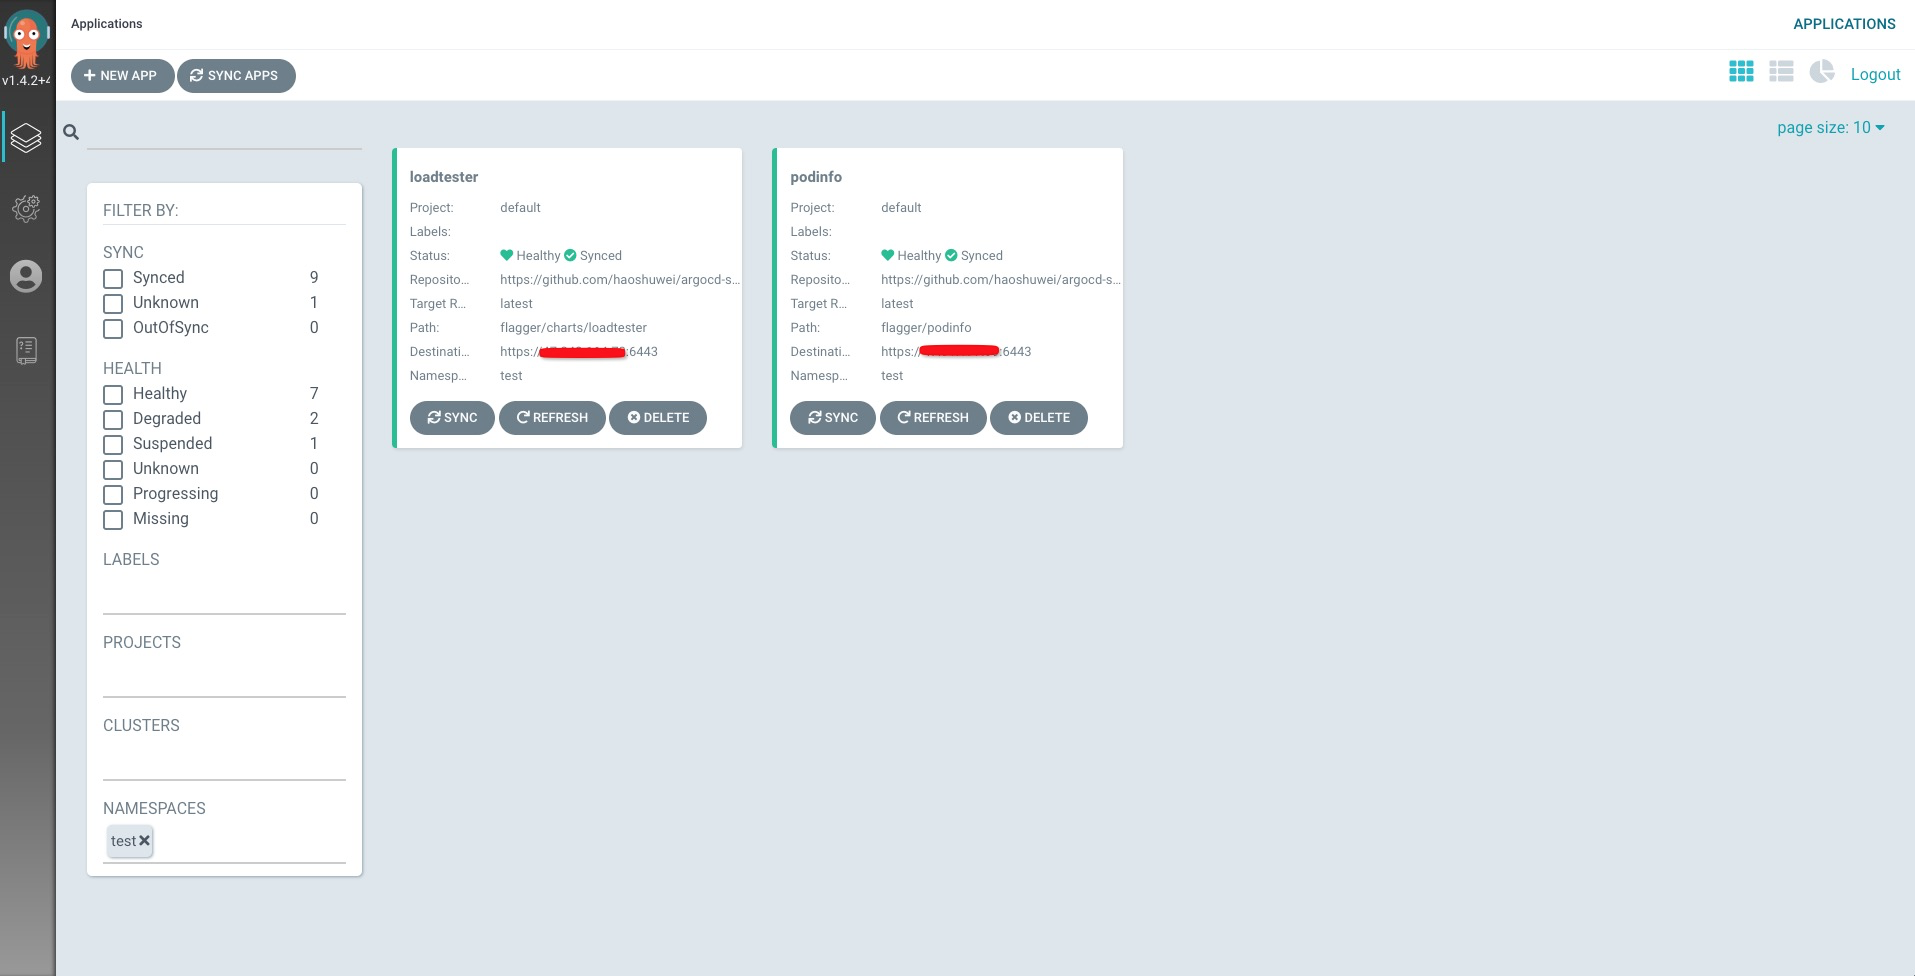
podinfo 详情:
loadtester 详情:
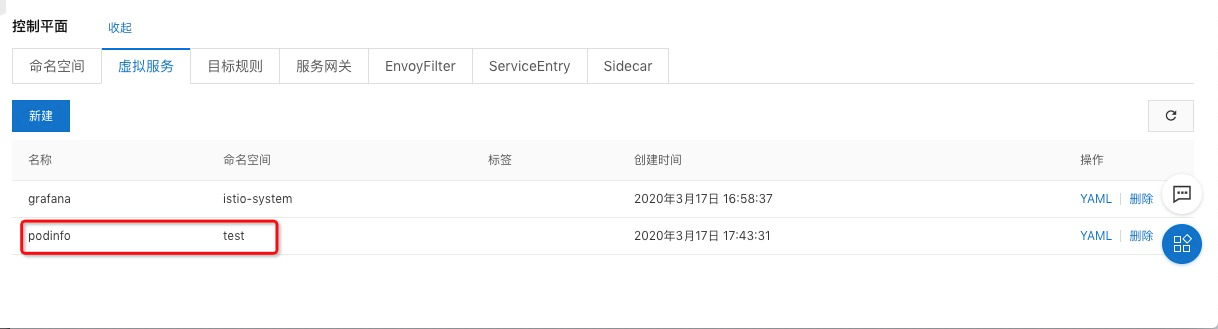
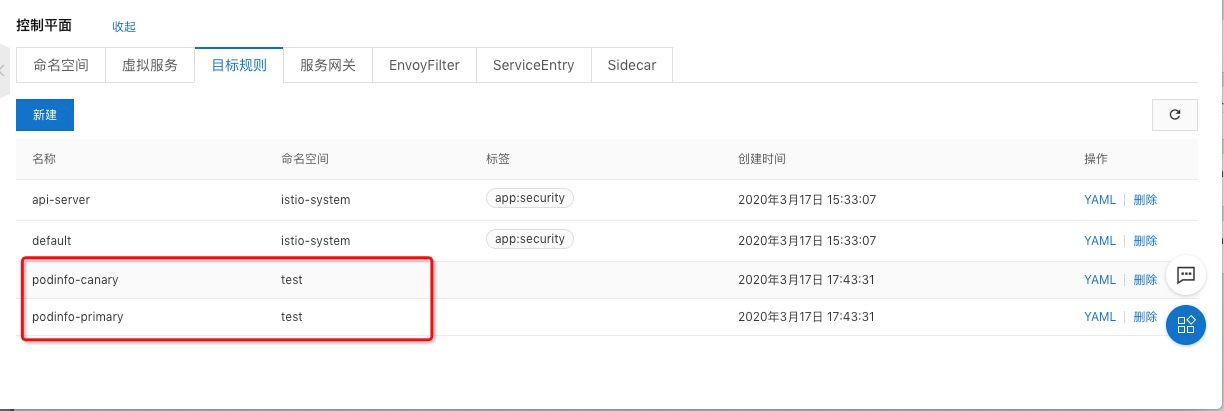
在 ASM 的控制面板我们可以查看 Flagger 动态创建的虚拟服务和目标规则:
访问服务:

GitOps 自动发布应用
新建分支修改应用容器镜像版本提交,并创建指向 latest 分支的 PullRequest:
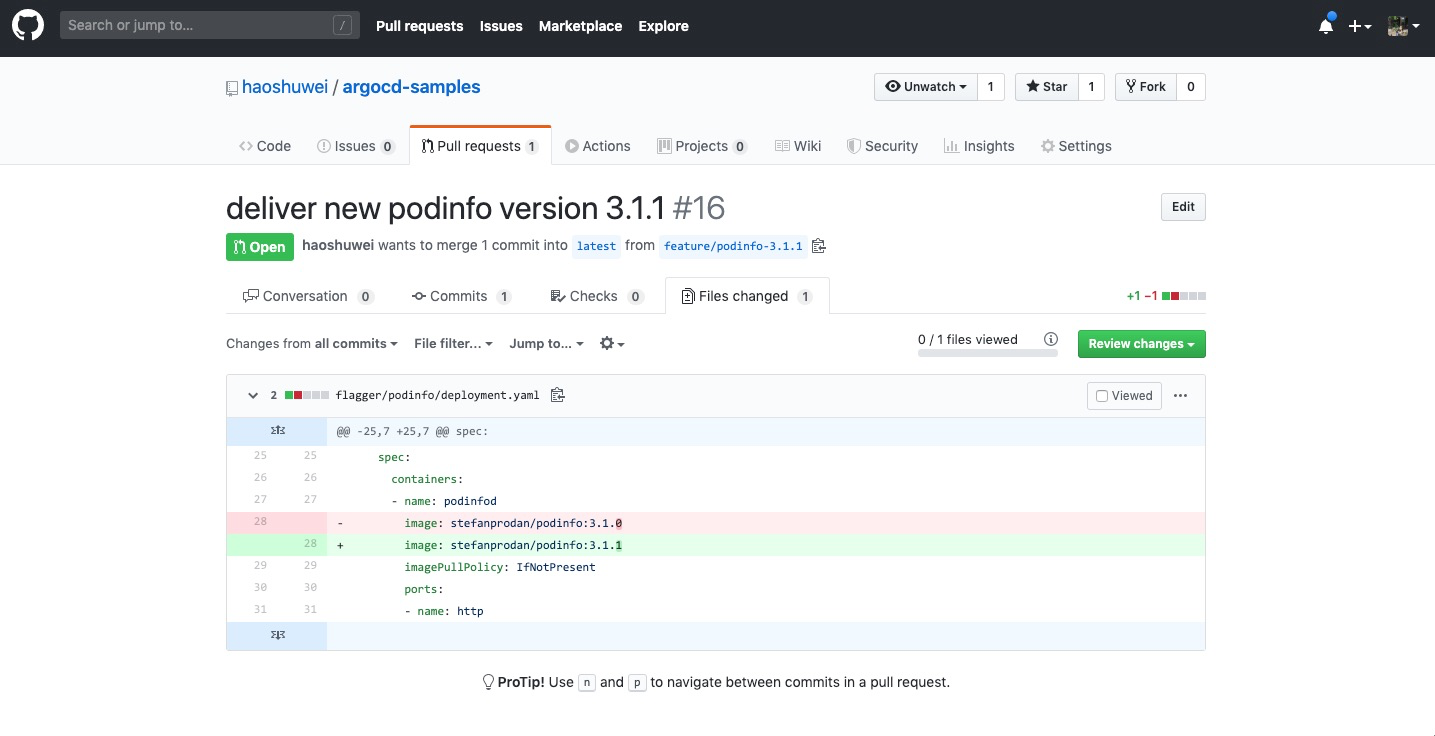
管理员审批并 merge pr 后,latest 分支有新代码进入,ArgoCD 会自动把更新同步集群环境中,flagger 检测到 podinfo 应用有新版本变更,则开始自动化渐进式地发布新版本应用,通过以下命令可以查看应用发布进度:
$ watch kubectl get canaries --all-namespaces
Every 2.0s: kubectl get canaries --all-namespaces

NAMESPACE   NAME      STATUS        WEIGHT   LASTTRANSITIONTIME
test        podinfo   Progressing   10       2020-03-17T11:04:01Z
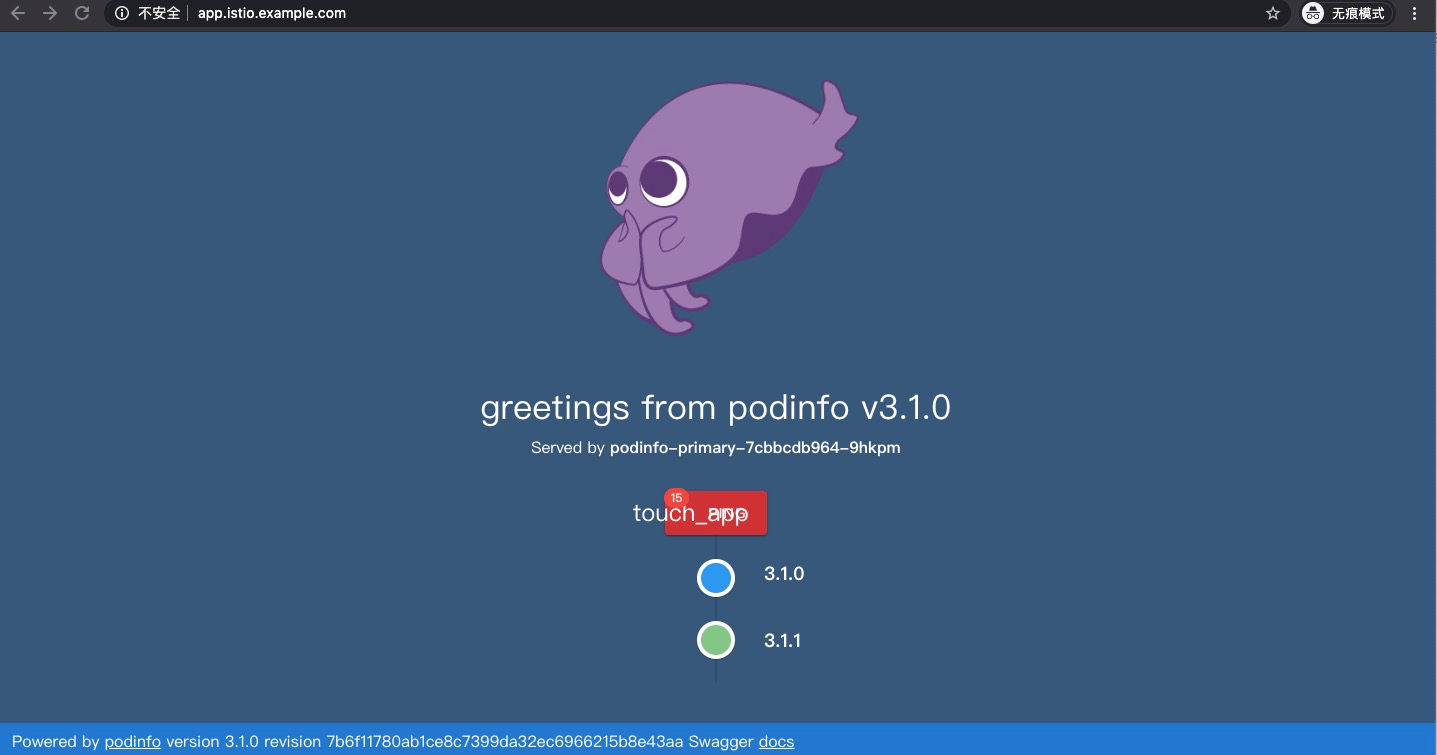
访问应用可以看到有流量切换到新版本上:
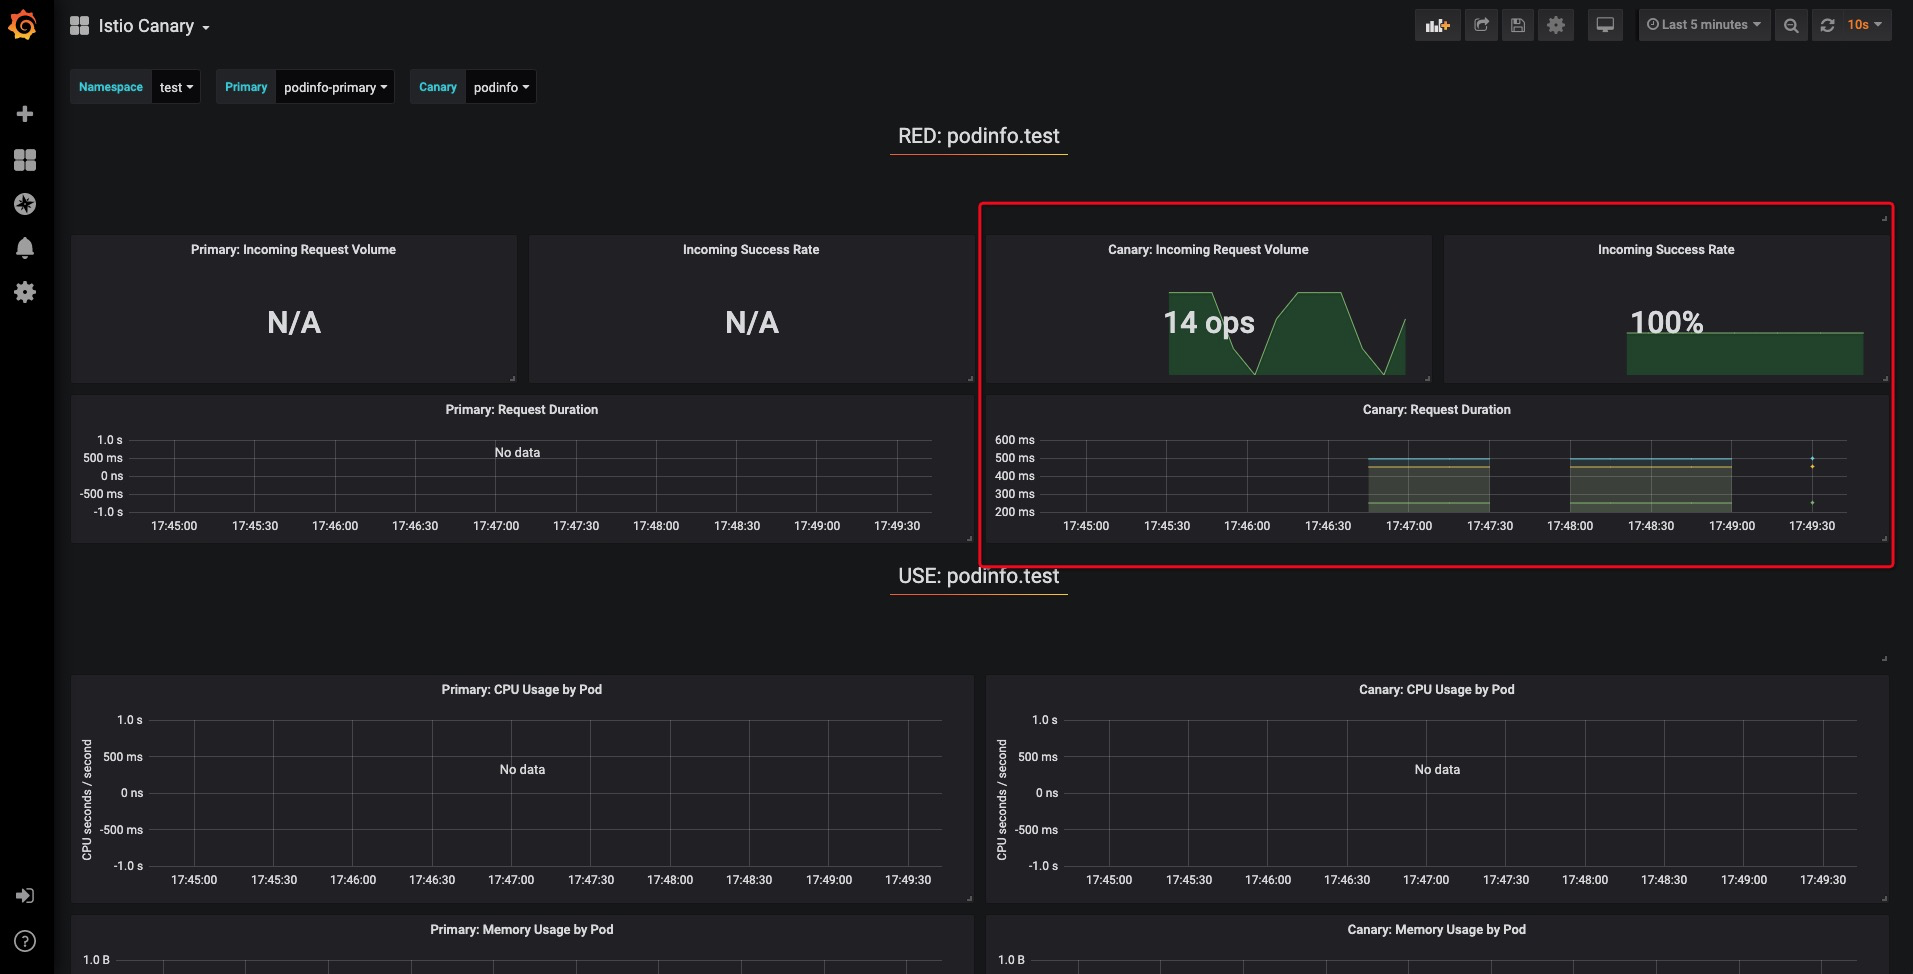
同时我们也可以在 Grafana 面板中查看到新版本测试指标情况:
整个发布过程的 messages 输出如下:
"msg":"New revision detected! Scaling up podinfo.test","canary":"podinfo.test"
"msg":"Starting canary analysis for podinfo.test","canary":"podinfo.test"
"msg":"Advance podinfo.test canary weight 5","canary":"podinfo.test"
"msg":"Advance podinfo.test canary weight 10","canary":"podinfo.test"
"msg":"Advance podinfo.test canary weight 15","canary":"podinfo.test"
"msg":"Advance podinfo.test canary weight 20","canary":"podinfo.test"
"msg":"Advance podinfo.test canary weight 25","canary":"podinfo.test"
"msg":"Advance podinfo.test canary weight 30","canary":"podinfo.test"
"msg":"Advance podinfo.test canary weight 35","canary":"podinfo.test"
"msg":"Advance podinfo.test canary weight 40","canary":"podinfo.test"
"msg":"Advance podinfo.test canary weight 45","canary":"podinfo.test"
"msg":"Advance podinfo.test canary weight 50","canary":"podinfo.test"
"msg":"Copying podinfo.test template spec to podinfo-primary.test","canary":"podinfo.test"
"msg":"Halt advancement podinfo-primary.test waiting for rollout to finish: 3 of 4 updated replicas are available","canary":"podinfo.test"
"msg":"Routing all traffic to primary","canary":"podinfo.test"
"msg":"Promotion completed! Scaling down podinfo.test","canary":"podinfo.test"
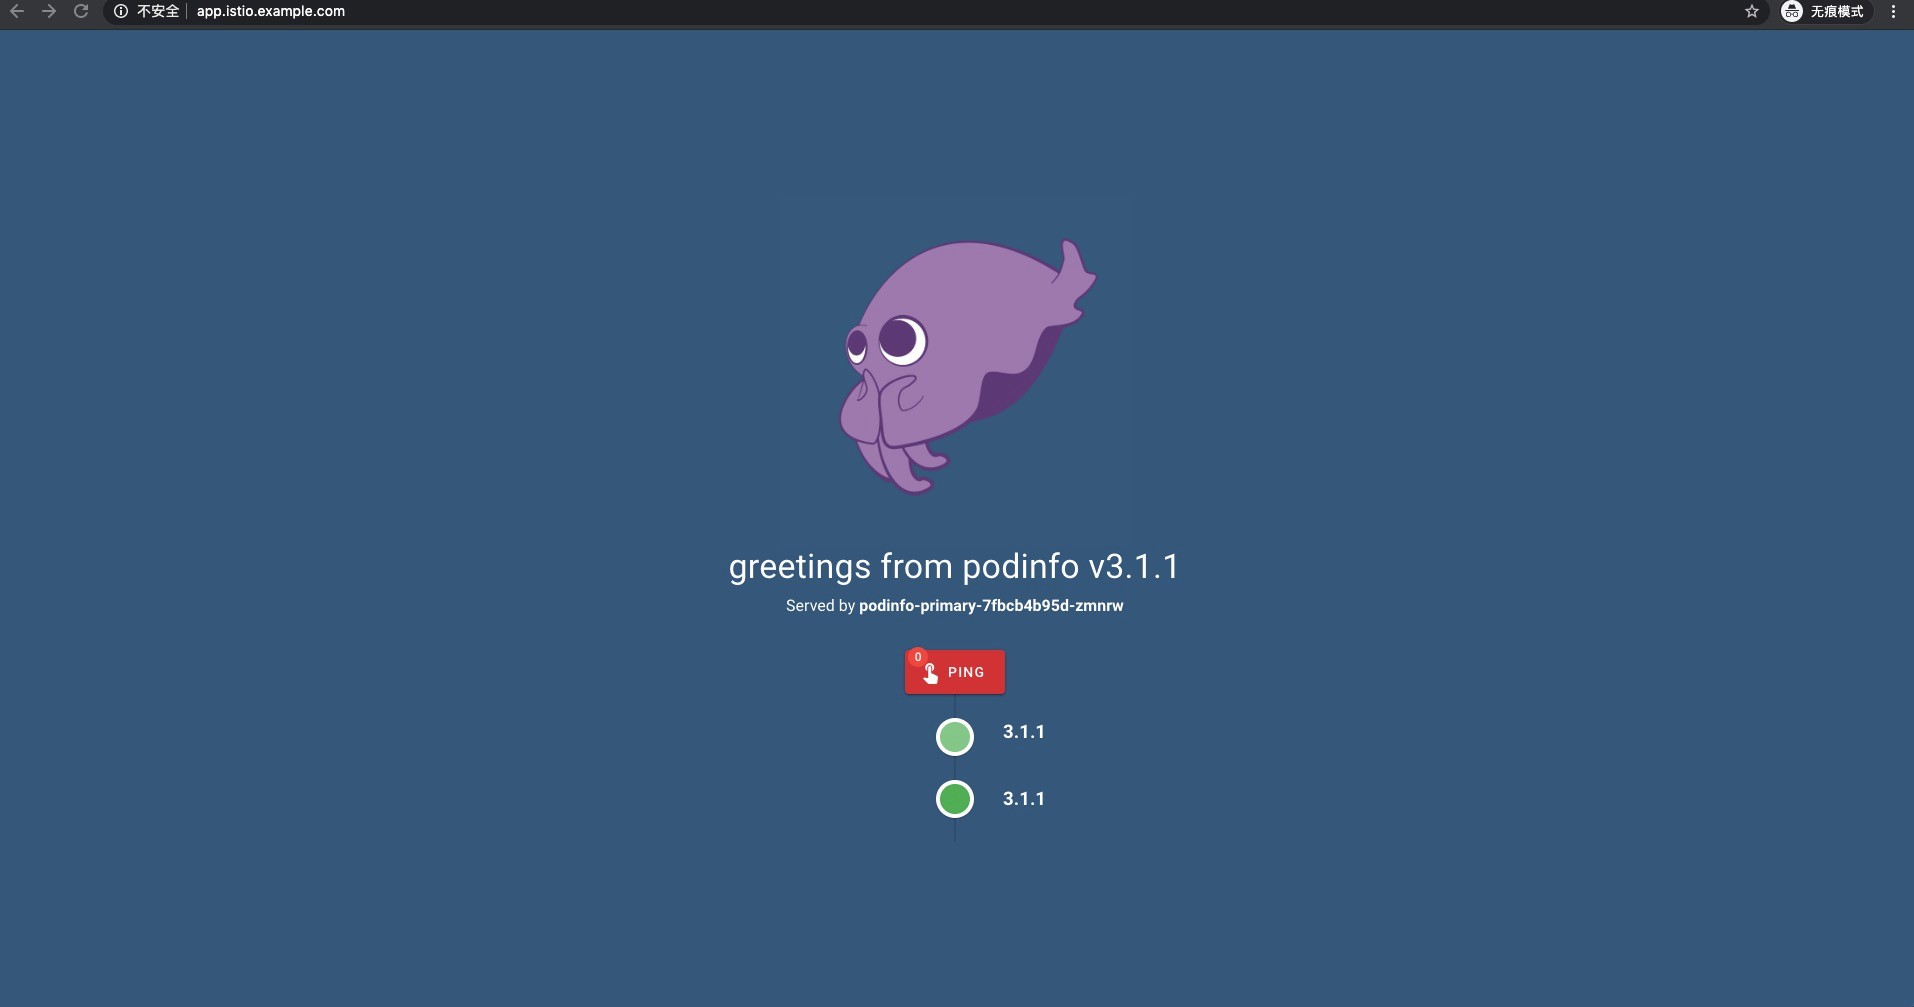
应用发布完毕后,所有流量切换到新版本上:
若新版本应用测试指标不达标,则应用自动回滚到初始稳定状态:
"msg":"New revision detected! Scaling up podinfo.test","canary":"podinfo.test"
"msg":"Starting canary analysis for podinfo.test","canary":"podinfo.test"
"msg":"Advance podinfo.test canary weight 10","canary":"podinfo.test"
"msg":"Halt advancement no values found for istio metric request-success-rate probably podinfo.test is not receiving traffic","canary":"podinfo.test"
"msg":"Halt advancement no values found for istio metric request-duration probably podinfo.test is not receiving traffic","canary":"podinfo.test"
"msg":"Halt advancement no values found for istio metric request-duration probably podinfo.test is not receiving traffic","canary":"podinfo.test"
"msg":"Halt advancement no values found for istio metric request-duration probably podinfo.test is not receiving traffic","canary":"podinfo.test"
"msg":"Halt advancement no values found for istio metric request-duration probably podinfo.test is not receiving traffic","canary":"podinfo.test"
"msg":"Synced test/podinfo"
"msg":"Rolling back podinfo.test failed checks threshold reached 5","canary":"podinfo.test"
"msg":"Canary failed! Scaling down podinfo.test","canary":"podinfo.test"
Kubernetes & Kubernetes SIGs member
阿里云容器服务团队研发工程师,热衷于 Kubernetes 与云原生相关技术。
Recommend
About Joyk
Aggregate valuable and interesting links.
Joyk means Joy of geeK