

Vue3 + Vite2 + TypeScript + Pinia(Vuex)+JSX 搭建企业级开发脚手架【开箱即用】
source link: https://segmentfault.com/a/1190000041458613
Go to the source link to view the article. You can view the picture content, updated content and better typesetting reading experience. If the link is broken, please click the button below to view the snapshot at that time.

随着
Vue3的普及,已经有越来越多的项目开始使用Vue3。为了快速进入开发状态,在这里向大家推荐一套开箱即用的企业级开发脚手架,框架使用:Vue3+Vite2+TypeScript+JSX+Pinia(Vuex)+Antd。废话不多话,直接上手开撸。
该脚手架根据使用状态库的不同分为两个版本Vuex版、Pinia版,下面是相关代码地址:
Vuex版、
Pinia版
搭建需准备
- Vscode : 前端人必备写码神器
- Chrome :对开发者非常友好的浏览器(程序员标配浏览器)
- Nodejs & npm :配置本地开发环境,安装 Node 后你会发现 npm 也会一起安装下来 (V12+)
使用npm安装依赖包时会发现非常慢,在这里推荐使用cnpm、yarn代替。
脚手架目录结构
├── src
│   ├── App.tsx
│   ├── api                     # 接口管理模块
│   ├── assets                  # 静态资源模块
│   ├── components              # 公共组件模块
│   ├── mock                    # mock接口模拟模块
│   ├── layouts                 # 公共自定义布局
│   ├── main.ts                 # 入口文件
│   ├── public                  # 公共资源模块
│   ├── router                  # 路由
│   ├── store                   # vuex状态库
│   ├── types                   # 声明文件
│   ├── utils                   # 公共方法模块
│   └── views                   # 视图模块
├── tsconfig.json
└── vite.config.js
什么是Vite
下一代前端开发与构建工具
Vite(法语意为 "快速的",发音/vit/,发音同 "veet")是一种新型前端构建工具,能够显著提升前端开发体验。它主要由两部分组成:
- 一个开发服务器,它基于 原生 ES 模块 提供了 丰富的内建功能,如速度快到惊人的 模块热更新(HMR)。
- 一套构建指令,它使用 Rollup 打包你的代码,并且它是预配置的,可输出用于生产环境的高度优化过的静态资源。
Vite 意在提供开箱即用的配置,同时它的 插件 API 和 JavaScript API 带来了高度的可扩展性,并有完整的类型支持。
你可以在 为什么选 Vite 中了解更多关于项目的设计初衷。
什么是Pinia
Pinia.js 是新一代的状态管理器,由 Vue.js团队中成员所开发的,因此也被认为是下一代的 Vuex,即 Vuex5.x,在 Vue3.0 的项目中使用也是备受推崇
Pinia.js 有如下特点:
- 相比Vuex更加完整的 typescript 的支持;
- 足够轻量,压缩后的体积只有1.6kb;
- 去除 mutations,只有 state,getters,actions(支持同步和异步);
- 使用相比Vuex更加方便,每个模块独立,更好的代码分割,没有模块嵌套,store之间可以自由使用
npm install pinia --save
创建Store
新建 src/store 目录并在其下面创建 index.ts,并导出store
import { createPinia } from 'pinia' const store = createPinia() export default store- 在main.ts中引入
import { createApp } from 'vue'
import store from './store'

const app = createApp(App)

app.use(store)
定义State
在新建src/store/modules,根据模块划分在modules下新增common.ts
import { defineStore } from 'pinia'

export const CommonStore = defineStore('common', {
  // 状态库
  state: () => ({
    userInfo: null, //用户信息
  }),
})
获取State
获取state有多种方式,最常用一下几种:
import { CommonStore } from '@/store/modules/common'
// 在此省略defineComponent
setup(){
    const commonStore = CommonStore()
    return ()=>(
        <div>{commonStore.userInfo}</div>
    )
}
使用computed获取
const userInfo = computed(() => common.userInfo)
使用Pinia提供的storeToRefs
import { storeToRefs } from 'pinia'
import { CommonStore } from '@/store/modules/common'

...
const commonStore = CommonStore()
const { userInfo } = storeToRefs(commonStore)
修改State
修改state的三种方式:
- 直接修改(不推荐)
commonStore.userInfo = '曹操'
- 通过$patch
commonStore.$patch({
    userInfo:'曹操'
})- 通过actions修改store
export const CommonStore = defineStore('common', {
  // 状态库
  state: () => ({
    userInfo: null, //用户信息
  }),
  actions: {
    setUserInfo(data) {
      this.userInfo = data
    },
  },
})
import { CommonStore } from '@/store/modules/common'
const commonStore = CommonStore()
commonStore.setUserInfo('曹操')Getters
export const CommonStore = defineStore('common', {
  // 状态库
  state: () => ({
    userInfo: null, //用户信息
  }),
  getters: {
    getUserInfo: (state) => state.userInfo
  }
})
使用同State获取
Actions
Pinia赋予了Actions更大的职能,相较于Vuex,Pinia去除了Mutations,仅依靠Actions来更改Store状态,同步异步都可以放在Actions中。
同步action
export const CommonStore = defineStore('common', {
  // 状态库
  state: () => ({
    userInfo: null, //用户信息
  }),
  actions: {
    setUserInfo(data) {
      this.userInfo = data
    },
  },
})
异步actions
...
actions: {
   async getUserInfo(params) {
      const data = await api.getUser(params)
      return data
    },
}
内部actions间相互调用
...
actions: {
   async getUserInfo(params) {
      const data = await api.getUser(params)
      this.setUserInfo(data)
      return data
    },
    setUserInfo(data){
       this.userInfo = data
    }
}
modules间actions相互调用
import { UserStore } from './modules/user'
...
actions: {
async getUserInfo(params) {
const data = await api.getUser(params)
const userStore = UserStore()
userStore.setUserInfo(data)
return data
},
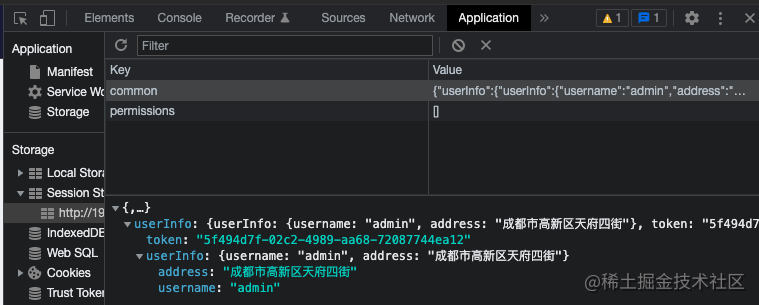
}pinia-plugin-persist 插件实现数据持久化
npm i pinia-plugin-persist --save
// src/store/index.ts

import { createPinia } from 'pinia'
import piniaPluginPersist from 'pinia-plugin-persist'

const store = createPinia().use(piniaPluginPersist)

export default store
对应store中的使用
export const CommonStore = defineStore('common', {
  // 状态库
  state: () => ({
    userInfo: null, //用户信息
  }),
  // 开启数据缓存
  persist: {
    enabled: true,
    strategies: [
      {
        storage: localStorage, // 默认存储在sessionStorage里
        paths: ['userInfo'],  // 指定存储state,不写则存储所有
      },
    ],
  },
})
Fetch
为了更好的支持TypeScript,统计Api请求,这里将axios进行二次封装
结构目录:

// src/utils/fetch.ts

import axios, { AxiosRequestConfig, AxiosResponse, AxiosInstance } from 'axios'
import { getToken } from './util'
import { Modal } from 'ant-design-vue'
import { Message, Notification } from '@/utils/resetMessage'

// .env环境变量
const BaseUrl = import.meta.env.VITE_API_BASE_URL as string

// create an axios instance
const service: AxiosInstance = axios.create({
  baseURL: BaseUrl, // 正式环境
  timeout: 60 * 1000,
  headers: {},
})

/**
 * 请求拦截
 */
service.interceptors.request.use(
  (config: AxiosRequestConfig) => {
    config.headers.common.Authorization = getToken() // 请求头带上token
    config.headers.common.token = getToken()
    return config
  },
  (error) => Promise.reject(error),
)

/**
 * 响应拦截
 */
service.interceptors.response.use(
  (response: AxiosResponse) => {
    if (response.status == 201 || response.status == 200) {
      const { code, status, msg } = response.data
      if (code == 401) {
        Modal.warning({
          title: 'token出错',
          content: 'token失效,请重新登录!',
          onOk: () => {
            sessionStorage.clear()
          },
        })
      } else if (code == 200) {
        if (status) {
          // 接口请求成功
          msg && Message.success(msg) // 后台如果返回了msg,则将msg提示出来
          return Promise.resolve(response) // 返回成功数据
        }
        // 接口异常
        msg && Message.warning(msg) // 后台如果返回了msg,则将msg提示出来
        return Promise.reject(response) // 返回异常数据
      } else {
        // 接口异常
        msg && Message.error(msg)
        return Promise.reject(response)
      }
    }
    return response
  },
  (error) => {
    if (error.response.status) {
      switch (error.response.status) {
        case 500:
          Notification.error({
            message: '温馨提示',
            description: '服务异常,请重启服务器!',
          })
          break
        case 401:
          Notification.error({
            message: '温馨提示',
            description: '服务异常,请重启服务器!',
          })
          break
        case 403:
          Notification.error({
            message: '温馨提示',
            description: '服务异常,请重启服务器!',
          })
          break
        // 404请求不存在
        case 404:
          Notification.error({
            message: '温馨提示',
            description: '服务异常,请重启服务器!',
          })
          break
        default:
          Notification.error({
            message: '温馨提示',
            description: '服务异常,请重启服务器!',
          })
      }
    }
    return Promise.reject(error.response)
  },
)

interface Http {
  fetch<T>(params: AxiosRequestConfig): Promise<StoreState.ResType<T>>
}

const http: Http = {
  // 用法与axios一致(包含axios内置所有请求方式)
  fetch(params) {
    return new Promise((resolve, reject) => {
      service(params)
        .then((res) => {
          resolve(res.data)
        })
        .catch((err) => {
          reject(err.data)
        })
    })
  },
}

export default http['fetch']
// src/api/user.ts

import qs from 'qs'
import fetch from '@/utils/fetch'
import { IUserApi } from './types/user'

const UserApi: IUserApi = {
  // 登录
  login: (params) => {
    return fetch({
      method: 'post',
      url: '/login',
      data: params,
    })
  }
}

export default UserApi
/**
 * 接口返回结果Types
 * --------------------------------------------------------------------------
 */
// 登录返回结果
export interface ILoginData {
  token: string
  userInfo: {
    address: string
    username: string
  }
}

/**
 * 接口参数Types
 * --------------------------------------------------------------------------
 */
// 登录参数
export interface ILoginApiParams {
  username: string // 用户名
  password: string // 密码
  captcha: string // 验证码
  uuid: string // 验证码uuid
}

/**
 * 接口定义Types
 * --------------------------------------------------------------------------
 */
export interface IUserApi {
  login: (params: ILoginApiParams) => Promise<StoreState.ResType<ILoginData>>
}
Router4
// src/router/router.config.ts

const Routes: Array<RouteRecordRaw> = [
  {
 path: '/403',
 name: '403',
 component: () =>
   import(/* webpackChunkName: "403" */ '@/views/exception/403'),
 meta: { title: '403', permission: ['exception'], hidden: true },
  },
  {
 path: '/404',
 name: '404',
 component: () =>
   import(/* webpackChunkName: "404" */ '@/views/exception/404'),
 meta: { title: '404', permission: ['exception'], hidden: true },
  },
  {
 path: '/500',
 name: '500',
 component: () =>
   import(/* webpackChunkName: "500" */ '@/views/exception/500'),
 meta: { title: '500', permission: ['exception'], hidden: true },
  },
  {
 path: '/:pathMatch(.*)',
 name: 'error',
 component: () =>
   import(/* webpackChunkName: "404" */ '@/views/exception/404'),
 meta: { title: '404', hidden: true },
  },
]
title: 导航显示文字;hidden: 导航上是否隐藏该路由 (true: 不显示 false:显示)
- 动态路由(权限路由)
// src/router/router.ts

router.beforeEach(
  async (
    to: RouteLocationNormalized,
    from: RouteLocationNormalized,
    next: NavigationGuardNext,
  ) => {
    const token: string = getToken() as string
    if (token) {
      // 第一次加载路由列表并且该项目需要动态路由
      if (!isAddDynamicMenuRoutes) {
        try {
          //获取动态路由表
          const res: any = await UserApi.getPermissionsList({})
          if (res.code == 200) {
            isAddDynamicMenuRoutes = true
            const menu = res.data
            // 通过路由表生成标准格式路由
            const menuRoutes: any = fnAddDynamicMenuRoutes(
              menu.menuList || [],
              [],
            )
            mainRoutes.children = []
            mainRoutes.children?.unshift(...menuRoutes, ...Routes)
            // 动态添加路由
            router.addRoute(mainRoutes)
            // 注:这步很关键,不然导航获取不到路由
            router.options.routes.unshift(mainRoutes)
            // 本地存储按钮权限集合
            sessionStorage.setItem(
              'permissions',
              JSON.stringify(menu.permissions || '[]'),
            )
            if (to.path == '/' || to.path == '/login') {
              const firstName = menuRoutes.length && menuRoutes[0].name
              next({ name: firstName, replace: true })
            } else {
              next({ path: to.fullPath })
            }
          } else {
            sessionStorage.setItem('menuList', '[]')
            sessionStorage.setItem('permissions', '[]')
            next()
          }
        } catch (error) {
          console.log(
            `%c${error} 请求菜单列表和权限失败,跳转至登录页!!`,
            'color:orange',
          )
        }
      } else {
        if (to.path == '/' || to.path == '/login') {
          next(from)
        } else {
          next()
        }
      }
    } else {
      isAddDynamicMenuRoutes = false
      if (to.name != 'login') {
        next({ name: 'login' })
      }
      next()
    }
  },
)
Layouts布局组件
脚手架提供多种排版布局,目录结构如下:

- BlankLayout.tsx: 空白布局,只做路由分发
- RouteLayout.tsx: 主体布局,内容显示部分,包含面包屑
- LevelBasicLayout.tsx 多级展示布局,适用于2级以上路由
- SimplifyBasicLayout.tsx 简化版多级展示布局,适用于2级以上路由


相关参考链接
文章暂时就写到这,后续会增加JSX语法部分,如果本文对您有什么帮助,别忘了动动手指点个赞❤️。
本文如果有错误和不足之处,欢迎大家在评论区指出,多多提出您宝贵的意见!
Recommend
About Joyk
Aggregate valuable and interesting links.
Joyk means Joy of geeK