

可视化深度学习模型架构的六个常用的方法总结
source link: https://www.51cto.com/article/702026.html
Go to the source link to view the article. You can view the picture content, updated content and better typesetting reading experience. If the link is broken, please click the button below to view the snapshot at that time.

本文将使用 Keras 和 PyTorch 构建一个简单的深度学习模型,然后使用不同的工具和技术可视化其架构。
可视化有助于解释和理解深度学习模型的内部结构。 通过模型计算图的可视化可以弄清楚神经网络是如何计算的,对于模型的可视化主要包括以下几个方面:
- 模型有多少层
- 每层的输入和输出形状
- 不同的层是如何连接的?
- 每层使用的参数
- 使用了不同的激活函数
本文将使用 Keras 和 PyTorch 构建一个简单的深度学习模型,然后使用不同的工具和技术可视化其架构。
使用Keras构建模型
import keras
# Train the model on Fashion MNIST dataset
(train_images, train_labels), _ = keras.datasets.fashion_mnist.load_data()
train_images = train_images / 255.0
# Define the model.
model = keras.models.Sequential([
keras.layers.Flatten(input_shape=(28, 28)),
keras.layers.Dense(32, activation='relu'),
keras.layers.Dropout(0.2),
keras.layers.Dense(10, activation='softmax')
])
#Compile the model
model.compile(
optimizer='adam',
loss='sparse_categorical_crossentropy',
metrics=['accuracy'])
Keras 内置可视化模型
在 Keras 中显示模型架构的最简单就是使用 summary()方法
model.summary()
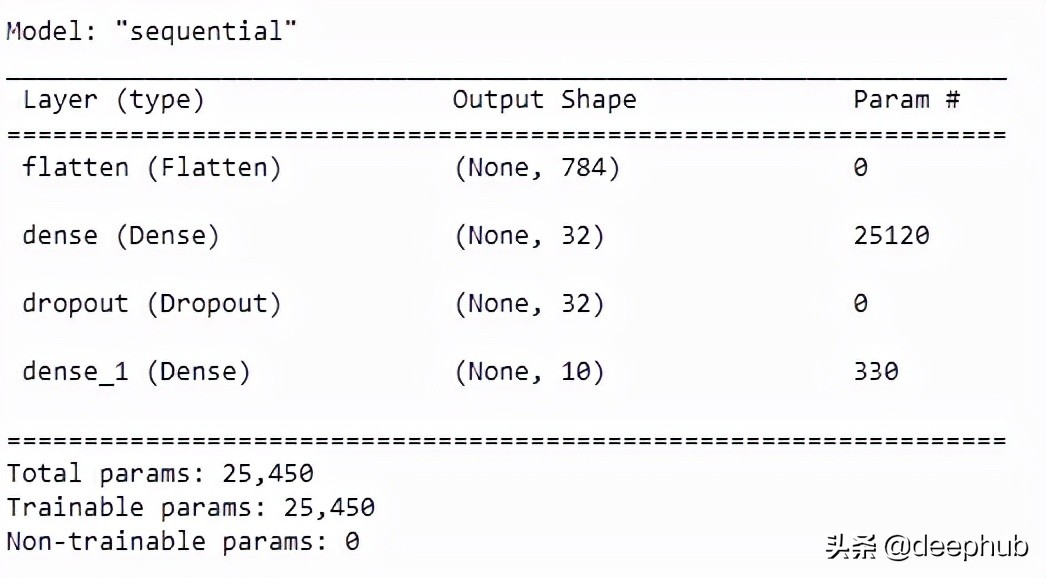
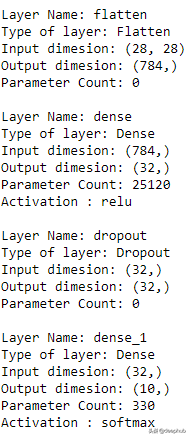
这个方法是keras内置的实现,他的原理很简单。就是遍历所有模型层并打印相关细节,如层的输入维度和输出维度、参数数量、激活类型等,我们也可以用for训练遍历实现,代码如下:
for layer in model.layers:
print("Layer Name: " + layer.name)
print("Type of layer: " + layer.__class__.__name__)
print("Input dimesion: {}".format(layer.input_shape[1:]))
print("Output dimesion: {}".format(layer.output_shape[1:]))
print("Parameter Count: {}".format( layer.count_params()))
try:
print("Activation : " + layer.activation.__name__)
print(" ")
except:
print(" ")
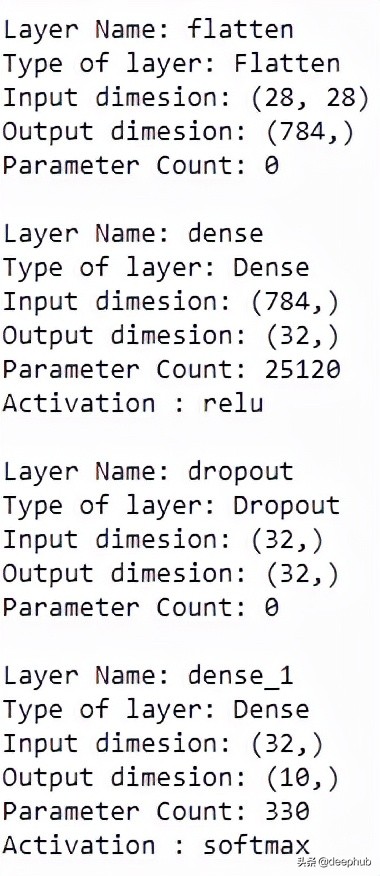
这种方法只能提供一些简单的信息,下面我们介绍一些更好用的方法
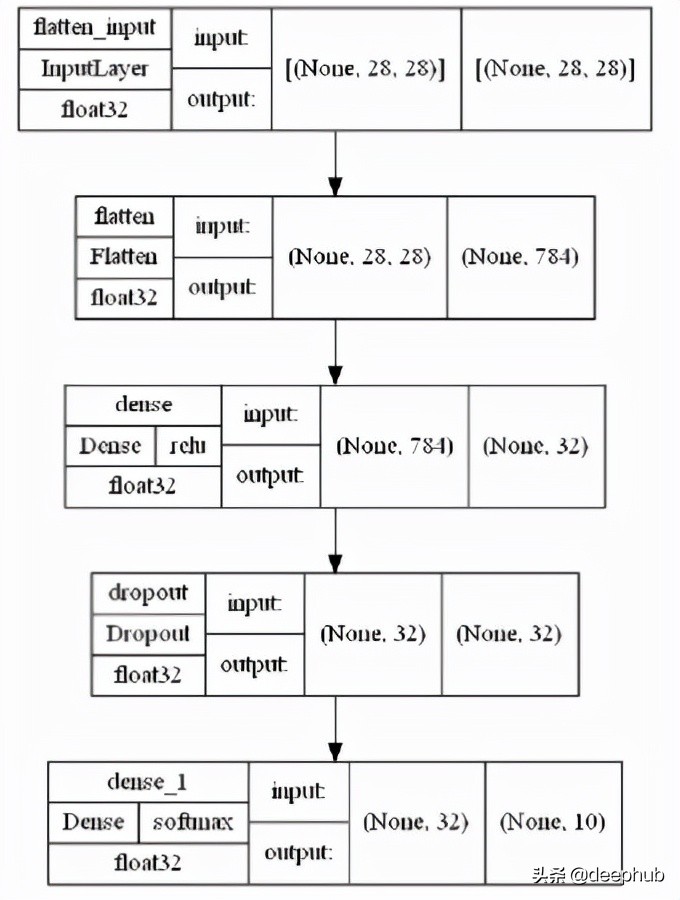
Keras vis_utils
keras.utils.vis_utils 提供了使用 Graphviz 绘制 Keras 模型的实用函数。但是在使用之前需要安装一些其他的依赖:
pip install pydot
pip install pydotplus
pip install graphviz
使用Graphviz,还需要在系统 PATH 中添加 Graphviz bin 文件夹的路径,设置完成后就可以使用了
model_img_file = 'model.png'
tf.keras.utils.plot_model(model, to_file=model_img_file,
show_shapes=True,
show_layer_activations=True,
show_dtype=True,
show_layer_names=True )
Visualkears
Visualkears 库只支持 CNN(卷积神经网络)的分层样式架构生成和大多数模型的图形样式架构,包括普通的前馈网络。
pip install visualkeras
layered view() 用于查看 CNN 模型架构
visualkeras.layered_view(model,legend=True, draw_volume=True)
TensorBoard
TensorBoard 的 Graphs 可查看模型结构图。对于 Tensorboard,使用如下的方法。
import tensorflow as tf
from datetime import datetime
import tensorboard
如果需要在notebook中使用,可以用下面的语句加载 Tensorboard 扩展
%load_ext tensorboard
在 fit() 中使用的 Keras Tensorboard Callback
# Define the Keras TensorBoard callback.
logdir="logs/fit/" + datetime.now().strftime("%Y%m%d-%H%M%S")
tensorboard_callback = keras.callbacks.TensorBoard(log_dir=logdir)
# Train the model.
model.fit(
train_images,
train_labels,
batch_size=64,
epochs=5,
callbacks=[tensorboard_callback])

model.save("model.h5")
模型训练完成后,启动 TensorBoard 并等待 UI 加载。
%tensorboard --logdir logs
通过单击的“Graphs”就可以看到模型的可视化结果了。

注:在Pytorch 1.8以后中提供了from torch.utils.tensorboard import SummaryWriter也可以生成tensorboard的数据,与tensorboard 对接。
Netron
Netron 是专门为神经网络、深度学习和机器学习模型设计的查看器。 它支持 Keras、TensorFlow lite、ONNX、Caffe,并对 PyTorch、TensorFlow 有实验性支持。
pip install netron
浏览器并输入netron.app ,请单击“打开模型”并选择 h5 文件的路径上传。
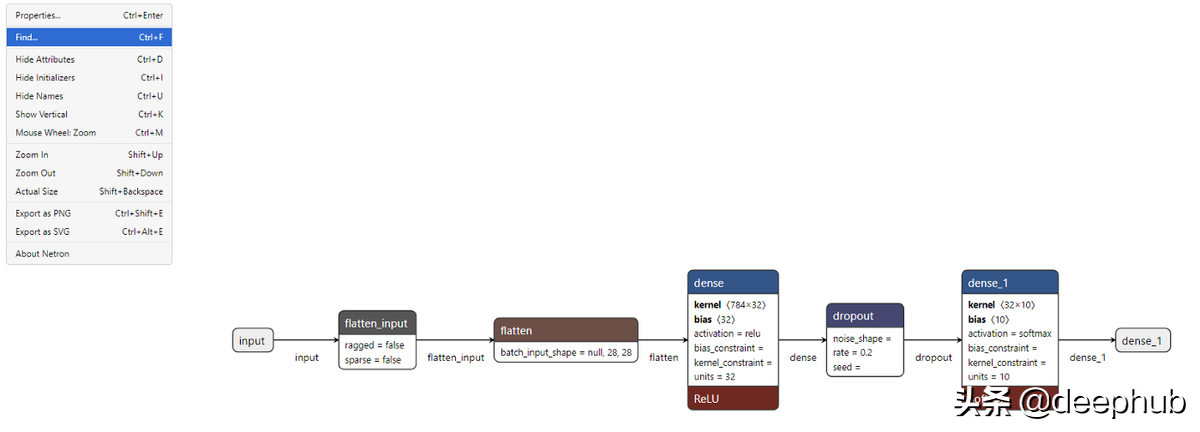
就可以看到每一层的可视化结果了。
在 PyTorch 中构建一个简单的深度学习模型
import torch
from torch import nn
# Get cpu or gpu device for training.
device = "cuda" if torch.cuda.is_available() else "cpu"
print(f"Using {device} device")
class NeuralNetwork(nn.Module):
def __init__(self):
super(NeuralNetwork, self).__init__()
self.flatten = nn.Flatten()
self.linear_relu_stack = nn.Sequential(
nn.Linear(28*28, 512),
nn.ReLU(),
nn.Linear(512, 512),
nn.ReLU(),
nn.Linear(512, 10),
)def forward(self, x):
x = self.flatten(x)
logits = self.linear_relu_stack(x)
return logits
pytorch_model = NeuralNetwork().to(device)
x = torch.randn( 512, 28,28,1).requires_grad_(True)
y = pytorch_model(x)
查看模型架构最直接的方法是打印它。
print(pytorch_model)
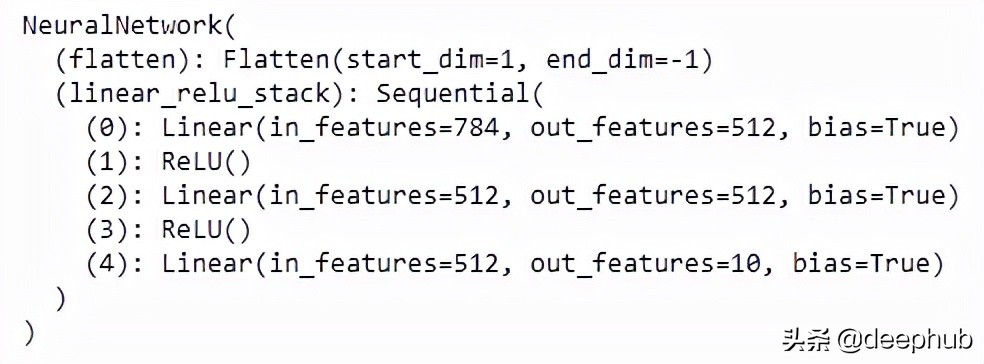
虽然可以看到完整的模型架构,但是效果还没有Keras的内置函数效果好,下面介绍一个很好用的库解决这个问题。
PyTorchViz
PyTorchViz 依赖于graphviz,所以也需要安装:
pip install graphviz
pip install torchviz
使用PyTorchViz 可视化模型非常简单,只需要一个方法即可:
from torchviz import make_dot
make_dot(y, params=dict(list(pytorch_model.named_parameters()))).render("torchviz", format="png")
上面的代码生成了一个torchviz.png文件,如下图。
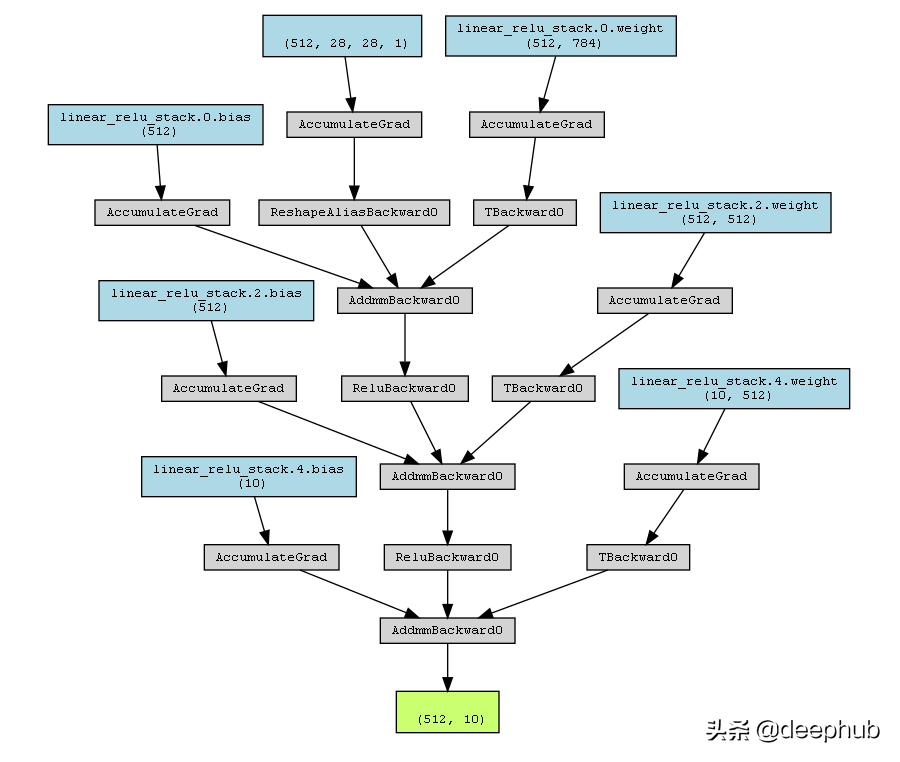
可视化模型架构可以更好的解释深度学习模型。 模型结构可视化显示层数、每层数据的输入和输出形状、使用的激活函数以及每层中的参数数量,为优化模型提供更好的理解。


 分享到微信
分享到微信  分享到微博
分享到微博Recommend
About Joyk
Aggregate valuable and interesting links.
Joyk means Joy of geeK