
4

webpack构建常见流程
source link: https://snayan.github.io/post/process_of_webpack_build_project/
Go to the source link to view the article. You can view the picture content, updated content and better typesetting reading experience. If the link is broken, please click the button below to view the snapshot at that time.

现在前端项目的构建一般基本都是基于 webpack 的。项目的技术栈目前比较主流的是 react 全家桶和 vue 全家桶。 趁空闲,以公司一个项目整理了 webpack 构建常见的流程,这个项目是使用 vue 全家桶开发的。
- typescript
浏览器支持
"browserslist": [
    "> 1%",
    "last 2 versions",
    "not ie <= 9",
    "Android >= 4.3"
]
- babel
- postcss
- eslint
babel
Babel is a JavaScript compiler.
让我们可以在项目中使用较新 JavaScript 特性。可以通过.babelrc文件指定我们需要编译到的目标版本
{
  "presets": [
    [
      "env",
      {
        "modules": false,
        "useBuiltIns": "usage"
      }
    ],
    "stage-2"
  ],
  "plugins": ["transform-vue-jsx", "transform-runtime"]
}
postcss
a tool for transforming styles with JS plugins
可以让我们在项目使用一些较新 css 的特性。可以通过.postcssrc.js文件指定我们配置的 postcss 插件
- 可以通过 rem 方案来处理移动设备上的适配,在构建过程中,使用了 px2rem 插件来将 px 转为 rem。
- 使用了 postcss-import 将@import 引入的 css 文件内容内联到当前文件内
- postcss-url,配合 postcss-import 使用
- postcss-cssnext,使用一些 css 新特性,目前已建议使用 postcss-preset-env 替换。
- postss-pxtorem,将 px 转为 rem
module.exports = {
  plugins: {
    "postcss-import": {
      path: "src/css/",
    },
    "postcss-url": {},
    "postcss-cssnext": {},
    "postcss-pxtorem": {
      rootValue: 75,
      unitPrecision: 5,
      propList: ["*"],
      selectorBlackList: [],
      replace: true,
      mediaQuery: false,
      minPixelValue: 2,
    },
  },
}
tslint
An extensible linter for the TypeScript language.
定制项目 javascript 使用的标准化,建议将多个项目统一定制为一套。可以在 tslint.json 中定制项目的检查规则。
{
"extends": "tslint:recommended",
"rulesDirectory": ["path/to/custom/rules/directory/", "another/path/"],
"rules": {
"max-line-length": {
"options": [120]
},
"new-parens": true,
"no-arg": true,
"no-bitwise": true,
"no-conditional-assignment": true,
"no-consecutive-blank-lines": false,
"no-console": {
"severity": "warning",
"options": ["debug", "info", "log", "time", "timeEnd", "trace"]
}
},
"jsRules": {
"max-line-length": {
"options": [120]
}
}
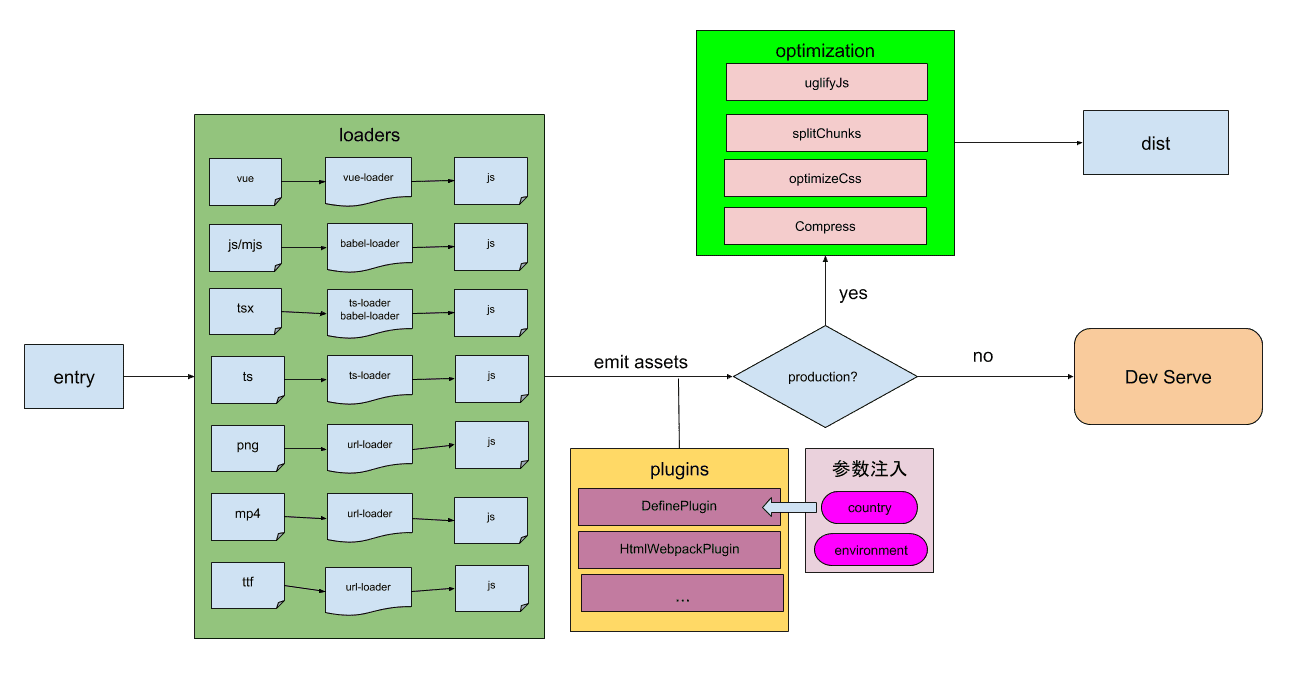
}在配置 webpack 文件时,分 dev 和 prod 环境,不同的环境配置项有所差别,主要体现在 plugin 的使用上。主要有三个 webpack 配置文件
- webpack.base.conf.js,dev 和 prod 公用的基础配置,主要 loader 的配置
- webpack.dev.conf.js,dev 环境的配置,主要配置了 webpack-dev-serve,供开发环境使用
- webpack.prod.conf.js,production 环境的配置,主要增加了一些优化的配置,比如 OptimizeCSSPlugin,UglifyJsPlugin 可以根据实际业务情况,配置不同环境变量,比如,我整理的这个项目,是会区分不同国家,以及不同的测试部署环境。在区分不同国家,不同部署环境时,采用了 test,staging,live 等环境名称。development 和 production 只是针对开发人员而言的,在本地开发就是 development,代码部署到 test,staging,live 都是 production。对不同国家,不同部署环境,又有 dev.env.js 和 prod.env.js.这两个文件其实是一样的,只不过参数不同而已。可以统一从 process.env.env 和 process.env.cid 拿参数,这样就可以不需要这两个配置文件了,且不需要在 build 脚本中去动态替换 prod.env.js 里的配置项(个人觉得,可以讨论)
- dev.env.js
const merge = require("webpack-merge")
const prodEnv = require("./prod.env")

module.exports = merge(prodEnv, {
  NODE_ENV: '"development"',
  country: '"sg"',
  environment: '"test"',
})- prod.env.js
const COUNTRY = "sg"
const shopeeEnvironment = "live"

module.exports = {
  NODE_ENV: '"production"',
  country: '"' + COUNTRY + '"',
  environment: '"' + shopeeEnvironment + '"',
}- 在 dev 开发环境,需执行
npm run start或者yarn start - 在 build 时,需执行
npm run build或者yarn build
- babel-polyfill,对不同设备对 js 的兼容,可以考虑使用 polyfill.io,针对具体设备引入具体的 feature
- normalize.css,针对 Html5,样式 reset
Recommend
About Joyk
Aggregate valuable and interesting links.
Joyk means Joy of geeK