
Python编写一个验证码图片数据标注GUI程序
source link: https://zmister.com/archives/1370.html
Go to the source link to view the article. You can view the picture content, updated content and better typesetting reading experience. If the link is broken, please click the button below to view the snapshot at that time.
Python编写一个验证码图片数据标注GUI程序
做验证码图片的识别,不论是使用传统的ORC技术,还是使用统计机器学习或者是使用深度学习神经网络,都少不了从网络上采集大量相关的验证码图片做数据集样本来进行训练。
采集验证码图片,可以直接使用Python进行批量下载,下载完之后,就需要对下载下来的验证码图片进行标注。一般情况下,一个验证码图片的文件名就是图片中验证码的实际字符串。
在不借助工具的情况下,我们对验证码图片进行上述标注的流程是:
- 1、打开图片所在的文件夹;
- 2、选择一个图片;
- 3、鼠标右键重命名;
- 4、输入正确的字符串;
州的先生亲身体验,一个验证码完成数据的标注,大概需要10到20秒。大量的时间浪费在了重复地进行鼠标右键重命名操作了。于是,使用Qt的Python封装包——PyQt5,编写了一个小工具,方便进行验证码图片的数据标注,节省时间,珍惜生命。
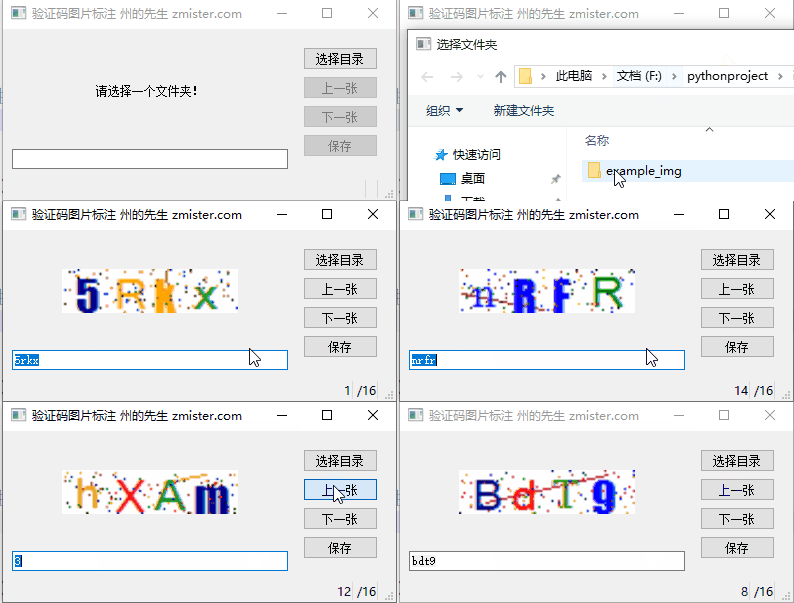
程序的运行如下动图所示:

下面我们来了解一下如何编写这个验证码图片数据标注程序。
文章目录 [显示]
一、构建图形界面
首先,我们来构建一个图形界面。这个图形界面里面包含了一个图像展示控件、一个文本输入控件、四个按钮控件。基于此,我们选择三个布局来排列图形界面的布局。图形界面窗口中的核心控件是一个QWidget(),其布局层设置为网格布局QGridLayout()。在其中放置三个控件:图像展示控件QWidget()、文本输入控件QLineText()、四个按钮组QWidget()。
同时,图像展示控件QWidget()用水平布局层QHBoxLayout()包含一个QLabel()标签来占位;按钮组控件QWidget()用一个垂直布局层QVBoxLayout()将4个按钮控件QPushButton()添加进去。最后,代码如下所示:
class ImgTag(QtWidgets.QMainWindow):
    def __init__(self):
        super().__init__()
        self.setWindowTitle("验证码图片标注 州的先生 zmister.com")
        # 主控件和主控件布局
        self.main_widget = QtWidgets.QWidget()
        self.main_layout = QtWidgets.QGridLayout()
        self.main_widget.setLayout(self.main_layout)

        # 图像展示控件
        self.img_widget = QtWidgets.QWidget()
        self.img_layout = QtWidgets.QHBoxLayout()
        self.img_widget.setLayout(self.img_layout)
        # 标签占位
        self.img_view = QtWidgets.QLabel("请选择一个文件夹!")
        self.img_view.setAlignment(QtCore.Qt.AlignCenter)
        self.img_layout.addWidget(self.img_view)

        # 图像标注控件
        self.img_input = QtWidgets.QLineEdit()

        # 控制按钮控件
        self.opera_widget = QtWidgets.QWidget()
        self.opera_layout = QtWidgets.QVBoxLayout()
        self.opera_widget.setLayout(self.opera_layout)
        # 各个按钮
        self.select_img_btn = QtWidgets.QPushButton("选择目录")
        self.previous_img_btn = QtWidgets.QPushButton("上一张")
        self.previous_img_btn.setEnabled(False)
        self.next_img_btn = QtWidgets.QPushButton("下一张")
        self.next_img_btn.setEnabled(False)
        self.save_img_btn = QtWidgets.QPushButton("保存")
        self.save_img_btn.setEnabled(False)
        # 添加按钮到布局
        self.opera_layout.addWidget(self.select_img_btn)
        self.opera_layout.addWidget(self.previous_img_btn)
        self.opera_layout.addWidget(self.next_img_btn)
        self.opera_layout.addWidget(self.save_img_btn)

        # 将控件添加到主控件布局层
        self.main_layout.addWidget(self.img_widget,0,0,4,4)
        self.main_layout.addWidget(self.opera_widget,0,4,5,1)
        self.main_layout.addWidget(self.img_input,4,0,1,4)

        # 状态栏
        self.img_total_current_label = QtWidgets.QLabel()
        self.img_total_label = QtWidgets.QLabel()
        self.statusBar().addPermanentWidget(self.img_total_current_label)
        self.statusBar().addPermanentWidget(self.img_total_label, stretch=0)  # 在状态栏添加永久控件

        # 设置UI界面核心控件
        self.setCentralWidget(self.main_widget)
运行上述代码,我们可以得到以下如下图所示的图形界面:

下面,我们为这个静态的图形界面添加事件响应。
二、选择目录读取文件
首先,我们来实现“选择目录”按钮的功能。这个按钮点击之后,需要打开文件夹选择框,然后在选择一个文件夹之后,自动读取文件夹内的图片文件,并将第一张图片显示到图形展示控件上。
在这里,我们通过QFileDialog.getExistingDirectory()来实现调用文件夹对话框,其会返回所选择文件夹路径的字符串。然后通过os模块的listdir()方法,获取文件夹下所有的文件,对其进行遍历,提取出图片文件,将这些图片文件添加到一个新的列表中。代码如下所示:
# 选择目录按钮
def select_img_click(self):
    self.dir_path = QtWidgets.QFileDialog.getExistingDirectory(self,'选择文件夹')
    # print(self.dir_path)
    dir_list = os.listdir(self.dir_path)
    img_list = []
    for dir in dir_list:
        suffix_list = ['jpg','png','jpeg','bmp',]
        if dir.split('.')[-1].lower() in suffix_list:
            img_list.append(dir)
接着,我们继续遍历这个列表,生成一个图片的索引字典,用于记录每个图片的顺序信息,方便进行上一张、下一张按钮的切换操作。
# 图像文件索引字典
self.img_index_dict = dict()
for i,d in enumerate(img_list):
    self.img_index_dict[i] = d
self.current_index = 0 # 当前的图像索引
# 当前图片文件路径
self.current_filename = os.path.join(
    self.dir_path,self.img_index_dict[self.current_index]
)
然后,借助QImage()类实例化一个Qt的图像,在图像占位标签中通过setPixmap设置显示图像。
# 实例化一个图像
image = QtGui.QImage(self.current_filename)
self.img_width = image.width() # 图片宽度
self.img_height = image.height() # 图片高度
self.img_scale = 1
self.image = image.scaled(self.img_width*self.img_scale,self.img_height*self.img_scale)

# 在img_view控件中显示图像
self.img_view.setPixmap(QtGui.QPixmap.fromImage(self.image))
接着再设置文本输入框的内容、获取文本输入框的焦点并全选文本输入框的内容:
# 设置img_input控件文本内容
self.img_input.setText(self.current_text)
self.img_input.setFocus() # 获取输入框焦点
self.img_input.selectAll() # 全选文本
最后在状态栏设置图片数量的信息,包括当前图片和图片总数:
# 设置状态栏 图片数量信息
self.img_total_current_label.setText("{}".format(self.current_index+1))
self.img_total_label.setText("/{total}".format(total=len(img_list)))
以上这些代码都是写在select_img_click()方法操作。在完成select_img_click()这个方法的编写后,我们将其绑定到“选择目录”的点击信号上:
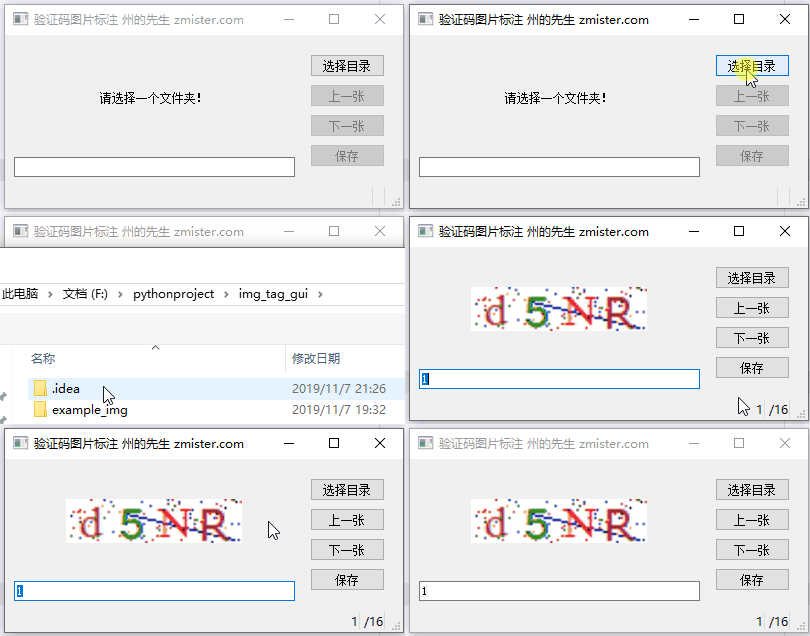
self.select_img_btn.clicked.connect(self.select_img_click)这样,就实现了选择目录,并显示目录中的第一张图片的功能。效果如下动图所示:

下面,我们再来实现下一张图片的按钮功能
三、切换下一张图片
要切换下一张图片,我们首先需要将当前显示的图片重命名为文本输入框中的内容:
# 下一张图片
def next_img_click(self):
    # 修改当前图像文件名
    new_tag = self.img_input.text() # 获取当前输入框内容
    current_img = self.img_index_dict[self.current_index] # 获取当前图片名称
    try:
        os.rename(
            os.path.join(self.dir_path,current_img),
            os.path.join(self.dir_path,new_tag+'.'+current_img.split('.')[-1])
        ) # 修改文件名
        self.img_index_dict[self.current_index] = new_tag+'.'+current_img.split('.')[-1]
    except FileExistsError as e: # 同名文件异常
        print(repr(e))
        QtWidgets.QMessageBox.information(
            self, '提示', '已存在同名文件!',
            QtWidgets.QMessageBox.Ok
        )
接下来,将图片当前索引变量值加1,通过这个索引值获取到下一张图片的文件名,再按照之前的方式将其读取为图像并显示在标签占位控件上,同时更新状态栏的信息:
# 当前图像索引加1
self.current_index += 1
if self.current_index in self.img_index_dict.keys():
    # 当前图片文件路径
    self.current_filename = os.path.join(
        self.dir_path, self.img_index_dict[self.current_index]
    )
    # 实例化一个图像
    image = QtGui.QImage(self.current_filename)
    self.img_width = image.width()  # 图片宽度
    self.img_height = image.height()  # 图片高度
    self.img_scale = 1
    self.image = image.scaled(self.img_width * self.img_scale, self.img_height * self.img_scale)

    # 在img_view控件中显示图像
    self.img_view.setPixmap(QtGui.QPixmap.fromImage(self.image))
    # 当前文件名
    self.current_text = self.img_index_dict[self.current_index].split('.')[0]
    # 设置img_input控件文本内容
    self.img_input.setText(self.current_text)
    self.img_input.setFocus()  # 获取输入框焦点
    self.img_input.selectAll()  # 全选文本

    # 设置状态栏
    self.img_total_current_label.setText(str(self.current_index+1))
else:
    self.current_index -=1
    QtWidgets.QMessageBox.information(
        self,'提示','所有图片已标注完!',
        QtWidgets.QMessageBox.Ok
    )
这样,调用next_img_click()方法,我们就可以切换下一张图片。我们将其绑定在“下一张”按钮、“保存”按钮和文本输入框的回车信号上,就可以实现点击“下一张”按钮、“保存”按钮或是在标注完一个数据后直接回车就能切换到下一张图片:
self.next_img_btn.clicked.connect(self.next_img_click)
self.save_img_btn.clicked.connect(self.next_img_click)
self.img_input.returnPressed.connect(self.next_img_click) # 回车事件绑定
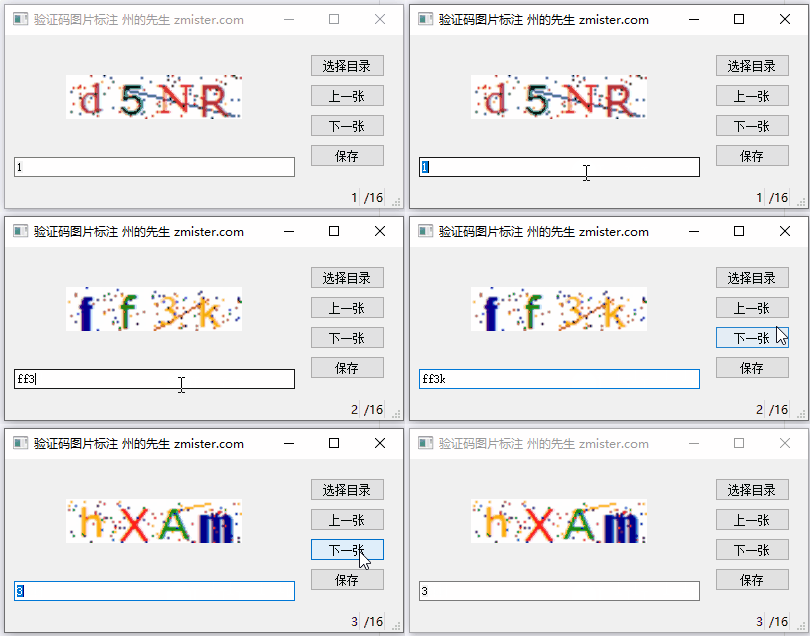
这样,切换下一张图片的功能也实现了,其效果如下动图所示:

四、切换上一张图片
有时候我们需要返回前面标注的图片,这时候切换上一张图片的功能也是很有必要的。切换上一张图片的逻辑与切换下一张图片的逻辑基本一致,只是需要将图像的索引值减1:
# 上一张图片
def previous_img_click(self):
    # 修改当前图像文件名
    new_tag = self.img_input.text()  # 获取当前输入框内容
    current_img = self.img_index_dict[self.current_index]  # 获取当前图片名称
    try:
        os.rename(
            os.path.join(self.dir_path, current_img),
            os.path.join(self.dir_path, new_tag + '.' + current_img.split('.')[-1])
        )  # 修改文件名
        self.img_index_dict[self.current_index] = new_tag + '.' + current_img.split('.')[-1]
    except FileExistsError as e:  # 同名文件异常
        print(repr(e))
        QtWidgets.QMessageBox.information(
            self, '提示', '已存在同名文件!',
            QtWidgets.QMessageBox.Ok
        )

    # 当前图像索引加1
    self.current_index -= 1
    if self.current_index in self.img_index_dict.keys():
        # 当前图片文件路径
        self.current_filename = os.path.join(
            self.dir_path, self.img_index_dict[self.current_index]
        )
        # 实例化一个图像
        image = QtGui.QImage(self.current_filename)
        self.img_width = image.width()  # 图片宽度
        self.img_height = image.height()  # 图片高度
        self.img_scale = 1
        self.image = image.scaled(self.img_width * self.img_scale, self.img_height * self.img_scale)

        # 在img_view控件中显示图像
        self.img_view.setPixmap(QtGui.QPixmap.fromImage(self.image))
        # 当前文件名
        self.current_text = self.img_index_dict[self.current_index].split('.')[0]
        # 设置img_input控件文本内容
        self.img_input.setText(self.current_text)
        self.img_input.setFocus()  # 获取输入框焦点
        self.img_input.selectAll()  # 全选文本

        # 设置状态栏
        self.img_total_current_label.setText(str(self.current_index + 1))
    else:
        self.current_index += 1
        QtWidgets.QMessageBox.information(
            self, '提示', '图片列表到顶了!',
            QtWidgets.QMessageBox.Ok
        )
可以看到,这和切换下一张图片的代码几乎是一致的,因为其核心逻辑本来就是一样的,我们将“上一张”按钮的点击信号绑定在这个方法上,就可以实现切换上一张图片的功能了:
self.previous_img_btn.clicked.connect(self.previous_img_click)其效果如下动图所示:

五、图片缩放
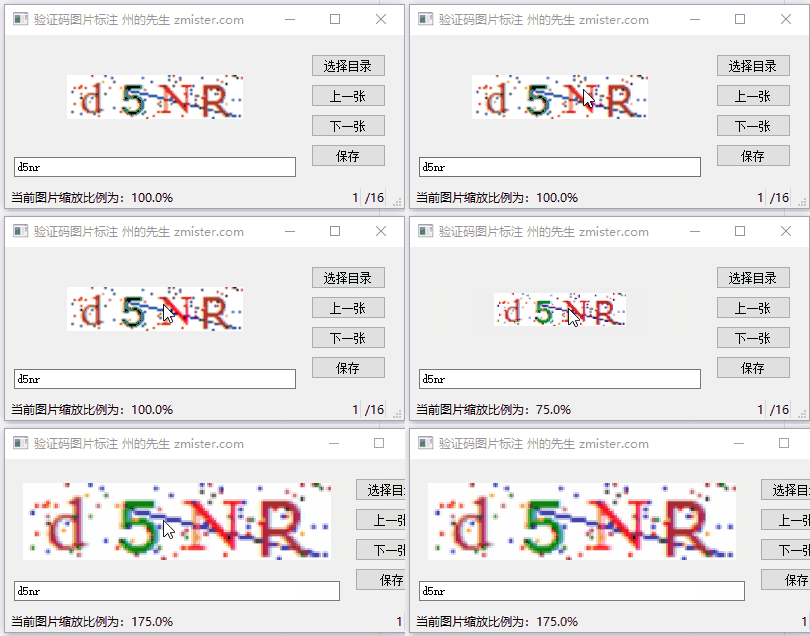
到这里,我们的验证码图片数据标注程序基本上已经完成了,但是突然发现,有些验证码图片很变态,它的干扰线和干扰点简直让人无法看清它到底是什么字符,这样的情况下可能需要把图片放大或缩小一点,方便我们确认验证码图片上的信息,所以,我们的程序还需要一个图片缩放功能。最终,我们实现的效果是,按住Ctrl+鼠标滚轮,滚轮向上,图片放大,滚轮向下,图片缩小。这是通过重写鼠标滚轮事件来实现的:
# 重写鼠标滚轮事件
def wheelEvent(self, event):
    # 如果按住了Ctrl
    if event.modifiers() == QtCore.Qt.ControlModifier:
        try:
            delta = event.angleDelta().y()
            if delta > 0:
                self.img_scale += 0.25
                self.image_scaled = self.image.scaled(self.img_width * self.img_scale, self.img_height * self.img_scale)
                self.img_view.setPixmap(QtGui.QPixmap.fromImage(self.image_scaled))
                self.statusBar().showMessage("当前图片缩放比例为:{}%".format(self.img_scale * 100))
            elif delta < 0:
                if self.img_scale > 0.25:
                    self.img_scale -= 0.25
                    self.image_scaled = self.image.scaled(self.img_width * self.img_scale, self.img_height * self.img_scale)
                    self.img_view.setPixmap(QtGui.QPixmap.fromImage(self.image_scaled))
                    self.statusBar().showMessage("当前图片缩放比例为:{}%".format(self.img_scale * 100))
        except Exception as e:
            print(traceback.print_exc())
            print(repr(e))
最后,这样图片缩放的功能也实现了,其效果如下所示:

六、程序完整代码
以上,我们的图片验证码数据标注程序就完全编写好了,基于此,我们可以进一步使用Pyinstaller等打包工具,将其打包为二进制的可执行文件,方便传播使用。
此程序的完整代码,大家可以关注州的先生微信公众号:zmister2016 ,回复关键词:0021 进行获取
Recommend
About Joyk
Aggregate valuable and interesting links.
Joyk means Joy of geeK