

个人网站迁移
source link: https://icodex.me/2022/01/04/%E4%B8%AA%E4%BA%BA%E7%BD%91%E7%AB%99%E8%BF%81%E7%A7%BB/
Go to the source link to view the article. You can view the picture content, updated content and better typesetting reading experience. If the link is broken, please click the button below to view the snapshot at that time.

个人网站迁移

新年伊始,将个人网站从 dumi 迁移到了 docusaurus。
背景
过去一年多的时间,我都在用 dumi 构建自己的前端知识体系文档,期间升级过很多次 dumi 的版本,也看着 dumi 从 200 多 star 逐渐增长到 2k 多 star。
过去选择 dumi,主要看中的是 dumi 对于在线文档的交互能力,因为有时候学习一个新的知识点总想着用 demo 的方式去实现,尤其是 CSS 这种的。而 dumi 提供的交互能力恰好可以满足我的这一个需求。同时配合 Typora 编写 markdown 文档十分的方便。
不过同时我也注意到了 docusaurus (这个取自document和saurus组合词的名称真的太难记了)这个文档生成工具,不过一年前这个工具还比较稚嫩,提供的能力不太全面,所以就放弃了。不过随着越来越多的网站开始使用 docusaurus,我也开始了迁移之路。
迁移步骤
docusaurus 提供脚手架工具直接生成站点项目代码,这里直接利用脚手架来创建。
npx create-docusaurus@latest my-website classic --typescript
生成的项目目录如下:
my-website
├── blog
│   ├── 2019-05-28-hola.md
│   ├── 2019-05-29-hello-world.md
│   └── 2020-05-30-welcome.md
├── docs
│   ├── doc1.md
│   ├── doc2.md
│   ├── doc3.md
│   └── mdx.md
├── src
│   ├── css
│   │   └── custom.css
│   └── pages
│       ├── styles.module.css
│       └── index.js
├── static
│   └── img
├── docusaurus.config.js
├── package.json
├── README.md
├── sidebars.js
└── yarn.lock
插件和预设能力
docusaurus 提供插件和预设的配置,类似于 babel,webpack 这些工具的能力,使用 CLI 指定@docusaurus/preset-classic预设会同时包含至关重要的三个插件:
@docusaurus/plugin-content-docs:提供文档编写能力,对应生成的docs目录@docusaurus/plugin-content-blog:提供博客渲染能力,对应生成的blog目录@docusaurus/plugin-content-pages:提供普通前端页面的渲染能力,对应生成的pages目录
这三种插件的配置都在docusaurus.config.js这个文件下,对于我个人需求来说这三种能力都需要,因此我都开启了,如果不需要的话,直接在presets.docs|blog|pages设置成false即可。
修改主页指向
我希望将个人博客页面作为站点主页,那么需要在docusaurus.config.js将blog对应的routeBasePath设置成/,同时指定博客文档所在的目录path;这样其他在docs或者pages就是相对于blog的路由路径。
// docusaurus.config.js

module.exports = {
  presets: [
    "classic",
    {
      blog: {
        // blog作为主页
        routeBasePath: "/",
        path: "./blog",
        ...
      },
      pages: {
        path: "src/pages",
        // 指定 pages 的路由路径,因为 blog 作为主页了
        routeBasePath: "/pages",
        ...
      }
    }
  ]
}
顶部导航栏配置
顶栏无非就是 Logo,导航栏这些,对应 docusaurus 提供的主题配置项的navbar。
titlestringundefined顶部标题logoobjectundefined顶部 logoitemsNavbarItem[][]顶部菜单导航hideOnScrollbooleanfalse是否在页面向下滚动时自动隐藏导航栏style`'primary''dark'`导航菜单通过items配置,docusaurus 提供 5 种菜单配置类型:
type="link":默认形式,配置to或者href指定菜单点击跳转路由;type="dropdown":下拉菜单导航
type="docsVersionDropdown":文档版本下拉菜单type="localeDropdown":文档多国语选择下拉菜单type="search":搜索框,需要配置搜索引擎才可用
同时顶部默认是提供网站夜间和白天主题的切换按钮。
我觉得唯一的不足就是不支持自定义菜单项的icon,例如需要显示 GitHub 链接,需要自己在src/custom.css里进行样式覆盖:
{
  href: "https://github.com/wood3n/icodex",
  position: "right",
  // custom logo in custom.css
  className: "header-github-link",
 "aria-label": "GitHub repository",
}
/* GitHub Link */
.header-github-link:hover {
  opacity: 0.6;
}

.header-github-link:before {
  content: "";
  width: 24px;
  height: 24px;
  display: flex;
  background: url("data:image/svg+xml,%3Csvg viewBox='0 0 24 24' xmlns='http://www.w3.org/2000/svg'%3E%3Cpath d='M12 .297c-6.63 0-12 5.373-12 12 0 5.303 3.438 9.8 8.205 11.385.6.113.82-.258.82-.577 0-.285-.01-1.04-.015-2.04-3.338.724-4.042-1.61-4.042-1.61C4.422 18.07 3.633 17.7 3.633 17.7c-1.087-.744.084-.729.084-.729 1.205.084 1.838 1.236 1.838 1.236 1.07 1.835 2.809 1.305 3.495.998.108-.776.417-1.305.76-1.605-2.665-.3-5.466-1.332-5.466-5.93 0-1.31.465-2.38 1.235-3.22-.135-.303-.54-1.523.105-3.176 0 0 1.005-.322 3.3 1.23.96-.267 1.98-.399 3-.405 1.02.006 2.04.138 3 .405 2.28-1.552 3.285-1.23 3.285-1.23.645 1.653.24 2.873.12 3.176.765.84 1.23 1.91 1.23 3.22 0 4.61-2.805 5.625-5.475 5.92.42.36.81 1.096.81 2.22 0 1.606-.015 2.896-.015 3.286 0 .315.21.69.825.57C20.565 22.092 24 17.592 24 12.297c0-6.627-5.373-12-12-12'/%3E%3C/svg%3E")
    no-repeat;
}

html[data-theme="dark"] .header-github-link:before {
  background: url("data:image/svg+xml,%3Csvg viewBox='0 0 24 24' xmlns='http://www.w3.org/2000/svg'%3E%3Cpath fill='white' d='M12 .297c-6.63 0-12 5.373-12 12 0 5.303 3.438 9.8 8.205 11.385.6.113.82-.258.82-.577 0-.285-.01-1.04-.015-2.04-3.338.724-4.042-1.61-4.042-1.61C4.422 18.07 3.633 17.7 3.633 17.7c-1.087-.744.084-.729.084-.729 1.205.084 1.838 1.236 1.838 1.236 1.07 1.835 2.809 1.305 3.495.998.108-.776.417-1.305.76-1.605-2.665-.3-5.466-1.332-5.466-5.93 0-1.31.465-2.38 1.235-3.22-.135-.303-.54-1.523.105-3.176 0 0 1.005-.322 3.3 1.23.96-.267 1.98-.399 3-.405 1.02.006 2.04.138 3 .405 2.28-1.552 3.285-1.23 3.285-1.23.645 1.653.24 2.873.12 3.176.765.84 1.23 1.91 1.23 3.22 0 4.61-2.805 5.625-5.475 5.92.42.36.81 1.096.81 2.22 0 1.606-.015 2.896-.015 3.286 0 .315.21.69.825.57C20.565 22.092 24 17.592 24 12.297c0-6.627-5.373-12-12-12'/%3E%3C/svg%3E")
    no-repeat;
}
文档侧栏菜单配置
docusaurus默认是会渲染在blog文件夹下的.md或者.mdx文件,对于src/pages目录的任何文件都会渲染成页面,而对于docs目录的 markdown 文件可以通过sidebarPath来配置生成不同的侧边菜单栏。
如果使用脚手架创建文档站点,ducusaurus 会默认生成一个sidebars.js文件,包含下面这个默认配置项:
module.exports = {
  mySidebar: [
    {
      type: 'autogenerated',
      dirName: '.'
    },
  ],
};
默认情况下,在docs目录的 markdown 文件会全部显示出来,不会自动归类,而我的需求是能够根据我在 docs目录下创建的文件夹进行分类,并自动生成每篇文档的路由地址。来看一下 docusaurus 提供的能力 —— Sidebar | Docusaurus,对于侧边栏生成的类型有以下几种:
type="doc":配合id指定单个文档的标题和链接type="link":配合href指定任意跳转链接type="category":配合items指定分类包含的文档type="autogenerated":配合dirName自动生成侧边栏
看起来type="category"可以满足我的需求,但是每篇文章写完我都要配置一下侧边栏这也太麻烦了,于是我尝试了下type="autogenerated"这个自动生成的,dirname配置成在docs下创建的目录名称就可以自动对该目录下文档进行分类,再配合顶部导航栏的docId指向每个文档分类下的第一篇文章,点击以后就会自动打开不同目录下归类的文档列表。
// sidebars.js
const sidebars = {
  javascript: [
    {
      type: "autogenerated",
      dirName: "javascript",
    },
  ],
  typescript: [
    {
      type: "autogenerated",
      dirName: "typescript",
    },
  ],
  css: [
    {
      type: "autogenerated",
      dirName: "css",
    },
  ]
}
// docusaurus.config.js
module.exports = {
  themeConfig: {
    navbar: {
      items: [
        {
          type: "dropdown",
          label: "Skill",
          position: "right",
          items: [
            {
              type: "doc",
              label: "JavaScript",
              docId: "javascript/类型/类型定义",
            }
            ...
          ]
        }
      ]
    }
  }
}
图片目录
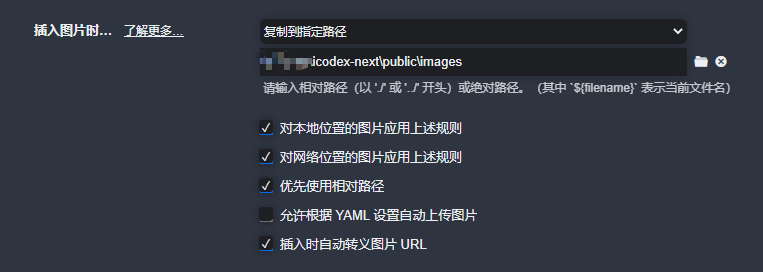
对于图片的处理,我这边没有选择图床,直接复制到指定目录下,docusaurus 提供staticDirectories配置项用于指定静态资源目录,默认是static文件夹,对于static文件夹的文件,全部都会在构建以后复制到网站根目录下。
而对于staticDirectories没有包含的文件目录,包括 markdown 中引用的图片文件等,都会在构建后复制到网站根目录的assets目录下(图片的话就是assets/images),并且会对路径自动进行转换。利用这个能力,我在网站代码根目录下创建了public/images目录用于保存所有在 markdown 页面包含的图片,配合 Typora 复制图片并转换图片相对路径的能力,就可以做到在任何地方打开 markdown 都能正常显示图片。
网站部署
网站部署不用多说了,依旧白嫖 GitHub Pages,docusaurus 也提供了集成 GitHub Actions 自动部署的配置参考 —— Deployment | Docusaurus:
name: Deploy to GitHub Pages

on:
  push:
    branches: [main]
    paths: [website/**]

jobs:
  deploy:
    name: Deploy to GitHub Pages
    runs-on: ubuntu-latest
    steps:
      - uses: actions/checkout@v2
      - uses: actions/setup-node@v2
        with:
          node-version: 14.x
          cache: yarn
      - name: Build website
        run: |
          yarn install --frozen-lockfile
          yarn build

# Popular action to deploy to GitHub Pages:
      # Docs: https://github.com/peaceiris/actions-gh-pages#%EF%B8%8F-docusaurus
      - name: Deploy to GitHub Pages
        uses: peaceiris/actions-gh-pages@v3
        with:
          github_token: ${{ secrets.GITHUB_TOKEN }}
          # Build output to publish to the `gh-pages` branch:
          publish_dir: ./build
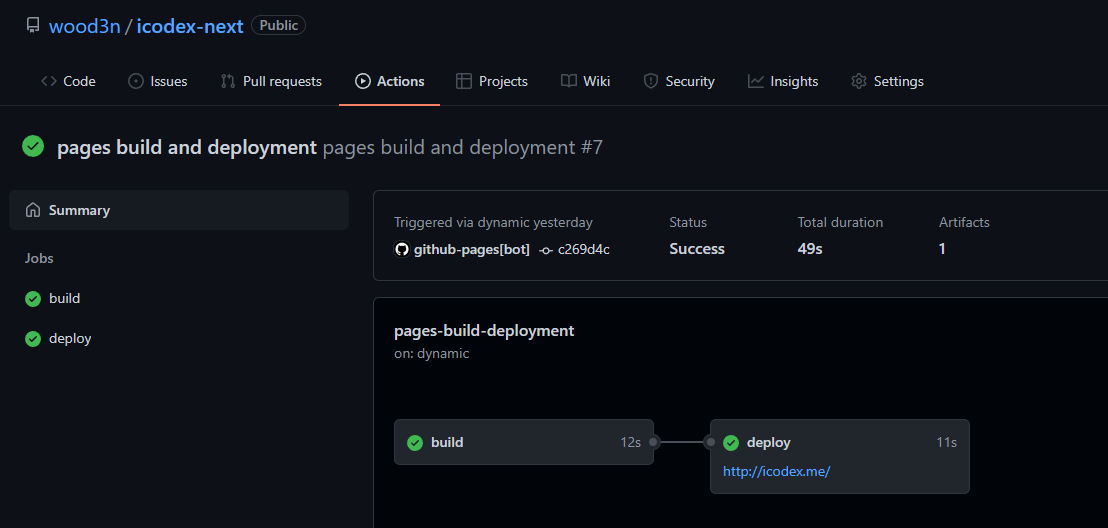
这样在使用 Typora 写完文档或者博客以后,直接push到 GitHub 仓库,触发 GitHub Actions 完成自动构建打包和部署,一气呵成,妈妈再也不用担心我写博客时候手忙脚乱的部署了。
网站全局搜索
docusaurus 优先提供支持 Algolia 的能力,使用起来也很简单,分为三步:
Recommend
About Joyk
Aggregate valuable and interesting links.
Joyk means Joy of geeK