

线程模型分析:Consumer最后一个发送请求Handler——TransportClientHandler分析
source link: https://segmentfault.com/a/1190000041213255
Go to the source link to view the article. You can view the picture content, updated content and better typesetting reading experience. If the link is broken, please click the button below to view the snapshot at that time.

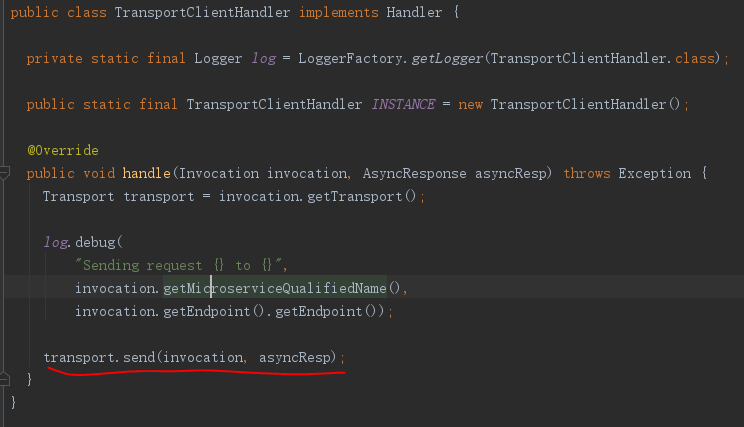
Consumer 的Handler处理链最后一个是TransportClientHandler,这个Handler主要是:
1.发起连接
2.请求之前执行HttpClientFilter的beforeSendRequest
3.塞入ServiceComb的微服务调用上下文,设置响应回调处理,发送请求
ServiceComb发送请求使用vertx,而vertx网络发送接收构建在netty之上,因而能够异步高并发。
java很大一个特点是向建设大楼的脚手架,一个套在一个上面,举例,serviceComb网络发送与接收是:最基础是jdk,上面是netty,然后是vertx,然后是serviceComb。
1.发起连接
transport实际上是VertxRestTransport,最终到RestClientInvocation的invoke,这个invoke重点分析,
public void invoke(Invocation invocation, AsyncResponse asyncResp) throws Exception {
...
Future<HttpClientRequest> requestFuture = createRequest(ipPort, path);
...
}
Future<HttpClientRequest> createRequest(IpPort ipPort, String path) {
...
return httpClientWithContext.getHttpClient().request(requestOptions);
...
}
public Future<HttpClientRequest> request(RequestOptions options) {
ContextInternal ctx = this.vertx.getOrCreateContext();
PromiseInternal<HttpClientRequest> promise = ctx.promise();
this.doRequest(options, promise);
return promise.future();
}
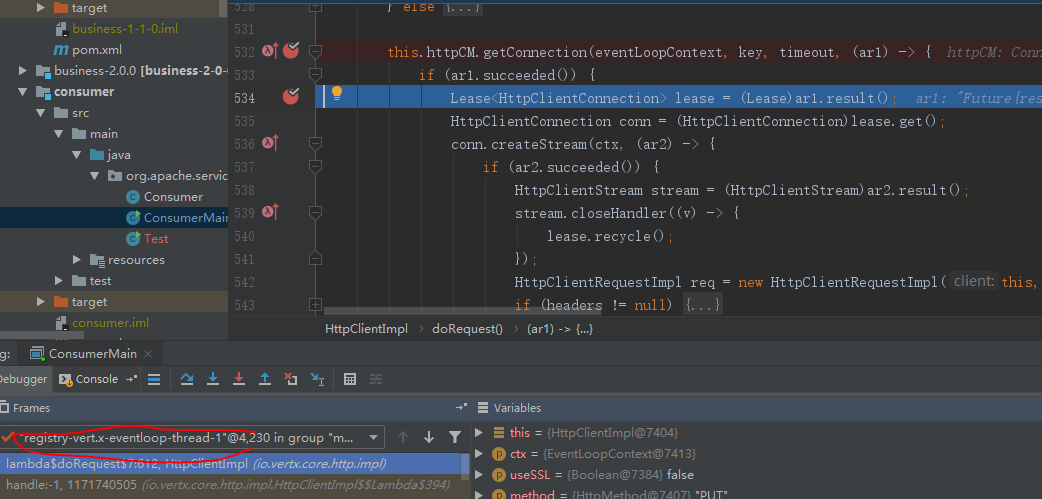
private void doRequest(HttpMethod method, SocketAddress peerAddress, SocketAddress server, String host, int port, Boolean useSSL, String requestURI, MultiMap headers, long timeout, Boolean followRedirects, ProxyOptions proxyOptions, PromiseInternal<HttpClientRequest> requestPromise) {
...
this.httpCM.getConnection(eventLoopContext, key, timeout, (ar1) -> {
...
requestPromise.tryComplete(req);
...
}
...
}httpCM 建立连接成功后,把requestPromise设置Complete,到此连接建立完成。
2.请求之前执行HttpClientFilter的beforeSendRequest和发送
如下是发送请求逻辑
// 创建连接
Future<HttpClientRequest> requestFuture = createRequest(ipPort, path);
// 连接创建成功后执行compose里的逻辑
requestFuture.compose(clientRequest -> {
this.clientRequest = clientRequest;
RestClientRequestImpl restClientRequest =
new RestClientRequestImpl(clientRequest, httpClientWithContext.context(), asyncResp, throwableHandler);
invocation.getHandlerContext().put(RestConst.INVOCATION_HANDLER_REQUESTCLIENT, restClientRequest);
Buffer requestBodyBuffer;
try {
requestBodyBuffer = restClientRequest.getBodyBuffer();
} catch (Exception e) {
return Future.failedFuture(e);
}
HttpServletRequestEx requestEx = new VertxClientRequestToHttpServletRequest(clientRequest, requestBodyBuffer);
// 发送前执行HttpClientFilter的beforeSendRequest逻辑
for (HttpClientFilter filter : httpClientFilters) {
if (filter.enabled()) {
filter.beforeSendRequest(invocation, requestEx);
}
}
// 再次嵌套,把请求放到httpClientWithContext去执行
// 从业务线程转移到网络线程中去发送
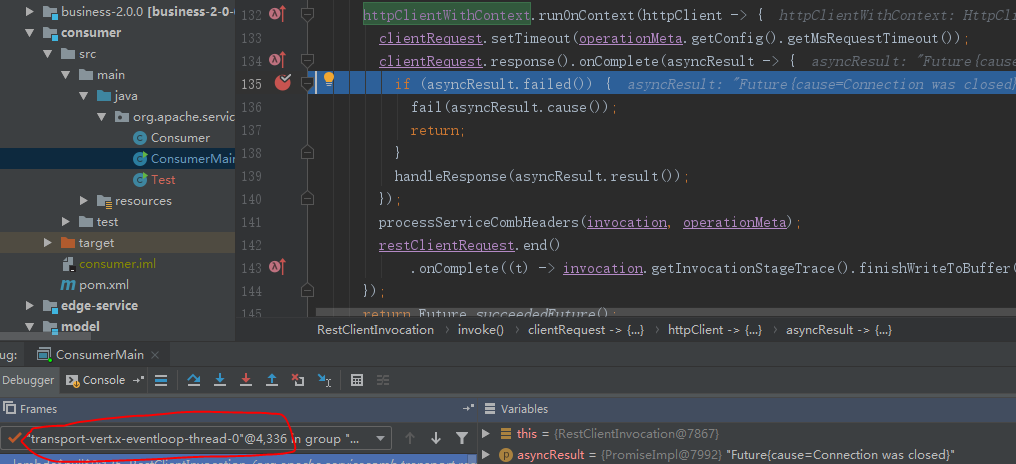
httpClientWithContext.runOnContext(httpClient -> {
clientRequest.setTimeout(operationMeta.getConfig().getMsRequestTimeout());
// 设置异步响应后的业务处理回调
clientRequest.response().onComplete(asyncResult -> {
if (asyncResult.failed()) {
fail(asyncResult.cause());
return;
}
// 异步响应后,回调处理响应response
handleResponse(asyncResult.result());
});
// 发送前,设置微服务调用上下文,传递到下游被调用方
processServiceCombHeaders(invocation, operationMeta);
// end是发送触发器,并设置异步回调
restClientRequest.end()
.onComplete((t) -> invocation.getInvocationStageTrace().finishWriteToBuffer(System.nanoTime()));
});
return Future.succeededFuture();
}).onFailure(failure -> {
//失败处理
});走到这里是main线程

建立连接的线程transport-eventllop
连接建立后,进入请求发送,还是transport-eventllop线程

异步响应传递仍是transport-eventloop线程,往下看马上会传回main线程
又转回到main线程

3.线程模型分析
通过上面分析可知,整个过程,main线程->transport线程->main线程; transport线程只是负责建立连接和发送,以及接收响应后触发响应处理,把处理传递到main线程。很神奇,这个过程是如何实现的。看代码
从CseClientHttpRequest中的doInvoke开始,
  protected Response doInvoke(Invocation invocation) {
    return InvokerUtils.innerSyncInvoke(invocation);
  }

进入核心类

public static Response innerSyncInvoke(Invocation invocation) {
    try {

// 创建一个同步器,这个正是main线程,后面会将自己阻塞等待网络线程的response,进行解码
      SyncResponseExecutor respExecutor = new SyncResponseExecutor();
      invocation.setResponseExecutor(respExecutor);

// 开始触发Handler链,最后一个Handler是TransportClientHandler
      invocation.next(respExecutor::setResponse);

      Response response = respExecutor.waitResponse(invocation);

      return response;
    } catch (Throwable e) {

    }
  }
接着看RestClientInvocation的网络线程传递到main线程代码
protected void processResponseBody(Buffer responseBuf) {
    invocation.getInvocationStageTrace().finishReceiveResponse();

// 网络线程传递到main线程
    invocation.getResponseExecutor().execute(() -> {
      try {
        invocation.getInvocationStageTrace().startClientFiltersResponse();
        HttpServletResponseEx responseEx =
            new VertxClientResponseToHttpServletResponse(clientResponse, responseBuf);

// HttpClientFilter接收请求后的处理afterReceiveResponse

        for (HttpClientFilter filter : httpClientFilters) {
          if (filter.enabled()) {
            Response response = filter.afterReceiveResponse(invocation, responseEx);
            if (response != null) {
              complete(response);
              return;
            }
          }
        }
      } catch (Throwable e) {
        fail(e);
      }
    });


// 上述的excute是在SyncResponseExecutor中,把lautch countDown
  @Override
  public void execute(Runnable cmd) {
    this.cmd = cmd;

    // one network thread, many connections, then this notify will be performance bottlenecks
    // if save to a queue, and other thread(s) to invoke countDown, will get good performance
    // but if have multiple network thread, this "optimization" will reduce performance
    // now not change this.
    latch.countDown();
  }

// countDown后InvokerUtils的waitResponse就执行
      Response response = respExecutor.waitResponse(invocation);

// 就是执行SyncResponseExecutor的waitResponse,走到cmd 不为空,执行run
  public Response waitResponse(Invocation invocation) throws InvocationException {
    guardedWait(invocation);

    // cmd为null,是没走execute,直接返回的场景
    if (cmd != null) {
      cmd.run();
    }

    return response;
  }


// waitResponse执行run实际上就是RestClientInvocation的complete函数
  protected void complete(Response response) {
    invocation.getInvocationStageTrace().finishClientFiltersResponse();
    asyncResp.complete(response);
  }


// 最终RestClientInvocation的complete通过asyncResp设置response,asyncResp其实就是InvokerUtils中innerSyncInvoke函数的如下代码
      invocation.next(respExecutor::setResponse);

// setResponse也就是SyncResponseExecutor的setResponse九九归一,绕了一圈,都是围绕SyncResponseExecutor进行。实现main->网络线程->main的过程。
Recommend
About Joyk
Aggregate valuable and interesting links.
Joyk means Joy of geeK