

HTML5 Event Calendar/Scheduler
source link: https://www.codeproject.com/Articles/732679/HTML-Event-Calendar-Scheduler
Go to the source link to view the article. You can view the picture content, updated content and better typesetting reading experience. If the link is broken, please click the button below to view the snapshot at that time.

HTML5 Event Calendar/Scheduler
In this article, we will build a simple HTML5 event calendar web application. The client-side (HTML5/JavaScript) part is universal. We will use sample PHP and ASP.NET Core backends.
Features:
- Weekly HTML5 event calendar/scheduler
- Changing the calendar using a date navigator (on the left side)
- Drag and drop event creating, moving and resizing
- Changing the look in a single click using a CSS theme
- PHP REST backend
- ASP.NET Core REST backend
We will use DayPilot Lite for JavaScript [javascript.daypilot.org] to build the event calendar. DayPilot Lite for JavaScript is open-source - available under Apache License 2.0.
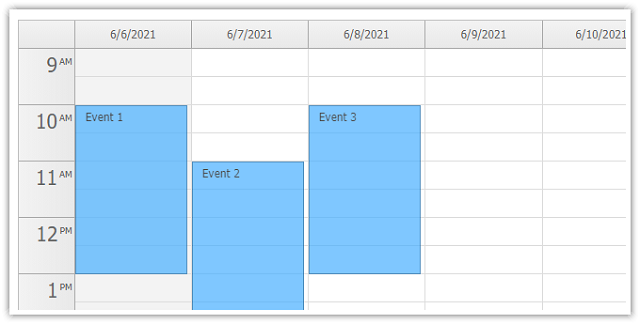
Scheduler CSS Themes
DayPilot Lite for JavaScript comes with several pre-built CSS themes.
You can create your own theme using the online CSS theme designer [themes.daypilot.org].
Default CSS Theme

Green CSS Theme

Google-Like CSS Theme

Traditional CSS Theme
Transparent CSS Theme
White CSS Theme

Step 1: Event Calendar JavaScript Library
Include daypilot-all.min.js. No other dependencies are required for the basic look (the default CSS theme is embedded).
<script src="js/daypilot/daypilot-all.min.js" type="text/javascript"></script>
Step 2: Event Calendar Placeholder
Add a placeholder <div> to the HTML5 page:
<div id="dp"></div>
Step 3: Initialize the Scheduler
Initialize the scheduler using Daypilot.Calendar class:
<script type="text/javascript">
  const dp = new DayPilot.Calendar("dp");
  dp.viewType = "Week";
  dp.init();
</script>
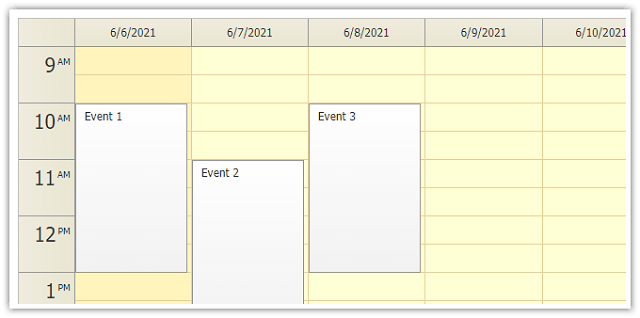
These simple steps will render an empty scheduler:

Step 4: Load Data
We will load the data to the event calendar using a simple AJAX call:
function loadEvents() {
  DayPilot.Http.ajax({
    url: "backend_events.php?start=" + dp.visibleStart() +
         "&end=" + dp.visibleEnd(),   // in .NET, use "/api/CalendarEvents"
    success: function(data) {
        dp.events.list = data;
        dp.update();
    }
  });
}
Since version 2018.2.232, you can also use a built-in shortcut method to load events:
function loadEvents() {
  dp.events.load("backend_events.php"); // in .NET, use "api/CalendarEvents"
}
We will detect the currently-visible date range using visibleStart() and visibleEnd() methods and send it to backend_events.php as parameters.
The backend_event.php endpoint returns the calendar event data in the following format:
[
  {
    "id":"1",
    "text":"Calendar Event 1",
    "start":"2022-02-25T10:30:00",
    "end":"2022-02-25T16:30:00"
  },
  {
    "id":"2",
    "text":"Calendar Event 2",
    "start":"2022-02-24T09:00:00",
    "end":"2022-02-24T14:30:00"
  },
  {
    "id":"3",
    "text":"Calendar Event 3",
    "start":"2022-02-27T12:00:00",
    "end":"2022-02-27T16:00:00"
  }
]
PHP backend (backend_events.php):
<?php
require_once '_db.php';

$stmt = $db->prepare('SELECT * FROM events WHERE NOT ((end <= :start) OR (start >= :end))');

$stmt->bindParam(':start', $_GET['start']);
$stmt->bindParam(':end', $_GET['end']);

$stmt->execute();
$result = $stmt->fetchAll();

class Event {}
$events = array();

foreach($result as $row) {
  $e = new Event();
  $e->id = $row['id'];
  $e->text = $row['name'];
  $e->start = $row['start'];
  $e->end = $row['end'];
  $events[] = $e;
}

echo json_encode($events);

?>
ASP.NET Core backend (CalendarEventsController.cs):
// GET: api/CalendarEvents
[HttpGet]
public async Task<ActionResult<IEnumerable<CalendarEvent>>>
       GetEvents([FromQuery] DateTime start, [FromQuery] DateTime end)
{
    return await _context.Events
        .Where(e => !((e.End <= start) || (e.Start >= end)))
        .ToListAsync();
}
Read more about loading the calendar event data [doc.daypilot.org].
Step 5: Event Moving

The drag and drop user actions (selecting a time range, event moving, event resizing) are enabled by default in the scheduler.
We just need to add custom handler to submit the changes to the server side using an AJAX call.
JavaScript event handler (for PHP):
dp.onEventMoved = args => {
  DayPilot.Http.ajax({
    url: "backend_move.php",
    data: {
      id: args.e.data.id,
      newStart: args.newStart,
      newEnd: args.newEnd
    },
    success: function () {
      console.log("Event was moved.");
    }
  });
};
PHP backend (backend_move.php):
<?php

require_once '_db.php';

$json = file_get_contents('php://input');
$params = json_decode($json);

$insert = "UPDATE events SET start = :start, end = :end WHERE id = :id";

$stmt = $db->prepare($insert);

$stmt->bindParam(':start', $params->newStart);
$stmt->bindParam(':end', $params->newEnd);
$stmt->bindParam(':id', $params->id);

$stmt->execute();

class Result {}

$response = new Result();
$response->result = 'OK';
$response->message = 'Update was successful';

header('Content-Type: application/json');
echo json_encode($response);
JavaScript event handler (for ASP.NET Core):
dp.onEventMoved = args => {
    DayPilot.Http.ajax({
        url: "/api/CalendarEvents/" + args.e.id(),
        method: "PUT",
        data: {
            id: args.e.data.id,
            start: args.newStart,
            end: args.newEnd,
            text: args.e.data.text
        },
        success: function () {
            console.log("Event was Resized.");
        }
    });
};
ASP.NET Core backend (CalendarEventsController.cs):
// PUT: api/CalendarEvents/5
[HttpPut("{id}")]
public async Task<IActionResult> PutCalendarEvent(int id, CalendarEvent calendarEvent)
{
    if (id != calendarEvent.Id)
    {
        return BadRequest();
    }

    _context.Entry(calendarEvent).State = EntityState.Modified;

    try
    {
        await _context.SaveChangesAsync();
    }
    catch (DbUpdateConcurrencyException)
    {
        if (!CalendarEventExists(id))
        {
            return NotFound();
        }
        else
        {
            throw;
        }
    }

    return NoContent();
}
Read more about drag and drop event moving [doc.daypilot.org].
Step 6: Event Editing

You can use DayPilot Modal dialog to edit the events details. DayPilot Modal is an open-source library for building modal forms from code (online Modal Dialog Builder application for visual modal dialog design is also available).
First, we add an onEventClick event handler that is fired when users click an existing event.
Our modal dialog will have just a single form field (text value called "Name"):
const form = [
  {name: "Name", id: "text"}
];
Now we can open the modal dialog using DayPilot.Modal.form() method. The second parameter specifies the source data object. The data object will be used to fill the initial values (the id value of the form item specifies the property/field of the data object).
The DayPilot.Modal.form() method returns a promise. That means we can use the await syntax to wait for the result and simplify the code:
const modal = await DayPilot.Modal.form(form, args.e.data);
if (modal.canceled) {
  return;
}
The result is available as modal.result object. It's a copy of the original object, with the updated values applied.
This is our onEventClick event handler:
dp.onEventClick = async args => {
  const form = [
    {name: "Name", id: "text"}
  ];

  const modal = await DayPilot.Modal.form(form, args.e.data);
  if (modal.canceled) {
    return;
  }

  DayPilot.Http.ajax({
    url: "backend_update.php",
    // use `url: "/api/CalendarEvents/" + args.e.id(),` in ASP.NET Core
    // use `method: "PUT",` in ASP.NET Core
    data: {
      id: args.e.id(),
      text: modal.result.text
    },
    success: () => {
      dp.events.update({
        ...args.e.data,
        text: modal.result.text
      });
      console.log("Updated.");
    }
  });
};
PHP backend (backend_update.php)
<?php
require_once '_db.php';

$json = file_get_contents('php://input');
$params = json_decode($json);

$insert = "UPDATE events SET name = :text WHERE id = :id";

$stmt = $db->prepare($insert);

$stmt->bindParam(':text', $params->text);

$stmt->execute();

class Result {}

$response = new Result();
$response->result = 'OK';
$response->message = 'Update successful';

header('Content-Type: application/json');
echo json_encode($response);
Step 7: Apply the CSS Theme
If you want to use a custom CSS theme, you need to include the stylesheet:
<link type="text/css" rel="stylesheet" href="themes/calendar_transparent.css" />
And set the theme property during initialization:
<script type="text/javascript">
  const dp = new DayPilot.Calendar("dp");
  dp.viewType = "Week";
  dp.theme = "calendar_transparent";
  dp.init();
</script>
You can choose one of the included CSS themes or you can create your own using the online CSS theme designer.
Monthly Event Calendar

DayPilot also includes a monthly event calendar view. The API of the monthly view control uses the same design as the daily/weekly calendar:
<div id="dp"></div>

<script type="text/javascript">
  const dp = new DayPilot.Month("dp");
  dp.startDate = "2021-01-01";
  dp.init();
</script>
Event Calendar Localization

You can switch the event calendar locale easily using .locale property:
<script type="text/javascript">
  const dp = new DayPilot.Calendar("dp");
  dp.locale = "de-de";
  dp.init();
</script>
The calendar includes built-in support for the following locales:
ca-escs-czda-dkde-atde-chde-dede-luen-auen-caen-gben-uses-eses-mxeu-esfi-fifr-befr-chfr-frfr-lugl-esit-itit-chja-jpnb-nonl-nlnl-benn-nopt-brpl-plpt-ptru-rusk-sksv-sezh-cn
You can also create and register your own locale:
DayPilot.Locale.register(
  new DayPilot.Locale('en-us',
  {
    'dayNames':['Sunday','Monday','Tuesday','Wednesday','Thursday','Friday','Saturday'],
    'dayNamesShort':['Su','Mo','Tu','We','Th','Fr','Sa'],
    'monthNames':['January','February','March','April','May',
                  'June','July','August','September','October','November','December'],
    'monthNamesShort':['Jan','Feb','Mar','Apr','May','Jun',
                       'Jul','Aug','Sep','Oct','Nov','Dec'],
    'timePattern':'h:mm tt',
    'datePattern':'M/d/yyyy',
    'dateTimePattern':'M/d/yyyy h:mm tt',
    'timeFormat':'Clock12Hours',
    'weekStarts':0
  }
));
Changing the Scheduler Date

You can use the DayPilot.Navigator control (on the left side in the screenshot above) to change the scheduler dates (the visible week):
<div id="nav"></div>

<script type="text/javascript">
  const nav = new DayPilot.Navigator("nav");
  nav.showMonths = 3;
  nav.skipMonths = 3;
  nav.selectMode = "week";
  nav.onTimeRangeSelected = args => {
      dp.startDate = args.day;
      dp.update();
      loadEvents();
  };
  nav.init();
</script>
Duration Bar

Version 1.1 of the DayPilot Lite HTML5 event calendar supports a duration bar (an indicator of real calendar event duration on the left side of the event). It is enabled by default and you can style it using the CSS theme.
Event Customization (HTML, CSS)
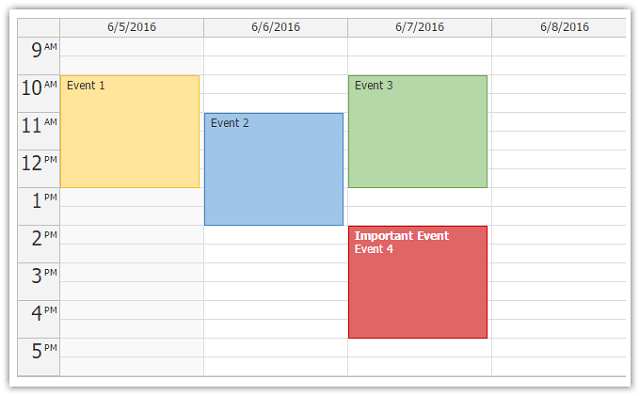
Since version 1.3 SP3, DayPilot Lite supports event customization using onBeforeEventRender event handler:
<div id="dp"></div>

<script type="text/javascript">

    const dp = new DayPilot.Calendar("dp");

    // view
    dp.startDate = "2016-06-06";
    dp.viewType = "Week";
    dp.durationBarVisible = false;

    dp.events.list = [
        {
            "start": "2016-06-07T10:00:00",
            "end": "2016-06-07T13:00:00",
            "id": "29b7a553-d44f-8f2c-11e1-a7d5f62eb123",
            "text": "Event 3",
            "backColor": "#B6D7A8",
            "borderColor": "#6AA84F"
        },
        {
            "start": "2016-06-07T14:00:00",
            "end": "2016-06-07T17:00:00",
            "id": "ff968cfb-eba1-8dc1-7396-7f0d4f465c8a",
            "text": "Event 4",
            "backColor": "#EA9999",
            "borderColor": "#CC0000",
            "tags": {
                "type": "important"
            }
        }
    ];

    dp.onBeforeEventRender = args => {
        if (args.data.tags && args.data.tags.type === "important"){
            args.data.html = "<b>Important Event</b><br>" + args.data.text;
            args.data.fontColor = "#fff";
            args.data.backColor = "#E06666";
        }
    };

    dp.init();


</script>
You can use it to customize the following properties:
backColorbarBackColorbarColorbarHiddenborderColorcssClassfontColorhtmltoolTip
Demo:
- Event Customization Demo [javascript.daypilot.org]
Monthly Calendar Event Customization
Event customization support was added to the monthly calendar control in DayPilot Lite for JavaScript 1.3 SP4.
DayPilot Month supports customization of the following event properties:
backColorborderColorcssClassfontColorhtmltoolTip
Demo:
- Monthly Calendar Event Customization Demo [javascript.daypilot.org]
Example:
<div id="dp"></div>

<script type="text/javascript">
    const dp = new DayPilot.Month("dp");

    // ...

    dp.events.list = [
        {
            "start": "2021-03-03T00:00:00",
            "end": "2021-03-03T12:00:00",
            "id": "5a8376d2-8e3d-9739-d5d9-c1fba6ec02f9",
            "text": "Event 3"
        },
        {
            "start": "2021-02-25T00:00:00",
            "end": "2021-02-27T12:00:00",
            "id": "1fa34626-113a-ccb7-6a38-308e6cbe571e",
            "text": "Event 4",
            "tags": {
                "type": "important"
            }
        },
        // ...
    ];

    dp.onBeforeEventRender = args => {
        var type = args.data.tags && args.data.tags.type;
        switch (type) {
            case "important":
                args.data.fontColor = "#fff";
                args.data.backColor = "#E06666";
                args.data.borderColor = "#E06666";
                break;
            // ...
        }
    };

    dp.init();

</script>
Angular Event Calendar/Scheduler
Since version 2021.4.341, DayPilot Lite includes an Angular Event Calendar component which supports day/week/month views:
- Angular Calendar: Day/Week/Month Views (Open-Source) [code.daypilot.org]
jQuery Plugin
DayPilot includes a jQuery event calendar plugin that allows initialization of the calendar using jQuery API.
See Also
History
- December 28, 2021: DayPilot Lite for JavaScript 2021.4.341 released: Angular, React and Vue Calendar component support, extended date picker (Navigator component)
- June 2, 2021: DayPilot Lite for JavaScript 2021.2.261 released; updated to ES6 syntax; event editing section added
- January 18, 2021: DayPilot Lite for JavaScript 2021.1.248 released; ASP.NET Core backend (.NET 5, Entity Framework); jQuery dependency removed
- June 18, 2018: DayPilot Lite for JavaScript 2018.1.232 released (API improvements, event deleting added to the project source code)
- February 27, 2018: DayPilot Lite for JavaScript 2018.1.228 released (introduces event deleting)
- December 12, 2016: DayPilot Lite for JavaScript 1.3 SP5 released; Navigator CSS styling improved
- August 24, 2016: DayPilot Lite for JavaScript 1.3 SP4 released; includes support for monthly calendar event customization
- June 6, 2016: DayPilot Lite for JavaScript 1.3 SP3 released; event customization example added
- April 26, 2016: DayPilot Lite for JavaScript 1.3 SP2 released; AngularJS "controller as" syntax example added.
- January 3, 2016: Switching the CSS theme fixed. DayPilot Lite for JavaScript 1.3 SP1 released. The sample project uses the latest DayPilot Lite version. The sample ASP.NET MVC project uses Visual Studio 2015. jQuery section added. Monthly calendar view section added.
- November 2, 2015: DayPilot Lite for JavaScript 1.3 released.
- June 3, 2015: DayPilot Lite for JavaScript 1.2 SP2 released.
- March 23, 2015: DayPilot Lite for JavaScript 1.2 SP1 released. Sample projects updated and fixed (drag and drop event resizing).
- January 12, 2015: DayPilot Lite for JavaScript 1.2 released, includes AngularJS event calendar plugin, AngularJS monthly calendar plugin
- November 10, 2014: Doc links added.
- July 17, 2014: Navigator code for switching the visible week added
- May 15, 2014: backend_events.php code listing fixed (
$_POSTinstead of$_GET) - April 1, 2014: DayPilot Lite for JavaScript 1.1 SP1 released, localization example added
- March 17, 2014: Sample ASP.NET MVC5 backend added (download and code listing)
- March 13, 2014: DayPilot Lite for JavaScript 1.1 released
- February 24, 2014: Initial version
Recommend
About Joyk
Aggregate valuable and interesting links.
Joyk means Joy of geeK