
How to Increase Office 365 Mailbox Size Limits
source link: https://www.nakivo.com/blog/how-to-increase-mailbox-size-in-exchange-online/
Go to the source link to view the article. You can view the picture content, updated content and better typesetting reading experience. If the link is broken, please click the button below to view the snapshot at that time.

NAKIVO Blog > Data Protection > How to Increase Mailbox Size in Exchange Online
How to Increase Mailbox Size in Exchange Online
Email is one of the most important communication methods in the business environment. Exchange Online is a reliable email service included in the Office 365 suite that is accessible from anywhere via the internet. However, cloud storage for Office 365 mailboxes is limited. If a mailbox is full, issues can occur. Nobody wants to miss an important email and lose data. This blog post explains the Office 365 mailbox size limit and how to avoid issues related to mailbox size limit.
Exchange Online Limits for Mailbox Storage
Office 365 storage limits for mailboxes are different for different subscription plans and depend on the mailbox type and license assigned to a user. The standard mailbox size for most subscription plans is 50 gigabytes (GB). The Office 365 mailbox size limit for the top subscription plan is 100 GB. As for archive mailboxes, Office 365 email storage limits are 50 GB for most subscription plans and unlimited archive storage with auto-expanding is provided for the top subscription plans.
Mailbox Archive mailbox Microsoft 365 Business Basic 50 GB 50 GB Microsoft 365 Business Standard 50 GB 50 GB Office 365 Enterprise E1 50 GB 50 GB Office 365 Enterprise E3 100 GB Unlimited Office 365 Enterprise E5 100 GB Unlimited Office 365 Enterprise F3 2 GB Not available Exchange Online Plan 1 50 GB 50 GB Exchange Online Plan 2 100 GB Unlimited Exchange Online Kiosk 2 GB Not availableFor example, the Microsoft 365 Business Standard mailbox size is 50 GB and the archive mailbox size is also 50 GB (as you can see in the table above). Read more about Office 365 licensing and subscription plans in this blog post.
What Happens When a Mailbox Size Limit Is Reached?
There are three limits according to the configured mailbox storage quotas: warning limit, send limit, and send/receive limit. Users receive a notification message when a limit has been reached.
Warning limit. This is a signal that the user is about to reach Office 365 email storage limits and should delete non-critical emails. If space is not freed up, sending emails is disabled.
Send limit. The user cannot send emails any more. This issue can be fixed by deleting emails from the mailbox. The ability to receive emails is still available.
Send/receive limit. The user can neither send nor receive emails until the email storage is freed up. A non-delivery report (NDR) is sent to the email sender.
Methods to Increase the Mailbox Size
There are a few methods to increase mailbox sizes for Office 365 users, but certain conditions must be met for each method. Otherwise, you need to free up mailbox storage by archiving old emails or deleting emails. The methods that can help you avoid email storage issues in Office 365 are explained below.
Upgrade the subscription plan. This method is straightforward but requires additional costs. You can buy an Office 365 subscription for a higher plan that provides higher Exchange Online limits for mailboxes. Top subscription plans provide unlimited storage for archive mailboxes.
Edit quotas. Administrators can set mailbox quotas and edit the warning limit, send limit, and send/receive limit. However, these values cannot exceed the limit of the Office 365 subscription plan in use. By default, the warning quota is set to 98% of the maximum mailbox size, the send quota is set to 99%, and the send/receive quota is set to 100% of the Office 365 mailbox capacity. Office 365 administrators can edit Office 365 mailbox size limits for users centrally.
Enable archiving. Mailbox archive allows you to enable 50 GB or 100 GB of additional email storage space in the cloud for moving old emails to archive without deleting them. The top subscription plans support unlimited archive storage for a user. In this case, when 100 GB of archive storage is used up, another 100 GB of Office 365 online archive storage is provisioned. This feature is called auto-expanding. A user cannot use the mailbox archive for purposes other than archiving their own emails. For example, it is not permitted to archive emails of other users. While data of the primary mailbox is stored in the cloud and can also be stored in an email client, data of the archive mailbox is stored only in the cloud.
Delete unnecessary data. Users can delete data that they no longer need from a mailbox to free up storage space. If there is no unnecessary data, users can back up Office 365 email data to a custom location, and then delete these emails from the Office 365 cloud storage.
Note: If you use an email client (for example, Microsoft Office Outlook) and delete email messages in the client, you need to check whether emails are also deleted on the cloud side in Outlook Online. If you use POP3 to receive email and a mail client is configured to leave a copy of a message on a mail server, then deleting a message in the email client doesn’t delete the message on Microsoft 365 mail servers. You need to open the web interface of Outlook Online and delete messages from the cloud email storage. If your email account is configured to use IMAP, then email is completely synchronized between the email client and email server. If you delete the inbox message from the mail client, this message is also deleted from the mail server. If your email client is configured to leave a copy of sent items on a mail server when using SMTP, you need to check these emails in Outlook Online. Delete the emails from the Office 365 email cloud storage if necessary.
Increase the Office 365 mailbox size. Office 365 administrators can increase the Office 365 mailbox size in PowerShell if the subscription plan supports this operation. This method can be used if the old Office 365 mailbox size limit is still applied for the mailbox, and Microsoft increased the mailbox size limit for the used subscription plan (for example, the limit was increased in 2013 and 2016 for Office 365 E3 and E5 subscription plans). If you created a mailbox before 2016, you can use this method to increase Office 365 email storage limits from 25 GB to 50 GB and from 50 GB to 100 GB accordingly.
Increasing the maximum mailbox size doesn’t affect other limitations such as email size, address book limits, number of mailbox folders, sending limits, etc. PowerShell commands to increase Office 365 mailbox size limits and steps to enable mailbox archive are explained below in this blog post.
How to Check the Office 365 Mailbox Size for a User?
A user can check the used space of their own mailbox in Outlook Online. Office 365 administrators can check the used space of any users in the Exchange admin center. Let’s explain both methods to check the Office 365 mailbox size.
Checking Office 365 storage limits in Outlook Online
Open Outlook Online in a web browser by going to https://outlook.office.com and sign into Office 365 with your credentials.
In the top right corner of the web interface of Outlook Online, click the settings icon. The Settings display pane is opened.
At the bottom of the display pane, click View all Outlook settings.
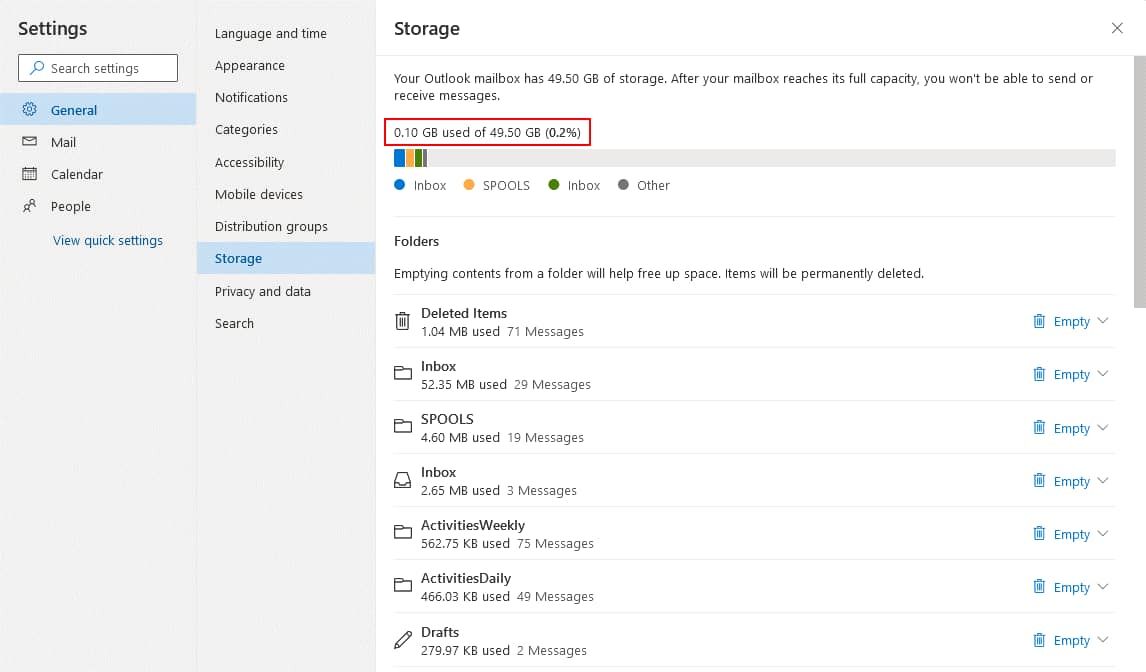
In the Settings window, go to General > Storage. On the Storage page, you can see used space and the maximum mailbox storage size. Messages are categorized by colors on the diagram. The size of each email folder in Outlook Online for the current user is displayed under the diagram.
Checking Office 365 storage limits in the Exchange admin center
Open the Exchange admin center in a web browser by going to https://admin.exchange.microsoft.com. Log in with the credentials of an Office 365 administrator account.
In the navigation pane, go to Recipients > Mailboxes. A list of Office 365 mailboxes for the organization is displayed.
Click the needed Office 365 user account to open user details in the display pane that appears on the right side of the interface.
Information about the Office 365 mailbox size for the selected user is displayed in the bottom right corner (see the screenshot below).
How to Increase the Office 365 Mailbox Size in PowerShell
While you can check the mailbox size in the web interface, you can increase Office 365 mailbox size only in PowerShell.
Run Windows PowerShell as an administrator in Windows. In order to do this, click Start, type cmd, right click the cmd shortcut, and in the context menu click Run as Administrator.
Connect to Exchange Online PowerShell. This step is required to use cmdlets for managing Exchange Online.
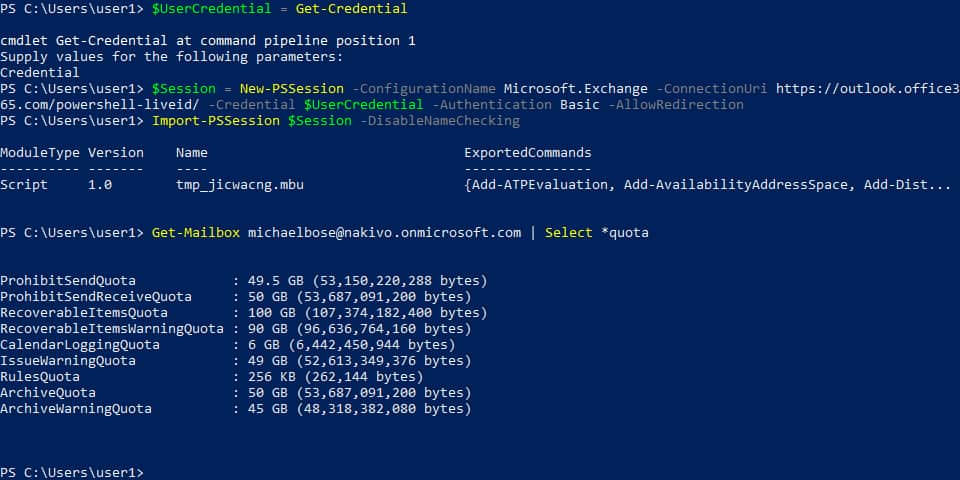
Use this command to open a dialog window and enter the credentials of your Office 365 administrator account:
$UserCredential = Get-Credential
The entered credentials are saved in a variable.
Create a new Exchange Online session by using the credentials entered earlier:
$Session = New-PSSession -ConfigurationName Microsoft.Exchange -ConnectionUri https://outlook.office365.com/powershell-liveid/ -Credential $UserCredential -Authentication Basic -AllowRedirection
Import-PSSession $Session -DisableNameChecking
Check mailbox quota for a user:
Get-Mailbox <User ID> | Select *quota
At this step, you can run the command to increase Office 365 mailbox size limit. Note that this command works only if the license (subscription plan) supports extending the mailbox size.
Set-Mailbox <UserID> -ProhibitSendQuota <Value> -ProhibitSendReceiveQuota <Value> -IssueWarningQuota <Value>
Where:
ProhibitSendQuota, ProhibitSendReceiveQuota, and IssueWarningQuota are the appropriate storage quotas for the Office 365 mailbox. The ProhibitSendQuota value must be less or equal to the value of the ProhibitSendReceiveQuota. The IssueWarningQuota must be less or equal to the value of the ProhibitSendQuota.
<UserID> is the email address of the Office 365 user, user principal name, or globally unique identifier (GUID).
<Value> is the amount of storage in Gigabytes, Megabytes, or Kilobytes (GB, MB, or KB).
In my example, I use this command:
Set-Mailbox [email protected] -ProhibitSendQuota 98GB -ProhibitSendReceiveQuota 99GB -IssueWarningQuota 97GB
You can set a lower value for the IssueWarningQuota to notify a user in time about the ending of free mailbox storage space.
Other commands to manage mailbox sizes
In PowerShell, you can check the current size of mailboxes for all Office 365 accounts in an organization. The result is displayed in the console output as a list, and you don’t need to click the properties of each user in the graphical user interface of the admin center.
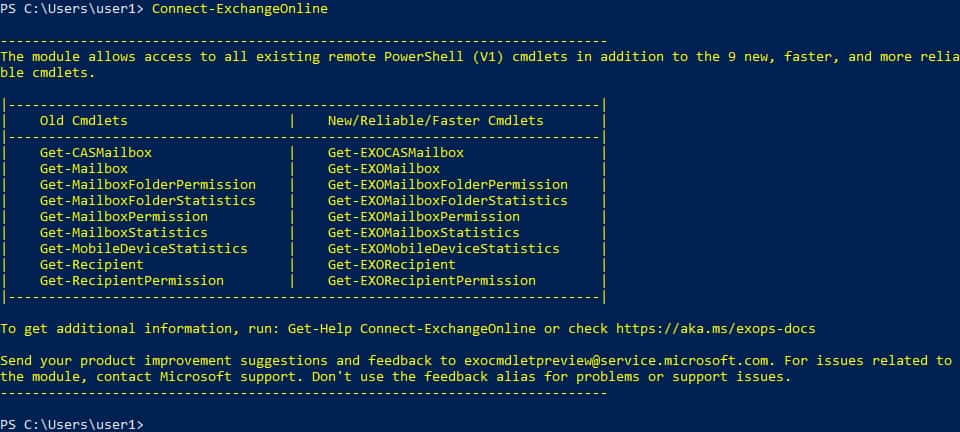
Connect to Exchange Online for using the new module with new cmdlets:
Connect-Exchange-Online
Download the data of the mailbox to the variable with the command:
$exomailboxsize = (Get-EXOMailbox | Get-EXOMailboxStatistics)
You can sort mailboxes by size:
$exomailboxsize | select TotalItemSize, DisplayName | sort -Property TotalItemSize -Descending
This command is convenient for identifying users whose mailboxes are full or nearly full.
Changing quotas for multiple users
You can change Office 365 mailbox size quotas for multiple users with a single command. Use this command to change Office 365 mailbox size for all users:
Get-Mailbox | Set-Mailbox -ProhibitSendQuota <Value> -ProhibitSendReceiveQuota <Value> -IssueWarningQuota <Value>
You can also use filters and change Office 365 mailbox size limit for accounts of an entire department:
Get-User | where {$_.Department -eq "Department_Name"} | Get-Mailbox | Set-Mailbox -ProhibitSendQuota <Value> -ProhibitSendReceiveQuota <Value> -IssueWarningQuota <Value>
Close the PowerShell session after you finish work with Exchange Online:
Remove-PSSession $Session
How to Enable an Archive Mailbox?
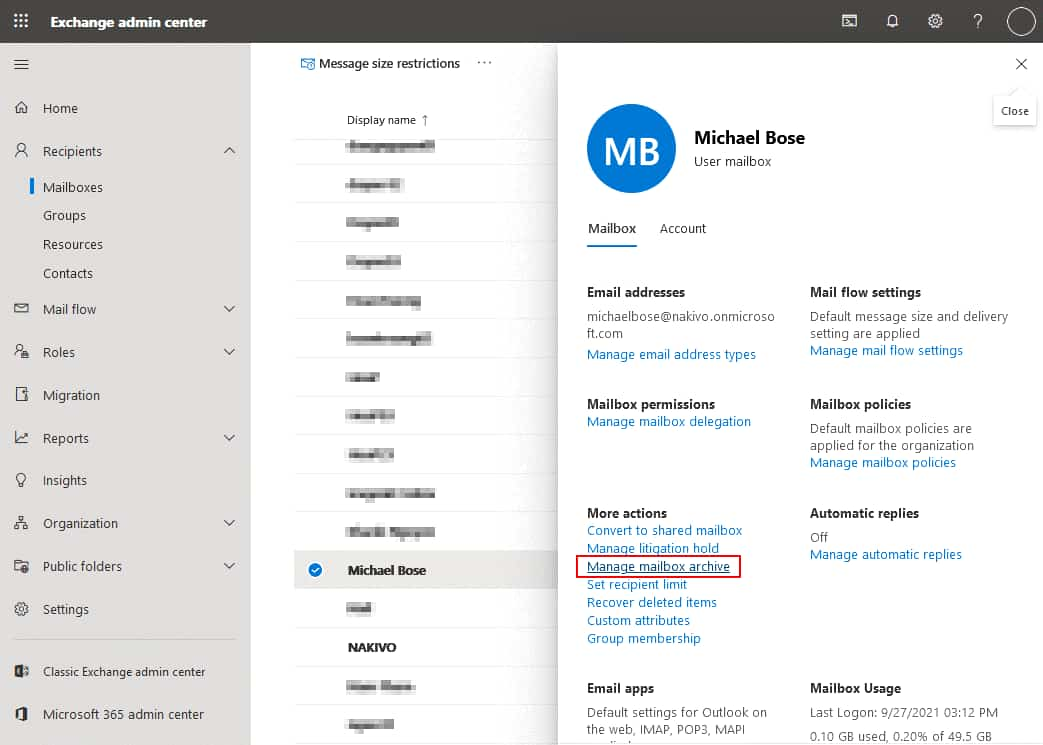
Open the Exchange admin center, go to Recipients > Mailboxes in the navigation pane and select the needed Office 365 user. The display pane with user details is opened.
Make sure that the Mailbox tab is selected and, under More actions, click Manage mailbox archive.
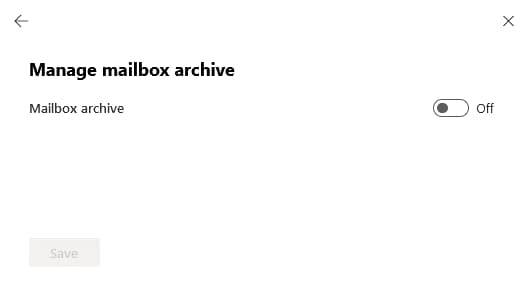
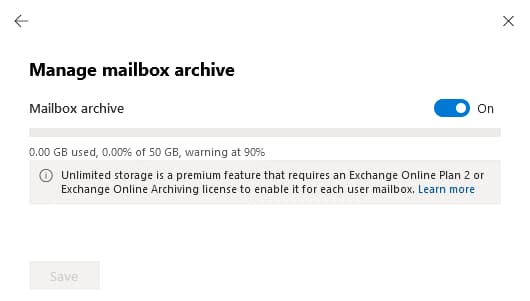
In the opened display pane, click the toggle to turn on the mailbox archive option. Click Save and close the display pane.
When the mailbox archive is enabled, the amount of storage used in the mailbox archive is displayed on the bar. By default, a warning is displayed at 90% of storage use for the archive.
There are also commands to enable mailbox archiving in PowerShell.
To enable mailbox archiving for a single user:
Get-mailbox -Identity [email protected] | Enable-Mailbox -Archive
Define the correct name of the user instead of [email protected].
To enable archiving for all mailboxes:
Get-mailbox -Filter {ArchiveStatus -eq 'none' -and RecipientTypeDetails -eq "UserMailbox"} | Enable-Mailbox -Archive
To check which mailboxes are configured to use the mailbox archive:
Get-Mailbox -Archive
If the subscription plan supports unlimited auto-expanding archiving, you can enable this feature with the command:
Enable-Mailbox -Identity user -AutoExpandingArchive
A user can move emails to the archive mailbox manually to free up mailbox storage space. However, Office 365 administrators can configure retention policies to move old emails to the archived mailbox automatically. Administrators can configure a policy to delete old emails automatically. Read this blog post to learn more about Office 365 retention policies for Exchange Online. The default Exchange Online retention policy set after enabling archiving involves archiving emails that are older than two years.
Conclusion
Office 365 provides the reliable Exchange Online email service, but Office 365 mailbox sizes are limited by the chosen subscription plan. If a user reaches the Office 365 mailbox size limits, the user cannot send and receive emails. This blog post has explained how to increase Office 365 mailbox size to avoid issues. If Exchange Online limits cannot be increased for mailboxes, you can enable the archive mailbox for a user account to free up storage space in the primary mailbox. If you decide to delete some emails from the primary mailbox, it is recommended that you back up Office 365 email data first. Use NAKIVO Backup & Replication for Office 365 backup. The solution supports Exchange Online, OneDrive for Business, and SharePoint Online backup, and allows you to recover the entire mailbox or particular emails to a source or custom Office 365 account. Download NAKIVO Backup & Replication Free Edition from the official website and start protecting your SaaS data.
Recommend
About Joyk
Aggregate valuable and interesting links.
Joyk means Joy of geeK


