

How to run WildFly on Openshift - Mastertheboss
source link: http://www.mastertheboss.com/soa-cloud/openshift/using-wildfly-on-openshift/?utm_campaign=using-wildfly-on-openshift
Go to the source link to view the article. You can view the picture content, updated content and better typesetting reading experience. If the link is broken, please click the button below to view the snapshot at that time.

How to run WildFly on Openshift
This tutorial will teach you how to run the latest version of WildFly on Openshift. We will then look at advanced options such as overriding the default server settings (WildFly 26 update). Finally, we will learn how to create a custom WildFly distribution using Galleon layers.
Setting up WildFly Image Streams
Openshift uses Image Streams to reference a Docker image. An image stream comprises one or more Docker images identified by tags. It presents a single virtual view of related images, similar to a Docker image repository, and may contain images from any of the following:
- Its own image repository in OpenShift’s integrated Docker Registry
- Other image streams
- Docker image repositories from external registries
The evident advantage of using Image Streams vs a standard Docker image is that OpenShift components such as builds and deployments can watch an image stream to receive notifications when new images are added and react by performing a build or a deployment. In other words, the Image Stream can let you decouple your application from a specific Docker Image.
Once started OpenShift, you should be able to find the available image streams with:
$ oc get is -n openshift
This is the default set of images you should be able to use when you start Openshift origin. If you cannot find wildfly Image Stream, then you have to load it. Perform the following steps to do that:
Login in as administrator:
$ oc login -u system:admin
Now reload the Image streams for your WildFly version. For example, to load WildFly 26 Image Stream, execute the following command:
$ oc create -f https://raw.githubusercontent.com/wildfly/wildfly-s2i/wf-26.0/imagestreams/wildfly-centos7.json
The image streams which are already loaded will be skipped. Now login as developer so that your WildFly application will be available in that namespace:
$ oc login
Authentication required for https://192.168.1.194:8443 (openshift)
Username: developer
Password: developer
Creating an example application
Now you can create a new app using a sample Git Hub project which uses WildFly Image Stream:
$ oc new-app wildfly:26~https://github.com/fmarchioni/ocpdemos --context-dir=wildfly-basic --name=wildfly-basic
Next, expose the application wildfly-basic to the router so that it’s available to outside:
$ oc expose service wildfly-basic
Finally, checkout the Route which has been created:
$ oc get route
NAME            HOST/PORT                                        PATH   SERVICES        PORT
wildfly-basic   wildfly-basic-demo.apps.fmarchio-qe.rh-ocs.com          wildfly-basic   8080-tcp
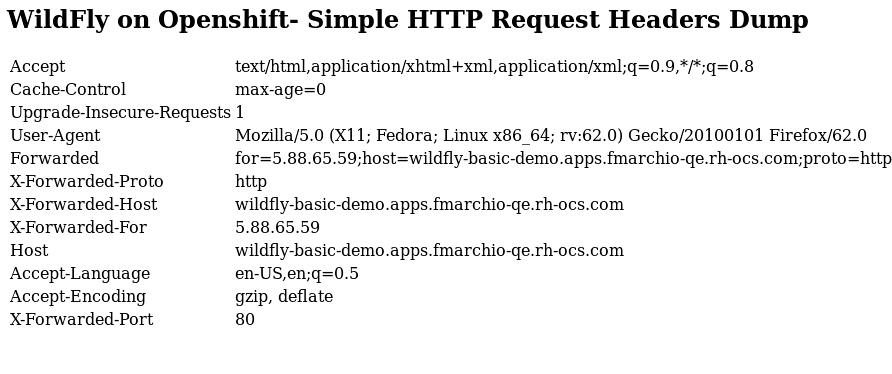
Open the browser at the Route Host address, and here is your example application on Openshift:
How to override WildFly settings
In WildFly 26 there is a nice shortcut to override the configuration settings of the application server. You can inject configuration values through environment variables, using a conversion pattern.
Let’s see it with an example. Supposing you want to set the following attribute:
/subsystem=io/worker=default:write-attribute(name=task-max-threads,value=50)
To set the task-max-threads attribute of the io subsystem, you will set the following environment variable:
SUBSYSTEM_IO_WORKER_DEFAULT__TASK_MAX_THREADS=30
Here’s how the conversion works:
- Remove the trailing slash
- Turn the CLI command to uppercase
- Then, replace non-alphanumeric characters with an underscore (_)
- Add two underscores (__) to the name of the attribute you are going to set
The transformation is not on by default. You have to set this environment variable to enable it:
WILDFLY_OVERRIDING_ENV_VARS=1
Let’s wrap it up! Here is how you can create the WildFly example application setting the task-max-threads attribute:
oc new-app wildfly:26.0~https://github.com/fmarchioni/ocpdemos --context-dir=wildfly-basic --name=wildfly-basic -e WILDFLY_OVERRIDING_ENV_VARS=1 -e SUBSYSTEM_IO_WORKER_DEFAULT__TASK_MAX_THREADS=30
That’s it! You can rsh into the Pod to verify that the attribute is in the configuration:
<subsystem xmlns="urn:jboss:domain:io:3.0">
    <worker name="default" task-max-threads="50"/>
    <buffer-pool name="default"/>
</subsystem>
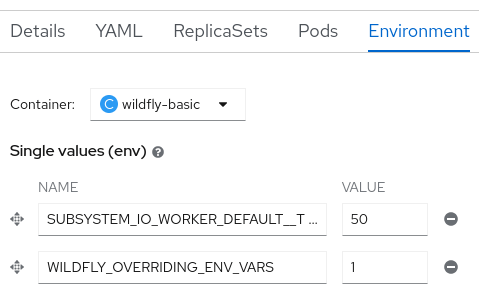
It is worth mentioning, that you can also set the Environment variables on the Deployment of your application. That will, by default, trigger a restart of your Pod:
Provisioning WildFly layers on Openshift with Galleon
If you don’t need the full sized WildFly application server, you can provision an Image of it which just contains the layers you need. For example, if you only need to use REST Server API (and their dependencies such as the Web Server), you can create the above example:
oc new-app wildfly:26~https://github.com/fmarchioni/ocpdemos --context-dir=wildfly-basic --name=wildfly-basic --build-env GALLEON_PROVISION_LAYERS=jaxrs-server
You can verify your custom WildFly configuration by logging into the Pod which runs WildFly:
$ oc get pods
NAME                     READY   STATUS      RESTARTS   AGE
wildfly-basic-1-build    0/1     Completed   0          5m22s
wildfly-basic-1-deploy   0/1     Completed   0          2m27s
wildfly-basic-1-gk6z9    1/1     Running     0          2m22s
Now launch a remote shell (rsh) into the Running Pod:
$ oc rsh wildfly-basic-1-gk6z9

sh-4.2$
And have a look at the extensions installed in your WildFly Server (for the sake of brevity, just the top of the configuration is shown):
sh-4.2$ cat /wildfly/standalone/configuration/standalone.xml
<server xmlns="urn:jboss:domain:10.0">
    <extensions>
        <extension module="org.jboss.as.clustering.infinispan"/>
        <extension module="org.jboss.as.connector"/>
        <extension module="org.jboss.as.deployment-scanner"/>
        <extension module="org.jboss.as.ee"/>
        <extension module="org.jboss.as.jaxrs"/>
        <extension module="org.jboss.as.jmx"/>
        <extension module="org.jboss.as.jpa"/>
        <extension module="org.jboss.as.logging"/>
        <extension module="org.jboss.as.naming"/>
        <extension module="org.jboss.as.transactions"/>
        <extension module="org.jboss.as.weld"/>
        <extension module="org.wildfly.extension.bean-validation"/>
        <extension module="org.wildfly.extension.core-management"/>
        <extension module="org.wildfly.extension.elytron"/>
        <extension module="org.wildfly.extension.io"/>
        <extension module="org.wildfly.extension.request-controller"/>
        <extension module="org.wildfly.extension.security.manager"/>
        <extension module="org.wildfly.extension.undertow"/>
    </extensions>
As you can see, just the RESTEasy API, its dependencies and the Core dependencies have been created.
That’s all. If you want to learn further about WildFly on OpenShift, we recommend checking this tutorial_Create custom WildFly container images with S2I toolkit
Categories openshift Post navigation
Recommend
About Joyk
Aggregate valuable and interesting links.
Joyk means Joy of geeK