

Client to Server File/Data Streaming
source link: https://www.codeproject.com/Articles/5320154/Client-to-Server-File-Data-Streaming
Go to the source link to view the article. You can view the picture content, updated content and better typesetting reading experience. If the link is broken, please click the button below to view the snapshot at that time.

Contents
Introduction
Trying to find an authoritative reference guide for how to stream upload client files to a server was an arduous task, hence this article.
This article demonstrates:
- Uploading a file from a C# client
- Uploading a file from a browser page:
- Using a Form element
- Using XHR with a Form element
- Uploading "blob" data
- Drag & Drop of files
To keep things simple:
- all variations described are handled by a single back-end endpoint.
- Nothing but simple JavaScript is used on the front-end. The demo is actually just an HTML file.
- I also demonstrate how to add additional metadata to the file/blob being uploaded.
Why Use Streams?
While the answer should be obvious, the main reason is that neither the client-side nor the server-side has to pull in the entire file into memory - instead, a stream breaks down the data from a large file into small chunks. The entire process, from the client reading the file to the server saving the contents to a file, is managed as "streamed data" and at most, both ends require only a buffer the size of the stream chunk.
How I Figured This All Out
Piecing this together involved a lot of Google searches. These are the links I found most useful:
Increasing the allowed content length
Increasing the allowed form content size
Upload via an API call (C# client)
Server URL
The server is set up to use IIS and therefore the URL used everywhere is http://localhost/FileStreamServer/file/upload and because this is a demonstration article, its hard-coded in the examples. Obviously one would implement this differently in real life!
The Server
The server is implemented with .NET Core 3.1. The API endpoint is straightforward:
using System.IO;
using System.Threading.Tasks;

using Microsoft.AspNetCore.Http;
using Microsoft.AspNetCore.Mvc;

namespace FileStreamServer.Controllers
{
  [ApiController]
  [Route("[controller]")]
  public class FileController : ControllerBase
  {
    public FileController()
    {
    }

    [HttpPost("upload")]
    public async Task<IActionResult> Upload([FromForm] DocumentUpload docInfo)
    {
      IActionResult ret;

      if (docInfo == null || docInfo.File == null)
      {
        ret = BadRequest("Filename not specified.");
      }
      else
      {
        var fn = Path.GetFileNameWithoutExtension(docInfo.File.FileName);
        var ext = Path.GetExtension(docInfo.File.FileName);
        string outputPathAndFile = $@"c:\projects\{fn}-{docInfo.Id}{ext}";

        using (FileStream output = System.IO.File.Create(outputPathAndFile))
        {
          await docInfo.File.CopyToAsync(output);
        }

        ret = Ok();
      }

      return ret;
    }
  }
}
The salient points of this implementation are as follows:
- The attribute
[FromForm]informs the endpoint handler that is will be receiving form data. - The class
DocumentUploadis the container for the "file" and form metadata.
The DocumentUpload Class
public class DocumentUpload
{
  public IFormFile File { get; set; }
  public string Id { get; set; }
}
The property names must match the naming convention used on the front-end! This example illustrates the expectation that only one file will be specified and the metadata consists only of an "Id" value.
Handling Large Files
The more complicated part of this is actually configuring ASP.NET Core to accept large files. First, the web.config file has to be modified. In the system.webServer section, we have to increase the request limit:
<security>
  <requestFiltering>
    <!-- 4 GB is the max we can set but we use 2GB 2147483647 because that is the form limit -->
      <requestLimits maxAllowedContentLength="2147483647" />
  </requestFiltering>
</security>
Secondly, the form options need to be set. I've opted to do this in the Startup code:
public void ConfigureServices(IServiceCollection services)
{
  ...
  services.Configure<FormOptions>(x =>
  {
    // int.MaxValue is 2GB.
    x.ValueLengthLimit = int.MaxValue;
    x.MultipartBodyLengthLimit = int.MaxValue;
  });
  ...
}
Because int.MaxValue has a max value of 2GB, the size of the file being uploaded is limited to around that limit. Because of encoding overhead, the actual file size one can upload is less than 2GB, but I haven't figured out how much less.
A C# Client
A very simple C# console client that uploads a picture of one of my cats (file is included in the article download) is this, in its entirety:
using System.IO;
using System.Net.Http;
using System.Threading.Tasks;

namespace FileStreamClient
{
  class Program
  {
    static void Main(string[] args)
    {
        var task = Task.Run(async () => await UploadAsync("http://localhost/FileStreamServer/file/upload", "cat.png"));
        task.Wait();
    }

    // https://stackoverflow.com/a/16925159
    // This was an alternate that is a lot more complicated: https://stackoverflow.com/a/2996904
    // and that I couldn't get to work on the server-side.

    private async static Task<Stream> UploadAsync(string url, string filename)
    {
      FileStream fileStream = new FileStream("cat.png", FileMode.Open, FileAccess.Read);
      HttpContent fileStreamContent = new StreamContent(fileStream);
      HttpContent stringContent = new StringContent("1");

      using (var client = new HttpClient())
      {
        using (var formData = new MultipartFormDataContent())
        {
            formData.Add(stringContent, "Id");
            formData.Add(fileStreamContent, "File", filename);
            var response = await client.PostAsync(url, formData);
            Stream ret = await response.Content.ReadAsStreamAsync();

            return ret;
        }
      }
    }
  }
}
Note how the content string "Id" and the file stream content "File" names match the properties in the DocumentUpload class defined on the server.
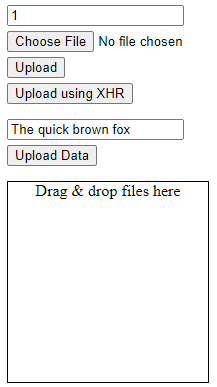
Client Web Page
For the web client-side, I wanted to demonstrate supporting several different things:
- A straight form upload with a submit button.
- Replacing the standard submit process with an XHR upload implementation.
- Uploading data as a blob.
- Uploading a file via drag and drop.
To keep things simple, multiple files are not supported.
The HTML file provided in the article download can be opened directly in the browser, for example: file:///C:/projects/FileStreaming/FileStreamClient/upload.html
A Straight Form Upload with a Submit Button

This is a very simple process with the failing that the action redirects the browser to the upload URL, which really is not what we want unless you want to display a page like "Your document has been uploaded."
<form id="uploadForm" action="http://localhost/FileStreamServer/file/upload" method="post" enctype="multipart/form-data">
  <div>
    <input id="id" placeholder="ID" type="text" name="id" value="1" />
  </div>
  <div style="margin-top:5px">
    <input id="file" style="width:300px" type="file" name="file" />
  </div>
  <div style="margin-top:5px">
    <button type="submit">Upload</button>
  </div>
</form>
That's all there is to it. Notice that the name tags match (case is not sensitive) of the DocumentUpload class on the server.
Replacing the Standard Submit Process with an XHR Upload Implementation

This implementation requires changing the form tag and implementing the XHR upload code.
<form id="uploadForm" onsubmit="xhrUpload(); return false;" action="#">
  <div>
    <input id="id" placeholder="ID" type="text" name="id" value="1" />
  </div>
  <div style="margin-top:5px">
    <input id="file" style="width:300px" type="file" name="file" />
  </div>
  <div style="margin-top:5px">
    <button type="submit">Upload</button>
  </div>
</form>

<div style="margin-top:5px">
  <button onclick="xhrUpload()">Upload using XHR</button>
</div>
Notice that the button to upload using XHR is not part of the form!
The JavaScript implementation:
function xhrUpload() {
  const form = document.getElementById("uploadForm");
  const xhr = new XMLHttpRequest();
  responseHandler(xhr);
  xhr.open("POST", "http://localhost/FileStreamServer/file/upload");
  const formData = new FormData(form);
  xhr.send(formData);
}

function responseHandler(xhr) {
  xhr.onreadystatechange = function() {
    if (xhr.readyState === 4) {
      uploadResponse(xhr);
    }
  }
}

function uploadResponse(xhr) {
  if (xhr.status >= 200 && xhr.status < 300) {
    alert("Upload successful.");
  } else {
    alert("Upload failed: " + xhr.responseText);
  }
}
The most interesting part of this code is this:
const form = document.getElementById("uploadForm");
...
const formData = new FormData(form);
As whatever id value was entered and file selected are applied when instantiating the FormData object.
Uploading Data as a Blob

HTML:
<div style="margin-top:15px">
  <input id="data" placeholder="some data" type="text" value="The quick brown fox" />
</div>
<div style="margin-top:5px">
  <button onclick="uploadData()">Upload Data</button>
</div>
JavaScript:
function uploadData() {
  const id = document.getElementById("id").value;
  const data = document.getElementById("data").value;
  const blob = new Blob([data]);

  var xhr = new XMLHttpRequest();
  responseHandler(xhr);
  xhr.open("POST", "http://localhost/FileStreamServer/file/upload");

  var formData = new FormData();
  formData.append("Id", id);
  formData.append("File", blob, "data.txt");
  xhr.send(formData);
}
Note here that FormData is instantiated without referencing the form and instead the form data is applied programmatically. Also note that the filename is hard-coded. This code also reuses the responseHandler defined earlier.
Uploading a File with Drag and Drop

HTML:
<div ondrop="dropFile(event);" ondragover="allowDrop(event);" style="margin-top:15px; width:200px; height:200px; border-style:solid; border-width: 1px; text-align:center">
  <div>Drag & drop file here</div>
</div>
The important thing here is that for drag & drop to work, both the ondrop and ondragover must have implementations.
JavaScript:
function allowDrop(e) {
  e.preventDefault();
}

function dropFile(e) {
  e.preventDefault();
  const dt = e.dataTransfer;

  // We could implement multiple files here.
  const file = dt.files[0];
  const id = document.getElementById("id").value;
  uploadFile(id, file);
}

function uploadFile(id, file) {
  var xhr = new XMLHttpRequest();
  responseHandler(xhr);
  xhr.open("POST", "http://localhost/FileStreamServer/file/upload");

  var formData = new FormData();
  formData.append("Id", id);
  formData.append("File", file, file.name);
  xhr.send(formData);
}
Notice that we call preventDefault as this is necessary to prevent the browser from actually attempting to render the file.
The other interesting part of this code is how we get the file object:
const dt = e.dataTransfer;
const file = dt.files[0];
I certainly would not have figured this out with searching the web for an example, as I rarely implement drag & drop on the front-ends that I build.
Conclusion
There you have it. A single reference article for uploading files / data using forms, XHR, or drag & drop.
Recommend
About Joyk
Aggregate valuable and interesting links.
Joyk means Joy of geeK