

ARM64 VM on macOS with libvirt + QEMU
source link: https://www.naut.ca/blog/2021/12/09/arm64-vm-on-macos-with-libvirt-qemu/
Go to the source link to view the article. You can view the picture content, updated content and better typesetting reading experience. If the link is broken, please click the button below to view the snapshot at that time.

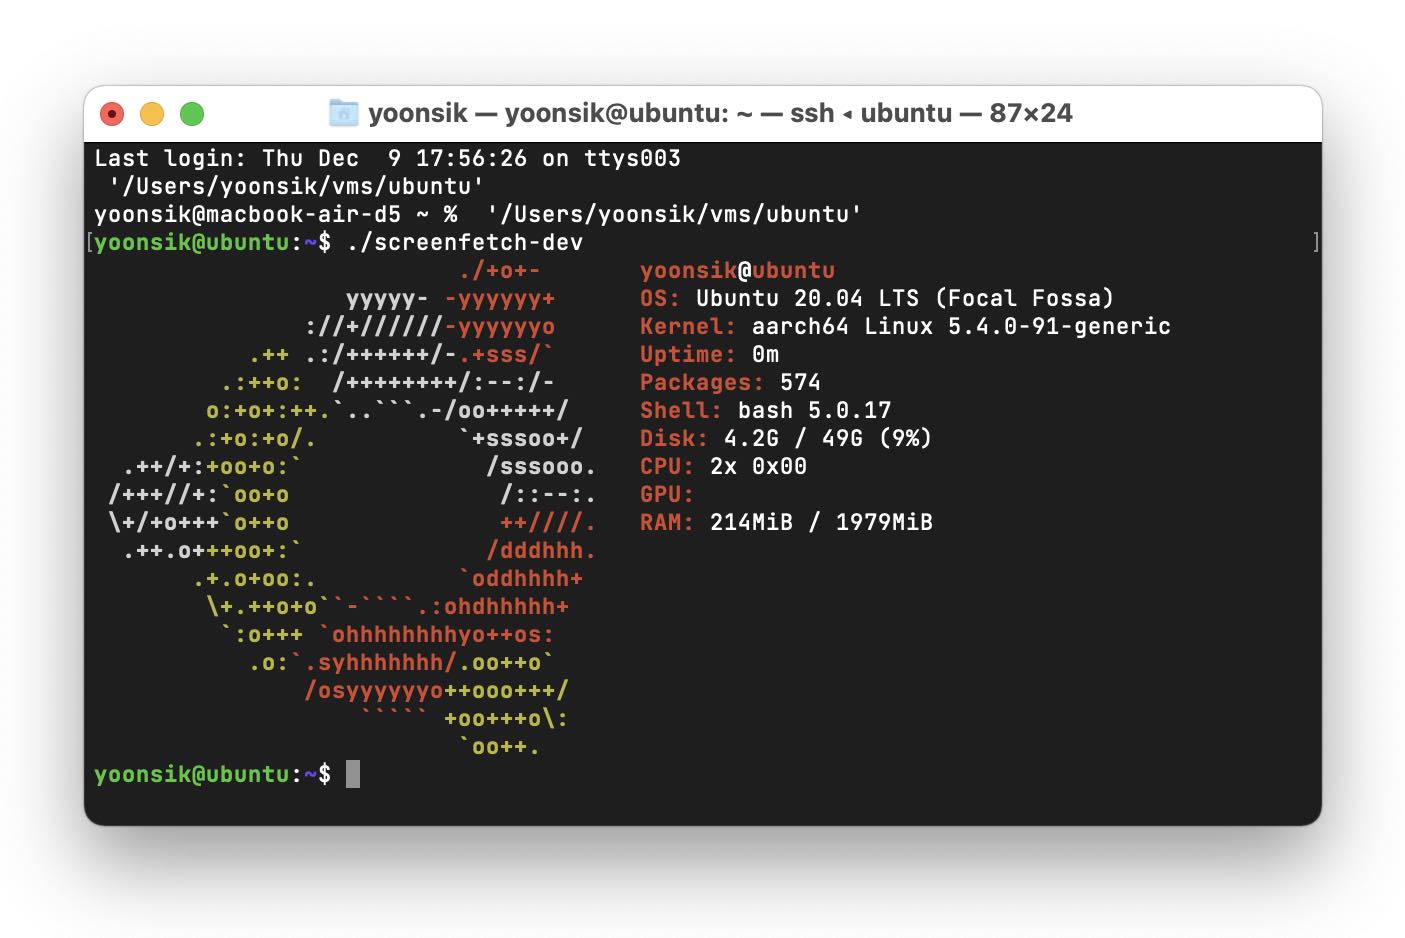
This is the same article I published last year, except updated for M1 Macs. Overall, this method is great for headless Linux VMs that run in the background. We will be using the ARM versions of libvirt and QEMU, with full Hypervisor.Framework support.
Installing libvirt and QEMU
- First, install homebrew, which is a package manager for macOS.
- Run
brew install qemu gcc. - Download the modified libvirt formula and install it with
brew install --build-from-source --debug ./path_to/libvirt.rb. The only change from the original is line 51, which force enables HVM. - Since macOS doesn't support QEMU security features, we need to disable them:
echo 'security_driver = "none"' >> /opt/homebrew/etc/libvirt/qemu.conf echo "dynamic_ownership = 0" >> /opt/homebrew/etc/libvirt/qemu.conf echo "remember_owner = 0" >> /opt/homebrew/etc/libvirt/qemu.conf - Finally start the libvirt service, with
brew services start libvirt. It will start after boot as well.
Installing Ubuntu Server 20.04
There are two ways to access the virtual display of the VM, either using a VNC client or the virt-viewer program. I recommend RealVNC Viewer. The VNC client is responsive and quick to install, but if you have multiple VMs you need to manually manage the different ports. The rest of this guide uses VNC.
-
Create a
vmsfolder in your home directory, and generate a disk image. Change50gto the size of your prefered disk:mkdir ~/vms && cd ~/vms qemu-img create -f qcow2 ubuntu.qcow2 50g -
Download the ARM Ubuntu Server 20.04 Install Image and my ARM libvirt XML template and place the .iso and .xml files in the same folder.
-
Modify the following elements in the
ubuntu.xmlfile to match your your VM preferences and file paths. Save, then runvirsh define ubuntu.xmlfollowed byvirsh start ubuntu.<domain type='qemu' xmlns:qemu='http://libvirt.org/schemas/domain/qemu/1.0'> <name>name of the VM</name> <memory unit='GB'>how much ram</memory> <vcpu>how many cpus</vcpu> ... <disk type='file' device='disk'> <source file='full path to your qcow2 file'/> ... <disk type='file' device='disk'> <source file='full path to your install iso'/> -
Start RealVNC Viewer and connect to
localhost. Click theCtrl+Alt+Delbutton to reboot the machine, and quickly pressEscto get into the setup menu. Select Boot Manager, then select the Ubuntu Server image. You might need some trial and error here, but for me it was UEFI Misc Device 3.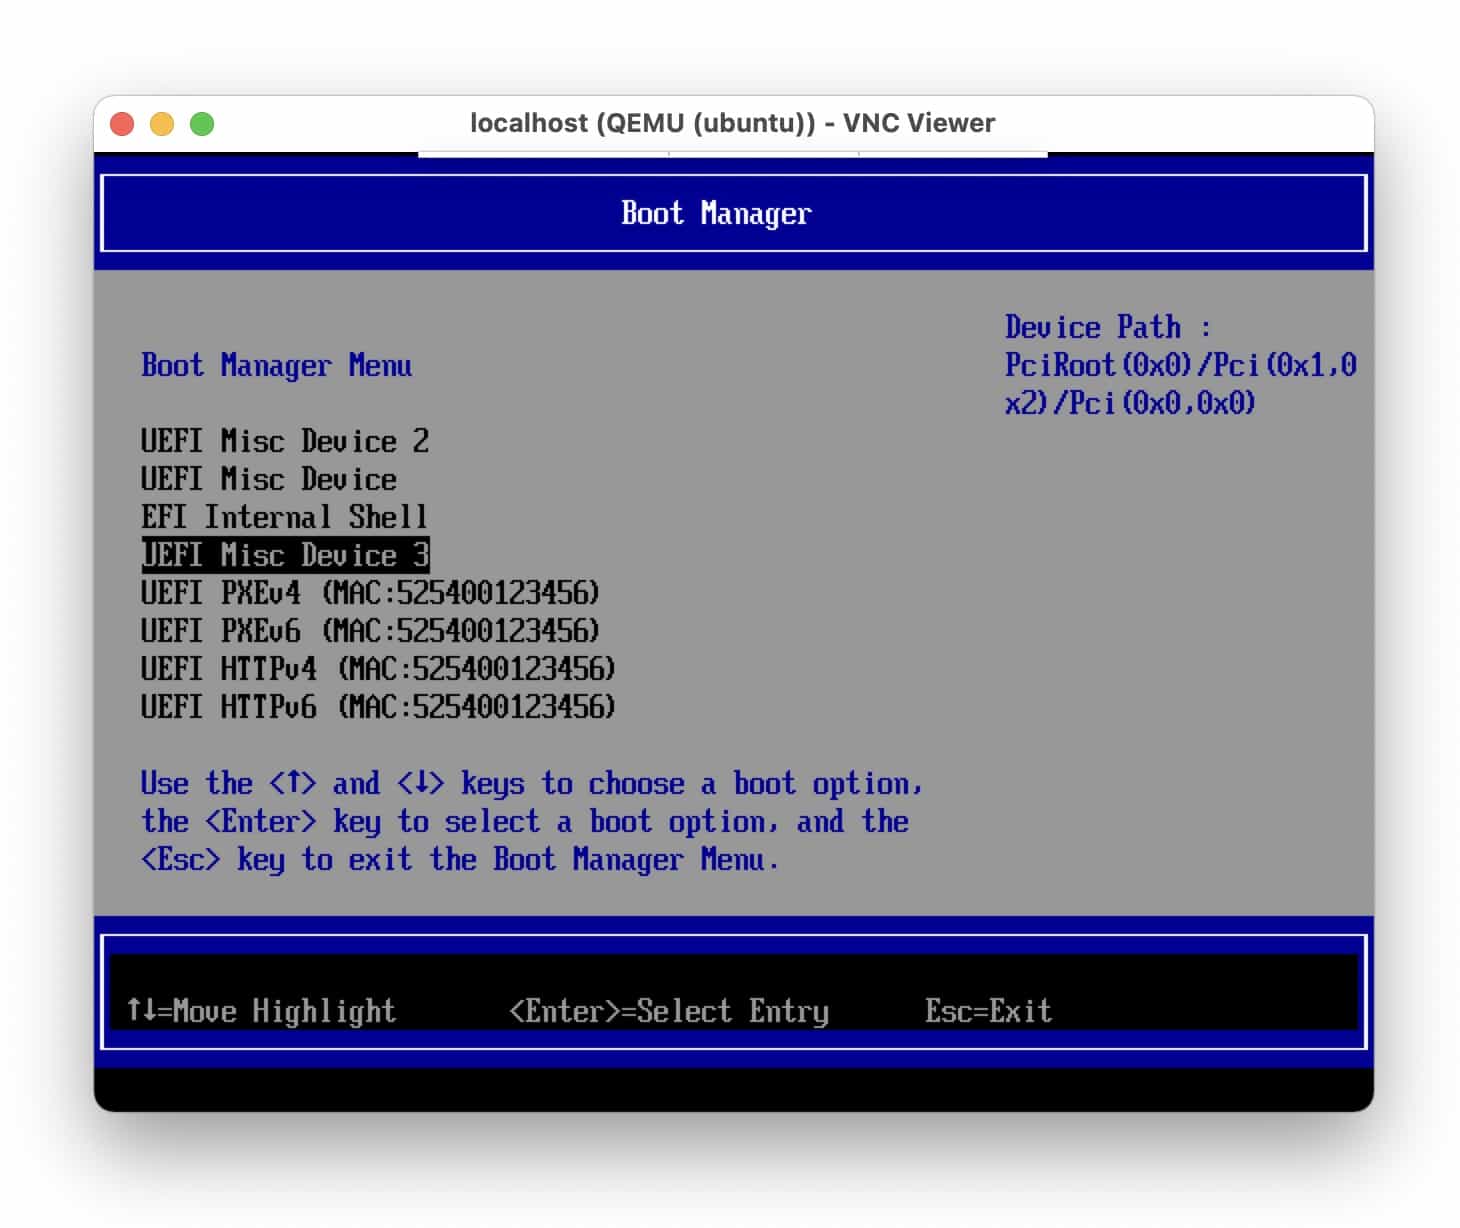
-
Install Ubuntu Server normally, making sure to enable the SSH server. Once it restarts you can connect to the VM from your terminal by running
ssh -p 2222 user@localhost. -
To send a shutdown signal to your VM, run
virsh shutdown ubuntu. To force shutdown, runvirsh destroy ubuntu. -
To forward a port, e.g. port 443 from the VM to port 8443 locally, run the following:
ssh -p 2222 -L8443:localhost:443 user@localhost
Multiple VMs
If you want to create multiple VMs, create an XML file for each machine with a unique UUID, VM name, and VNC port. Also, change the hostfwd argument so that each VM exposes a different port for SSH, e.g. 2223 instead of 2222. After you have defined them all, you can get a list of the VMs that are currently running with virsh list.
References:
Recommend
-
52
libvirt介绍Libvirt是一个软件集合,便于使用者管理虚拟机和其他虚拟化功能,比如存储和网络接口管理等等。Libvirt概括起来包括一个API库、一个daemon(libvirtd)和一个命令行工具(virsh)。支持的虚拟化技术:KVM,XEN,VMWARE,Qemu,LXC,OpenVZ等libvirt中的术语...
-
73
Libvirt 库是一种实现 Linux 虚拟化功能的 Linux® API,它支持各种虚拟机监控程序,包括 Xen 和 KVM,以及 QEMU 和用于其他操作系统的一些虚拟产品。 libvirt 提供一种虚拟机监控程序不可知的 API 来安全管理...
-
112
iOS on QEMU This project is a fork of the official QEMU repository. Please refer to this README for information about the QEMU project. ...
-
12
iOS on QEMU This project is a fork of the official QEMU repository. Please refer to this README for information about the QEMU project. The goal of this project...
-
4
获取balloon信息, hmp格式¶ #virsh qemu-monitor-command domain_name --hmp 'info balloon' balloon: actual=1024
-
12
How to run Windows 10 on ARM or Ubuntu for ARM64 in QEMU on Apple Silicon Mac Here is easy steps to try Windows 10 on ARM or Ubuntu for ARM64 on your Apple Silicon Mac. Enjoy! NOTE: that this is current, 10/1/...
-
8
Running arm64.aarch64 FreeBSD on QEMU/UTM.app on Apple Silicon Around a year ago I got an M1 MacBook Air for work. At this point, a lot of people that I know use these Apple Silicon mach...
-
7
Concept IntroduceQemu is an emulator that simulates the CPU and other hardware to the Guest OS, which thinks it is dealing directly with the hardware, but is actually dealing with the hardware simulated by Qemu,...
-
5
patch sed -i 's/-O2/-Og/g' Makefile Disable BUILD_BUG_ON easy! :) git diff include/asm-generic/fixmap.h diff --git a/include/asm-generic/fixmap.h b/include/asm-gener...
-
7
milen.me — Exploring Windows XP on macOS ARM64 Exploring Windows XP on macOS ARM64 Published on...
About Joyk
Aggregate valuable and interesting links.
Joyk means Joy of geeK