

How to Build a 3D Product Model In 5 Minutes - DZone DevOps
source link: https://dzone.com/articles/build-3d-model-5-minutes
Go to the source link to view the article. You can view the picture content, updated content and better typesetting reading experience. If the link is broken, please click the button below to view the snapshot at that time.

How to Build a 3D Product Model In Just 5 Minutes
Displaying products with 3D models is something too great to ignore for an e-commerce app. The 3D model plays an important role in boosting user conversion.
Join the DZone community and get the full member experience.
Join For FreeDisplaying products with 3D models is something too great to ignore for an e-commerce app. Using those fancy gadgets, such an app can leave users with the first impression upon products in a fresh way!
The 3D model plays an important role in boosting user conversion. It allows users to carefully view a product from every angle before they make a purchase. Together with the AR technology, which gives users an insight into how the product will look in reality, the 3D model brings a fresher online shopping experience that can rival offline shopping.
Despite its advantages, the 3D model has yet to be widely adopted. The underlying reason for this is that applying current 3D modeling technology is expensive:
- Technical requirements: Learning how to build a 3D model is time-consuming.
- Time: It takes at least several hours to build a low polygon model for a simple object, and even longer for a high polygon one.
- Spending: The average cost of building a simple model can be more than one hundred dollars, and even higher for building a complex one.
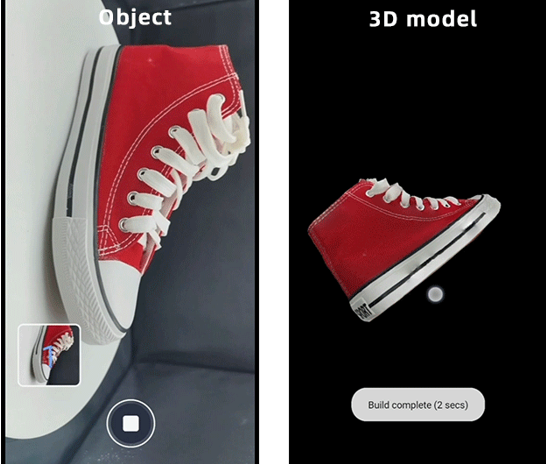
Luckily, 3D object reconstruction, a capability in 3D Modeling Kit newly launched in HMS Core, makes 3D model building straightforward. This capability automatically generates a 3D model with a texture for an object, via images shot from different angles with a common RGB-Cam. It gives an app the ability to build and preview 3D models. For instance, when an e-commerce app has integrated 3D object reconstruction, it can generate and display 3D models of shoes. Users can then freely zoom in and out on the models for a more immersive shopping experience.
Actual Effect
Technical Solutions
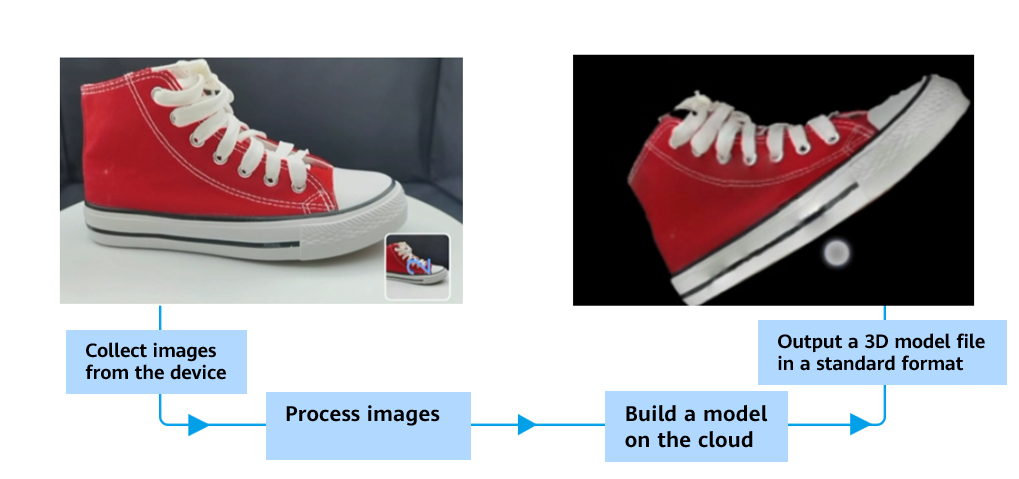
3D object reconstruction is implemented on both the device and cloud. RGB images of an object are collected on the device and then uploaded to the cloud. Key technologies involved in the on-cloud modeling process include object detection and segmentation, feature detection and matching, sparse/dense point cloud computing, and texture reconstruction. Finally, the cloud outputs an OBJ file (a commonly used 3D model file format) of the generated 3D model with 40,000 to 200,000 patches.
Preparations
1. Configuring a Dependency on the 3D Modeling SDK
Open the app-level build.gradle file and add a dependency on the 3D Modeling SDK in the dependencies block.
/Build a dependency on the 3D Modeling SDK.
implementation 'com.huawei.hms:modeling3d-object-reconstruct:1.0.0.300'
2. Configuring AndroidManifest.xml
Open the AndroidManifest.xml file in the main folder. Add the following information before <application> to apply for the storage read and write permissions and camera permission.
Development Procedure
1. Configuring the Storage Permission Application
In the onCreate() method of MainActivity, check whether the storage read and write permissions have been granted; if not, apply for them by using requestPermissions.
if (EasyPermissions.hasPermissions(MainActivity.this, PERMISSIONS)) {Log.i(TAG, "Permissions OK");
} else {EasyPermissions.requestPermissions(MainActivity.this, "To use this app, you need to enable the permission.",
RC_CAMERA_AND_EXTERNAL_STORAGE, PERMISSIONS);
}
Check the application result. If the permissions are not granted, prompt the user to grant them.
@Override
public void onPermissionsGranted(int requestCode, @NonNull List<String> perms) {Log.i(TAG, "permissions = " + perms);
if (requestCode == RC_CAMERA_AND_EXTERNAL_STORAGE && PERMISSIONS.length == perms.size()) {initView();
initListener();
}
}
@Override
public void onPermissionsDenied(int requestCode, @NonNull List<String> perms) {if (EasyPermissions.somePermissionPermanentlyDenied(this, perms)) {new AppSettingsDialog.Builder(this)
.setRequestCode(RC_CAMERA_AND_EXTERNAL_STORAGE)
.setRationale("To use this app, you need to enable the permission.").setTitle("Insufficient permissions").build()
.show();
}
}
2. Creating a 3D Object Reconstruction Configurator
// Set the PICTURE mode.
Modeling3dReconstructSetting setting = new Modeling3dReconstructSetting.Factory()
.setReconstructMode(Modeling3dReconstructConstants.ReconstructMode.PICTURE)
.create();
3. Creating a3D Object Reconstruction Engine And Initializing The Task
Call getInstance() of Modeling3dReconstructEngine and pass the current context to create an instance of the 3D object reconstruction engine.
// Create an engine.
modeling3dReconstructEngine = Modeling3dReconstructEngine.getInstance(mContext);
Use the engine to initialize the task.
// Initialize the 3D object reconstruction task.
modeling3dReconstructInitResult = modeling3dReconstructEngine.initTask(setting);
// Obtain the task ID.
String taskId = modeling3dReconstructInitResult.getTaskId();
4. Creating a Listener Callback to Process the Image Upload Result
Create a listener callback that allows you to configure the operations triggered upon upload success and failure.
// Create an upload listener callback.
private final Modeling3dReconstructUploadListener uploadListener = new Modeling3dReconstructUploadListener() {@Override
public void onUploadProgress(String taskId, double progress, Object ext) {// Upload progress.
}
@Override
public void onResult(String taskId, Modeling3dReconstructUploadResult result, Object ext) {if (result.isComplete()) {isUpload = true;
ScanActivity.this.runOnUiThread(new Runnable() {@Override
public void run() {progressCustomDialog.dismiss();
Toast.makeText(ScanActivity.this, getString(R.string.upload_text_success), Toast.LENGTH_SHORT).show();
}
});
TaskInfoAppDbUtils.updateTaskIdAndStatusByPath(new Constants(ScanActivity.this).getCaptureImageFile() + manager.getSurfaceViewCallback().getCreateTime(), taskId, 1);
}
}
@Override
public void onError(String taskId, int errorCode, String message) {isUpload = false;
runOnUiThread(new Runnable() {@Override
public void run() {progressCustomDialog.dismiss();
Toast.makeText(ScanActivity.this, "Upload failed." + message, Toast.LENGTH_SHORT).show();
LogUtil.e("taskid" + taskId + "errorCode: " + errorCode + " errorMessage: " + message);}
});
}
};
5. Passing the Upload Listener Callback to the Engine to Upload Images
Pass the upload listener callback to the engine. Call uploadFile(), pass the task ID obtained in step 3 and the path of the images to be uploaded. Then, upload the images to the cloud server.
// Pass the listener callback to the engine.
modeling3dReconstructEngine.setReconstructUploadListener(uploadListener);
// Start uploading.
modeling3dReconstructEngine.uploadFile(taskId, filePath);
6. Querying the Task Status
Call getInstance of Modeling3dReconstructTaskUtils to create a task processing instance. Pass the current context.
// Create a task processing instance.
modeling3dReconstructTaskUtils = Modeling3dReconstructTaskUtils.getInstance(Modeling3dDemo.getApp());
Call queryTask of the task processing instance to query the status of the 3D object reconstruction task.
// Query the task status, which can be: 0 (images to be uploaded); 1: (image upload completed); 2: (model being generated); 3( model generation completed); 4: (model generation failed).
Modeling3dReconstructQueryResult queryResult = modeling3dReconstructTaskUtils.queryTask(task.getTaskId());
7. Creating a Listener Callback to Process the Model File Download Result
Create a listener callback that allows you to configure the operations triggered upon download success and failure.
// Create a download listener callback.
private Modeling3dReconstructDownloadListener modeling3dReconstructDownloadListener = new Modeling3dReconstructDownloadListener() {@Override
public void onDownloadProgress(String taskId, double progress, Object ext) {((Activity) mContext).runOnUiThread(new Runnable() {@Override
public void run() {dialog.show();
}
});
}
@Override
public void onResult(String taskId, Modeling3dReconstructDownloadResult result, Object ext) {((Activity) mContext).runOnUiThread(new Runnable() {@Override
public void run() {Toast.makeText(getContext(), "Download complete", Toast.LENGTH_SHORT).show();
TaskInfoAppDbUtils.updateDownloadByTaskId(taskId, 1);
dialog.dismiss();
}
});
}
@Override
public void onError(String taskId, int errorCode, String message) {LogUtil.e(taskId + " <---> " + errorCode + message);
((Activity) mContext).runOnUiThread(new Runnable() {@Override
public void run() {Toast.makeText(getContext(), "Download failed." + message, Toast.LENGTH_SHORT).show();
dialog.dismiss();
}
});
}
};
8. Passing the Download Listener Callback to the Engine to Download the File of the Generated Model
Pass the download listener callback to the engine. Call downloadModel, pass the task ID obtained in step 3 and the path for saving the model file to download it.
// Pass the download listener callback to the engine.
modeling3dReconstructEngine.setReconstructDownloadListener(modeling3dReconstructDownloadListener);
// Download the model file.
modeling3dReconstructEngine.downloadModel(appDb.getTaskId(), appDb.getFileSavePath());
More Information
- The object should have a rich texture, be medium-sized, and have a rigid body. The object should not be reflective, transparent, or semi-transparent. The object types include goods (like plush toys, bags, and shoes), furniture (like sofas), and cultural relics (such as bronzes, stone artifacts, and wooden artifacts).
- The object dimension should be within the range from 15 x 15 x 15 cm to 150 x 150 x 150 cm (A larger dimension requires a longer time for modeling).
- 3D object reconstruction does not support modeling for the human body and face.
- Ensure the following requirements are met during image collection: Put a single object on a stable plane in pure color. The environment shall not be dark or dazzling. Keep all images in focus, free from blur caused by motion or shaking. Ensure images are taken from various angles including the bottom, flat, and top (it is advised that you upload more than 50 images for an object). Move the camera as slowly as possible. Do not change the angle during shooting. Lastly, ensure the object-to-image ratio is as big as possible, and all parts of the object are present.
These are all about the sample code of 3D object reconstruction. You can download the sample code from GitHub. Try to integrate it into your app and build your own 3D models!
Recommend
About Joyk
Aggregate valuable and interesting links.
Joyk means Joy of geeK