

Spring Cloud Gateway的断路器(CircuitBreaker)功能
source link: https://my.oschina.net/zq2599/blog/5313075
Go to the source link to view the article. You can view the picture content, updated content and better typesetting reading experience. If the link is broken, please click the button below to view the snapshot at that time.

欢迎访问我的GitHub
https://github.com/zq2599/blog_demos
内容:所有原创文章分类汇总及配套源码,涉及Java、Docker、Kubernetes、DevOPS等;
- 一起深入了解Spring Cloud Gateway的断路器(CircuitBreaker)功能:
- 先聊聊理论
- 再结合官方和大神的信息确定技术栈
- 再动手开发,先实现再验证
- 再趁热打铁,看看它的源码
- 最后,回顾一下有哪些不足(下一篇文章解决这些不足)
关于断路器(CircuitBreaker)
- 下图来自resilience4j官方文档,介绍了什么是断路器:

- CLOSED状态时,请求正常放行
- 请求失败率达到设定阈值时,变为OPEN状态,此时请求全部不放行
- OPEN状态持续设定时间后,进入半开状态(HALE_OPEN),放过部分请求
- 半开状态下,失败率低于设定阈值,就进入CLOSE状态,即全部放行
- 半开状态下,失败率高于设定阈值,就进入OPEN状态,即全部不放行
- 有个概念先确认一下,即<font color="blue">Spring Cloud断路器</font>与<font color="blue">Spring Cloud Gateway断路器功能</font>不是同一个概念,Spring Cloud Gateway断路器功能还涉及过滤器,即在过滤器的规则下使用断路器:

- 本篇的重点是Spring Cloud Gateway如何配置和使用断路器(CircuitBreaker),因此不会讨论Resilience4J的细节,如果您想深入了解Resilience4J,推荐资料是Spring Cloud Circuit Breaker
关于Spring Cloud断路器
- 先看Spring Cloud断路器,如下图,Hystrix、Sentinel这些都是熟悉的概念:

关于Spring Cloud Gateway的断路器功能
- 来看Spring Cloud Gateway的官方文档,如下图,有几个关键点稍后介绍:

- 上图透露了几个关键信息:
- Spring Cloud Gateway内置了断路器filter,
- 具体做法是使用Spring Cloud断路器的API,将gateway的路由逻辑封装到断路器中
- 有多个断路器的库都可以用在Spring Cloud Gateway(遗憾的是没有列举是哪些)
- Resilience4J对Spring Cloud 来说是开箱即用的
-
简单来说Spring Cloud Gateway的断路器功能是通过内置filter实现的,这个filter使用了Spring Cloud断路器;
-
官方说多个断路器的库都可以用在Spring Cloud Gateway,但是并没有说具体是哪些,这就郁闷了,此时咱们去了解一位牛人的观点:Piotr Mińkowski,就是下面这本书的作者:
- Piotr Mińkowski的博客对Spring Cloud Gateway的断路器功能做了详细介绍,如下图,有几个重要信息稍后会提到:

- 上图可以get到三个关键信息:
- 从2.2.1版本起,Spring Cloud Gateway集成了Resilience4J的断路器实现
- Netflix的Hystrix进入了维护阶段(能理解为即将退休吗?)
- Netflix的Hystrix依然可用,但是已废弃(deprecated),而且Spring Cloud将来的版本可能会不支持
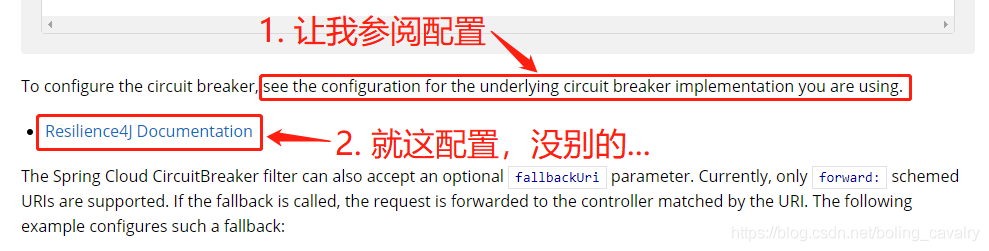
- 再关联到官方文档也以resilience4为例(如下图),胆小的我似乎没有别的选择了,就Resilience4J吧:
- 理论分析就到此吧,接下来开始实战,具体的步骤如下:
- 准备工作:服务提供者新增一个web接口<font color="blue">/account/{id}</font>,根据入参的不同,该接口可以立即返回或者延时500毫秒返回
- 新增名为<font color="blue">circuitbreaker-gateway</font>的子工程,这是个带有断路器功能的Spring Cloud Gateway应用
- 在<font color="blue">circuitbreaker-gateway</font>里面编写单元测试代码,用来验证断路器是否正常
- 运行单元测试代码,观察断路器是否生效
- 给断路器添加fallback并验证是否生效
- 做一次简单的源码分析,一为想深入了解断路器的同学捋清楚源码路径,二为检验自己以前了解的springboot知识在阅读源码时有么有帮助
- 本篇实战中的完整源码可在GitHub下载到,地址和链接信息如下表所示(https://github.com/zq2599/blog_demos):
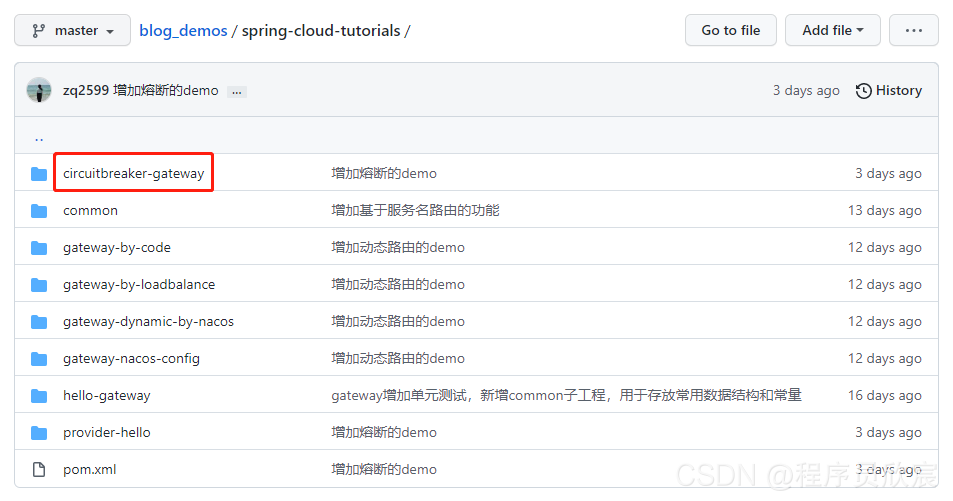
- 这个git项目中有多个文件夹,本篇的源码在<font color="blue">spring-cloud-tutorials</font>文件夹下,如下图红框所示:

- <font color="blue">spring-cloud-tutorials</font>文件夹下有多个子工程,本篇的代码是<font color="red">circuitbreaker-gateway</font>,如下图红框所示:
-
咱们要准备一个可控的web接口,通过参数控制它成功或者失败,这样才能触发断路器
-
本篇的实战中,服务提供者依旧是<font color="blue">provider-hello</font>,为了满足本次实战的需求,咱们在Hello.java文件中增加一个web接口,对应的源码如下:
    @RequestMapping(value = "/account/{id}", method = RequestMethod.GET)
    public String account(@PathVariable("id") int id) throws InterruptedException {
        if(1==id) {
            Thread.sleep(500);
        }

        return Constants.ACCOUNT_PREFIX + dateStr();
    }
-
上述代码很简单:就是接收id参数,如果等于1就延时五百毫秒,不等于1就立即返回
-
如果把断路器设置为超过两百毫秒就算失败,那么通过控制id参数的值,咱们就能模拟请求成功或者失败了,<font color="blue">这是验证断路器功能的关键</font>
-
准备完成,开始写代码
-
在父工程<font color="blue">spring-cloud-tutorials</font>下面新增子工程<font color="blue">circuitbreaker-gateway</font>
-
增加以下依赖
<dependency>
	<groupId>org.springframework.cloud</groupId>
    <artifactId>spring-cloud-starter-circuitbreaker-reactor-resilience4j</artifactId>
</dependency>
- 配置文件application.yml如下:
server:
  #服务端口
  port: 8081
spring:
  application:
    name: circuitbreaker-gateway
  cloud:
    gateway:
      routes:
        - id: path_route
          uri: http://127.0.0.1:8082
          predicates:
            - Path=/hello/**
          filters:
            - name: CircuitBreaker
              args:
                name: myCircuitBreaker
package com.bolingcavalry.circuitbreakergateway;

import org.springframework.boot.SpringApplication;
import org.springframework.boot.autoconfigure.SpringBootApplication;

@SpringBootApplication
public class CircuitbreakerApplication {
    public static void main(String[] args) {
        SpringApplication.run(CircuitbreakerApplication.class,args);
    }
}
- 配置类如下,这是断路器相关的参数配置:
package com.bolingcavalry.circuitbreakergateway.config;

import io.github.resilience4j.circuitbreaker.CircuitBreakerConfig;
import io.github.resilience4j.timelimiter.TimeLimiterConfig;
import org.springframework.cloud.circuitbreaker.resilience4j.ReactiveResilience4JCircuitBreakerFactory;
import org.springframework.cloud.circuitbreaker.resilience4j.Resilience4JConfigBuilder;
import org.springframework.context.annotation.Bean;
import org.springframework.context.annotation.Configuration;
import java.time.Duration;

@Configuration
public class CustomizeCircuitBreakerConfig {

    @Bean
    public ReactiveResilience4JCircuitBreakerFactory defaultCustomizer() {

        CircuitBreakerConfig circuitBreakerConfig = CircuitBreakerConfig.custom() //
                .slidingWindowType(CircuitBreakerConfig.SlidingWindowType.TIME_BASED) // 滑动窗口的类型为时间窗口
                .slidingWindowSize(10) // 时间窗口的大小为60秒
                .minimumNumberOfCalls(5) // 在单位时间窗口内最少需要5次调用才能开始进行统计计算
                .failureRateThreshold(50) // 在单位时间窗口内调用失败率达到50%后会启动断路器
                .enableAutomaticTransitionFromOpenToHalfOpen() // 允许断路器自动由打开状态转换为半开状态
                .permittedNumberOfCallsInHalfOpenState(5) // 在半开状态下允许进行正常调用的次数
                .waitDurationInOpenState(Duration.ofSeconds(5)) // 断路器打开状态转换为半开状态需要等待60秒
                .recordExceptions(Throwable.class) // 所有异常都当作失败来处理
                .build();

        ReactiveResilience4JCircuitBreakerFactory factory = new ReactiveResilience4JCircuitBreakerFactory();
        factory.configureDefault(id -> new Resilience4JConfigBuilder(id)
                .timeLimiterConfig(TimeLimiterConfig.custom().timeoutDuration(Duration.ofMillis(200)).build())
                .circuitBreakerConfig(circuitBreakerConfig).build());

        return factory;
    }
}
-
上述代码有一次需要注意:<font color="blue">timeLimiterConfig</font>方法设置了超时时间,服务提供者如果超过200毫秒没有响应,Spring Cloud Gateway就会向调用者返回失败
-
开发完成了,接下来要考虑的是如何验证
单元测试类
- 为了验证Spring Cloud Gateway的断路器功能,咱们可以用Junit单元测试来精确控制请求参数和请求次数,测试类如下,可见测试类会连续发一百次请求,在前五十次中,请求参数始终在0和1之间切换,参数等于1的时候,接口会有500毫秒延时,超过了Spring Cloud Gateway的200毫秒超时限制,这时候就会返回失败,等失败多了,就会触发断路器的断开:
package com.bolingcavalry.circuitbreakergateway;

import io.github.resilience4j.circuitbreaker.CircuitBreaker;
import org.junit.jupiter.api.RepeatedTest;
import org.junit.jupiter.api.Test;
import org.junit.jupiter.api.extension.ExtendWith;
import org.springframework.beans.factory.annotation.Autowired;
import org.springframework.boot.test.autoconfigure.web.reactive.AutoConfigureWebTestClient;
import org.springframework.boot.test.context.SpringBootTest;
import org.springframework.http.MediaType;
import org.springframework.test.context.junit.jupiter.SpringExtension;
import org.springframework.test.web.reactive.server.WebTestClient;

@SpringBootTest
@ExtendWith(SpringExtension.class)
@AutoConfigureWebTestClient
public class CircuitbreakerTest {

    // 测试的总次数
    private static int i=0;

    @Autowired
    private WebTestClient webClient;

    @Test
    @RepeatedTest(100)
    void testHelloPredicates() throws InterruptedException {
        // 低于50次时,gen在0和1之间切换,也就是一次正常一次超时,
        // 超过50次时,gen固定为0,此时每个请求都不会超时
        int gen = (i<50) ? (i % 2) : 0;

        // 次数加一
        i++;

        final String tag = "[" + i + "]";

        // 发起web请求
        webClient.get()
                .uri("/hello/account/" + gen)
                .accept(MediaType.APPLICATION_JSON)
                .exchange()
                .expectBody(String.class).consumeWith(result  -> System.out.println(tag + result.getRawStatusCode() + " - " + result.getResponseBody()));

        Thread.sleep(1000);
    }
}
-
启动nacos(服务提供者依赖的)
-
启动子工程<font color="blue">provider-hello</font>
-
运行咱们刚才开发的单元测试类,控制台输入的内容截取部分如下,稍后会有分析:
[2]504 - {"timestamp":"2021-08-28T02:55:42.920+00:00","path":"/hello/account/1","status":504,"error":"Gateway Timeout","message":"","requestId":"594efed1"}
[3]200 - Account2021-08-28 10:55:43
[4]504 - {"timestamp":"2021-08-28T02:55:45.177+00:00","path":"/hello/account/1","status":504,"error":"Gateway Timeout","message":"","requestId":"427720b"}
[5]200 - Account2021-08-28 10:55:46
[6]503 - {"timestamp":"2021-08-28T02:55:47.227+00:00","path":"/hello/account/1","status":503,"error":"Service Unavailable","message":"","requestId":"6595d7f4"}
[7]503 - {"timestamp":"2021-08-28T02:55:48.250+00:00","path":"/hello/account/0","status":503,"error":"Service Unavailable","message":"","requestId":"169ae1c"}
[8]503 - {"timestamp":"2021-08-28T02:55:49.259+00:00","path":"/hello/account/1","status":503,"error":"Service Unavailable","message":"","requestId":"53b695a1"}
[9]503 - {"timestamp":"2021-08-28T02:55:50.269+00:00","path":"/hello/account/0","status":503,"error":"Service Unavailable","message":"","requestId":"4a072f52"}
[10]504 - {"timestamp":"2021-08-28T02:55:51.499+00:00","path":"/hello/account/1","status":504,"error":"Gateway Timeout","message":"","requestId":"4bdd96c4"}
[11]200 - Account2021-08-28 10:55:52
[12]504 - {"timestamp":"2021-08-28T02:55:53.745+00:00","path":"/hello/account/1","status":504,"error":"Gateway Timeout","message":"","requestId":"4e0e7eab"}
[13]200 - Account2021-08-28 10:55:54
[14]504 - {"timestamp":"2021-08-28T02:55:56.013+00:00","path":"/hello/account/1","status":504,"error":"Gateway Timeout","message":"","requestId":"27685405"}
[15]503 - {"timestamp":"2021-08-28T02:55:57.035+00:00","path":"/hello/account/0","status":503,"error":"Service Unavailable","message":"","requestId":"3e40c5db"}
[16]503 - {"timestamp":"2021-08-28T02:55:58.053+00:00","path":"/hello/account/1","status":503,"error":"Service Unavailable","message":"","requestId":"2bf2698b"}
[17]503 - {"timestamp":"2021-08-28T02:55:59.075+00:00","path":"/hello/account/0","status":503,"error":"Service Unavailable","message":"","requestId":"38cb1840"}
[18]503 - {"timestamp":"2021-08-28T02:56:00.091+00:00","path":"/hello/account/1","status":503,"error":"Service Unavailable","message":"","requestId":"21586fa"}
[19]200 - Account2021-08-28 10:56:01
[20]504 - {"timestamp":"2021-08-28T02:56:02.325+00:00","path":"/hello/account/1","status":504,"error":"Gateway Timeout","message":"","requestId":"4014d6d4"}
[21]200 - Account2021-08-28 10:56:03
[22]504 - {"timestamp":"2021-08-28T02:56:04.557+00:00","path":"/hello/account/1","status":504,"error":"Gateway Timeout","message":"","requestId":"173a3b9d"}
[23]200 - Account2021-08-28 10:56:05
[24]504 - {"timestamp":"2021-08-28T02:56:06.811+00:00","path":"/hello/account/1","status":504,"error":"Gateway Timeout","message":"","requestId":"aa8761f"}
[25]200 - Account2021-08-28 10:56:07
[26]504 - {"timestamp":"2021-08-28T02:56:09.057+00:00","path":"/hello/account/1","status":504,"error":"Gateway Timeout","message":"","requestId":"769bfefc"}
[27]200 - Account2021-08-28 10:56:10
[28]504 - {"timestamp":"2021-08-28T02:56:11.314+00:00","path":"/hello/account/1","status":504,"error":"Gateway Timeout","message":"","requestId":"2fbcb6c0"}
[29]503 - {"timestamp":"2021-08-28T02:56:12.332+00:00","path":"/hello/account/0","status":503,"error":"Service Unavailable","message":"","requestId":"58e4e70f"}
[30]503 - {"timestamp":"2021-08-28T02:56:13.342+00:00","path":"/hello/account/1","status":503,"error":"Service Unavailable","message":"","requestId":"367651c5"}
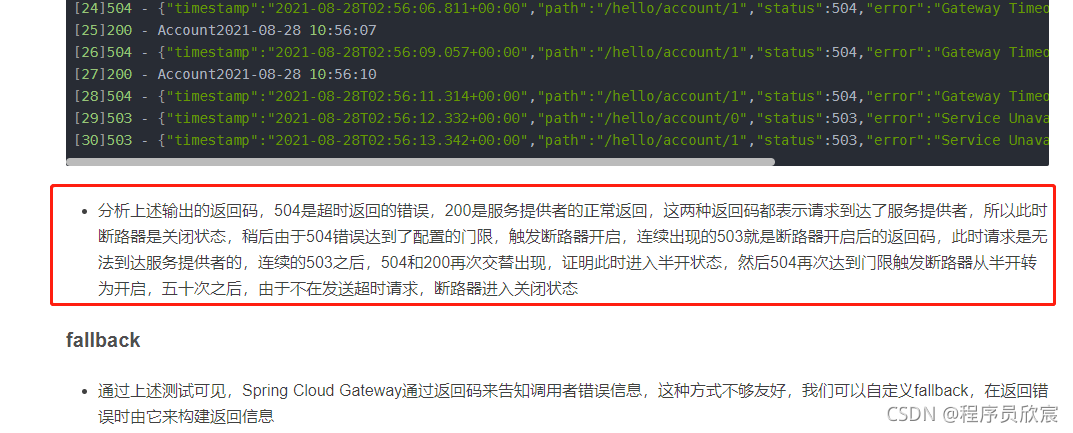
- 分析上述输出的返回码:
- 504是超时返回的错误,200是服务提供者的正常返回
- 504和200两种返回码都表示请求到达了服务提供者,所以此时断路器是关闭状态
- 多次504错误后,达到了配置的门限,触发断路器开启
- 连续出现的503就是断路器开启后的返回码,此时请求是无法到达服务提供者的
- 连续的503之后,504和200再次交替出现,证明此时进入半开状态,然后504再次达到门限触发断路器从半开转为开启,五十次之后,由于不在发送超时请求,断路器进入关闭状态
fallback
-
通过上述测试可见,Spring Cloud Gateway通过返回码来告知调用者错误信息,这种方式不够友好,我们可以自定义fallback,在返回错误时由它来构建返回信息
-
再开发一个web接口,没错,就是在<font color="blue">circuitbreaker-gateway</font>工程中添加一个web接口:
package com.bolingcavalry.circuitbreakergateway.controller;

import org.springframework.web.bind.annotation.GetMapping;
import org.springframework.web.bind.annotation.RestController;
import java.text.SimpleDateFormat;
import java.util.Date;

@RestController
public class Fallback {

    private String dateStr(){
        return new SimpleDateFormat("yyyy-MM-dd hh:mm:ss").format(new Date());
    }

    /**
     * 返回字符串类型
     * @return
     */
    @GetMapping("/myfallback")
    public String helloStr() {
        return "myfallback, " + dateStr();
    }
}
- application.yml配置如下,可见是给filter增加了<font color="blue">fallbackUri</font>属性:
server:
  #服务端口
  port: 8081
spring:
  application:
    name: circuitbreaker-gateway
  cloud:
    gateway:
      routes:
        - id: path_route
          uri: http://127.0.0.1:8082
          predicates:
            - Path=/hello/**
          filters:
            - name: CircuitBreaker
              args:
                name: myCircuitBreaker
                fallbackUri: forward:/myfallback
- 再运行单元测试,可见返回码全部是200,原来的错误现在全部变成了刚才新增的接口的返回内容:
[2]200 - myfallback, 2021-08-28 11:15:02
[3]200 - Account2021-08-28 11:15:03
[4]200 - myfallback, 2021-08-28 11:15:04
[5]200 - Account2021-08-28 11:15:05
[6]200 - myfallback, 2021-08-28 11:15:06
[7]200 - myfallback, 2021-08-28 11:15:08
[8]200 - myfallback, 2021-08-28 11:15:09
[9]200 - myfallback, 2021-08-28 11:15:10
[10]200 - myfallback, 2021-08-28 11:15:11
[11]200 - Account2021-08-28 11:15:12
[12]200 - myfallback, 2021-08-28 11:15:13
[13]200 - Account2021-08-28 11:15:14
[14]200 - myfallback, 2021-08-28 11:15:15
- 至此,咱们已完成了Spring Cloud Gateway的断路器功能的开发和测试,如果聪明好学的您并不满足这寥寥几行配置和代码,想要深入了解断路器的内部,那么请您接往下看,咱们聊聊它的源码;
- RouteDefinitionRouteLocator的构造方法(bean注入)中有如下代码,将name和实例绑定:
gatewayFilterFactories.forEach(factory -> this.gatewayFilterFactories.put(factory.name(), factory));
-
然后会在loadGatewayFilters方法中使用这个map,找到上面put的bean;
-
最终的效果:路由配置中指定了name等于<font color="blue">CircuitBreaker</font>,即可对应SpringCloudCircuitBreakerFilterFactory类型的bean,因为它的name方法返回了"CircuitBreaker",如下图:

- 现在的问题:SpringCloudCircuitBreakerFilterFactory类型的bean是什么?如下图红框,SpringCloudCircuitBreakerResilience4JFilterFactory是SpringCloudCircuitBreakerFilterFactory唯一的子类:
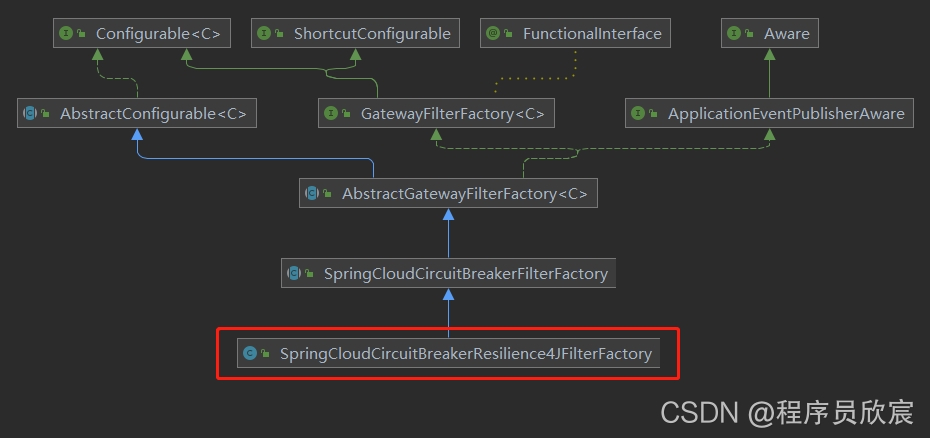
-
从上图来看,CircuitBreaker类型的filter应该是SpringCloudCircuitBreakerResilience4JFilterFactory,不过那只是从继承关系推断出来的,还差一个关键证据:在spring中,到底存不存在SpringCloudCircuitBreakerResilience4JFilterFactory类型的bean?
-
最终发现了GatewayResilience4JCircuitBreakerAutoConfiguration中的配置,可以证明SpringCloudCircuitBreakerResilience4JFilterFactory会被实例化并注册到spring:
@Bean
	@ConditionalOnBean(ReactiveResilience4JCircuitBreakerFactory.class)
	@ConditionalOnEnabledFilter
	public SpringCloudCircuitBreakerResilience4JFilterFactory springCloudCircuitBreakerResilience4JFilterFactory(
			ReactiveResilience4JCircuitBreakerFactory reactiveCircuitBreakerFactory,
			ObjectProvider<DispatcherHandler> dispatcherHandler) {
		return new SpringCloudCircuitBreakerResilience4JFilterFactory(reactiveCircuitBreakerFactory, dispatcherHandler);
	}
-
综上所述,当您配置了CircuitBreaker过滤器时,实际上是SpringCloudCircuitBreakerResilience4JFilterFactory类在为您服务,而关键代码都集中在其父类SpringCloudCircuitBreakerFilterFactory中;
-
所以,要想深入了解Spring Cloud Gateway的断路器功能,请阅读SpringCloudCircuitBreakerFilterFactory.apply方法
- 还记得刚才分析控制台输出的那段内容吗?就是下图红框中的那段,当时咱们用返回码来推测断路器处于什么状态:
-
相信您在看这段纯文字时,对欣宸的分析还是存在疑惑的,根据返回码就把断路器的状态确定了?例如504的时候到底是关闭还是半开呢?都有可能吧,所以,这种推测只能证明断路器正在工作,但是无法确定某个时刻具体的状态
-
所以,咱们需要一种更准确的方式知道每个时刻断路器的状态,这样才算对断路器有了深刻了解
-
接下来的文章中,咱们在今天的成果上更进一步,在请求中把断路器状态打印出来,那就...敬请期待吧,欣宸原创,从未让您失望;
你不孤单,欣宸原创一路相伴
欢迎关注公众号:程序员欣宸
微信搜索「程序员欣宸」,我是欣宸,期待与您一同畅游Java世界... https://github.com/zq2599/blog_demos
Recommend
About Joyk
Aggregate valuable and interesting links.
Joyk means Joy of geeK