

A Guide to NestJS Swagger Configuration
source link: https://dzone.com/articles/a-guide-to-nestjs-swagger-configuration
Go to the source link to view the article. You can view the picture content, updated content and better typesetting reading experience. If the link is broken, please click the button below to view the snapshot at that time.

A Guide to NestJS Swagger Configuration
In this post, we will learn about the basic NestJS Swagger Configuration. Learn how to configure swagger for NestJS to effectively document API endpoints
Join the DZone community and get the full member experience.
Join For FreeIn this post, we will learn about the basic NestJS Swagger Configuration. Documentation is a key aspect of application development. Basically, good API documentation is import for clients to use our APIs effectively.
The OpenAPI specification provides a framework for the same. Basically, the framework is language agnostic. This makes it widely acceptable in the development community. NestJS also provides a dedicated module for enabling Swagger and thereby, supports the OpenAPI specification. Basically, this module helps generate OpenAPI compliant documentation using decorators.
1 – Installation
The first step is to install the dependencies. To do so, execute the below command:
$ npm install --save @nestjs/swagger swagger-ui-express
Since we use express, we are installing the swagger-ui-express package. However, for Fastify we use the fastify-swagger package.
2 – Bootstrapping NestJS Swagger
The next step is to bootstrap the NestJS Swagger Module in our application. To do so, we initialize Swagger using SwaggerModule in the main.ts file.
See below code:
import { NestFactory } from '@nestjs/core';import { DocumentBuilder, SwaggerModule } from '@nestjs/swagger';import { AppModule } from './app.module';
async function bootstrap() {const app = await NestFactory.create(AppModule);
const config = new DocumentBuilder().setTitle('Demo Application') .setDescription("Demo API Application") .setVersion('v1') .addTag('books').build();
const document = SwaggerModule.createDocument(app, config);
SwaggerModule.setup('api', app, document);
await app.listen(3000);
}
bootstrap();
The first thing to notice above is the DocumentBuilder class. Basically, DocumentBuilder helps structure a base document. This document confirms to the OpenAPI specification. It allows us to set several properties such as title, description, and so on. In the above example, we set the title, description, version, and tag properties. Finally, we call the build() method to return an instance of the document.
Next, we call the createDocument() method from the SwaggerModule class. This method basically takes two arguments as input. First is the application instance. The second is the configuration document itself from the previous step. We can also provide a third argument to specify document options. We will check them in the next section.
Lastly, we call the setup()method from the SwaggerModule class. This method accepts several inputs as below:
- The path to mount the Swagger UI. In this case, we specify the path as API. Basically, this means that the Swagger UI will be available on http://localhost:3000/api.
- An application instance.
- The document object is instantiated in the previous step.
- Optional configuration options. In the above code, we don’t have them.
3 – NestJS Swagger UI
To display something meaningful, we will quickly put together a few endpoints for demo purposes.
See below:
import { Body, Controller, Get, Param, Post, Res } from '@nestjs/common';import { AppService } from './app.service';import { Book } from './book.model';
@Controller('books')export class AppController { constructor(private readonly appService: AppService) { }
@Post()
async createBook(@Res() response, @Body() book: Book) { console.log("Book: ", book);}
@Get()
async fetchAll(@Res() response) {}
@Get('/:id') async findById(@Res() response, @Param('id') id) { console.log("Fetch Book for Id: ", id)}
}
You can read more about controllers and endpoints in our detailed post on NestJS Controllers. With the basic configuration in place, we can start our application using the below command:
$ npm run start
The Swagger UI will be available at http://localhost:3000/api. See the below screenshot:
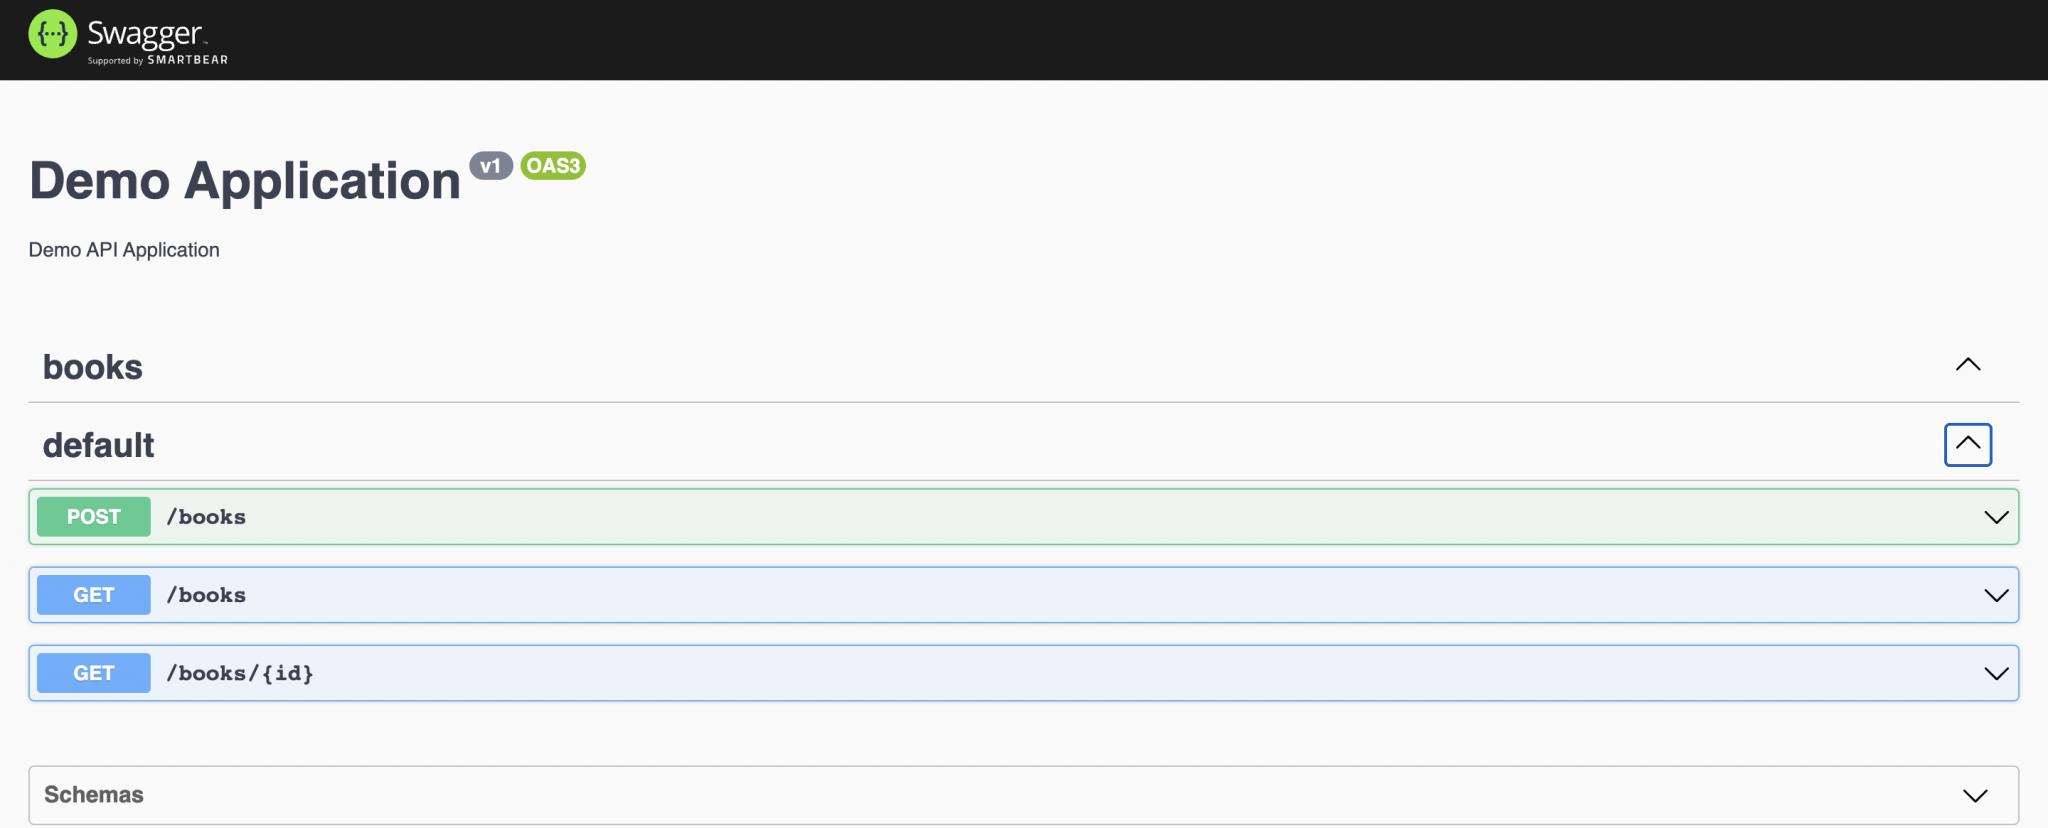
As you can notice, the SwaggerModule automatically reflects all our endpoints. Also, the rest of the parameters such as title, description, version, etc., are also present.
We can also download the Swagger JSON file from http://localhost:3000/api-json. It will look as below:
{"openapi": "3.0.0",
"paths": { "/books": { "post": {"operationId": "AppController_createBook",
"parameters": [],
"requestBody": {"required": true,
"content": { "application/json": { "schema": {"$ref": "#/components/schemas/Book"
}
}
}
},
"responses": { "201": {"description": ""
}
}
},
"get": {"operationId": "AppController_fetchAll",
"parameters": [],
"responses": { "200": {"description": ""
}
}
}
},
"/books/{id}": { "get": {"operationId": "AppController_findById",
"parameters": [],
"responses": { "200": {"description": ""
}
}
}
}
},
"info": {"title": "Demo Application",
"description": "Demo API Application",
"version": "v1",
"contact": {}},
"tags": [{"name": "books",
"description": ""
}],
"servers": [],
"components": { "schemas": { "Book": {"type": "object",
"properties": {}}
}
}
}
4 – NestJS Swagger Configuration Options
As discussed earlier, it is also possible to provide additional NestJS Swagger Configuration Options. These options are part of SwaggerDocumentOptions class.
See below:
export interface SwaggerDocumentOptions {/**
* List of modules to include in the specification
*/
include?: Function[];
/**
* Additional, extra models that should be inspected and included in the specification
*/
extraModels?: Function[];
/**
* If `true`, swagger will ignore the global prefix set through `setGlobalPrefix()` method
*/
ignoreGlobalPrefix?: boolean;
/**
* If `true`, swagger will also load routes from the modules imported by `include` modules
*/
deepScanRoutes?: boolean;
/**
* Custom operationIdFactory that will be used to generate the `operationId`
* based on the `controllerKey` and `methodKey`
* @default () => controllerKey_methodKey
*/
operationIdFactory?: (controllerKey: string, methodKey: string) => string;
}
We can configure the options as below:
const options: SwaggerDocumentOptions = {deepScanRoutes: true
};
const document = SwaggerModule.createDocument(app, config, options);
5 – NestJS Swagger UI Configuration Options
There is another layer of config options available. We can pass an options object belonging to the class ExpressSwaggerCustomOptions as the fourth argument to the SwaggerModule.setup() method.
See below interface definition:
export interface ExpressSwaggerCustomOptions {explorer?: boolean;
swaggerOptions?: Record<string, any>;
customCss?: string;
customCssUrl?: string;
customJs?: string;
customfavIcon?: string;
swaggerUrl?: string;
customSiteTitle?: string;
validatorUrl?: string;
url?: string;
urls?: Record<'url' | 'name', string>[];
}
As you can see, there are many configuration options. We can use them as below:
const customOptions: SwaggerCustomOptions = {customSiteTitle: 'Book API Docs'
}
SwaggerModule.setup('api', app, document, customOptions);This will basically change the site title in the browser tab.
Conclusion
With this, we have successfully learned about NestJS Swagger Configuration. We also looked at document-level custom options and Swagger UI customization options. However, our API definitions are still incomplete and insufficient. In further posts, we will look at how to use the NestJS Swagger APIProperty and NestJS Swagger Operations to describe our APIs in an even better way.
If you have any comments or queries, please feel free to write in the comments section below.
Recommend
-
139
OpenAPI Testing Meqanized Meqa generates and runs test suites using your OpenAPI (formerly Swagger) spec in YAML. It makes REST API testing easy by generating useful test patterns - no coding needed. Highlights Unde...
-
36
Recently, I got a requirement to integrate Swagger 2 with Spring MVC. As the Spring configuration was done using XML based on the project, I had to go for that only, and I started looking for the example but could not fin...
-
35
Kubectl client gives us possibility to configure and switch easy between multiple K8s clusters. Config files location for kubectl Main location for kubectl config files is $HOME/.kub...
-
5
This article provides you with an understanding of the organizational units, master data and shows how to configure SAP S/4HANA – Sourcing and Procurement. Target Audience SAP S/4HANA Project teams SAP S/4HANA Te...
-
2
The Cisco IOS XE Scripting with Tcl feature provides the ability to run Tool Command Language (Tcl) version 8.3.4 commands from the Cisco IOS XE command-line interface (CLI)....
-
4
NAKIVO Blog > VMware Administration and Backup > How to Configure HA in VMw...
-
5
How to Create Modules in NestJS: Step By Step GuideWhat the article is going to coverWhat is a module in NestJS?A module encapsulates a closely related set of...
-
11
Series Intro This series will cover the full implementation of OAuth2.0 Authentication in NestJS for the following types of APIs: And it is divided in 5 parts: ...
-
8
NAKIVO Blog > NAKIVO Backup & Replication > How to Back Up Data to Azur...
-
11
About Joyk
Aggregate valuable and interesting links.
Joyk means Joy of geeK