

Using Flutter to build a native-looking desktop app for macOS and Windows
source link: https://blog.whidev.com/native-looking-desktop-app-with-flutter/
Go to the source link to view the article. You can view the picture content, updated content and better typesetting reading experience. If the link is broken, please click the button below to view the snapshot at that time.

Using Flutter to build a native-looking desktop app for macOS and Windows
Building the Shortcut Keeper app for both platforms, while taking care to make it look and feel native for each one.
Edit: This post has made it to Hacker News, so you can check the discussion here as well.
It is fair to say that using Flutter desktop to create the Shortcut Keeper app went great! The app is now available both on the Mac App Store and the Microsoft Store, and it already has a dedicated audience that finds it useful in their daily tasks.
In the previous post, I focused on how I used Flutter and its ecosystem to develop and ship the app in such a short timeframe (~1 month for the macOS version and about two weeks to adapt it for Windows).
Here, I will try to present another huge benefit of using Flutter desktop: the ability to build an app with a user interface that matches the underlying platform’s design standards.
As you can see, Shortcut Keeper is built to be an adaptive app for desktops, boasting a different UI design for macOS and Windows, while using a single codebase:
- Dark home screen (Windows)
I will also include some tips on how to implement these designs, and provide useful resources.
Why should anyone build an adaptive desktop app
Users expect the apps on their system to behave similarly to other apps they use daily. There are specific norms and idioms on each platform that an app developer can easily follow and replicate, and improve the user’s experience with the app.
A classical example of this is how on Windows, the “confirm” button is traditionally placed on the left side, while it’s the opposite on macOS:
These may seem to be small things, but they eventually add up to make a difference on the user’s efficiency while navigating throughout the app.
Another argument for building apps with adaptive UI design, is that you immediately take advantage of each platform’s best design practices. In the case of a desktop app, that means following Apple’s Human Interface Guidelines and Microsoft’s Fluent Design language. I feel that you are always better off learning from the best and following their battle-tested implementations.
Finally, it helps with building trust. A macOS user that is accustomed to the design of apps like Finder, Notes, or Safari, will find herself at home with an app that features similar buttons, toolbars, text fields, etc.
Similarities between the Notes app and Shortcut Keeper, with the sidebar on the left side and the icon buttons in the top bar.It makes even more sense in the context of desktop apps, as most users don’t use multiple operating systems, but are tied to one for a long time.
Two widget libraries to save a lot of work
As I explained in the previous post, I wouldn’t be able to implement this design and behavior, without these highly recommended packages:
The macos_ui package for the macOS version.The fluent_ui package for the Windows version.They both provide a wealth of useful UI widgets, like buttons, dropdowns, list tiles, etc., and a basic layout scaffold to work from. Each one tries to adhere closely to the respective platform’s design language, so the real challenge was to:
- Get both libraries mixed in the same codebase and handle all the conditional logic of the integration.
- Extend or customize each library in places that I needed something special for my app’s features.
So, let me list some more examples of platform-specific UI design, and how I used these libraries alongside Flutter, to build Shortcut Keeper’s UI.
Comparing UI elements on macOS and Windows
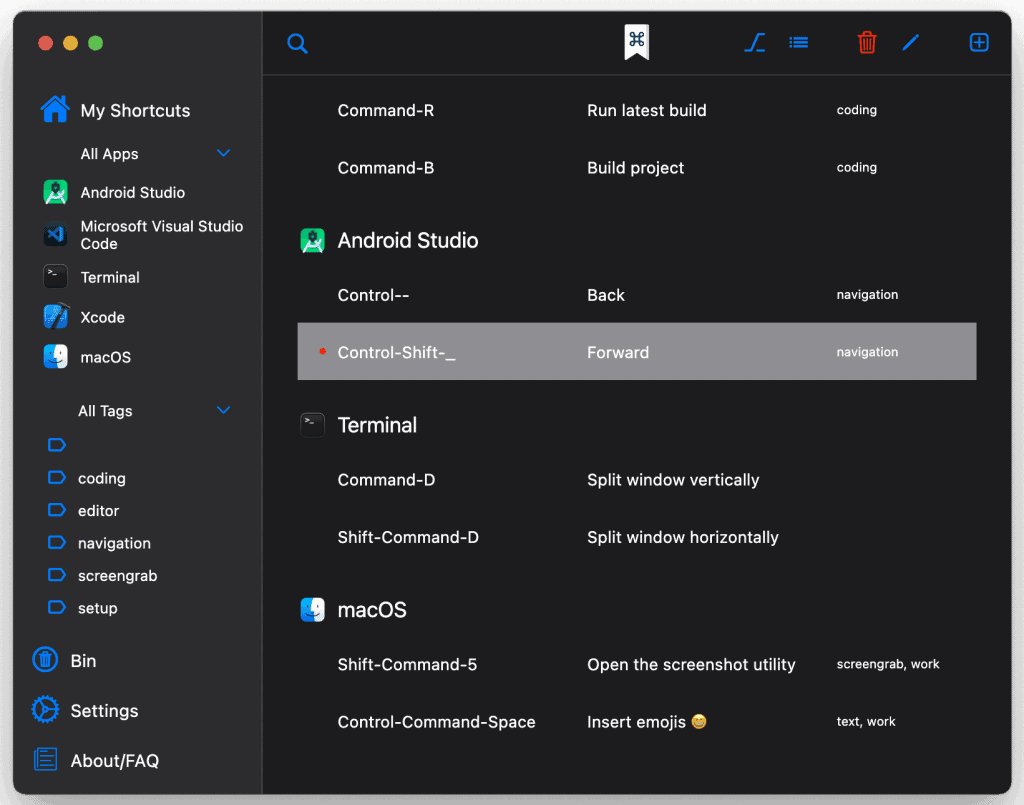
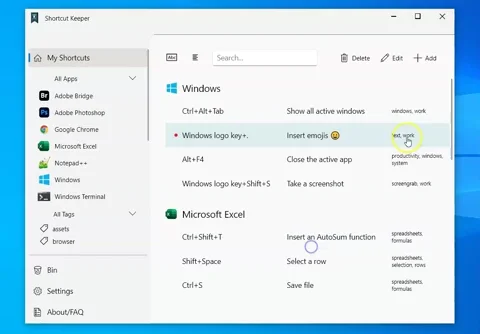
Here is the home screen of the Shortcut Keeper app in both platforms:
Let’s see the main differences between the two of them and how each UI component differs between the macOS and Windows versions.
Title bar and icon buttons
At the top section of the app’s UI:
- The app’s main action buttons are at the very top on macOS, while on Windows they are placed inside the main section. This conforms to platform norms, as shown above on the Apple Notes app, while on Windows, the top-level chrome is usually left blank and only shows the app’s name and icon.
- The icon buttons (Delete, Edit, Add) feature an additional text label on Windows. On the macOS version, the design is more colorful.
Buttons, text fields and checkboxes
When adding a new shortcut, there is the option to manually select the shortcut’s keyboard combination. Here is that screen on both platforms:
The new shortcut dialog on Windows.The new shortcut dialog on macOS.We can see here that:
- The “Save Shortcut” button appears on the left on Windows, in contrast to macOS, where it’s on the right.
- Buttons on Windows are more rectangular than on macOS.
- Checkboxes and text fields also have a different design for either platform.
Show/hide dialog animation
Animations are used mostly when navigating the app’s screens or when dialogs come into view. They are pretty different between the two platforms.
On Windows, you can see:
- The various screens have a back-to-front zooming in animation, consistent with other Microsoft apps. Also notice the cool moving effect of the vertical line at the very left of the sidebar.
- The dialogs appear with a similar animation, and also apply a shadow backdrop when active.
On macOS:
- Navigation animations are snappier and more immediate.
- Dialogs have a bouncing animation when they appear and apply a whitened out backdrop to the rest of the UI.
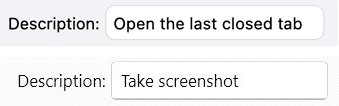
Font and typography
I chose to use the default font family of each system, so it is San Francisco on macOS and Segoe UI on Windows:
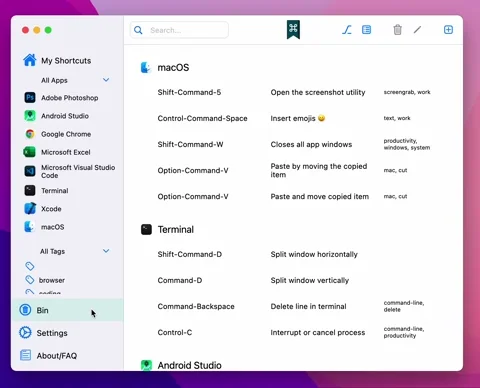
I decided to keep the sidebar and the main area with the list of shortcuts pretty much the same, to achieve a consistent look between them.
There are, of course, other small differences to talk about; even the app’s logo is different, as it wouldn’t make sense to use the Command symbol in Windows:
The app’s icon on macOS and Windows.Now, to explain a bit about how I went about bringing these different designs to life with Flutter.
Splitting the app into two
The initial step was to get the app’s main.dart to decide which type of app to build: a MacosApp for macOS or a FluentApp for Windows. This is done with a simple conditional:
This is required in order to be able to use each library’s custom widgets, just like how Material widgets expect to have at least one Material ancestor, when using Flutter’s default Material UI.
There is also another way to do this split, and at the same time benefit from Flutter’s dependencies tree shaking. I will talk about it in a future, more technical, post.
Mixing macOS and Windows widgets: the platform-aware widget
For UI components that are available as widgets in both packages, I opted to create my own “platform-aware” widgets. For example, here is the simplest implementation of such a widget, a PlatformTextField widget:
PlatformTextField stateless widget.It is essentially a simple fork to select which library widget to use for each platform, with maximum code reuse. This renders differently for each platform:
MacosTextField at the top and TextBox below.Both libraries are still in development phase, so there were cases that there wasn’t a directly appropriate widget to use for each platform. In this case, I had to provide my custom widget implementation, at least until feature parity is reached:
The build function of aPlatformDropdown stateless widget. Notice the implementation for macOS that builds on Flutter’s default dropdown.Here, I tried to implement my own dropdown widget for the missing macos_ui version of it:
fluent_ui‘s ComboBox on the left, and my own dropdown widget for the macOS version.Extending and customizing the UI libraries
Of course, both macos_ui and fluent_ui are meant to provide the basic layout and widgets as a starting point to work from. There were places in Shortcut Keeper’s UI that I needed my own custom components that are vital for the app’s functionality.
An example of this is the My Shortcuts section of the app’s sidebar, that allows the user to filter the shortcuts list by app or tag. To maintain consistency, I needed this to work the same for both platforms.
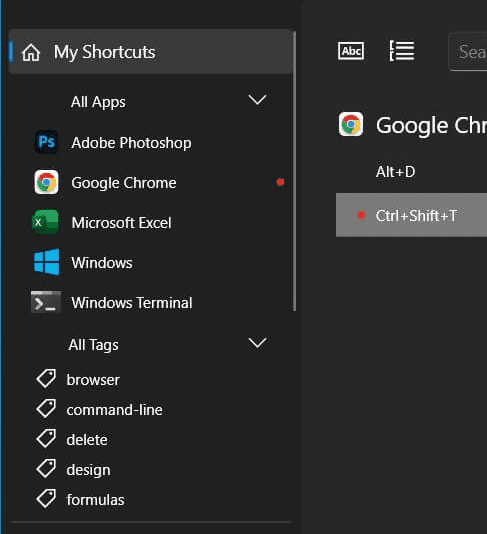 The My Shortcuts section in the Windows version.
However, I found that the sidebar section in fluent_ui is implemented with a NavigationPane widget, which can only accept a specific set of widgets as its children:
To solve this issue, and get my own custom widget shown in the sidebar, I went with using my own fork of the library and customizing it. In my own version, I implemented a simple CustomPane widget that just builds its child, overriding the initial limitations for NavigationPane items:
CustomPaneItem widget will be used as a child for NavigationPane and build whatever its child argument is.Thus, I was able to use the same sidebar widget that I have on the macOS version and increase code reuse:
Now theAllAppsToggle widget can be used inside the NavigationPane (the sidebar).This kind of library extension will also make a good addition for the original package, so it’s something that I will be opening an issue for, to help its development.
The final result
In the end, using the above packages and techniques, I was able to create an app that functions exactly the same on both platforms, while respecting their design principles and norms.
Here are some comparison screenshots for the app on macOS and Windows:
- Shortcuts screen (macOS)
- Shortcuts screen (Windows)
- Dark home screen (macOS)
- Dark home screen (Windows)
- New shortcut dialog (macOS)
- New shortcut dialog (Windows)
- Settings screen (macOS)
- Settings screen (Windows)
- Delete dialog (macOS)
- Delete dialog (Windows)
Useful resources
I really hope that this article and its resources prove useful for anyone looking to build an app with Flutter desktop!
In this whole endeavor, I came across some great guides and packages:Articles/Documentation:
Packages/Open Source projects:
- Flutter Gallery’s repo.
- flutter_platform_widgets, which does a similar job in choosing widgets according to the platform, but for iOS and Android (Cupertino and Material UI).
- macos_ui and fluent_ui, which were used extensively here.
- bitsdojo_window, a really useful package for customizing the appearance of the window for each platform.
- msix, to build the required installer of the app for the Microsoft Store.
Thanks for reading! Here is a photo of my cat:
Recommend
About Joyk
Aggregate valuable and interesting links.
Joyk means Joy of geeK