

SpringBoot如何集成Caffeine?
source link: https://segmentfault.com/a/1190000040912996
Go to the source link to view the article. You can view the picture content, updated content and better typesetting reading experience. If the link is broken, please click the button below to view the snapshot at that time.
前面我们有学习Caffeine 本地缓存性能之王Caffeine,并且也提到SpringBoot默认使用的本地缓存也是Caffeine啦,今天我们来看看Caffeine如何与SpringBoot集成的。
集成caffeine
caffeine与SpringBoot集成有两种方式:
- 一种是我们直接引入
Caffeine依赖,然后使用Caffeine方法实现缓存。相当于使用原生api 引入
Caffeine和Spring Cache依赖,使用SpringCache注解方法实现缓存。SpringCache帮我们封装了Caffeine
pom文件引入<dependency> <groupId>org.springframework.boot</groupId> <artifactId>spring-boot-starter-cache</artifactId> </dependency> <dependency> <groupId>com.github.ben-manes.caffeine</groupId> <artifactId>caffeine</artifactId> <version>2.6.0</version> </dependency>第一种方式
首先配置一个
Cache,通过构造者模式构建一个Cache对象,然后后续关于缓存的增删查都是基于这个cache对象。@Configuration public class CacheConfig { @Bean public Cache<String, Object> caffeineCache() { return Caffeine.newBuilder() // 设置最后一次写入或访问后经过固定时间过期 .expireAfterWrite(60, TimeUnit.SECONDS) // 初始的缓存空间大小 .initialCapacity(100) // 缓存的最大条数 .maximumSize(1000) .build(); }第一种方式我们就一一不介绍了,基本上就是使用
caffeineCache来根据你自己的业务来操作以下方法
这种方式使用的话是对代码有侵入性的。第二种方式
需要在SpingBoot启动类标上
EnableCaching注解,这个玩意跟很多框架都一样,比如我们肴集成dubbo也需要标上@EnableDubbole注解等。@SpringBootApplication @EnableCaching public class DemoApplication { public static void main(String[] args) { SpringApplication.run(DemoApplication.class, args); }在
application.yml配置我们的使用的缓存类型、过期时间、缓存策略等。spring: profiles: active: dev cache: type: CAFFEINE caffeine: spec: maximumSize=500,expireAfterAccess=600s如果我们不习惯使用这种方式的配置,当然我们也可以使用
JavaConfig的配置方式来代替配置文件。@Configuration public class CacheConfig { @Bean public CacheManager cacheManager() { CaffeineCacheManager cacheManager = new CaffeineCacheManager(); cacheManager.setCaffeine(Caffeine.newBuilder() // 设置最后一次写入或访问后经过固定时间过期 .expireAfterAccess(600, TimeUnit.SECONDS) // 初始的缓存空间大小 .initialCapacity(100) // 缓存的最大条数 .maximumSize(500)); return cacheManager; }接下来就是代码中如何来使用这个缓存了
  @Override
  @CachePut(value = "user", key = "#userDTO.id")
  public UserDTO save(UserDTO userDTO) {
      userRepository.save(userDTO);
      return userDTO;
  }

  @Override
  @CacheEvict(value = "user", key = "#id")//2
  public void remove(Long id) {
      logger.info("删除了id、key为" + id + "的数据缓存");
  }

  @Override
  @Cacheable(value = "user",key = "#id")
  public UserDTO getUserById(Long id) {
      return userRepository.findOne(id);
  }
上述代码中我们可以看到有几个注解
@CachePut、@CacheEvict、@Cacheable
我们只需要在方法上标上这几个注解,我们就能够使用缓存了,我们分别来介绍下这几个注解。@Cacheable
@Cacheable它是既可以标注在类上也可以标注在方法上,当它标记在类上的时候它表述这个类上面的所有方法都会支持缓存,同样的
当它作用在法上面时候它表示这个方法是支持缓存的。比如上面我们代码中的getUserById这个方法第一次缓存里面没有数据,我们会去查询DB,但是第二次来查询的时候就不会走DB查询了,而是直接从缓存里面拿到结果就返回了。value 属性
@Cacheable的value属性是必须指定的,其表示当前方法的返回值是会被缓存在哪个Cache上的,对应Cache的名称。@Cacheable的key有两种方式一种是我们自己显示的去指定我们的key,还有一种默认的生成策略,默认的生成策略是SimpleKeyGenerator这个类,这个生成key的方式也比较简单我们可以看下它的源码:public static Object generateKey(Object... params) { // 如果方法没有参数 key就是一个 new SimpleKey() if (params.length == 0) { return SimpleKey.EMPTY; } // 如果方法只有一个参数 key就是当前参数 if (params.length == 1) { Object param = params[0]; if (param != null && !param.getClass().isArray()) { return param; } } // 如果key是多个参数,key就是new SimpleKey ,不过这个SimpleKey对象的hashCode 和Equals方法是根据方法传入的参数重写的。 return new SimpleKey(params); }上述代码还是非常好理解的分为三种情况:
- 方法没有参数,那就new使用一个全局空的
SimpleKey对象来作为key。 - 方法就一个参数,就使用当前参数来作为
key 方法参数大于
1个,就new一个SimpleKey对象来作为key,new这个SimpleKey的时候用传入的参数重写了SimpleKey的hashCode和equals方法,
至于为啥需要重写的原因话,就跟Map用自定义对象来作为key的时候必须要重写hashCode和equals方法原理是一样的,因为caffein也是借助了ConcurrentHashMap来实现,上述代码我们可以发现默认生成
key只跟我们传入的参数有关系,如果我们有一个类里面如果存在多个没有参数的方法,然后我们使用了默认的缓存生成策略的话,就会造成缓存丢失。
或者缓存相互覆盖,或者还有可能会发生ClassCastException因为都是使用同一个key。比如下面这代码就会发生异常(ClassCastException)@Cacheable(value = "user") public UserDTO getUser() { UserDTO userDTO = new UserDTO(); userDTO.setUserName("Java金融"); return userDTO; } @Cacheable(value = "user") public UserDTO2 getUser1() { UserDTO2 userDTO2 = new UserDTO2(); userDTO2.setUserName2("javajr.cn"); return userDTO2; }所以一般不怎么推荐使用默认的缓存生成
key的策略。如果非要用的话我们最好自己重写一下,带上方法名字等。类似于如下代码:@Component public class MyKeyGenerator extends SimpleKeyGenerator { @Override public Object generate(Object target, Method method, Object... params) { Object generate = super.generate(target, method, params); String format = MessageFormat.format("{0}{1}{2}", method.toGenericString(), generate); return format; }自定义key
我们可以通过
Spring的EL表达式来指定我们的key。这里的EL表达式可以使用方法参数及它们对应的属性。
使用方法参数时我们可以直接使用“#参数名”或者“#p参数index”这也是我们比较推荐的做法:@Cacheable(value="user", key="#id") public UserDTO getUserById(Long id) { UserDTO userDTO = new UserDTO(); userDTO.setUserName("java金融"); return userDTO; } @Cacheable(value="user", key="#p0") public UserDTO getUserById1(Long id) { return null; } @Cacheable(value="user", key="#userDTO.id") public UserDTO getUserById2(UserDTO userDTO) { return null; } @Cacheable(value="user", key="#p0.id") public UserDTO getUserById3(UserDTO userDTO) { return null; }@CachePut
@CachePut指定的属性是和@Cacheable一样的,但是它们两个是有区别的,@CachePut标注的方法不会先去查询缓存是否有值,而是每次都会先去执行该方法,然后把结果返回,并且结果也会缓存起来。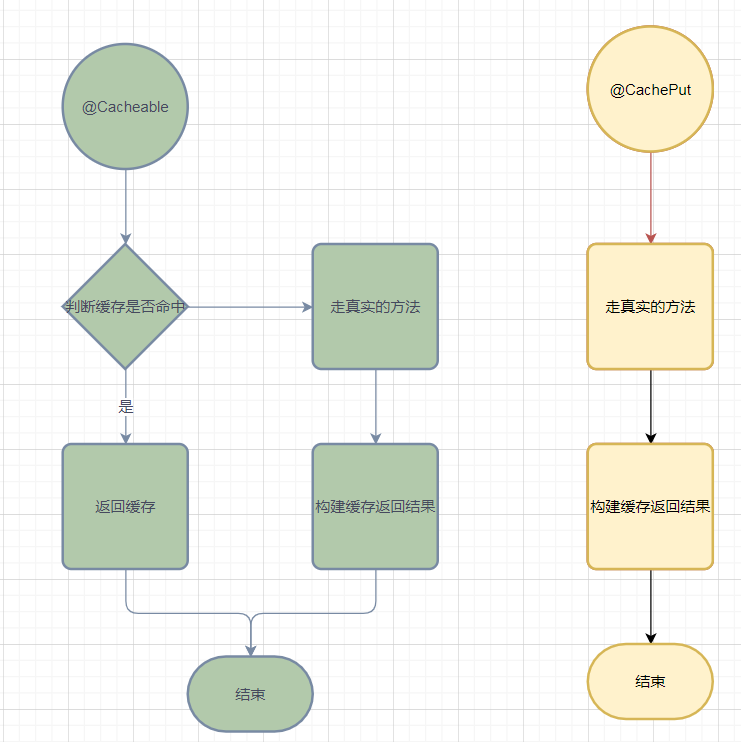

为什么是这样的一个流程我们可以去看看它的源码关键代码就是这一行,
Cache.ValueWrapper cacheHit = findCachedItem(contexts.get(CacheableOperation.class));当我们使用方法上有@Cacheable注解的时候再contexts里面会把CacheableOperation加入进去,只有contexts.get(CacheableOperation.class)取到的内容不为空的话,才会去从缓存里面取内容,否则的话cacheHit会直接返回null。至于contexts什么时候加入CacheableOperation的话我们看下SpringCacheAnnotationParser#parseCacheAnnotations这个方法就会明白的。具体的源码就不展示了,感兴趣的可以自己去翻。
@CacheEvict
把缓存中数据删除,用法跟前面两个注解差不多有value和key属性,需要注意一点的是它多了一个属性beforeInvocation
beforeInvocation这个属性需要注意下它的默认值是false,false代表的意思是再执调用方法之前不删除缓存,只有方法执行成功之后才会去删除缓存。设置为true的话调用方法之前会去删除一下缓存,方法执行成功之后还会去调用删除缓存这样就是双删了。如果方法执行异常的话就不会去删除缓存。allEntrie是否清空所有缓存内容,默认值为false,如果指定为true,则方法调用后将立即清空所有缓存
@Caching
这是一个组合注解集成了上面三个注解,有三个属性:cacheable、put和evict,分别用于来指定@Cacheable、@CachePut和@CacheEvict。
第二种方式是侵入式的,它的实现原理也比较简单就是通过切面的方法拦截器来实现,拦截所有的方法,它的核心代码如下:看起来就跟我们的业务代码差不了多少,感兴趣的也可以去瞅一瞅。
if (contexts.isSynchronized()) {
            CacheOperationContext context = contexts.get(CacheableOperation.class).iterator().next();
            if (isConditionPassing(context, CacheOperationExpressionEvaluator.NO_RESULT)) {
                Object key = generateKey(context, CacheOperationExpressionEvaluator.NO_RESULT);
                Cache cache = context.getCaches().iterator().next();
                try {
                    return wrapCacheValue(method, cache.get(key, () -> unwrapReturnValue(invokeOperation(invoker))));
                }
                catch (Cache.ValueRetrievalException ex) {
                    // The invoker wraps any Throwable in a ThrowableWrapper instance so we
                    // can just make sure that one bubbles up the stack.
                    throw (CacheOperationInvoker.ThrowableWrapper) ex.getCause();
                }
            }
            else {
                // No caching required, only call the underlying method
                return invokeOperation(invoker);
            }
        }


        // Process any early evictions
        // beforeInvocation 属性是否为true,如果是true就删除缓存
        processCacheEvicts(contexts.get(CacheEvictOperation.class), true,
                CacheOperationExpressionEvaluator.NO_RESULT);

        // Check if we have a cached item matching the conditions
        Cache.ValueWrapper cacheHit = findCachedItem(contexts.get(CacheableOperation.class));

        // Collect puts from any @Cacheable miss, if no cached item is found
        List<CachePutRequest> cachePutRequests = new LinkedList<>();
        if (cacheHit == null) {
            collectPutRequests(contexts.get(CacheableOperation.class),
                    CacheOperationExpressionEvaluator.NO_RESULT, cachePutRequests);
        }

        Object cacheValue;
        Object returnValue;

        if (cacheHit != null && !hasCachePut(contexts)) {
            // If there are no put requests, just use the cache hit
            cacheValue = cacheHit.get();
            returnValue = wrapCacheValue(method, cacheValue);
        }
        else {
            // Invoke the method if we don't have a cache hit
            returnValue = invokeOperation(invoker);
            cacheValue = unwrapReturnValue(returnValue);
        }

        // Collect any explicit @CachePuts
        collectPutRequests(contexts.get(CachePutOperation.class), cacheValue, cachePutRequests);

        // Process any collected put requests, either from @CachePut or a @Cacheable miss
        for (CachePutRequest cachePutRequest : cachePutRequests) {
            cachePutRequest.apply(cacheValue);
        }

        // Process any late evictions
        processCacheEvicts(contexts.get(CacheEvictOperation.class), false, cacheValue);

        return returnValue;
}- 由于自己才疏学浅,难免会有纰漏,假如你发现了错误的地方,还望留言给我指出来,我会对其加以修正。
- 如果你觉得文章还不错,你的转发、分享、赞赏、点赞、留言就是对我最大的鼓励。
- 感谢您的阅读,十分欢迎并感谢您的关注。
站在巨人的肩膀上摘苹果:
https://www.cnblogs.com/fashf...!comments
Recommend
About Joyk
Aggregate valuable and interesting links.
Joyk means Joy of geeK