

benzblog · benzblog
source link: https://bentsukun.ch/
Go to the source link to view the article. You can view the picture content, updated content and better typesetting reading experience. If the link is broken, please click the button below to view the snapshot at that time.

07 Nov 2021, 11:27
The BSD build system in general, and pkgsrc in particular, have a large number
of Makefiles ending in .mk.
Recently, I was looking at a commit message in Gmail and noticed that these
names are linkified. At the time, I was looking at a Go module
package, where there is a
go-modules.mk file containing details about
dependencies. This got me thinking: Why is this file name turned into a link?
It turns out that .mk is the ccTLD of the Republic of North Macedonia! So I
did what I had to do: I went to the website of a registrar in Skopje and
reserved the go-modules.mk domain.
For the DNS, I created a zone in Google Cloud DNS, which was simple and extremely cheap, on the order of a few cents per month. For the contents, I added the domain as a redirect to my existing blog on the Firebase console.
So there you have it: next time, you see one of those emails, clicking the file name will bring you directly to this blog.
I have not checked if other standard Makefile names are still free as domains.
So if you are interested in putting your pages at bsd.prog.mk or similar, here
is your chance! :D
12 May 2021, 18:31
This weekend, I made a series of somewhat unusual changes to pkgsrc.
I removed a bunch of Go packages.
Why? Because of Go modules.
What are Go modules?
Since my series of design-ish blog posts(part 1, part 2), Go module builds have fully landed in pkgsrc, to the point that they are now the preferred way to build Go packages.
To recap: There are two ways to use the go tool to build Go code.
- The old way is to have a tree, below
$GOPATH, that has all the dependencies in a directory tree according to their import path. For instance, thegolang.org/x/netpackage would be placed in a$GOPATH/src/golang.org/x/netdirectory. This is whatlang/go/go-package.mkimplements in pkgsrc. - The new way is to extract the source code wherever you want, just like any C
source. The top-level source directory contains a
go.modfile that specifies dependencies and their versions. Thegotool then downloads a bunch of.zipand.modfiles for those dependencies and unpacks them as needed. This is similar to how Cargo works for Rust code.
Like with Rust, in pkgsrc, we specify a list of dependent module files to be downloaded from the module proxy.
In actual practice, a useful pattern has emerged, where the
list of modules is in a separate file named go-modules.mk in the package
directory. To create or update the file, simply run
$ make patch
$ make show-go-modules > go-modules.mk
and then .include the file from the main Makefile.
But why remove all these packages?
A pkgsrc package built with lang/go/go-module.mk does not install any source
code or .a files. Only the binaries are packaged, just like for C.
Go packages that just correspond to intermediate libraries and do not contain
any useful binaries are simply no longer needed. They can be deleted as soon as
nothing depends on them any more.
In particular, I changed all the packages depending on golang.org/x/tools
to be modules, then migrated the go-tools package itself. go-tools depends on a
number of other libraries that nothing else depends on.
By the way, it is fairly simple to make a non-module into a module, even if the
source does not contain a go.mod:
- Change
go-package.mktogo-module.mk. - Run
make patchand change into the top-level source directory. - Run
go mod init github.com/foo/baror whatever the import path is. - Update the file with
go getand/orgo mod tidy. - Copy the generated
go.modandgo.sumfiles to afilesdirectory and copy them into place inpre-patch.
Future
Some future Go release will deprecate GOPATH builds, so we must convert all Go
code in pkgsrc to modules at some point. By the way, if upstream has not made
the jump to modules yet, they might be happy about your pull request :)
25 Apr 2021, 16:50
My new NAS at home is running TrueNAS Core. So far, it has been excellent, however I struggled a bit setting up a NetBSD VM on it. Part of the problem is that a lot of the docs and how-tos I found are stale, and the information in it no longer applies.
TrueNAS Core allows running VMs using bhyve, which is FreeBSD’s hypervisor. NetBSD is not an officially supported OS, at least according to the guest OS chooser in the TrueNAS web UI :) But since the release of NetBSD 9 a while ago, things have become far simpler than they used to be – with one caveat (see below).
UEFI Boot
NetBSD 9 and newer fully support booting through UEFI. This simplifies things because (as far as I understand) bhyve does not really support BIOS boot, it prefers loading the kernel directly.
It used to be the case that it was hard to get the installer working, so people started with an image of an already installed system, plus GRUB for bhyve. This is all very clunky and, to be clear, it is no longer needed.
Starting the Installer
Begin by downloading a CD image for the installer – the regular NetBSD 9_STABLE/amd64 installation CD image from https://nycdn.netbsd.org/pub/NetBSD-daily/netbsd-9/latest/amd64/installation/cdrom/ – and storing it on the ZFS volume.
In the web UI, under “Virtual Machines”, create a new one with the following settings:
- Guest OS: FreeBSD
- Boot method: UEFI
- VNC: enabled
- “wait with boot until VNC connects”: enabled
- Use VirtIO for disks and network
- When asked for an install CD, select the CD image downloaded earlier
Fallout
When you boot now, you will find that VNC disconnects after about five seconds. Further investigation shows that it’s actually the bhyve hypervisor that exits with a segfault.
This turns out to be an issue with the USB 3 (xhci) driver in the NetBSD
kernel – or rather, it is probably a bhyve bug but disabling the xhci driver
on the guest side works around it. Disabling xhci is not a big deal because
the VM does not need native USB 3 anyway.
To work around:
- Start the VM, then connect to VNC.
- Once the bootloader appears, press (3) to go to the prompt. Enter
boot -c. - In the userconf shell, enter
disable xhci*, thenquit. - The installer should appear, letting you install normally.
- After installation, shut down the VM and remove the CD from the list of devices.
- Start it again and repeat steps 2 and 3 to boot into the installed system.
To make the workaround permanent, edit the file /boot.cfg so that the first
line reads
menu=Boot normally:rndseed /var/db/entropy-file;userconf disable xhci*;boot
At this point, you should also uncheck the “wait for boot until VNC connects” checkbox in the settings so the VM can start unattended in the future.
Success!
Here is the obligatory dmesg output for this system:
Copyright (c) 1996, 1997, 1998, 1999, 2000, 2001, 2002, 2003, 2004, 2005,
    2006, 2007, 2008, 2009, 2010, 2011, 2012, 2013, 2014, 2015, 2016, 2017,
    2018, 2019, 2020 The NetBSD Foundation, Inc.  All rights reserved.
Copyright (c) 1982, 1986, 1989, 1991, 1993
    The Regents of the University of California.  All rights reserved.

NetBSD 9.1_STABLE (GENERIC) #0: Thu Apr 22 10:08:46 UTC 2021
	[email protected]:/usr/src/sys/arch/amd64/compile/GENERIC
total memory = 8191 MB
avail memory = 7926 MB
cpu_rng: RDSEED
rnd: seeded with 256 bits
timecounter: Timecounters tick every 10.000 msec
Kernelized RAIDframe activated
running cgd selftest aes-xts-256 aes-xts-512 done
xhci* disabled
xhci* already disabled
timecounter: Timecounter "i8254" frequency 1193182 Hz quality 100
efi: systbl at pa bfb7cf18
  BHYVE (1.0)
mainbus0 (root)
ACPI: RSDP 0x00000000BFB88014 000024 (v02 BHYVE )
ACPI: XSDT 0x00000000BFB870E8 00004C (v01 BHYVE  BVFACP   00000001      01000013)
ACPI: FACP 0x00000000BFB86000 0000F4 (v04 BHYVE  BVFACP   00000001 BHYV 00000001)
ACPI: DSDT 0x00000000BEA98000 00191A (v02 BHYVE  BVDSDT   00000001 INTL 20200430)
ACPI: FACS 0x00000000BFB8C000 000040
ACPI: HPET 0x00000000BFB85000 000038 (v01 BHYVE  BVHPET   00000001 BHYV 00000001)
ACPI: APIC 0x00000000BFB84000 000062 (v01 BHYVE  BVMADT   00000001 BHYV 00000001)
ACPI: MCFG 0x00000000BFB83000 00003C (v01 BHYVE  BVMCFG   00000001 BHYV 00000001)
ACPI: SPCR 0x00000000BFB82000 000050 (v01 BHYVE  BVSPCR   00000001 BHYV 00000001)
ACPI: 1 ACPI AML tables successfully acquired and loaded
ioapic0 at mainbus0 apid 4: pa 0xfec00000, version 0x11, 32 pins
cpu0 at mainbus0 apid 0
cpu0: Intel(R) Pentium(R) Gold G5420 CPU @ 3.80GHz, id 0x906ea
cpu0: package 0, core 0, smt 0
cpu1 at mainbus0 apid 1
cpu1: Intel(R) Pentium(R) Gold G5420 CPU @ 3.80GHz, id 0x906ea
cpu1: package 0, core 0, smt 1
cpu2 at mainbus0 apid 2
cpu2: Intel(R) Pentium(R) Gold G5420 CPU @ 3.80GHz, id 0x906ea
cpu2: package 1, core 0, smt 0
cpu3 at mainbus0 apid 3
cpu3: Intel(R) Pentium(R) Gold G5420 CPU @ 3.80GHz, id 0x906ea
cpu3: package 1, core 0, smt 1
acpi0 at mainbus0: Intel ACPICA 20190405
acpi0: X/RSDT: OemId <BHYVE ,BVFACP  ,00000001>, AslId <    ,01000013>
acpi0: MCFG: segment 0, bus 0-255, address 0x00000000e0000000
acpi0: SCI interrupting at int 9
acpi0: fixed power button present
timecounter: Timecounter "ACPI-Safe" frequency 3579545 Hz quality 900
hpet0 at acpi0: high precision event timer (mem 0xfed00000-0xfed00400)
timecounter: Timecounter "hpet0" frequency 16777216 Hz quality 2000
pckbc1 at acpi0 (KBD, PNP0303) (kbd port): io 0x60,0x64 irq 1
pckbc2 at acpi0 (MOU, PNP0F03) (aux port): irq 12
SIO (PNP0C02) at acpi0 not configured
COM1 (PNP0501) at acpi0 not configured
COM2 (PNP0501) at acpi0 not configured
attimer1 at acpi0 (TIMR, PNP0100): io 0x40-0x43 irq 0
pckbd0 at pckbc1 (kbd slot)
pckbc1: using irq 1 for kbd slot
wskbd0 at pckbd0: console keyboard
pms0 at pckbc1 (aux slot)
pckbc1: using irq 12 for aux slot
wsmouse0 at pms0 mux 0
pci0 at mainbus0 bus 0: configuration mode 1
pci0: i/o space, memory space enabled, rd/line, rd/mult, wr/inv ok
pchb0 at pci0 dev 0 function 0: vendor 1275 product 1275 (rev. 0x00)
virtio0 at pci0 dev 3 function 0
virtio0: Virtio Block Device (rev. 0x00)
ld0 at virtio0: Features: 0x10000244<INDIRECT_DESC,FLUSH,BLK_SIZE,SEG_MAX>
virtio0: allocated 270336 byte for virtqueue 0 for I/O request, size 128
virtio0: using 262144 byte (16384 entries) indirect descriptors
virtio0: config interrupting at msix0 vec 0
virtio0: queues interrupting at msix0 vec 1
ld0: 10240 MB, 5201 cyl, 64 head, 63 sec, 512 bytes/sect x 20971520 sectors
virtio1 at pci0 dev 4 function 0
virtio1: Virtio Network Device (rev. 0x00)
vioif0 at virtio1: Features: 0x11010020<INDIRECT_DESC,NOTIFY_ON_EMPTY,STATUS,MAC>
vioif0: Ethernet address xx:xx:xx:xx:xx:xx
virtio1: allocated 32768 byte for virtqueue 0 for rx0, size 1024
virtio1: allocated 311296 byte for virtqueue 1 for tx0, size 1024
virtio1: using 278528 byte (17408 entries) indirect descriptors
virtio1: config interrupting at msix1 vec 0
virtio1: queues interrupting at msix1 vec 1
genfb0 at pci0 dev 29 function 0: vendor fb5d product 40fb (rev. 0x00)
genfb0: framebuffer at 0xc1000000, size 1024x768, depth 32, stride 4096
genfb0: shadow framebuffer enabled, size 3072 KB
wsdisplay0 at genfb0 kbdmux 1: console (default, vt100 emulation), using wskbd0
wsmux1: connecting to wsdisplay0
drm at genfb0 not configured
vendor 8086 product 1e31 (USB serial bus, xHCI) at pci0 dev 30 function 0 not configured
pcib0 at pci0 dev 31 function 0: vendor 8086 product 7000 (rev. 0x00)
isa0 at pcib0
com0 at isa0 port 0x3f8-0x3ff irq 4: ns16550a, working fifo
com1 at isa0 port 0x2f8-0x2ff irq 3: ns16550a, working fifo
timecounter: Timecounter "clockinterrupt" frequency 100 Hz quality 0
timecounter: Timecounter "TSC" frequency 3792882480 Hz quality 3000
ld0: GPT GUID: xxxxxxxx-xxxx-xxxx-xxxx-xxxxxxxxxxxx
dk0 at ld0: "xxxxxxxx-xxxx-xxxx-xxxx-xxxxxxxxxxxx", 262144 blocks at 64, type: msdos
dk1 at ld0: "xxxxxxxx-xxxx-xxxx-xxxx-xxxxxxxxxxxx", 16512960 blocks at 262208, type: ffs
dk2 at ld0: "xxxxxxxx-xxxx-xxxx-xxxx-xxxxxxxxxxxx", 4196319 blocks at 16775168, type: swap
IPsec: Initialized Security Association Processing.
boot device: ld0
root on dk1 dumps on dk2
root file system type: ffs
kern.module.path=/stand/amd64/9.1/modules
wsdisplay0: screen 1 added (default, vt100 emulation)
wsdisplay0: screen 2 added (default, vt100 emulation)
wsdisplay0: screen 3 added (default, vt100 emulation)
wsdisplay0: screen 4 added (default, vt100 emulation)
04 Mar 2021, 14:06
Back when I was in Engineering school, my first-year internship happened in a refinery. In retrospect, this turned out to be extremely relevant for my current job in tech.
The subject of my internship was the optimization of an existing process. The unit had been planned on paper by an engineer on another continent, installed according to specs, and it turned out to be … not working so well.
Don’t believe Tech is unique
A refinery is a distributed system. There are specs and basically internal contracts on each sub-unit regarding the quantity it should process per day, what the requirements for inputs and the desired output characteristics are. Instead of queries, the inputs and outputs are, you know, oil and gas.
There are continuous and batch processes. Just like in tech, the interface between these is the subject of a lot of literature and ops knowledge.
In tech, services have availability and latency SLOs. In a refinery, there are input and output SLOs (plus specs like purity, sulfur content, water content, etc.).
In tech, there are error budgets. In a refinery, you have emission budgets as a limiting factor. You may only send x amount of NOx or SOx or CO2 into the air over the course of the day. You may only go over the target value for n hours per month, otherwise the company pays a fine. The water that leaves the grounds may only be so-and-so polluted and have at most y degrees of temperature, otherwise there is another fine. And so on.
And just like in tech, contractors do the darndest things, although in tech, you rarely get a truckload of methanol dumped into your waste water stream.
Safety and Postmortem culture
In a tech company, we might say that prod is on fire when there is an incident, but in a refinery, things might literally be on fire or explode.
I quickly learned to be distrustful of recently renovated spaces, because that means it may have been blown up recently. My intern office was recently renovated; at some point, they showed me the photos of the incident that had all but destroyed the building the previous year.
The oil and gas industry has had a strong safety culture for years. The postmortem culture that SRE is so proud of had been a thing in the industry for years. Thus, when there was a large fire in a refinery in Texas City (the refinery was run by a competitor!), we got hold of a copy of the postmortem analysis, so that we could learn from it and avoid making the same mistakes. There was a meeting where we went through it together, discussed and acknowledged various lessons.
I am not sure how blameless these postmortems are. The problem is that in a real incident, people can get hurt or killed. At some point, it involves responsibility in a legal sense. The director of a unit may be responsible for incidents resulting in damages to others, including in a criminal court. Fortunately (?) for tech, incidents usually do not have this kind of real-world impact.
Dev/Ops Divide
Maybe even more than in tech, there is a divide between “dev” (as in, process engineers and planners) and “ops” (actual operator crews who are literally opening and closing giant valves with their two hands).
As a budding chemical engineer, I interned in process engineering. I quickly found out that many process engineers don’t actually bother finding out how the units they planned perform day to day. On the other hand, the most helpful thing I could do was to sit with the ops in the control room, drink a lot of coffee, and listen to their mental models of the unit. They could perfectly explain it in terms of “when I open this valve too much, the temperature over here jumps up and I have to open this other valve to compensate”. But they cannot tell you why. The trick of the good engineer is to take what you know about physics, thermodynamics, etc. and translate this into an understanding of what actually happens.
Often, what actually happens is not what the planning says. In all cases, there are variables that you did not take into account (outside temperature anyone?).
In addition, some real-world boundary conditions are hard to express in correlation matrices and linear programming models. For example: “If you open this valve too much for too long, the bit in the middle will clog with corrosive white slime deposits”. What kind of coefficient is that?
Your Monitoring is lying
Just like in tech, your monitoring is lying to you! You could have a miscalibrated sensor, but what is more likely is that the sensor is placed in a way that it does not show you the true picture.
In our case, there was a laser measurement in a gas conduit where the laser sometimes passed through the stream of flowing gas and sometimes it didn’t. The wildly fluctuating output has no basis in the actual gas composition. In another part of the unit, a sensor was placed in such a way that it was disturbing the flow, so it was actually modifying the behavior of the system.
My two most important variables (the composition of the feed stock and the composition of ammonia) were not even available as measurements. In a refinery power plant, you burn whatever is left over at that moment. For gas, that may be pure hydrogen, pure butane or anything in between. And don’t get me started on the disgusting sludge they call heavy gas-oil.
As for the concentration of ammonia in the ammonia feed (yes, really), I asked for a manual measurement so I could have at least one data point. They told me it was impossible. I asked why. The answer was “when we open the storage drum, it catches fire. The contents are pyrophoric.” Yay.
Dependencies
The recommendation at the end of my internship was to switch off the unit and to tear it down. My manager agreed but it turned out to be impossible because other units had come to depend on this process to consume their input or output feeds.
So for all I know, the piece of crap unit I tried to optimize in the early 2000s is still there, making the surrounding air just a tiny bit dirtier.
Conclusion
Do not believe that tech is different from other, existing disciplines of engineering. There are other industries that have worked on distributed systems. Many software engineers I know are interested in the aerospace industry for a similar reason, which usually means binging on plane crash documentaries. But throughout many different industries, you can find solutions to many of the same issues that you have with your distributed cloud microservice mesh, or whatever.
04 Jan 2021, 20:25
My desktop PC has two NVMe drives, one for Windows and one for NetBSD. With Steam game footprints being what they are, the Windows one (256 GB) has been perpetually overfull, so it was time for something bigger.
At the same time, I had bought an NVMe daughter board for my Pinebook Pro. My impression with the PBP is that the I/O performance of the eMMC module is holding it back, so I am excited to give it fast storage :)
This presents an opportunity to change over the drives in a “rochade”:
- Remove the NetBSD drive, add empty drive.
- Add GRUB bootloader, copy over Windows installation.
- Move old SSD into the laptop, re-add NetBSD drive.
What’s nice about this is that at any point in time, one can roll back the process, so the chance of losing data is small.
This post is about some things I learned in the process.
Moving Windows 10 to a new drive
Some Googling told me that the simplest way of moving an existing Windows 10
installation to a new drive is something called System Image Restore.
First, you need to create an image of the existing C: drive onto yet
another storage medium – an external hard drive in my case. Then, you
boot from a rescue USB stick, such as the one from the retail Windows
packaging, and restore the image.
It turns out that this feature is somewhat deprecated and hidden; its code was evidently last touched in the days of Windows 7. It is hidden in the “Backup” tab of the system settings under the heading “Searching for an older backup?":
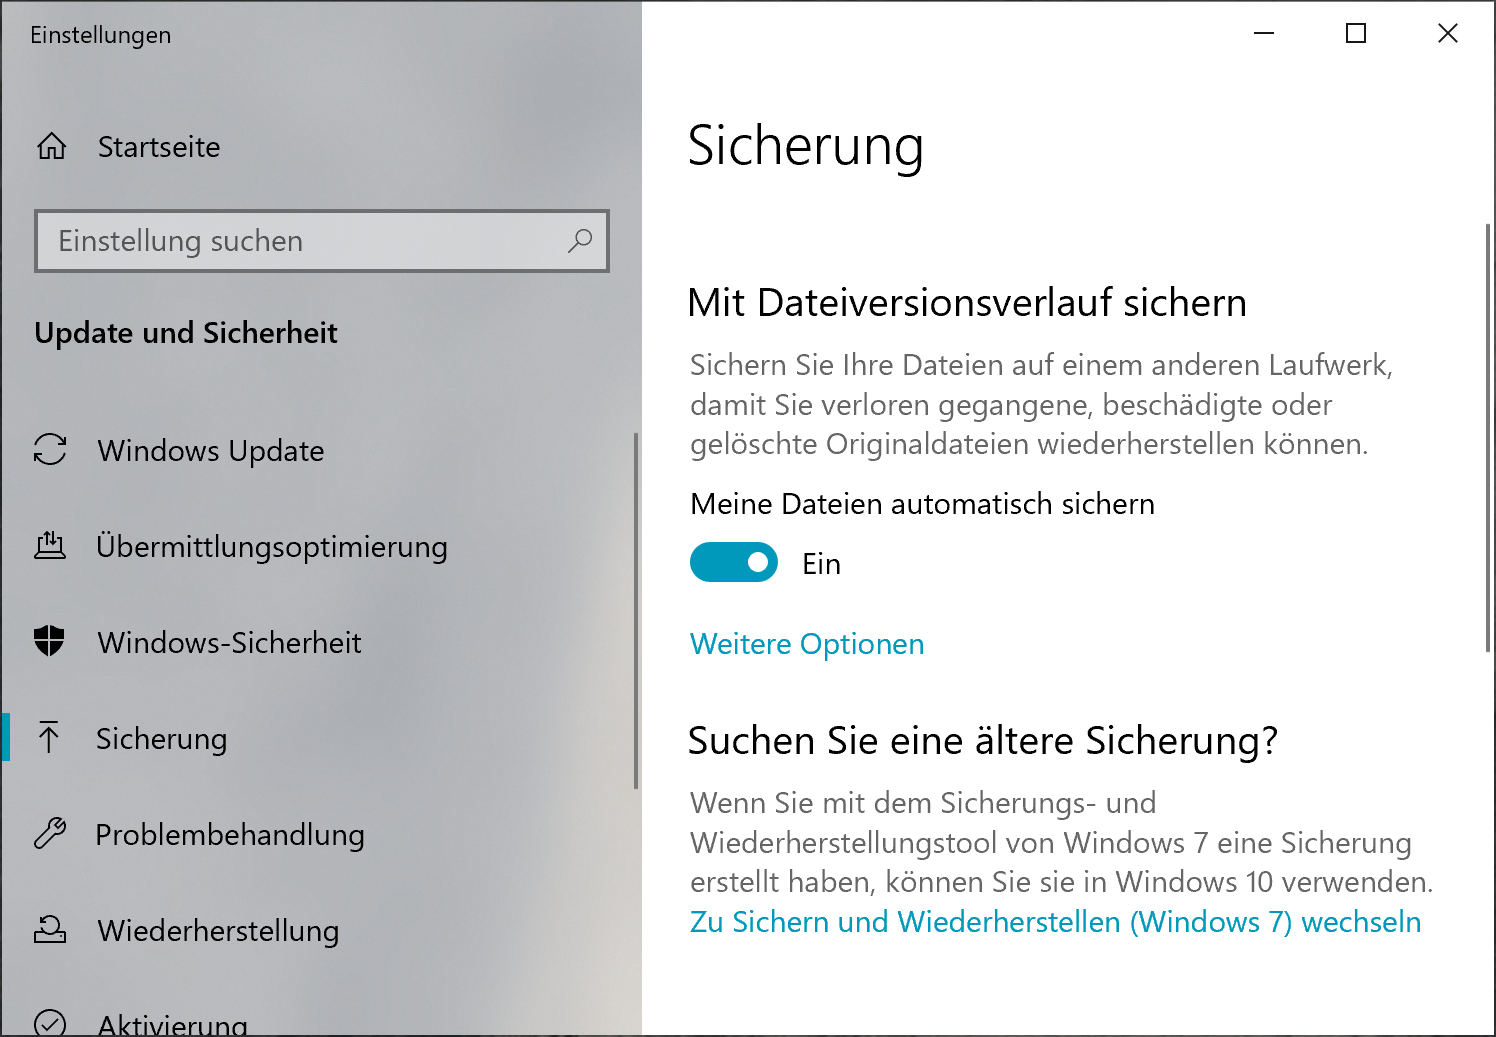
Backup Settings
Once there, hit the “Create system image” link on the top left:
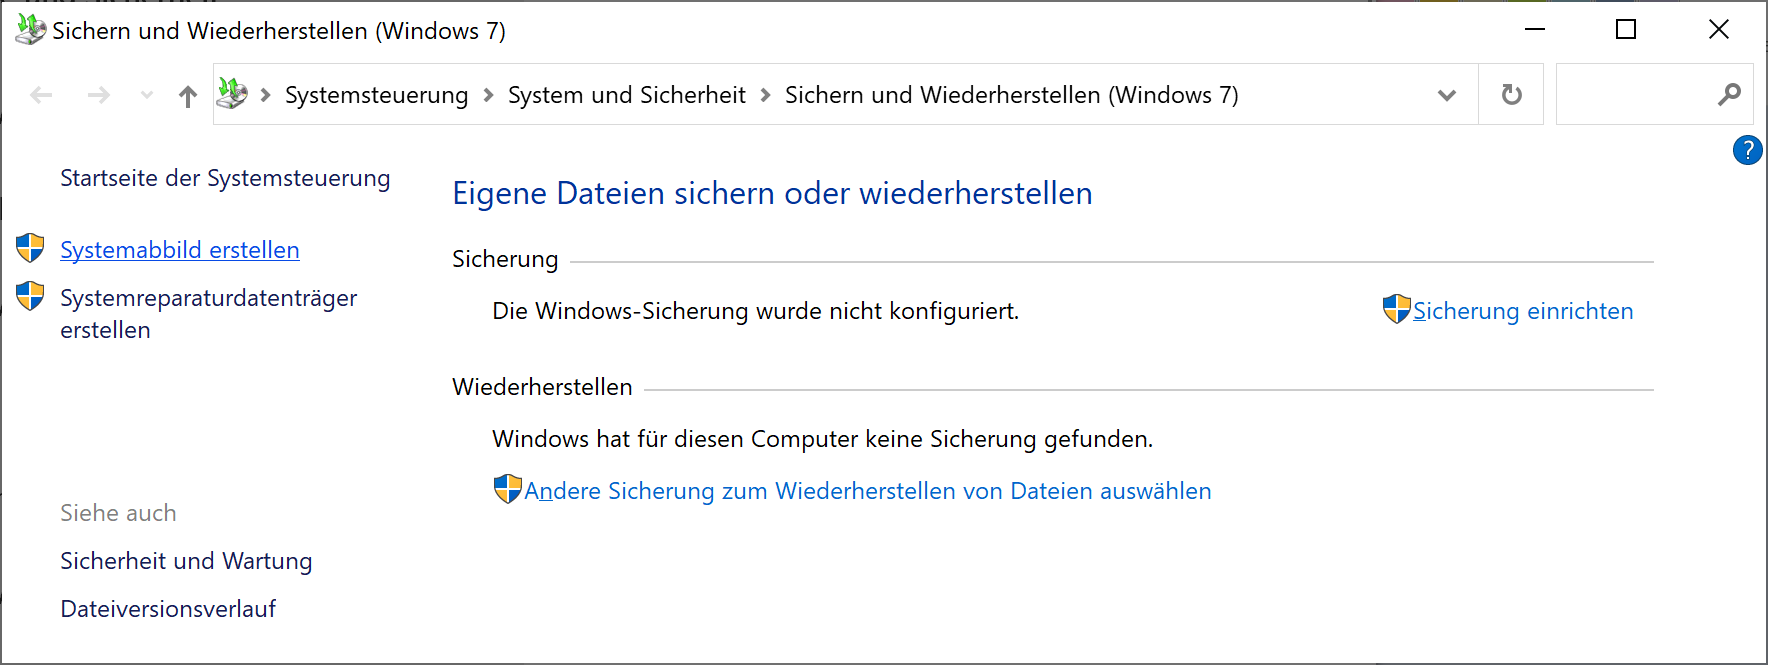
Link @ top left
Now, when it came time to restore the image to the new disk, I learned something important about the process:
You cannot restore to a different disk if the original disk is also present.
This means that you must disconnect the old drive first. Before we come to the other thing I learned, we need to talk about partition tables and (dual-)booting.
EFI, GPT, MBR, GRUB, etc.
In modern PCs, there are two fundamentally different ways to partition the boot drive and to boot the system:
MBR and BIOS: there is a “classic” partition table (also called an MBR partition table). It has space for four entries (“primary partitions”). One of these may be an “extended partition” that can contain further partitions. The first 512 bytes on the drive, the Master Boot Record, contain the start of the bootloader. The bootloader is executed in real mode, which means that your modern CPU pretends it is an 8086 from roughly 1982. In this scheme, NetBSD uses a single partition and places a disklabel at the start. Then, the partition can be further subdivided through the entries in the disklabel.
GPT and UEFI: UEFI, the Universal Extensible Firmware Interface, is a
modern-ish standard for writing bootloaders and such. Contrary to the BIOS,
it offers modern features such as 32- or 64-bit addressing on the CPU. The
partition table format used for UEFI booting is called GPT (GUID partition
table, where GUID is a Globally Unique Identifier). GPTs are also more
modern. They have space more entries (often 128) and no longer use the
obsolete cylinder/head/sector addressing. Each partition has a type, a UID
and optionally a label – a name that you choose and that you can use to
identify the partition in /etc/fstab and elsewhere. The bootloader is on a
partition of type “EFI System”, formatted with a vFAT (“msdos”) file system.
Of note is that UEFI and GPT are used on other platforms as well: For instance, modern ARM systems (such as the Pinebook Pro) have a UEFI bootloader and use GPT partitioning. There are also some MIPS systems using UEFI, and more. Depending on the age of the PC, there is either a choice between BIOS and UEFI boot, or UEFI is mandatory. –
My PC is from 2016, so both ways are supposed to work. In my old setup, I
used GRUB (the GRand Unified Bootloader) to show a boot menu and boot either
Windows or NetBSD, using its i386-pc architecture, i.e. BIOS boot.
To set up a GRUB partition, I booted from a grml.org Linux live system and
ran the grub-install command, after creating and mounting a Linux MBR
partition. To my surprise, it defaulted to a UEFI version of GRUB. Thus, I
re-did the partitioning using a GPT (through cgdisk) and installed GRUB:
mkfs.msdos /dev/nvme0n1p1
mount /dev/nvme0n1p1 /mnt
grub-install --efi-directory=/mnt /dev/nvme0n1
Rebooting gave me a GRUB shell in a tiny, barely readable font on my 4K screen. Surprise: Manually booting NetBSD resulted in an error message
No suitable video mode found. Booting in EFI blind mode.
And there was no more console output from NetBSD. If someone reading this article knows how to fix this, I would be glad for a tip :)
One Windows restore later …
Next, I booted from the Windows install / rescue stick. In the second screen, I selected “Repair your computer”, then “System Image Restore”.
Keeping in mind that the image was created on a system with BIOS boot, I was nonetheless surprised at what happened to the drive:
- The GPT partition table was gone, instead there was an MBR partition table.
- Windows reserved three out of four primary partition entries for itself
(system,
C:and a hidden “rescue” partition). The EFI partition was moved, no longer mountable and turned into a0x83(Linux) partition type. - Reset boots straight into Windows.
- My favorite dysfunction: The rescue and Linux partition were relocated to
the start of the free space, preventing extending the
C:drive with the free space – the very reason I had gone through all this hassle.
I fixed the latter issue by deleting and recreating the GRUB partition (see below) as well as moving the Windows “rescue” partition thing using gparted on grml.
GRUB install the second
This time, I created a new primary partition (entry #4) of type 0x83
(Linux), formatted it as ext2 and installed GRUB:
mke2fs /dev/nvme0n1p4
mount /dev/nvme0n1p4 /mnt
grub-install --boot-directory=/mnt --target=i386-pc /dev/nvme0n1
At this point, I also populated /mnt/grub/grub.cfg with the contents of the
boot menu.
And this actually worked!
Addendum: Now, Windows no longer shuts down correctly, no idea what’s up *with that. Rebooting does the right thing though.
23 Oct 2020, 06:50
I never spent much time toiling in the “sysadmin job” mines, though my first job was user support and admin. Later, I joined Google SRE and worked with both world-class and mediocre tools. As a junior SRE, you are mostly a user of these tools, though it is easy to pat yourself on the back and think of yourself as better than the run-of-the-mill admin because all this automation is available to you.
The thing is, the good tools did not get so good over night. Instead, they are the product of literally years of operational experience. I can assure you that the first generation of Google administration tools and helpers were just as shitty as anything a “regular” admin would write. Indeed, the notion of an SRE (Site Reliability Engineer) took years (and executive vision) to appear.
The Traditional Tooling Ladder
Let’s say you are indeed a systems administrator in a smallish shop. NB: I am assuming a willingness to write some code, which not all admins might have.
The SRE spirit – to automate yourself out of a job – can be a win-win (for you, who can do more interesting things) and for the company (who gains in efficiency). The tooling ladder typically goes like this:
- Shitty scripts, held together with duct tape, to automate the low-hanging fruit,
- Tooling improves over time and gets fancier
Step #1 is crucial already. You have to start somewhere. Step #2 has you add e.g. monitoring, a web interface, or unify your tooling into a larger whole. This process typically stops as soon as an equilibrium between the complexity of your use case and the effort to develop the tooling has been reached.
Jump-starting
These days, increasingly, instead of going from #1 to #2, there is this:
- Adapt a large, complex tool that has been open-sourced by a large company. Start by using a few percent of the features and increase over time.
Is this good or bad? On one hand, this allows you to fast-forward and skip acquiring all this experience, instead relying on the wisdom of others who have done this. In a way, this ultimately is what civilization is. No one builds their computer from scratch, starting with a bucket of sand, right?
On the other hand, learning the tool itself (instead of writing it) is now the rate-determining step. Some folks deploy powerful tools without understanding them and inadvertently cause security nightmares (such world-readable or even world-writable storage) because they don’t know what they are doing.
This is even more true when these tools come in the form of managed cloud services. By virtue of being on the internet, misconfigurations are a lot more problematic (and sometimes expensive!) than in a relatively isolated on-premise network. Cloud orchestration tools add a whole more blast radius on top.
Of course, the prime example for a complex tool described above is Kubernetes.
Don’t get me wrong, I am a huge fan of cluster orchestration tools – Borg within Google has been an absolute game-changer. Managing clusters of 50,000 nodes and thousands of production roles and services has enabled development to thrive beyond anyone’s wildest dreams.
However, if the size of your deployment is three on-prem VMs running one or two instances of two services, then perhaps you do not need all the complexity of Kubernetes in the first place. Maybe a classic arrangement of two larger servers with failover would be sufficient, and you could spent more time on the actual, you know, workload?
The complexity of the Kubernetes ecosystem has spawned a whole ecosystem of its own of Kubernetes-explainers, coaches, conferences and so on. It seems to me, as an outsider, that the dynamics of such a system lead to ever more complexity over time to sustain all of this.
For instance, there is a trend of adding ever more sidecar processes along your main service, into the same pod. At Google, we have largely eliminated sidecar jobs in the same container because they are just so damn inconvenient.. I can even remember a rewrite of an internal system where eliminating the sidecar was a major design goal.
Conclusion
In the end, there is a choice to be made between complex, “web-scale” deployments and perhaps a more limited, more conventional one. Again, the trade-offs depend on the scale and complexity of your services. But YAGNI (You Ain’t Gonna Need It) is a powerful principle.
Let me offer this small tale as an example: When the founder of Pinboard bought back the service from the company that was running it, it was losing a lot of money, since revenue did not match operation costs. The service was running in the Cloud, as a collection of microservices. He ended up reducing the cost of running it by more than 90% by essentially moving it onto a single machine in a colo.
If your use case is small enough, maybe that’s all you need?
(Note: I am saying this as someone whose tiny serverless app on GCP now ends up costing more each month than a small dedicated server would – sigh.)
08 Sep 2020, 18:19
Somehow, my contributions to NetBSD and pkgsrc have become monotonous. Because I am busy with work, family and real life, the amount of time I can spend on open source is fairly limited, and I have two commitments that I try to fulfill:
- Member of pkgsrc-releng: I process most of the pull-ups to the stable quarterly branch.
- Maintainer of Go and its infrastructure.
Unfortunately, these things are always kinda the same.
For the pull-ups, each ticket requires a verification build to see if the package in question actually works. That time tends to be dominated by Firefox builds, of all things: we fortunately have people that maintain the very regular updates to LTS versions of both firefox and tor-browser, but that means regular builds of those.
As for Go, there are regular updates to the two supported branches (1.14 and
1.15 as of now), some of which are security updates. This means: change
version, sync PLIST, commit, revbump all Go packages. Maybe file a pull-up.
This becomes somewhat uninteresting after a while.
What To Do
Honestly, I am not sure. Give off some of the responsibility? There is only one person in the pkgsrc-releng team that actually does pull-ups, and they are busy as well.
04 Jul 2020, 14:53
Like many ARM CPUs, the one in the Pinebook Pro has a “big.LITTLE” architecture, where some cores are more powerful than others:
[     1.000000] cpu0 at cpus0: Arm Cortex-A53 r0p4 (v8-A), id 0x0
[     1.000000] cpu1 at cpus0: Arm Cortex-A53 r0p4 (v8-A), id 0x1
[     1.000000] cpu2 at cpus0: Arm Cortex-A53 r0p4 (v8-A), id 0x2
[     1.000000] cpu3 at cpus0: Arm Cortex-A53 r0p4 (v8-A), id 0x3
[     1.000000] cpu4 at cpus0: Arm Cortex-A72 r0p2 (v8-A), id 0x100
[     1.000000] cpu5 at cpus0: Arm Cortex-A72 r0p2 (v8-A), id 0x101
The A72 is a more powerful than the efficiency-oriented A53, it has out-of-order execution, plus it reaches a higher maximum clock rate (1.4 GHz for the A53 and 2.0 GHz for the A72 in the Pinebook Pro).
On NetBSD-current, the kernel scheduler prefers the big cores to the little ones. However, when building software, you may want to force the build process onto the big cores only. One advantage is that you still have the little cores to deal with user input and such, yet your build has the highest performance. Also, building with all cores at the highest clock rate will quickly lead to overheating.
NetBSD has a somewhat obscure tool named psrset that allows creating “sets”
of cores and running tasks on one of those sets. Let’s try it:
$ psrset
system processor set 0: processor(s) 0 1 2 3 4 5
Now let’s create a set that comprises cpu4 and cpu5. You will have to do that as root for obvious reasons:
# psrset -c 4 5
1
# psrset
system processor set 0: processor(s) 0 1 2 3
user processor set 1: processor(s) 4 5
The first invocation printed “1”, which is the ID of our new processor set. Now we can run something on this set. Everything run below only sees two cores, cpu4 and cpu5. Note the “1” in the command below. This is the ID from before.
# psrset -e 1 make package-install MAKE_JOBS=2
If you run htop or similar while your package is building, you will see that
only cpu4 and cpu5 are busy. If you have installed estd to automatically
adjust CPU clocks, you will notice that cpu4 and cpu5 are at 2 GHz while
the four little cores are running at a cool 400 MHz.
20 Jun 2020, 18:09
If you buy a Pinebook Pro now, it comes with Manjaro Linux on the internal eMMC storage. Let’s install NetBSD instead!
The easiest way to get started is to buy a decent micro-SD card (what sort of markings it should have is a science of its own, by the way) and install NetBSD on that. On a warm boot (i.e. when rebooting a running system), the micro-SD card has priority compared to the eMMC, so the system will boot from there.
As for which version to run, there is a conundrum:
- There are binary packages but only for NetBSD-9. On -current, you have to compile everything yourself, which takes a long time.
- Hardware support is better in NetBSD-current.
The solution is to run a userland from NetBSD-9 with a NetBSD-current kernel.
As the Pinebook Pro is a fully 64-bit capable machine, we are going to run the evbarm-aarch64 NetBSD port on it. Head over to https://armbsd.org/arm/ (thanks, Jared McNeill!) and grab a NetBSD 9 image for the Pinebook Pro. Then (assuming you are under Linux), extract it onto the memory card with the following command:
zcat netbsd-9.img.gz | dd of=/dev/mmcblk2 bs=1m status=progress
Be sure to check that mmcblk2 is the correct device, e.g. by examining dmesg output! Once the command is done, you can reboot. Once booting is finished, you can log in as root with no password. The first thing you should do is to set one, using passwd.
To the eMMC!
Would you like to replace the pre-installed Manjaro Linux on the eMMC?
It makes sense to have your main OS on the built-in storage, since it is quite a bit faster than the typical micro-SD card. In my tests, I get write speeds of about 70 MiB per second on the eMMC.
By the way, if you want more and even faster Storage, PINE64 will sell you an adapter board for adding an NVMe drive (a fast SSD).
Once you have booted NetBSD from the memory card, mount the Linux volume and copy over the image file from before, then unmount and extract it in exactly the same way as above. The only difference is that the target device is called /dev/rld0d. Shut down the system, remove the memory card, switch it back on and watch NetBSD come up :)
Getting a -current Kernel
To have better driver support, I recommend installing a NetBSD-current kernel. To do that, you just need to replace the /netbsd file with the new kernel – no changes to the bootloader are required.
You can find a pre-built kernel under https://nycdn.netbsd.org/pub/NetBSD-daily/HEAD/latest/evbarm-aarch64/binary/kernel. Download the file and install it:
cp /netbsd /netbsd.old
gunzip netbsd-GENERIC64.gz
install -o root -g wheel -m 555 netbsd-GENERIC64 /netbsd
You will find that there is now a driver for the built-in Broadcom Wi-Fi (as the bwfm0 interface) but the firmware is missing. To fix this, download the base.tgz set from the same location and extract the firmware blobs only (as root):
cd /
tar xvpfz /path/to/base.tgz libdata/firmware
In my experience however, the Broadcom Wi-Fi driver is extremely likely to make the system crash or hang. I tend to rely mostly on an old Apple Ethernet-USB adapter (an axe interface).
NOTE: I have since back-pedaled and returned to NetBSD 9. Other than the unstable Wi-Fi, I also had crashes when running npm install and other issues.
31 May 2020, 16:04
Note: This post was written on the Pinebook Pro :)
After seeing it in action at FOSDEM (from afar, as the crowd was too large), I decided to buy a Pinebook Pro for personal use. From the beginning, the intention was to use it for pkgsrc development, with NetBSD as the main OS. It was finally delivered on Thursday, one day earlier than promised, so I thought I would write down my first impressions.
If you have never heard of the Pinebook Pro: It is a cheap, open, hackable laptop with an ARM processor, the successor of the original Pinebook (which I thought was too low-end to be a useful daily driver) with generally more premium components.
As I alluded to in the first paragraph, the enthusiasm of the Free Software community is incredibly strong! Nothing showed this better than the incredible resonance from a tweet with a quick snapshot after the first boot:
You’ll note, in passing, that on the photo, I am downloading the NetBSD install image :)
What makes this device attractive, apart from the price, is the ARM architecture without the baggage of the PC world. What’s more, an open and hackable system in the age of Macbooks with soldered everything, tablets that you cannot open, “secure” boot that severely limits what you can run on it, is something of a counterculture device. The Pine64 folks have built a great community that embodies the true hacker spirit.
The Hardware
Here is where I am going to be harsh: in some ways, using this device feels like a regression.
I was previously using a Samsung Chromebook Pro, a Pixelbook and a Pixel Slate as laptops. Compared to these, the Pinebook Pro has
- no HiDPI screen,
- no touchscreen,
- a barrel connector power supply,
and peripherals are mostly using USB-A port. To be fair, there is USB-C, and it can be used to charge the machine, so I haven’t used the original charger yet.
The display resolution is 1920x1080, equivalent to about 100 dpi. While I regret the absence of HiDPI, it is well lit and well readable. The viewing angles are fairly large, and the colors are crisp. The default Manjaro Linux wallpaper is a great showcase for this.
The Pinebook Pro is vaguely shaped like a MacBook Air from a few years ago, with the same curved bottom. At 14", it is surprisingly large – the machines mentioned above are 12 to 13". Compared to the MacBook and Pixelbook in their quest for ever thinner devices, the Pinebook Pro feels strangely empty. I guess there is actually free space on the inside that you can use for upgrades and such.
The most similar laptop I have used is the HP Chromebook 14. Against this, the Pinebook Pro holds up really well though: it is lighter, has a better keyboard and display and is actually cheaper!
Keyboard and Trackpad
The keyboard is an absolute joy to use. Really, it’s great. The keys have a large amount of travel, comparable to older MacBook Pros, before they introduced the terrible keyboard. The layout (I have ANSI, i.e. US) is exactly what you would expect. This is definitely made for typing a lot.
On the other hand, I am not friends with that trackpad. I am hoping I can get used to it at some point. The way it tracks small finger movement is … weird and counter-intuitive, and I am having a hard time hitting small click targets. It has two mouse buttons under the bottom left and bottom right, so clicking in the middle usually has no effect. For dragging, you need to keep one finger in the corner on the button and move another finger, which sometimes triggers multi-touch gestures.
Battery life
I have not done detailed measurements, but it seems pretty good at about
7 hours. Here is the envstat output while writing this:
                               Current  CritMax  WarnMax  WarnMin  CritMin  Unit
[cwfg0]
            battery voltage:     3.935                                         V
            battery percent:        79                                      none
  battery remaining minutes:       319        0        0        0        0  none
[rktsadc0]
                        CPU:    42.778   95.000   75.000                    degC
                        GPU:    43.333   95.000   75.000                    degC
Performance
Compared to all those ARM SBCs I have used (Raspberry Pi, Orange Pi, Pine-A64), the Pinebook Pro feels really fast. Storage (at this point I am using a memory card) is decent speed-wise, and compilations are reasonably fast – though my five year old Intel NUC with an i7 still beats it by far, of course. But my workload involves compiling lots of stuff, so this seems like a good fit.
Graphics performance has not blown me away. Animations on Manjaro stutter a bit, Midori on NetBSD (the first browser that I tried) is really testing my patience.
Hackability?
I noticed that opening the bottom of the housing is screwed on with standard Philips head screws and easy to open. There are no rubber feet glued on top of the screws, no special tools needed.
You can easily boot your custom OS from the micro-SD card reader. As mentioned, I bought this machine for running NetBSD on it, which works well.
There are upgrade kits available, for example an adapter to add an NVMe disk instead of the eMMC. For the original Pinebook, there has been an upgrade kit with a better processor even.
Because we are on ARM, there is no “Intel Inside”, and consequently, there are also no stickers, except for one on the underside that gives the model number.
Conclusion
This has become longer than I intended. Despite my criticism, I really like this machine. I am hoping I can get some good development work done with it and use NetBSD for my daily computing tasks.
Stay tuned for another post with some NetBSD tips!
Recommend
About Joyk
Aggregate valuable and interesting links.
Joyk means Joy of geeK