

Changing your nameservers at DreamHost
source link: https://help.dreamhost.com/hc/en-us/articles/360038897151-Changing-your-nameservers-at-DreamHost
Go to the source link to view the article. You can view the picture content, updated content and better typesetting reading experience. If the link is broken, please click the button below to view the snapshot at that time.

Changing your nameservers at DreamHost
Overview
There are many reasons for changing nameservers – you may need to host a domain elsewhere, or perhaps you want to run your DNS through a CDN (content delivery network) like Cloudflare.
This article explains how to update the nameservers for domains that are registered with DreamHost. If you own the registration elsewhere, you must make the nameserver change with the current registrar.
You can update the nameservers through two different pages on the DreamHost panel.
When you change your nameservers, all of your DNS points to the new hosting company.
If you want to host email at a different company than where your nameservers are pointed, make sure to also update your email DNS records as well.
Nameservers
- Navigate to the Manage Websites page.
- Open the Manage page for your site.
- If you're in Grid view, hover over your website and click the Manage button.
- If you're in List view, click the Manage button to the right of your website.

- Click the DNS tab.

- Click the Add Record button.

- Hover over the NS Record section and click the ADD link.
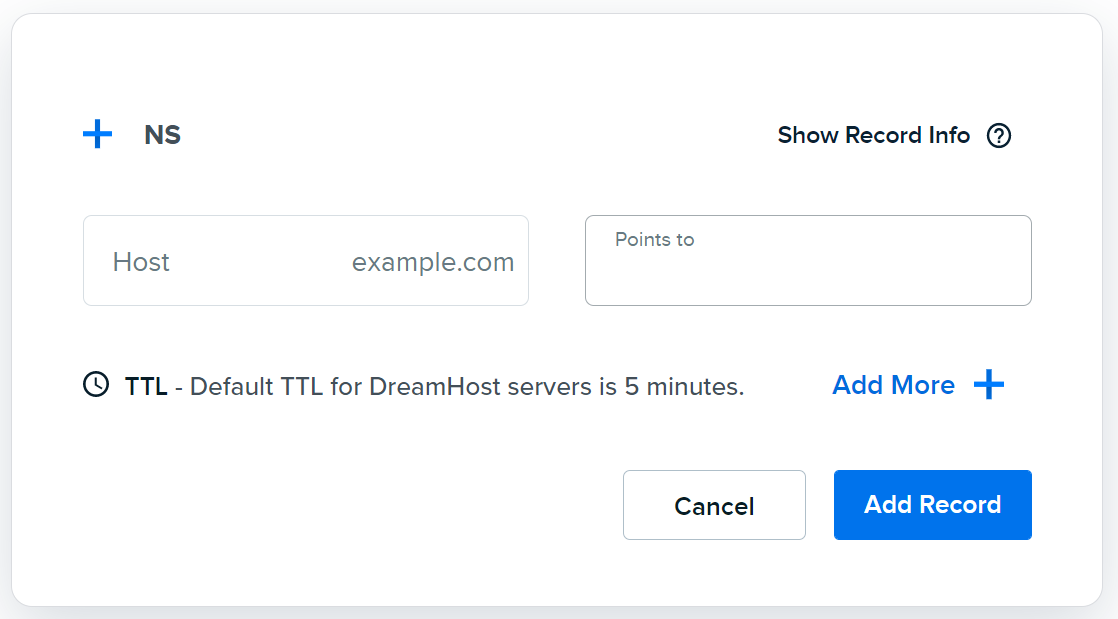
- Host: Enter the subdomain of this specific nameserver. Most often, this is just ns1, ns2, or ns3.
- Points to: Enter the URL the nameserver will resolve to. This is the domain of the company you're pointing to. For example, DreamHost's first nameserver is ns1.dreamhost.com. So you would just enter dreamhost.com in this field. You must ask your new hosting provider for this information.
- Click the Add Record button to save.
After clicking the Add Record button, the propagation for the new record begins. This can take up to 6 hours before the new record updates online.
Using the Registrations page to make a change
Any change you make to your domain registration occurs immediately, including edits to WHOIS, nameserver(s), and registrant information.
You can also edit the nameservers on the Registrations page. If your domain is listed on this page, it is registered with DreamHost and the nameservers can be edited.
The only exception is *.uk domain names. If you attempt to change the WHOIS info in the panel, you'll see this message:
Clicking the link takes you to 'secure.nominet.org.uk'. You can then change your WHOIS information there.
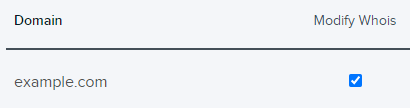
- Click the Whois Info button located next to your domain registration (or, if you have multiple registrations, check the box under the Modify Whois? column next to the domain you want to modify.
- Click the Modify Whois! button.

- On the next page, click the Nameservers tab and select the 'Use another host's nameservers' option to change your nameservers to another host (or, you can set DreamHost's nameservers automatically by clicking the radio button for 'Use DreamHost’s nameservers').
 If you set your DNS to point to another host’s nameservers instead of using DreamHost’s, the following fields appear on the Nameservers page:
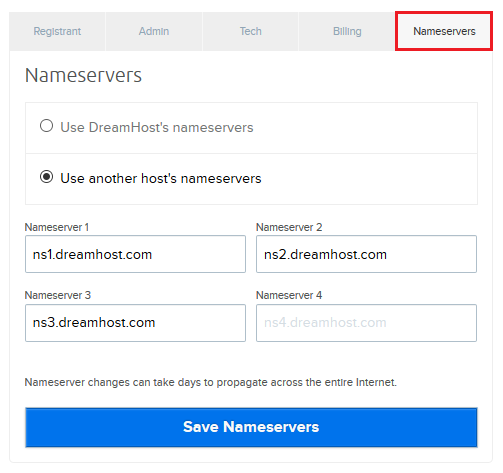
- In the fields provided, enter the nameservers for the other hosting company.
See also
Did this article answer your questions?
Recommend
About Joyk
Aggregate valuable and interesting links.
Joyk means Joy of geeK