

AMD 5800u 笔记本折腾 Proxmox VE 7.0 虚拟化
source link: https://soulteary.com/2021/10/23/amd-5800u-notebook-toss-proxmox-ve-7-0-virtualization.html
Go to the source link to view the article. You can view the picture content, updated content and better typesetting reading experience. If the link is broken, please click the button below to view the snapshot at that time.

之前在《廉价的家用工作站方案:前篇》一文中,我提到过使用两台笔记本设备作为轻量的家用工作站。
最近整理服务,把其中一台性能更强的 5800u 笔记本换上了 Proxmox。记录一下折腾过程。
为什么选择 Proxmox ,而不选择之前已经在 NUC 上验证过的 ESXi呢?
因为这次使用的设备 CPU 是 AMD 5800u,ESXi 虽然可以运行,但是官方明确提示这类 CPU 不在兼容列表里。考虑到运行稳定性,我选择使用和 Ubuntu 同源的、使用 Debian 做基础系统的 Proxmox (KVM / LXC)。
第一步:安装系统
折腾的基础,当然需要先安装系统,而安装系统的前提,需要下载到我们所需要的镜像:https://www.proxmox.com/en/downloads。
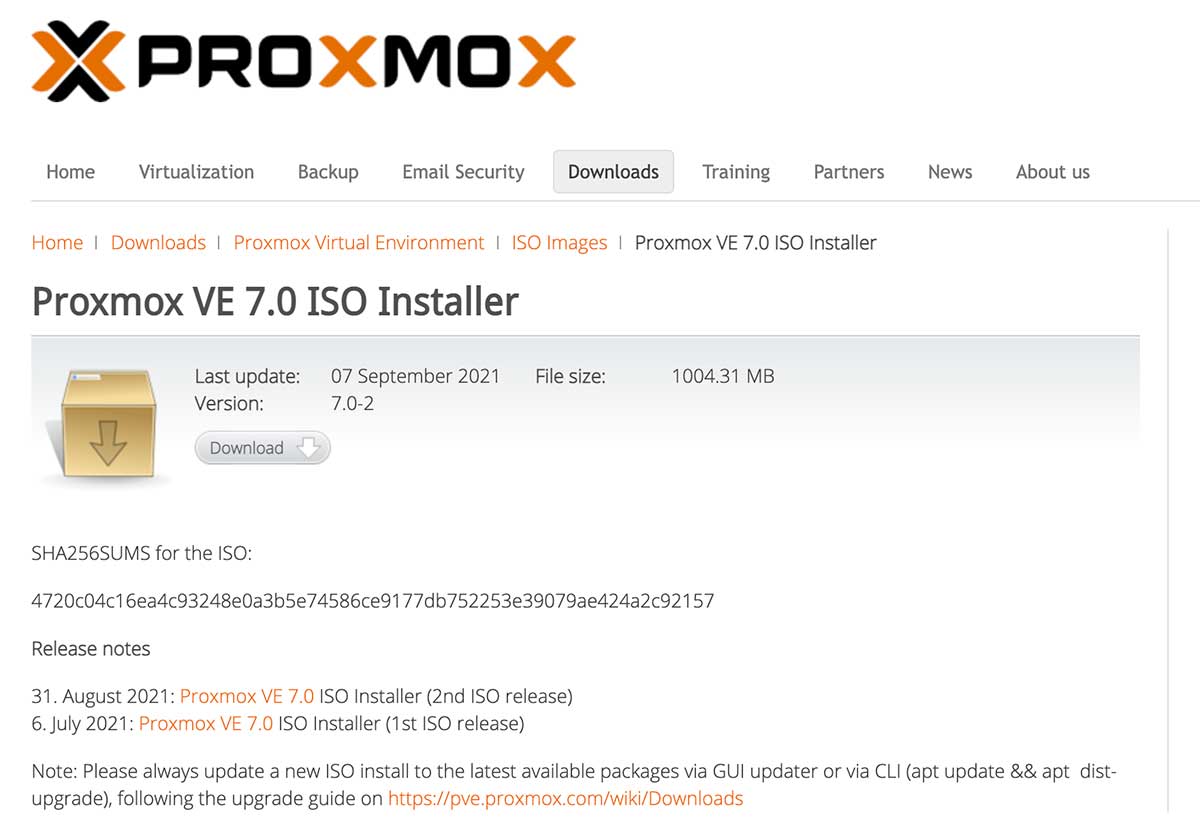
我这里选择的是 Proxmox 7.0 的镜像,下载完毕,参考之前文章中的 “制作 USB 启动盘”,烧录到 U 盘里,插到笔记本上,就能够执行系统安装了。

“一路 Next” 就能完成安装了,这里提一个细节:网络配置。第一次配置的时候,网卡默认是静态配置,所以你需要根据你自己的网络环境进行配置,如果使用默认配置,可能会导致“无法上网”(进终端调整 DHCP 模式,重新获取网络地址即可)。

顺利的话,你将能够看到类似下面的界面。
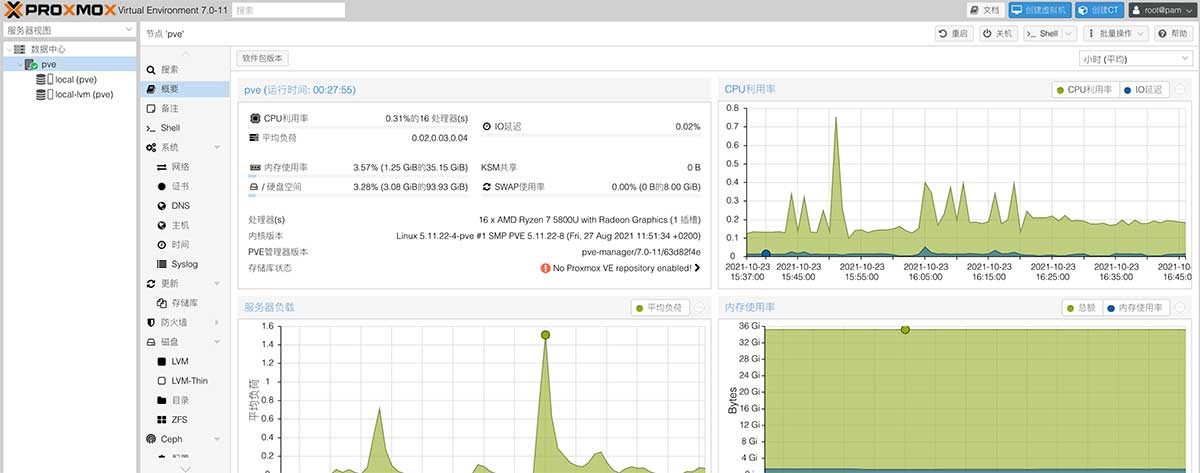
为了方便描述,下面使用 “PVE” 指代 “Proxmox”。
调整系统软件源
PVE 系统默认软件源,采用的是 Debian 的官方源,在国内访问速度比较慢。所以,这里考虑替换为国内的镜像软件源,可以明显提升使用过程中的软件下载效率。
sed -i -e "s/http:\/\/ftp.debian.org/https:\/\/mirrors.tuna.tsinghua.edu.cn/" /etc/apt/sources.list
sed -i -e "s/http:\/\/security.debian.org/https:\/\/mirrors.tuna.tsinghua.edu.cn\/debian-security/" /etc/apt/sources.list
但是,只使用上面的命令将软件源替换为清华源后,使用 apt update 更新系统,还是会看的一个错误提示:
Get:1 https://mirrors.tuna.tsinghua.edu.cn/debian bullseye InRelease [116 kB]
Get:2 https://mirrors.tuna.tsinghua.edu.cn/debian bullseye-updates InRelease [39.4 kB]
Get:3 https://mirrors.tuna.tsinghua.edu.cn/debian-security bullseye-security InRelease [44.1 kB]
Get:4 https://mirrors.tuna.tsinghua.edu.cn/debian bullseye/main amd64 Packages [8,180 kB]
Get:5 https://mirrors.tuna.tsinghua.edu.cn/debian bullseye/main Translation-en [6,241 kB]
Get:6 https://mirrors.tuna.tsinghua.edu.cn/debian bullseye/contrib amd64 Packages [50.5 kB]
Get:7 https://mirrors.tuna.tsinghua.edu.cn/debian bullseye/contrib Translation-en [46.9 kB]
Get:8 https://mirrors.tuna.tsinghua.edu.cn/debian bullseye-updates/main amd64 Packages [2,300 B]
Get:9 https://mirrors.tuna.tsinghua.edu.cn/debian bullseye-updates/main Translation-en [2,108 B]
Get:10 https://mirrors.tuna.tsinghua.edu.cn/debian-security bullseye-security/main amd64 Packages [72.0 kB]
Get:11 https://mirrors.tuna.tsinghua.edu.cn/debian-security bullseye-security/main Translation-en [45.9 kB]
Err:12 https://enterprise.proxmox.com/debian/pve bullseye InRelease
  401  Unauthorized [IP: 51.79.159.216 443]
Reading package lists... Done
E: Failed to fetch https://enterprise.proxmox.com/debian/pve/dists/bullseye/InRelease  401  Unauthorized [IP: 51.79.159.216 443]
E: The repository 'https://enterprise.proxmox.com/debian/pve bullseye InRelease' is not signed.
N: Updating from such a repository can't be done securely, and is therefore disabled by default.
N: See apt-secure(8) manpage for repository creation and user configuration details.
作为免费的非订阅用户,为了解决这个错误提示,我们需要删除官方软件源文件。
rm /etc/apt/sources.list.d/pve-enterprise.list
再次执行命令进行更新,就不会再出现错误提示啦。
apt update && apt upgrade -y
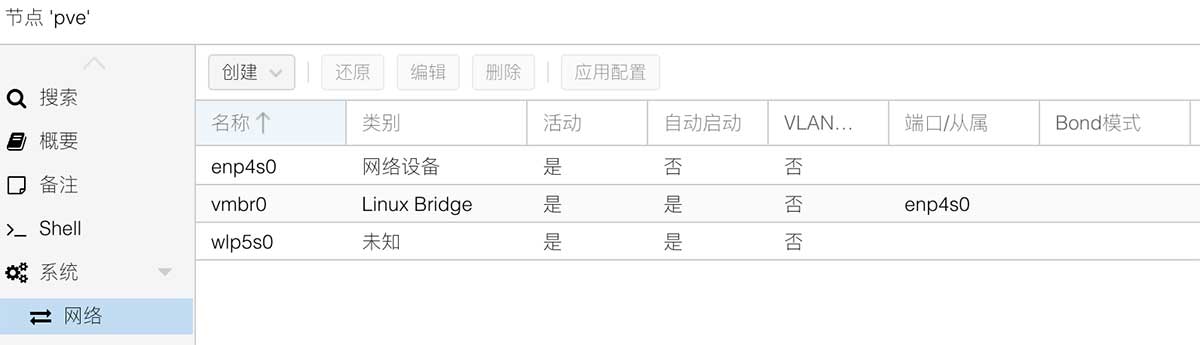
第二步:使用无线网卡
我希望能做到管理网卡和日常使用网卡分离,所以这里我考虑将设备的无线网卡激活和无线网卡一起使用。
使用 cat /etc/network/interfaces 查看当前系统的网络接口,可以看到默认只有有线网卡在工作。
auto lo
iface lo inet loopback

iface enp4s0 inet manual

auto vmbr0
iface vmbr0 inet static
	address 10.11.12.95/24
	gateway 10.11.12.13
	bridge-ports enp4s0
	bridge-stp off
	bridge-fd 0
这是因为 PVE 系统中并不包含无线网卡驱动,所以和《AMD 4750u 及 5800u 笔记本安装 Ubuntu 20.04》里提到的一样,需要进行驱动编译。
编译无线网卡
编译网卡驱动前,我们先确定网卡具体型号。通过 lspci 可以看到机器默认的有线和无线网卡都是 Realtek 的螃蟹卡:
04:00.0 Ethernet controller: Realtek Semiconductor Co., Ltd. RTL8111/8168/8411 PCI Express Gigabit Ethernet Controller (rev 15)
05:00.0 Network controller: Realtek Semiconductor Co., Ltd. Device 8852
其中 “Realtek Semiconductor Co., Ltd. Device 8852” 指的就是无线网卡,先尝试使用之前文章中的方案执行编译:
apt-get install -y make gcc build-essential git
git clone https://github.com/lwfinger/rtw89.git -b v5
cd rtw89
make
make install
命令执行的过程中,会发现编译报错,提示缺少 /lib/modules/5.11.22-4-pve 这个目录:
make
make -C /lib/modules/5.11.22-4-pve/build M=/root/rtw89 modules
make[1]: *** /lib/modules/5.11.22-4-pve/build: No such file or directory.  Stop.
make: *** [Makefile:52: all] Error 2
这是因为 PVE 内核是自己定制的,所以我们不能使用 apt-get install linux-headers-$(uname -r) 安装依赖(也会报错):
apt-get install linux-headers-$(uname -r)
Reading package lists... Done
Building dependency tree... Done
Reading state information... Done
E: Unable to locate package linux-headers-5.11.22-4-pve
E: Couldn't find any package by glob 'linux-headers-5.11.22-4-pve'
E: Couldn't find any package by regex 'linux-headers-5.11.22-4-pve'
正确方法是,使用 PVE 官方提供的 pve-headers 软件包,为了下载速度快一些,我们可以使用华农的开源镜像:
curl -O https://mirrors.scau.edu.cn/proxmox/debian/dists/bullseye/pve-no-subscription/binary-amd64/pve-headers-5.11.22-4-pve_5.11.22-9_amd64.deb
下载之后,使用 dpkg -i pve-headers-5.11.22-4-pve_5.11.22-9_amd64.deb 安装软件:
Selecting previously unselected package pve-headers-5.11.22-4-pve.
(Reading database ... 49447 files and directories currently installed.)
Preparing to unpack pve-headers-5.11.22-4-pve_5.11.22-9_amd64.deb ...
Unpacking pve-headers-5.11.22-4-pve (5.11.22-9) ...
Setting up pve-headers-5.11.22-4-pve (5.11.22-9) ...
依赖安装完毕后,再次执行之前的命令,进行编译安装,一切顺利的话,将看到类似下面的日志:
make && make install
make -C /lib/modules/5.11.22-4-pve/build M=/root/rtw89 modules
make[1]: Entering directory '/usr/src/linux-headers-5.11.22-4-pve'
  CC [M]  /root/rtw89/core.o
  CC [M]  /root/rtw89/debug.o
  CC [M]  /root/rtw89/mac80211.o
  CC [M]  /root/rtw89/mac.o
  CC [M]  /root/rtw89/phy.o
  CC [M]  /root/rtw89/fw.o
  CC [M]  /root/rtw89/rtw8852a.o
  CC [M]  /root/rtw89/rtw8852a_table.o
  CC [M]  /root/rtw89/rtw8852a_rfk.o
  CC [M]  /root/rtw89/rtw8852a_rfk_table.o
  CC [M]  /root/rtw89/cam.o
  CC [M]  /root/rtw89/efuse.o
  CC [M]  /root/rtw89/regd.o
  CC [M]  /root/rtw89/coex.o
  CC [M]  /root/rtw89/ps.o
  CC [M]  /root/rtw89/sar.o
  CC [M]  /root/rtw89/ser.o
  CC [M]  /root/rtw89/util.o
  LD [M]  /root/rtw89/rtw89core.o
  CC [M]  /root/rtw89/pci.o
  LD [M]  /root/rtw89/rtw89pci.o
  MODPOST /root/rtw89/Module.symvers
  CC [M]  /root/rtw89/rtw89core.mod.o
  LD [M]  /root/rtw89/rtw89core.ko
  BTF [M] /root/rtw89/rtw89core.ko
Skipping BTF generation for /root/rtw89/rtw89core.ko due to unavailability of vmlinux
  CC [M]  /root/rtw89/rtw89pci.mod.o
  LD [M]  /root/rtw89/rtw89pci.ko
  BTF [M] /root/rtw89/rtw89pci.ko
Skipping BTF generation for /root/rtw89/rtw89pci.ko due to unavailability of vmlinux
make[1]: Leaving directory '/usr/src/linux-headers-5.11.22-4-pve'
make -C /lib/modules/5.11.22-4-pve/build M=/root/rtw89 modules
make[1]: Entering directory '/usr/src/linux-headers-5.11.22-4-pve'
make[1]: Leaving directory '/usr/src/linux-headers-5.11.22-4-pve'
cp *.bin /lib/firmware/rtw89/.
Install rtw89 SUCCESS
再次使用 lspci -vvv 查看设备,可以看到设备已经挂上了我们编译好的驱动:
lspci -vvv


05:00.0 Network controller: Realtek Semiconductor Co., Ltd. Device 8852
	Subsystem: Lenovo Device 4852
	Control: I/O- Mem- BusMaster- SpecCycle- MemWINV- VGASnoop- ParErr- Stepping- SERR- FastB2B- DisINTx-
	Status: Cap+ 66MHz- UDF- FastB2B- ParErr- DEVSEL=fast >TAbort- <TAbort- <MAbort- >SERR- <PERR- INTx-
	Interrupt: pin A routed to IRQ 255
... ...
	Kernel modules: rtw89pci
不过此时,网卡还不能使用,我们还要进行网卡配置。
配置无线网卡
为了方便接下来的配置操作,需要先安装几个常用软件:
apt install net-tools wireless-tools wpasupplicant
软件安装完毕后,使用 iwconfig 查看当前网络接口,可以看到目前系统网卡设备里还没有无线网卡:
lo        no wireless extensions.

enp4s0    no wireless extensions.

vmbr0     no wireless extensions.
估计是因为设备并非热拔插,所以我们这里需要先重启一次设备。重启之后,再次使用 iwconfig 再次查看设备:
lo        no wireless extensions.

enp4s0    no wireless extensions.

wlp5s0    IEEE 802.11  ESSID:off/any
          Mode:Managed  Access Point: Not-Associated   Tx-Power=0 dBm
          Retry short limit:7   RTS thr:off   Fragment thr:off
          Encryption key:off
          Power Management:on

vmbr0     no wireless extensions.
可以看到列表中出现了无线网卡(wlp5s0),但是此刻网卡并未打开,电源提示 Tx-Power=0 dBm 。
配置无线网络
使用 iwlist wlp5s0 scan ,搜索无线网络,可以看到网卡目前确实还无法使用:
wlp5s0 Interface doesn't support scanning : Network is down
使用 ifconfig wlp5s0 up 启动网卡,然后再次使用 iwconfig 查看设备:
wlp5s0    IEEE 802.11  ESSID:off/any
          Mode:Managed  Access Point: Not-Associated   Tx-Power=20 dBm
          Retry short limit:7   RTS thr:off   Fragment thr:off
          Encryption key:off
          Power Management:on
可以看到网卡启动了,显示 Tx-Power=20 dBm,再次使用 iwlist wlp5s0 scan 进行无线网络扫描,会出现一堆无线网络名称:
...

Cell 07 - Address: 8C:XX:XX:XX:XX:XX
     Channel:36
     Frequency:5.18 GHz (Channel 36)
     Quality=70/70  Signal level=-9 dBm
     Encryption key:on
     ESSID:"WIFI_NAME"
     Bit Rates:6 Mb/s; 9 Mb/s; 12 Mb/s; 18 Mb/s; 24 Mb/s
               36 Mb/s; 48 Mb/s; 54 Mb/s
...
找到我们要连接的网络,然后使用下面的命令,先生成网络配置:
wpa_passphrase WIFI_NAME WIFI_PASSWORD > /etc/wpa_supplicant/wpa_supplicant.conf
接着,使用下面的命令,将无线网卡和刚刚生成的无线网络配置添加到当前的系统网络接口中:
echo 'auto wlp5s0
iface wlp5s0 inet dhcp
wpa-conf /etc/wpa_supplicant/wpa_supplicant.conf' >> /etc/network/interfaces
执行完毕后,使用下面的命令重启系统网络服务:
service networking restart
网络服务重启完毕之后,再次使用 iwconfig 命令查看网络接口,可以看到网卡已经在工作中了。
wlp5s0    IEEE 802.11  ESSID:"WIFI_NAME"
          Mode:Managed  Frequency:5.18 GHz  Access Point: 8C:XX:XX:XX:XX:XX
          Bit Rate=960.7 Mb/s   Tx-Power=20 dBm
          Retry short limit:7   RTS thr:off   Fragment thr:off
          Encryption key:off
          Power Management:on
          Link Quality=70/70  Signal level=-27 dBm
          Rx invalid nwid:0  Rx invalid crypt:0  Rx invalid frag:0
          Tx excessive retries:0  Invalid misc:11   Missed beacon:0
而使用 ifconfig ,则可以看到 PVE 的有线和无线网络都连上了网,并且都获取了网络地址。
vmbr0: flags=4163<UP,BROADCAST,RUNNING,MULTICAST>  mtu 1500
        inet 10.11.12.95  netmask 255.255.255.0  broadcast 0.0.0.0
        inet6 fe80::xxxx:xxxx:xxxx:xxxx  prefixlen 64  scopeid 0x20<link>
        ether 7c:XX:XX:XX:XX:XX  txqueuelen 1000  (Ethernet)
        RX packets 507  bytes 54603 (53.3 KiB)
        RX errors 0  dropped 40  overruns 0  frame 0
        TX packets 359  bytes 109176 (106.6 KiB)
        TX errors 0  dropped 0 overruns 0  carrier 0  collisions 0

wlp5s0: flags=4163<UP,BROADCAST,RUNNING,MULTICAST>  mtu 1500
        inet 10.11.12.94  netmask 255.255.255.0  broadcast 10.11.12.255
        inet6 fdb1:xxxx:xxxx:1:xxxx:xxxx:xxxx:xxxx  prefixlen 64  scopeid 0x0<global>
        inet6 fe80::xxxx:xxxx:xxxx:xxxx  prefixlen 64  scopeid 0x20<link>
        ether 74:XX:XX:XX:XX:XX  txqueuelen 1000  (Ethernet)
        RX packets 983  bytes 185637 (181.2 KiB)
        RX errors 0  dropped 149  overruns 0  frame 0
        TX packets 41  bytes 5410 (5.2 KiB)
        TX errors 0  dropped 0 overruns 0  carrier 0  collisions 0
接下来就可以使用有线网络提供服务,使用无线网络来进行设备管理了。不过如果你想对这块网卡打“端口聚合”的主意,PVE 并不支持,在网页界面中可以看到这块无线网卡,还是挺特别的。
第三步:初始化新磁盘
安装完 PVE 之后,除了系统安装盘之外,不会挂载其他的磁盘。
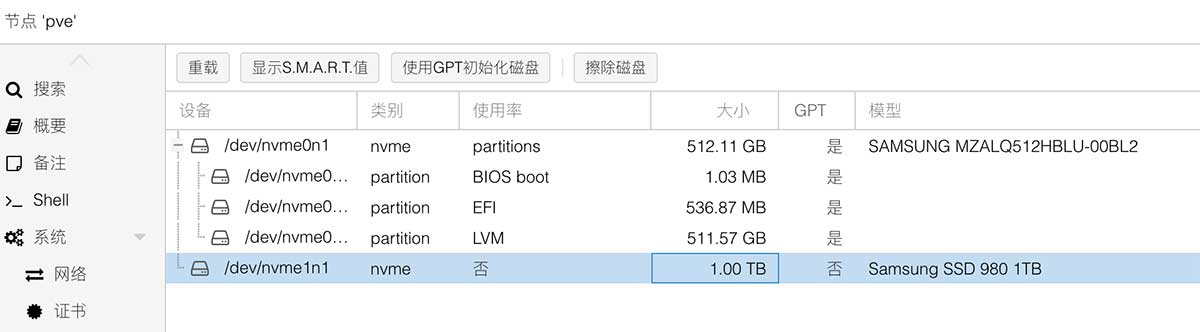
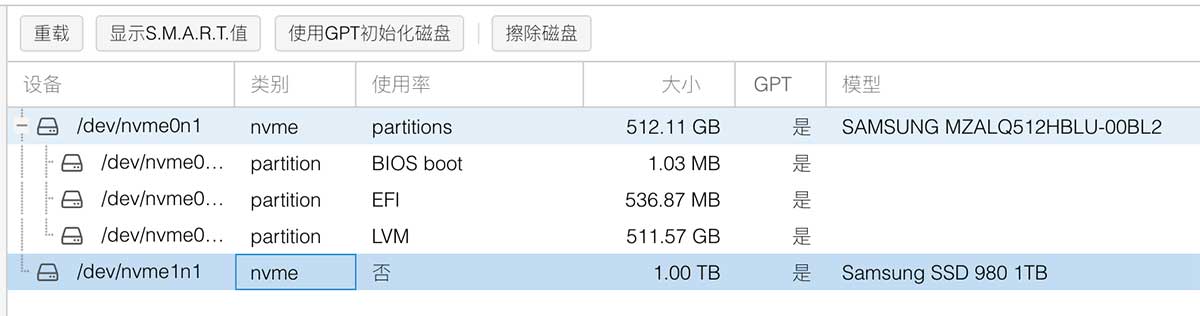
依次点击“擦除磁盘”、“使用 GPT 初始化磁盘” 后,可以看到磁盘状态有了变化。
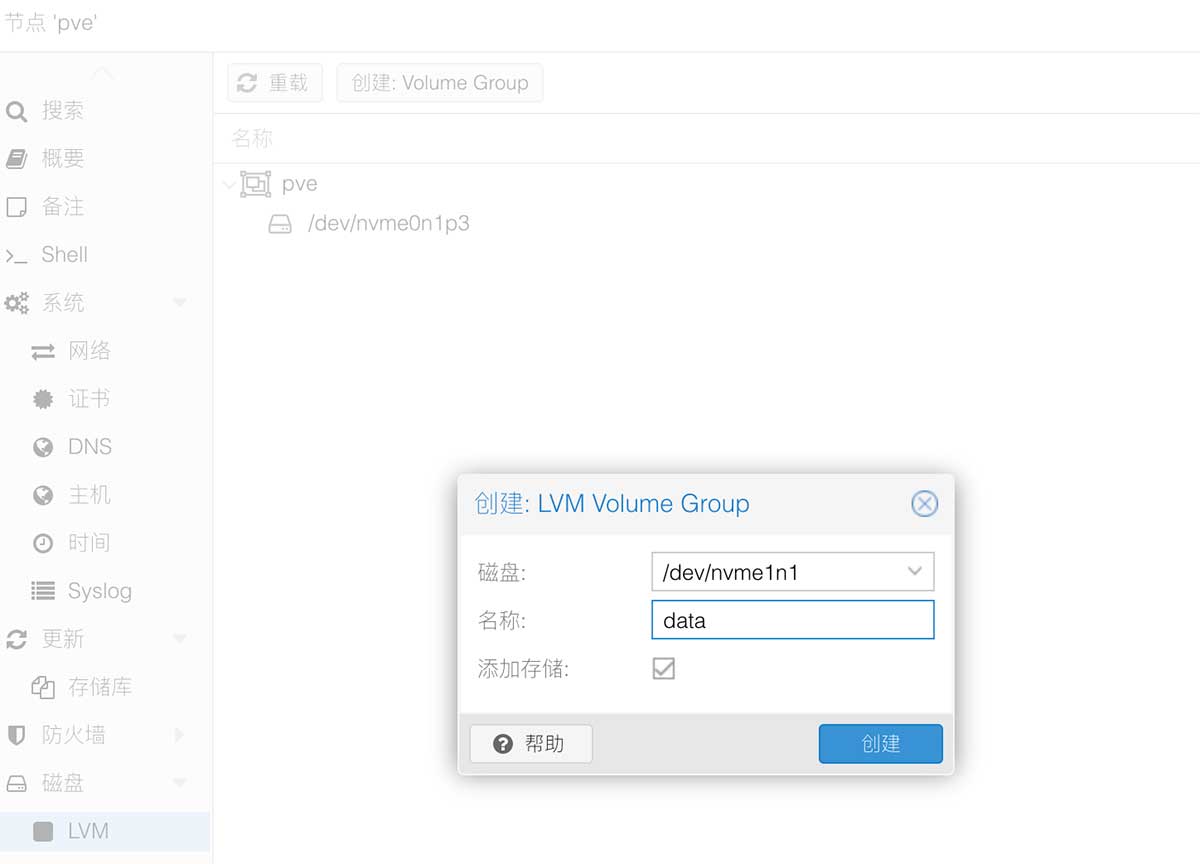
接下来,就能够将刚刚准备好的磁盘投入使用啦。将磁盘使用 LVM Group 的方式进行挂载。
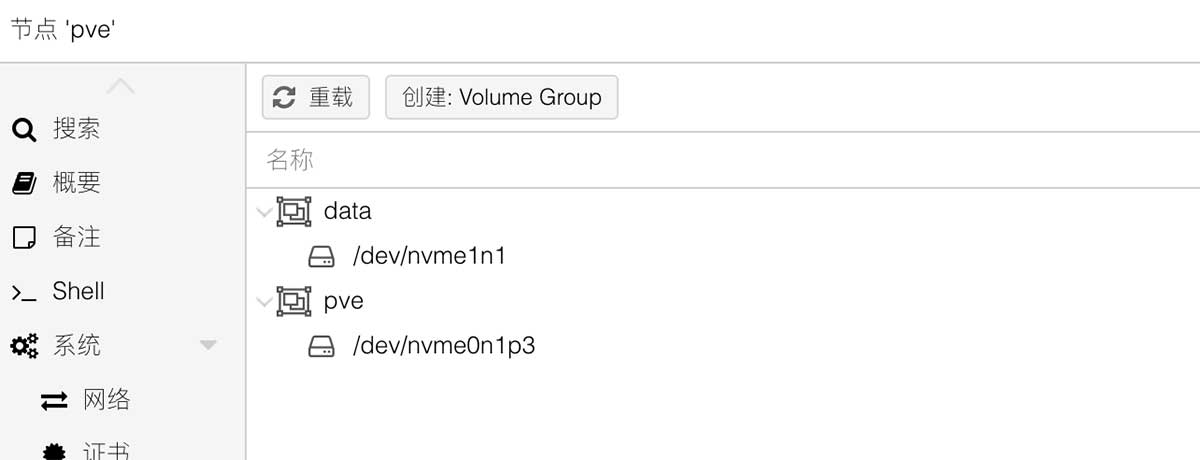
再次查看磁盘状态,可以看到磁盘已经挂载就绪了。
第四步:显示器自动休眠
使用笔记本当轻量服务器的好处是自带调试键鼠和显示器,但是 PVE 和之前使用的 Ubuntu 系统有一些不同,PVE 并不会让显示器休眠,长时间亮着一来费电,二来也烧屏。
作为一块成熟的屏幕,应该学会自己休眠了。参考 https://askubuntu.com/questions/62858/turn-off-monitor-using-command-line/1076734#1076734,我们修改 /etc/default/grub 的内容,将原本的:
GRUB_CMDLINE_LINUX_DEFAULT="quiet"
GRUB_CMDLINE_LINUX_DEFAULT="quiet consoleblank=15"
然后执行 update-grub,重启设备后,显示器就会在 15 秒无操作时,自动休眠啦。
彩蛋:去掉启动提示框
PVE 默认登陆后会弹一个提示框,虽然不碍事,但是确实比较烦。
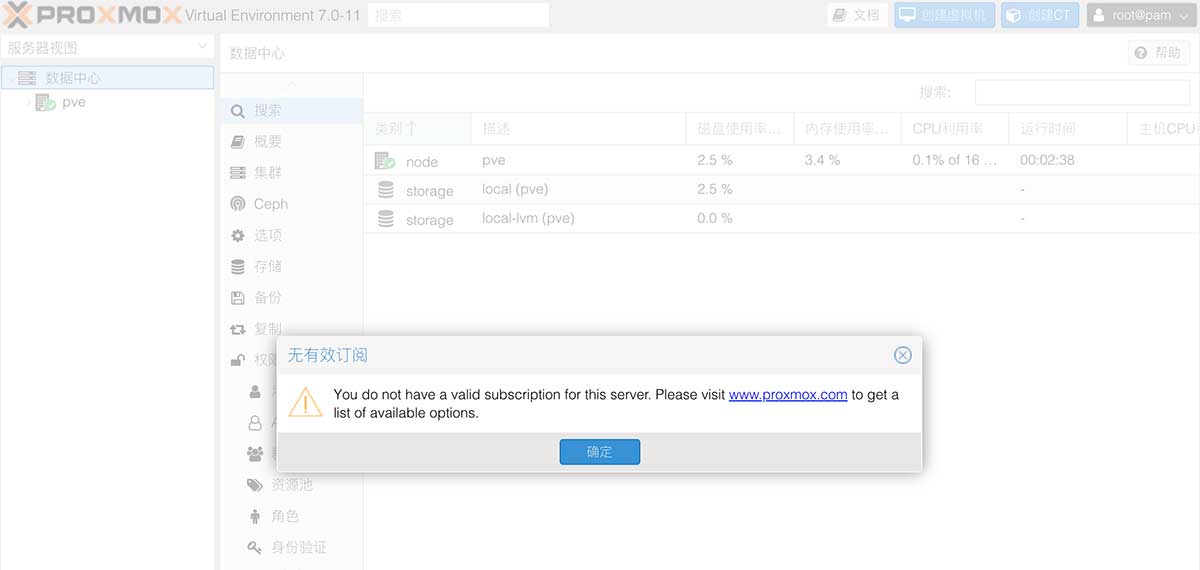
这里提供一个简单的方案,来干掉这个麻烦的提醒。
sed -i -e "s/Proxmox.Utils.checked_command(Ext.emptyFn);//" /usr/share/pve-manager/js/pvemanagerlib.js
先写到这里,后续服务迁移的过程中,再分享如何调整网络,让这台设备可以“移动”起来。
Recommend
About Joyk
Aggregate valuable and interesting links.
Joyk means Joy of geeK