

【中高级前端】必备,30+高频手写题及详细答案(万字长文),看“你”怎么难倒我
source link: https://segmentfault.com/a/1190000040803264
Go to the source link to view the article. You can view the picture content, updated content and better typesetting reading experience. If the link is broken, please click the button below to view the snapshot at that time.

写个快排吧、能手写一个Promise吗?、来一个深拷贝...相信大家已经不止一次在面试或者日常业务中遇到这样的题目了,每当现场写代码时感觉似曾相识,但就是写不出来,期望的offer也离我们远去o(╥﹏╥)o。来,兄弟们卷起来,日计不足,岁计有余,咱们每天学一个,看那些面试官还怎么难倒我们!!!哼哼哼

1. 实现instanceOf的3种方式
instanceof运算符用于检测构造函数的prototype属性是否出现在某个实例对象的原型链上。MDN上
关键点: 构造函数Fn的prototype,实例对象的原型链。
所以只要遍历实例对象的原型链,挨个往上查找看是否有与Fn的prototype相等的原型,直到最顶层Object还找不到,那么就返回false。
递归实现(方式1)
/**
 *
 * @param {*} obj 实例对象
 * @param {*} func 构造函数
 * @returns true false
 */
const instanceOf1 = (obj, func) => {
  if (obj === null || typeof obj !== 'object') {
    return false
  }

  let proto = Object.getPrototypeOf(obj)

  if (proto === func.prototype) {
    return true
  } else if (proto === null) {
    return false
  } else {
    return instanceOf1(proto, func)
  }
}

// 测试
let Fn = function () { }
let p1 = new Fn()

console.log(instanceOf1({}, Object)) // true
console.log(instanceOf1(p1, Fn)) // true
console.log(instanceOf1({}, Fn)) // false
console.log(instanceOf1(null, Fn)) // false
console.log(instanceOf1(1, Fn)) // false
遍历实现(方式2)
/**
 *
 * @param {*} obj 实例对象
 * @param {*} func 构造函数
 * @returns true false
 */
const instanceOf2 = (obj, func) => {
  if (obj === null || typeof obj !== 'object') {
    return false
  }

  let proto = obj

  while (proto = Object.getPrototypeOf(proto)) {
    if (proto === null) {
      return false
    } else if (proto === func.prototype) {
      return true
    }
  }

  return false
}

// 测试
let Fn = function () { }
let p1 = new Fn()

console.log(instanceOf2({}, Object)) // true
console.log(instanceOf2(p1, Fn)) // true
console.log(instanceOf2({}, Fn)) // false
console.log(instanceOf2(null, Fn)) // false
console.log(instanceOf2(1, Fn)) // false
遍历实现(方式3)
/**
 *
 * @param {*} obj 实例对象
 * @param {*} func 构造函数
 * @returns true false
 */
const instanceOf3 = (obj, func) => {
  if (obj === null || typeof obj !== 'object') {
    return false
  }

  let proto = obj
  // 因为一定会有结束的时候(最顶层Object),所以不会是死循环
  while (true) {
    if (proto === null) {
      return false
    } else if (proto === func.prototype) {
      return true
    } else {
      proto = Object.getPrototypeOf(proto)
    }
  }
}

// 测试
let Fn = function () { }
let p1 = new Fn()

console.log(instanceOf3({}, Object)) // true
console.log(instanceOf3(p1, Fn)) // true
console.log(instanceOf3({}, Fn)) // false
console.log(instanceOf3(null, Fn)) // false
console.log(instanceOf3(1, Fn)) // false
2. 实现JSON.stringify(超详细)
看代码实现前,可以先看看前几天写的一篇悲伤的故事就因为JSON.stringify,我的年终奖差点打水漂了
JSON.stringify()方法将一个 JavaScript 对象或值转换为 JSON 字符串,如果指定了一个 replacer 函数,则可以选择性地替换值,或者指定的 replacer 是数组,则可选择性地仅包含数组指定的属性。MDN
JSON.stringify本身有非常多的转换规则和特性(详情请查看MDN),要完整实现还是挺麻烦的(为了实现这个函数胖头鱼快不会动了o(╥﹏╥)o)
const jsonstringify = (data) => {
  // 确认一个对象是否存在循环引用
  const isCyclic = (obj) => {
  // 使用Set数据类型来存储已经检测过的对象
  let stackSet = new Set()
  let detected = false

  const detect = (obj) => {
    // 不是对象类型的话,可以直接跳过
    if (obj && typeof obj != 'object') {
      return
    }
    // 当要检查的对象已经存在于stackSet中时,表示存在循环引用
    if (stackSet.has(obj)) {
      return detected = true
    }
    // 将当前obj存如stackSet
    stackSet.add(obj)

    for (let key in obj) {
      // 对obj下的属性进行挨个检测
      if (obj.hasOwnProperty(key)) {
        detect(obj[key])
      }
    }
    // 平级检测完成之后,将当前对象删除,防止误判
    /*
      例如:对象的属性指向同一引用,如果不删除的话,会被认为是循环引用
      let tempObj = {
        name: '前端胖头鱼'
      }
      let obj4 = {
        obj1: tempObj,
        obj2: tempObj
      }
    */
    stackSet.delete(obj)
  }

  detect(obj)

  return detected
}

  // 特性七:
  // 对包含循环引用的对象(对象之间相互引用,形成无限循环)执行此方法,会抛出错误。
  if (isCyclic(data)) {
    throw new TypeError('Converting circular structure to JSON')
  }

  // 特性九:
  // 当尝试去转换 BigInt 类型的值会抛出错误
  if (typeof data === 'bigint') {
    throw new TypeError('Do not know how to serialize a BigInt')
  }

  const type = typeof data
  const commonKeys1 = ['undefined', 'function', 'symbol']
  const getType = (s) => {
    return Object.prototype.toString.call(s).replace(/\[object (.*?)\]/, '$1').toLowerCase()
  }

  // 非对象
  if (type !== 'object' || data === null) {
    let result = data
    // 特性四:
    // NaN 和 Infinity 格式的数值及 null 都会被当做 null。
    if ([NaN, Infinity, null].includes(data)) {
      result = 'null'
      // 特性一:
      // `undefined`、`任意的函数`以及`symbol值`被`单独转换`时,会返回 undefined
    } else if (commonKeys1.includes(type)) {
      // 直接得到undefined,并不是一个字符串'undefined'
      return undefined
    } else if (type === 'string') {
      result = '"' + data + '"'
    }

    return String(result)
  } else if (type === 'object') {
    // 特性五:
    // 转换值如果有 toJSON() 方法,该方法定义什么值将被序列化
    // 特性六:
    // Date 日期调用了 toJSON() 将其转换为了 string 字符串(同Date.toISOString()),因此会被当做字符串处理。
    if (typeof data.toJSON === 'function') {
      return jsonstringify(data.toJSON())
    } else if (Array.isArray(data)) {
      let result = data.map((it) => {
        // 特性一:
        // `undefined`、`任意的函数`以及`symbol值`出现在`数组`中时会被转换成 `null`
        return commonKeys1.includes(typeof it) ? 'null' : jsonstringify(it)
      })

      return `[${result}]`.replace(/'/g, '"')
    } else {
      // 特性二:
      // 布尔值、数字、字符串的包装对象在序列化过程中会自动转换成对应的原始值。
      if (['boolean', 'number'].includes(getType(data))) {
        return String(data)
      } else if (getType(data) === 'string') {
        return '"' + data + '"'
      } else {
        let result = []
        // 特性八
        // 其他类型的对象,包括 Map/Set/WeakMap/WeakSet,仅会序列化可枚举的属性
        Object.keys(data).forEach((key) => {
          // 特性三:
          // 所有以symbol为属性键的属性都会被完全忽略掉,即便 replacer 参数中强制指定包含了它们。
          if (typeof key !== 'symbol') {
            const value = data[key]
            // 特性一
            // `undefined`、`任意的函数`以及`symbol值`,出现在`非数组对象`的属性值中时在序列化过程中会被忽略
            if (!commonKeys1.includes(typeof value)) {
              result.push(`"${key}":${jsonstringify(value)}`)
            }
          }
        })

        return `{${result}}`.replace(/'/, '"')
      }
    }
  }
}

// 各种测试

// 1. 测试一下基本输出
console.log(jsonstringify(undefined)) // undefined
console.log(jsonstringify(() => { })) // undefined
console.log(jsonstringify(Symbol('前端胖头鱼'))) // undefined
console.log(jsonstringify((NaN))) // null
console.log(jsonstringify((Infinity))) // null
console.log(jsonstringify((null))) // null
console.log(jsonstringify({
  name: '前端胖头鱼',
  toJSON() {
    return {
      name: '前端胖头鱼2',
      sex: 'boy'
    }
  }
}))
// {"name":"前端胖头鱼2","sex":"boy"}

// 2. 和原生的JSON.stringify转换进行比较
console.log(jsonstringify(null) === JSON.stringify(null));
// true
console.log(jsonstringify(undefined) === JSON.stringify(undefined));
// true
console.log(jsonstringify(false) === JSON.stringify(false));
// true
console.log(jsonstringify(NaN) === JSON.stringify(NaN));
// true
console.log(jsonstringify(Infinity) === JSON.stringify(Infinity));
// true
let str = "前端胖头鱼";
console.log(jsonstringify(str) === JSON.stringify(str));
// true
let reg = new RegExp("\w");
console.log(jsonstringify(reg) === JSON.stringify(reg));
// true
let date = new Date();
console.log(jsonstringify(date) === JSON.stringify(date));
// true
let sym = Symbol('前端胖头鱼');
console.log(jsonstringify(sym) === JSON.stringify(sym));
// true
let array = [1, 2, 3];
console.log(jsonstringify(array) === JSON.stringify(array));
// true
let obj = {
  name: '前端胖头鱼',
  age: 18,
  attr: ['coding', 123],
  date: new Date(),
  uni: Symbol(2),
  sayHi: function () {
    console.log("hello world")
  },
  info: {
    age: 16,
    intro: {
      money: undefined,
      job: null
    }
  },
  pakingObj: {
    boolean: new Boolean(false),
    string: new String('前端胖头鱼'),
    number: new Number(1),
  }
}
console.log(jsonstringify(obj) === JSON.stringify(obj))
// true
console.log((jsonstringify(obj)))
// {"name":"前端胖头鱼","age":18,"attr":["coding",123],"date":"2021-10-06T14:59:58.306Z","info":{"age":16,"intro":{"job":null}},"pakingObj":{"boolean":false,"string":"前端胖头鱼","number":1}}
console.log(JSON.stringify(obj))
// {"name":"前端胖头鱼","age":18,"attr":["coding",123],"date":"2021-10-06T14:59:58.306Z","info":{"age":16,"intro":{"job":null}},"pakingObj":{"boolean":false,"string":"前端胖头鱼","number":1}}

// 3. 测试可遍历对象
let enumerableObj = {}

Object.defineProperties(enumerableObj, {
  name: {
    value: '前端胖头鱼',
    enumerable: true
  },
  sex: {
    value: 'boy',
    enumerable: false
  },
})

console.log(jsonstringify(enumerableObj))
// {"name":"前端胖头鱼"}

// 4. 测试循环引用和Bigint

let obj1 = { a: 'aa' }
let obj2 = { name: '前端胖头鱼', a: obj1, b: obj1 }
obj2.obj = obj2

console.log(jsonstringify(obj2))
// TypeError: Converting circular structure to JSON
console.log(jsonStringify(BigInt(1)))
// TypeError: Do not know how to serialize a BigInt
3. 实现一个Promise
篇幅原因,这里就不介绍Promise A+规范以及
then函数之外的其他详细实现了,下面这个版本我一般在面试中常用,基本直接通过。
class MyPromise {
  constructor (exe) {
    // 最后的值,Promise .then或者.catch接收的值
    this.value = undefined
    // 状态:三种状态 pending success failure
    this.status = 'pending'
    // 成功的函数队列
    this.successQueue = []
    // 失败的函数队列
    this.failureQueue = []
    const resolve = () => {
      const doResolve = (value) => {
        // 将缓存的函数队列挨个执行,并且将状态和值设置好
        if (this.status === 'pending') {
          this.status = 'success'
          this.value = value

          while (this.successQueue.length) {
            const cb = this.successQueue.shift()

            cb && cb(this.value)
          }
        }
      }

      setTimeout(doResolve, 0)
    }

    const reject = () => {
      // 基本同resolve
      const doReject = (value) => {
        if (this.status === 'pending') {
          this.status = 'failure'
          this.value = value

          while (this.failureQueue.length) {
            const cb = this.failureQueue.shift()

            cb && cb(this.value)
          }
        }
      }

      setTimeout(doReject, 0)
    }

    exe(resolve, reject)
  }

  then (success = (value) => value, failure = (value) => value) {
    // .then返回的是一个新的Promise
    return new MyPromise((resolve, reject) => {
      // 包装回到函数
      const successFn = (value) => {
        try {
          const result = success(value)
          // 如果结果值是一个Promise,那么需要将这个Promise的值继续往下传递,否则直接resolve即可
          result instanceof MyPromise ? result.then(resolve, reject) : resolve(result)
        } catch (err) {
          reject(err)
        }
      }
      // 基本筒成功回调函数的封装
      const failureFn = (value) => {
        try {
          const result = failure(value)

          result instanceof MyPromise ? result.then(resolve, reject) : resolve(result)
        } catch (err) {
          reject(err)
        }
      }
      // 如果Promise的状态还未结束,则将成功和失败的函数缓存到队列里
      if (this.status === 'pending') {
        this.successQueue.push(successFn)
        this.failureQueue.push(failureFn)
        // 如果已经成功结束,直接执行成功回调
      } else if (this.status === 'success') {
        success(this.value)
      } else {
        // 如果已经失败,直接执行失败回调
        failure(this.value)
      }
    })
  }
  // 其他函数就不一一实现了
  catch () {

  }
}
// 以下举个例子,验证一下以上实现的结果
const pro = new MyPromise((resolve, reject) => {
  setTimeout(resolve, 1000)
  setTimeout(reject, 2000)
})

pro
  .then(() => {
    console.log('2_1')
    const newPro = new MyPromise((resolve, reject) => {
      console.log('2_2')
      setTimeout(reject, 2000)
    })
    console.log('2_3')
    return newPro
  })
  .then(
    () => {
      console.log('2_4')
    },
    () => {
      console.log('2_5')
    }
  )

pro
  .then(
    data => {
      console.log('3_1')
      throw new Error()
    },
    data => {
      console.log('3_2')
    }
  )
  .then(
    () => {
      console.log('3_3')
    },
    e => {
      console.log('3_4')
    }
  )
// 2_1
// 2_2
// 2_3
// 3_1
// 3_4
// 2_5
4. 实现多维数组扁平化的3种方式
业务和面试中都经常会遇到,将多维数组扁平化是必备的技能
递归实现(方式1)
/**
 *
 * @param {*} array 深层嵌套的数据
 * @returns array 新数组
 */
const flat1 = (array) => {
  return array.reduce((result, it) => {
    return result.concat(Array.isArray(it) ? flat1(it) : it)
  }, [])
}

// 测试
let arr1 = [
  1,
  [ 2, 3, 4 ],
  [ 5, [ 6, [ 7, [ 8 ] ] ] ]
]
console.log(flat1(arr1)) // [1, 2, 3, 4, 5, 6, 7, 8]
遍历实现(方式2)
/**
 *
 * @param {*} array 深层嵌套的数据
 * @returns array 新数组
 */

const flat2 = (array) => {
  const result = []
  // 展开一层
  const stack = [ ...array ]

  while (stack.length !== 0) {
    // 取出最后一个元素
    const val = stack.pop()

    if (Array.isArray(val)) {
     // 遇到是数组的情况,往stack后面推入
      stack.push(...val)
    } else {
      // 往数组前面推入
      result.unshift(val)
    }
  }

  return result
}
// 测试
let arr2 = [
  1,
  [ 2, 3, 4 ],
  [ 5, [ 6, [ 7, [ 8 ] ] ] ]
]

console.log(flat2(arr2)) // [1, 2, 3, 4, 5, 6, 7, 8]
逗比版本(方式3)
借助原生flat函数,将需要展开的层,指定为Infinity即无限层,也就可以拍平了,算是一个思路,不过面试官估计觉得咱们是个逗比😄,也不知道写出这样的代码,让不让过。
/**
 *
 * @param {*} array 深层嵌套的数据
 * @returns 新数组
 */
const flat3 = (array) => {
  return array.flat(Infinity)
}
// 测试
let arr3 = [
  1,
  [ 2, 3, 4 ],
  [ 5, [ 6, [ 7, [ 8 ] ] ] ]
]

console.log(flat3(arr3)) // [1, 2, 3, 4, 5, 6, 7, 8]
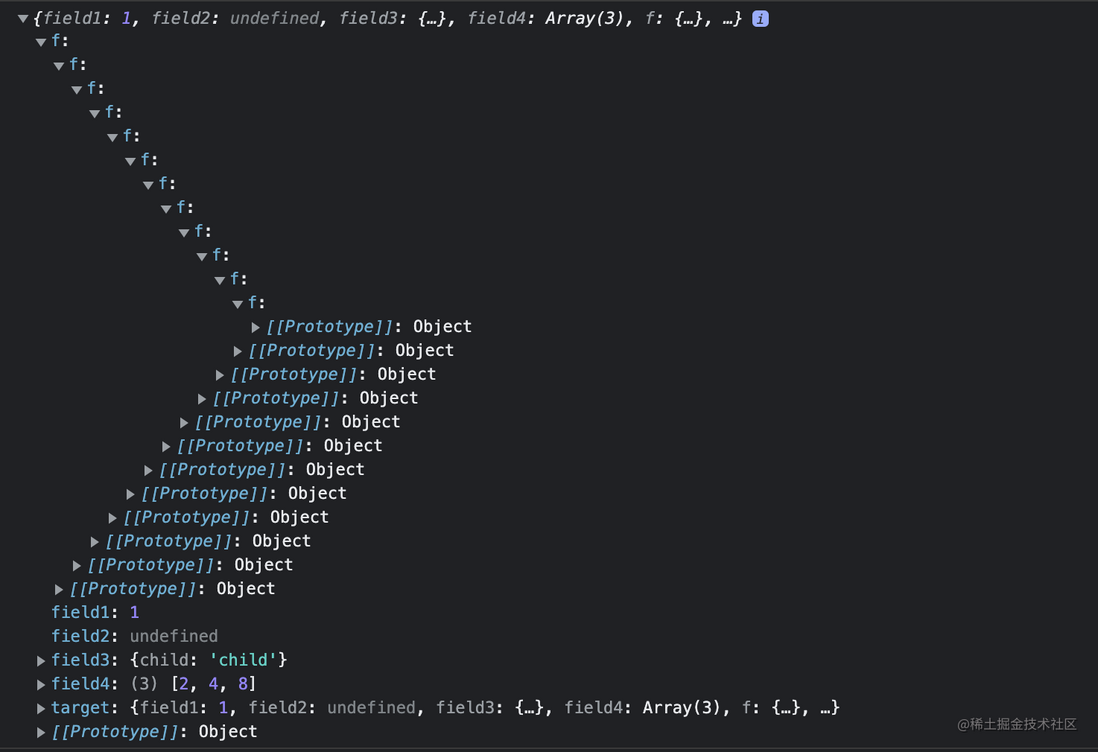
5. 实现深拷贝
const deepClone = (target, cache = new Map()) => {
  const isObject = (obj) => typeof obj === 'object' && obj !== null

  if (isObject(target)) {
    // 解决循环引用
    const cacheTarget = cache.get(target)
    // 已经存在直接返回,无需再次解析
    if (cacheTarget) {
      return cacheTarget
    }

    let cloneTarget = Array.isArray(target) ? [] : {}

    cache.set(target, cloneTarget)

    for (const key in target) {
      if (target.hasOwnProperty(key)) {
        const value = target[ key ]
        cloneTarget[ key ] = isObject(value) ? deepClone(value, cache) : value
      }
    }

    return cloneTarget
  } else {
    return target
  }
}

const target = {
  field1: 1,
  field2: undefined,
  field3: {
      child: 'child'
  },
  field4: [2, 4, 8],
  f: { f: { f: { f: { f: { f: { f: { f: { f: { f: { f: { f: {} } } } } } } } } } } },
};

target.target = target;

const result1 = deepClone(target);
console.log(result1)
6. 实现new操作符
思路: 在实现new之前,我们先了解一下new的执行过程
new 关键字会进行如下的操作:
- 创建一个空的简单JavaScript对象(即
{}); - 为步骤1新创建的对象添加属性 proto ,将该属性链接至构造函数的原型对象
- 将步骤1新创建的对象作为
this的上下文,执行该函数 ; - 如果该函数没有返回对象,则返回
this。
const _new = function (func, ...args) {

  // 步骤1和步骤2
  let obj = Object.create(func.prototype)
  // 也可以通过下面的代码进行模拟
  /**
  let Ctor = function () {}

  Ctor.prototype = func.prototype
  Ctor.prototype.constructor = func

  let obj = new Ctor()
 */
  // 步骤3
  let result = func.apply(obj, args)
  // 步骤4
  if (typeof result === 'object' && result !== null || typeof result === 'function') {
    return result
  } else {
    return obj
  }
}

// 测试
let Person = function (name, sex) {
  this.name = name
  this.sex = sex
}

Person.prototype.showInfo = function () {
  console.log(this.name, this.sex)
}

let p1 = _new(Person, 'qianlongo', 'sex')

console.log(p1)

// Person { name: '前端胖头鱼', sex: 'sex' }
7. 实现发布订阅(EventEmitter)
发布订阅相信大家一定不会陌生,实际工作也经常会遇到,比如Vue的
EventBus,$on,$emit等。接下来咱们实现一把试试
class EventEmitter {
  constructor () {
    this.events = {}
  }
  // 事件监听
  on (evt, callback, ctx) {
    if (!this.events[ evt ]) {
      this.events[ evt ] = []
    }

    this.events[ evt ].push(callback)

    return this
  }
  // 发布事件
  emit (evt, ...payload) {
    const callbacks = this.events[ evt ]

    if (callbacks) {
      callbacks.forEach((cb) => cb.apply(this, payload))
    }

    return this
  }
  // 删除订阅
  off (evt, callback) {

    // 啥都没传,所有的事件都取消
    if (typeof evt === 'undefined') {
      delete this.events
    } else if (typeof evt === 'string') {
      // 删除指定事件的回调
      if (typeof callback === 'function') {
        this.events[ evt ] = this.events[ evt ].filter((cb) => cb !== callback)
      } else {
        // 删除整个事件
        delete this.events[ evt ]
      }
    }

    return this
  }
  // 只进行一次的事件订阅
  once (evt, callback, ctx) {
    const proxyCallback = (...payload) => {
      callback.apply(ctx, payload)
      // 回调函数执行完成之后就删除事件订阅
      this.off(evt, proxyCallback)
    }

    this.on(evt, proxyCallback, ctx)
  }
}

// 测试
const e1 = new EventEmitter()

const e1Callback1 = (name, sex) => {
  console.log(name, sex, 'evt1---callback1')
}
const e1Callback2 = (name, sex) => {
  console.log(name, sex, 'evt1---callback2')
}
const e1Callback3 = (name, sex) => {
  console.log(name, sex, 'evt1---callback3')
}

e1.on('evt1', e1Callback1)
e1.on('evt1', e1Callback2)
// 只执行一次回调
e1.once('evt1', e1Callback3)

e1.emit('evt1', '前端胖头鱼', 'boy')
// 前端胖头鱼 boy evt1---callback1
// 前端胖头鱼 boy evt1---callback2
// 前端胖头鱼 boy evt1---callback3
console.log('------尝试删除e1Callback1------')
// 移除e1Callback1
e1.off('evt1', e1Callback1)
e1.emit('evt1', '前端胖头鱼', 'boy')
// 前端胖头鱼 boy evt1---callback2
8. 实现有并行限制的Promise
这是一道广大网友真实遇到题目,我们先看一下题意
/*
JS实现一个带并发限制的异步调度器Scheduler,保证同时运行的任务最多有两个。
完善下面代码的Scheduler类,使以下程序能够正常输出:
class Scheduler {
  add(promiseCreator) { ... }
  // ...
}

const timeout = time => {
  return new Promise(resolve => {
    setTimeout(resolve, time)
  }
})

const scheduler = new Scheduler()

const addTask = (time,order) => {
  scheduler.add(() => timeout(time).then(()=>console.log(order)))
}

addTask(1000, '1')
addTask(500, '2')
addTask(300, '3')
addTask(400, '4')

// output: 2 3 1 4
整个的完整执行流程:

起始1、2两个任务开始执行
500ms时,2任务执行完毕,输出2,任务3开始执行
800ms时,3任务执行完毕,输出3,任务4开始执行
1000ms时,1任务执行完毕,输出1,此时只剩下4任务在执行
1200ms时,4任务执行完毕,输出4
*/
解析
看完题目之后,大概会这几个问题存在
- 如何才能保证同时只有2个任务在处于执行中?
- 当某个任务执行结束之后,下一步如何知道应该执行哪个任务?
问题1:只需要用一个计数器来控制即可,每开始一个任务计数器+1,结束之后计数器-1,保证计数器一定<=2。
问题2:按照题目要求,任务的执行是有顺序的,只是任务的结束时间是不确定的,所以下一个任务一定是按照这样的顺序来
任务1 => 任务2 => 任务3 => 任务4
利用数组队列的性质,将任务挨个推入队列,前面的任务执行结束之后,将队首的任务取出来执行即可。
class Scheduler {
  constructor () {
    this.queue = []
    this.maxCount = 2
    this.runCount = 0
  }
  // promiseCreator执行后返回的是一个Promise
  add(promiseCreator) {
    // 小于等于2,直接执行
    this.queue.push(promiseCreator)
    // 每次添加的时候都会尝试去执行任务
    this.runQueue()
  }

  runQueue () {
    // 队列中还有任务才会被执行
    if (this.queue.length && this.runCount < this.maxCount) {
      // 执行先加入队列的函数
      const promiseCreator = this.queue.shift()
      // 开始执行任务 计数+1
      this.runCount += 1
      // 假设任务都执行成功,当然也可以做一下catch
      promiseCreator().then(() => {
        // 任务执行完毕,计数-1
        this.runCount -= 1
        // 尝试进行下一次任务
        this.runQueue()
      })
    }
  }
}

const timeout = time => {
  return new Promise(resolve => {
    setTimeout(resolve, time)
  })
}

const scheduler = new Scheduler()

const addTask = (time,order) => {
  scheduler.add(() => timeout(time).then(()=>console.log(order)))
}

addTask(1000, '1')
addTask(500, '2')
addTask(300, '3')
addTask(400, '4')

// 2
// 3
// 1
// 4
9. 手写LRU算法(蚂蚁金服曾遇到过)
这道算法题我记得以前在蚂蚁金服的面试中遇到过,大家也有可能会遇到噢。
大致题意
运用你所掌握的数据结构,设计和实现一个 LRU (最近最少使用) 缓存机制 。
实现 LRUCache 类:
- LRUCache(int capacity) 以
正整数作为容量 capacity 初始化 LRU 缓存 - int get(int key)
如果关键字 key 存在于缓存中,则返回关键字的值,否则返回 -1。 - void put(int key, int value)
如果关键字已经存在,则变更其数据值;如果关键字不存在,则插入该组「关键字-值」。当缓存容量达到上限时,它应该在写入新数据之前删除最久未使用的数据值,从而为新的数据值留出空间。
题目要求的1和2相对简单,主要是条件3,当缓存容量达到上限时,它应该在写入新数据之前删除最久未使用的数据值。容量和条件1相呼应,关键是怎么理解最久未使用呢?
- 读和写都是在使用数据
- 假设不管是读还是写,我们都把对应的
key值放到数组的末尾,那么是不是意味着数组的头部就是最久未使用的了呢?
数组&&对象实现方式
var LRUCache = function (capacity) {
  // 用数组记录读和写的顺序
  this.keys = []
  // 用对象来保存key value值
  this.cache = {}
  // 容量
  this.capacity = capacity
}

LRUCache.prototype.get = function (key) {
  // 如果存在
  if (this.cache[key]) {
    // 先删除原来的位置
    remove(this.keys, key)
    // 再移动到最后一个,以保持最新访问
    this.keys.push(key)
    // 返回值
    return this.cache[key]
  }
  return -1
}

LRUCache.prototype.put = function (key, value) {
  if (this.cache[key]) {
    // 存在的时候先更新值
    this.cache[key] = value
    // 再更新位置到最后一个
    remove(this.keys, key)

    this.keys.push(key)
  } else {
    // 不存在的时候加入
    this.keys.push(key)
    this.cache[key] = value
    // 容量如果超过了最大值,则删除最久未使用的(也就是数组中的第一个key)
    if (this.keys.length > this.capacity) {
      removeCache(this.cache, this.keys, this.keys[0])
    }
  }
}

// 移出数组中的key
function remove(arr, key) {
  if (arr.length) {
    const index = arr.indexOf(key)

    if (index > -1) {
      return arr.splice(index, 1)
    }
  }
}

// 移除缓存中 key
function removeCache(cache, keys, key) {
  cache[key] = null
  remove(keys, key)
}

const lRUCache = new LRUCache(2)

console.log(lRUCache.put(1, 1)) // 缓存是 {1=1}
console.log(lRUCache.put(2, 2)) // 缓存是 {1=1, 2=2}
console.log(lRUCache.get(1))    // 返回 1
console.log(lRUCache.put(3, 3)) // 该操作会使得关键字 2 作废,缓存是 {1=1, 3=3}
console.log(lRUCache.get(2))    // 返回 -1 (未找到)
console.log(lRUCache.put(4, 4)) // 该操作会使得关键字 1 作废,缓存是 {4=4, 3=3}
console.log(lRUCache.get(1) )   // 返回 -1 (未找到)
console.log(lRUCache.get(3))    // 返回 3
console.log(lRUCache.get(4) )   // 返回 4
Map实现方式
第一种实现方式,我们借助了数组来存储每次key被访问(get、set)的顺序,这样实现比较麻烦一些,有没有其他方案,让我们更加便捷一些,不需要额外维护数组呢?借助
Map设置值时可以保持顺序性,处理LRU算法将会及其方便
/**
 * @param {number} capacity
 */
var LRUCache = function (capacity) {
  this.cache = new Map()
  this.capacity = capacity
};

/**
 * @param {number} key
 * @return {number}
 */
LRUCache.prototype.get = function (key) {
  if (this.cache.has(key)) {
    const value = this.cache.get(key)
    // 更新位置
    this.cache.delete(key)
    this.cache.set(key, value)

    return value
  }

  return -1
};

/**
 * @param {number} key
 * @param {number} value
 * @return {void}
 */
LRUCache.prototype.put = function (key, value) {
  // 已经存在的情况下,更新其位置到”最新“即可
  // 先删除,后插入
  if (this.cache.has(key)) {
    this.cache.delete(key)
  } else {
    // 插入数据前先判断,size是否符合capacity
    // 已经>=capacity,需要把最开始插入的数据删除掉
    // keys()方法得到一个可遍历对象,执行next()拿到一个形如{ value: 'xxx', done: false }的对象
    if (this.cache.size >= this.capacity) {
      this.cache.delete(this.cache.keys().next().value)
    }
  }

  this.cache.set(key, value)
};

const lRUCache = new LRUCache(2)

console.log(lRUCache.put(1, 1)) // 缓存是 {1=1}
console.log(lRUCache.put(2, 2)) // 缓存是 {1=1, 2=2}
console.log(lRUCache.get(1))    // 返回 1
console.log(lRUCache.put(3, 3)) // 该操作会使得关键字 2 作废,缓存是 {1=1, 3=3}
console.log(lRUCache.get(2))    // 返回 -1 (未找到)
console.log(lRUCache.put(4, 4)) // 该操作会使得关键字 1 作废,缓存是 {4=4, 3=3}
console.log(lRUCache.get(1) )   // 返回 -1 (未找到)
console.log(lRUCache.get(3))    // 返回 3
console.log(lRUCache.get(4) )   // 返回 4
10. call
mdn call上是这样描述call的,
call方法使用一个指定的this值和单独给出的一个或多个参数来调用一个函数。 所以关键点是指定的this和一个或者多个参数,只要了解了this的基本用法,实现起来就简单多了。
/**
 *
 * @param {*} ctx 函数执行上下文this
 * @param  {...any} args 参数列表
 * @returns 函数执行的结果
 */

Function.prototype.myCall = function (ctx, ...args) {
  // 简单处理未传ctx上下文,或者传的是null和undefined等场景
  if (!ctx) {
    ctx = typeof window !== 'undefined' ? window : global
  }
  // 暴力处理 ctx有可能传非对象
  ctx = Object(ctx)
  // 用Symbol生成唯一的key
  const fnName = Symbol()
  // 这里的this,即要调用的函数
  ctx[ fnName ] = this
  // 将args展开,并且调用fnName函数,此时fnName函数内部的this也就是ctx了
  const result = ctx[ fnName ](...args)
  // 用完之后,将fnName从上下文ctx中删除
  delete ctx[ fnName ]

  return result
}

// 测试
let fn = function (name, sex) {
  console.log(this, name, sex)
}

fn.myCall('', '前端胖头鱼')
// window 前端胖头鱼 boy
fn.myCall({ name: '前端胖头鱼', sex: 'boy' }, '前端胖头鱼')
// { name: '前端胖头鱼', sex: 'boy' } 前端胖头鱼 boy
11. apply
该方法的语法和作用与
call方法类似,只有一个区别,就是call方法接受的是一个参数列表,而apply方法接受的是一个包含多个参数的数组。
/**
 *
 * @param {*} ctx 函数执行上下文this
 * @param {*} args  参数列表
 * @returns 函数执行的结果
 */
// 唯一的区别在这里,不需要...args变成数组
Function.prototype.myApply = function (ctx, args) {
  if (!ctx) {
    ctx = typeof window !== 'undefined' ? window : global
  }

  ctx = Object(ctx)

  const fnName = Symbol()

  ctx[ fnName ] = this
  // 将args参数数组,展开为多个参数,供函数调用
  const result = ctx[ fnName ](...args)

  delete ctx[ fnName ]

  return result
}

// 测试
let fn = function (name, sex) {
  console.log(this, name, sex)
}

fn.myApply('', ['前端胖头鱼', 'boy'])
// window 前端胖头鱼 boy
fn.myApply({ name: '前端胖头鱼', sex: 'boy' }, ['前端胖头鱼', 'boy'])
// { name: '前端胖头鱼', sex: 'boy' } 前端胖头鱼 boy
12. 实现trim方法的两种方式
trim方法会从一个字符串的两端删除空白字符。在这个上下文中的空白字符是所有的空白字符 (space, tab, no-break space 等) 以及所有行终止符字符(如 LF,CR等)
思路:
初看题目我们脑海中闪过的做法是把空格部分删除掉,保留非空格的部分,但是也可以换一种思路,也可以把非空格的部分提取出来,不管空格的部分。接下来我们来写一下两种trim方法的实现
去除空格法(方式1)
const trim = (str) => {
  return str.replace(/^\s*|\s*$/g, '')
}

console.log(trim(' 前端胖头鱼')) // 前端胖头鱼
console.log(trim('前端胖头鱼 ')) // 前端胖头鱼
console.log(trim(' 前端胖头鱼 ')) // 前端胖头鱼
console.log(trim(' 前端 胖头鱼 ')) // 前端 胖头鱼
字符提取法(方式2)
const trim = (str) => {
  return str.replace(/^\s*(.*?)\s*$/g, '$1')
}

console.log(trim(' 前端胖头鱼')) // 前端胖头鱼
console.log(trim('前端胖头鱼 ')) // 前端胖头鱼
console.log(trim(' 前端胖头鱼 ')) // 前端胖头鱼
console.log(trim(' 前端 胖头鱼 ')) // 前端 胖头鱼
13. 实现Promise.all
Promise.all() 方法接收一个promise的iterable类型(注:Array,Map,Set都属于ES6的iterable类型)的输入,并且只返回一个
Promise实例, 那个输入的所有promise的resolve回调的结果是一个数组。这个Promise的resolve回调执行是在所有输入的promise的resolve回调都结束,或者输入的iterable里没有promise了的时候。它的reject回调执行是,只要任何一个输入的promise的reject回调执行或者输入不合法的promise就会立即抛出错误,并且reject的是第一个抛出的错误信息。
上面是MDN上关于Promise.all的描述,咋一看有点懵逼,我们一起总结一下关键点
Promise.all接收一个数组,数组里面可以是Promise实例也可以不是Promise.all等待所有都完成(或第一个失败)Promise.all执行的结果也是一个Promise
Promise.myAll = (promises) => {
  // 符合条件3,返回一个Promise
  return new Promise((rs, rj) => {
    let count = 0
    let result = []
    const len = promises.length

    promises.forEach((p, i) => {
      // 符合条件1,将数组里的项通过Promise.resolve进行包装
      Promise.resolve(p).then((res) => {
        count += 1
        result[ i ] = res
        // 符合条件2 等待所有都完成
        if (count === len) {
          rs(result)
        }
        // 符合条件2  只要一个失败就都失败
      }).catch(rj)
    })
  })
}

let p1 = Promise.resolve(1)
let p2 = 2
let p3 = new Promise((resolve, reject) => {
  setTimeout(resolve, 100, 3)
})

let p4 = Promise.reject('出错啦')

Promise.myAll([p1, p2, p3]).then((res) => {
  console.log(res); // [ 1, 2, 3 ]
});


Promise.myAll([ p1, p2, 3 ]).then((res) => {
  console.log(res) // [ 1, 2, 3 ]
}).catch((err) => {
  console.log('err', err)
})


Promise.myAll([ p1, p2, p4 ]).then((res) => {
  console.log(res)
}).catch((err) => {
  console.log('err', err) // err 出错啦
})
14. 实现Promise.race
Promise.race(iterable)方法返回一个 promise,一旦迭代器中的某个promise解决或拒绝,返回的 promise就会解决或拒绝。
Promise.myRace = (promises) => {
  // 返回一个新的Promise
  return new Promise((rs, rj) => {
    promises.forEach((p) => {
      // 包装一下promises中的项,防止非Promise .then出错
      // 只要有任意一个完成了或者拒绝了,race也就结束了
      Promise.resolve(p).then(rs).catch(rj)
    })
  })
}

const promise1 = new Promise((resolve, reject) => {
  setTimeout(resolve, 500, 1);
});

const promise2 = new Promise((resolve, reject) => {
  setTimeout(resolve, 100, 2);
});

Promise.myRace([promise1, promise2]).then((value) => {
  // 因为promise2更快所以打印出2
  console.log(value) // 2
});

Promise.myRace([promise1, promise2, 3]).then((value) => {
  // 3比其他两个更快
  console.log(value) // 3
});
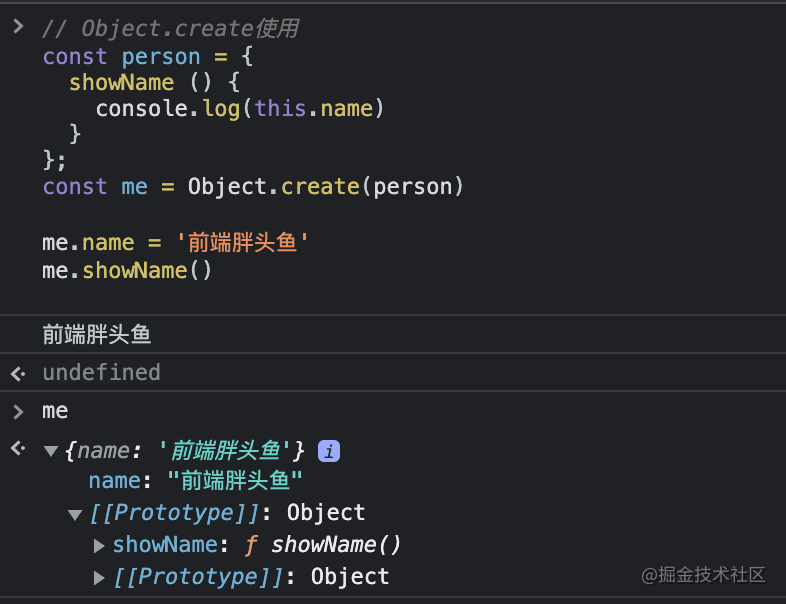
15. Object.create
Object.create()方法创建一个新对象,使用现有的对象来提供新创建的对象的__proto__。
先看看如何使用
// Object.create使用
const person = {
  showName () {
    console.log(this.name)
  }
}
const me = Object.create(person)

me.name = '前端胖头鱼'
me.showName() // 前端胖头鱼可以看到person作为me实例的原型存在,原型上有showName方法
- 创建原型为null的对象
const emptyObj = Object.create(null)

console.log(emptyObj)

- 第二个 propertiesObject参数
可选。需要传入一个对象,该对象的属性类型参照
Object.defineProperties()的第二个参数。如果该参数被指定且不为undefined,该传入对象的自有可枚举属性(即其自身定义的属性,而不是其原型链上的枚举属性)将为新创建的对象添加指定的属性值和对应的属性描述符。
let o = Object.create(Object.prototype, {
  // foo会成为所创建对象的数据属性
  foo: {
    writable:true, // 可以修改
    configurable:true, // 可以配置
    enumerable: true, // 可以遍历
    value: "hello"
  },
  // bar会成为所创建对象的访问器属性
  bar: {
    configurable: false,
    get: function() { return 10 },
    set: function(value) {
      console.log("Setting `o.bar` to", value);
    }
  }
})
// 无法进行修改
o.bar = '前端胖头鱼'

console.log(o.foo) // hello
console.log(o.bar) // 10
// 遍历测试
for (let key in o) {
  console.log(key, o[key]) // foo hello
}
代码实现
const create = (prop, props) => {
  if (![ 'object', 'function' ].includes(typeof prop)) {
    throw new TypeError(`Object prototype may only be an Object or null: ${prop}`)
  }
  // 创建构造函数
  const Ctor = function () {}
  // 赋值原型
  Ctor.prototype = prop
  // 创建实例
  const obj = new Ctor()
  // 支持第二个参数
  if (props) {
    Object.defineProperties(obj, props)
  }
  // 支持空原型
  if (prop === null) {
    obj.__proto__ = null
  }

  return obj
}

// 用前面的例子做测试
const person = {
  showName () {
    console.log(this.name)
  }
}
const me2 = create(person)

me2.name = '前端胖头鱼'
me2.showName() // 前端胖头鱼

const emptyObj2 = create(null)
console.log(emptyObj2)

const props = {
  // foo会成为所创建对象的数据属性
  foo: {
    writable:true,
    configurable:true,
    value: "hello"
  },
  // bar会成为所创建对象的访问器属性
  bar: {
    configurable: false,
    get: function() { return 10 },
    set: function(value) {
      console.log("Setting `o.bar` to", value);
    }
  }
}
let o2 = create(Object.prototype, props) // 请看下面的截图
// 无法修改
o2.bar = '前端胖头鱼'

console.log(o2.foo) // hello
console.log(o2.bar) // 10

16.快速排序
const quickSort = (array) => {
  const length = array.length

  if (length <= 1) {
    return array
  }

  const midIndex = Math.floor(length / 2)
  const midValue = array.splice(midIndex, 1)[ 0 ]
  let leftArray = []
  let rightArray = []
  let index = 0

  while (index < length - 1) {
    const curValue = array[ index ]

    if (curValue <= midValue) {
      leftArray.push(curValue)
    } else {
      rightArray.push(curValue)
    }

    index++
  }

  return quickSort(leftArray).concat([ midValue ], quickSort(rightArray))
}

const arr = [ -10, 10, 1, 34, 5, 1 ]

console.log(quickSort(arr)) // [-10, 1, 1, 5, 10, 34]
17.冒泡排序
/**
 * 1. 从第一个元素开始,比较相邻的两个元素,前者大就交换位置
 * 2. 每次遍历结束,都能找到一个最大值
 * 3. 如果还有没排序的元素继续1
 *
 */
const swap = (array, a, b) => [ array[ b ], array[ a ] ] = [ array[ a ], array[ b ] ]
const bubbleSort = (array) => {
  const length = array.length
  for (let i = 0; i < length - 1; i++) {
    for (let j = 0; j < length - 1 - i; j++) {
      if (array[ j ] > array[ j + 1 ]) {
        swap(array, j, j + 1)
      }
    }
  }

  return array
}

console.log(bubbleSort([ -1, 10, 10, 2 ])) //  [-1, 2, 10, 10]
18. 选择排序
/**
 * 1. 取出未排序的第一个元素,遍历该元素之后的部分并进行比较。第一次就是取第一个元素
 * 2. 如果有更小的就交换位置
 */

const swap = (array, a, b) => [ array[ b ], array[ a ] ] = [ array[ a ], array[ b ] ]
const selectSort = (array) => {
  const length = array.length

  for (let i = 0; i < length; i++) {
    let minIndex = i

    for (let j = i + 1; j < length; j++) {
      if (array[ j ] < array[ minIndex ]) {
        minIndex = j
      }
    }

    if (minIndex !== i) {
      swap(array, i, minIndex)
    }
  }

  return array
}

console.log(selectSort([ -1, 10, 10, 2 ]))  // [-1, 2, 10, 10]
19. 插入排序
// 插入排序
/**
 * 记住你是怎么打牌的就知道插入排序怎么实现了
 * 1. 首先有一个有序的序列,可以认为第一个元素就是已排序的序列
 * 2. 从未排序序列中取一个元素出来,往有序序列中找到合适的位置,如果该位置比元素大,则后移动, 否则继续往前找
 */

const insertSort = (array) => {
  for (let i = 1, length = array.length; i < length; i++) {
    let j = i - 1
    const curValue = array[ i ]

    while (j >= 0 && array[ j ] > curValue) {
      array[ j + 1 ] = array[ j ]
      j--
    }

    array[ j + 1 ] = curValue
  }

  return array
}

console.log(insertSort([ -1, 10, 10, 2 ])) // [-1, 2, 10, 10]
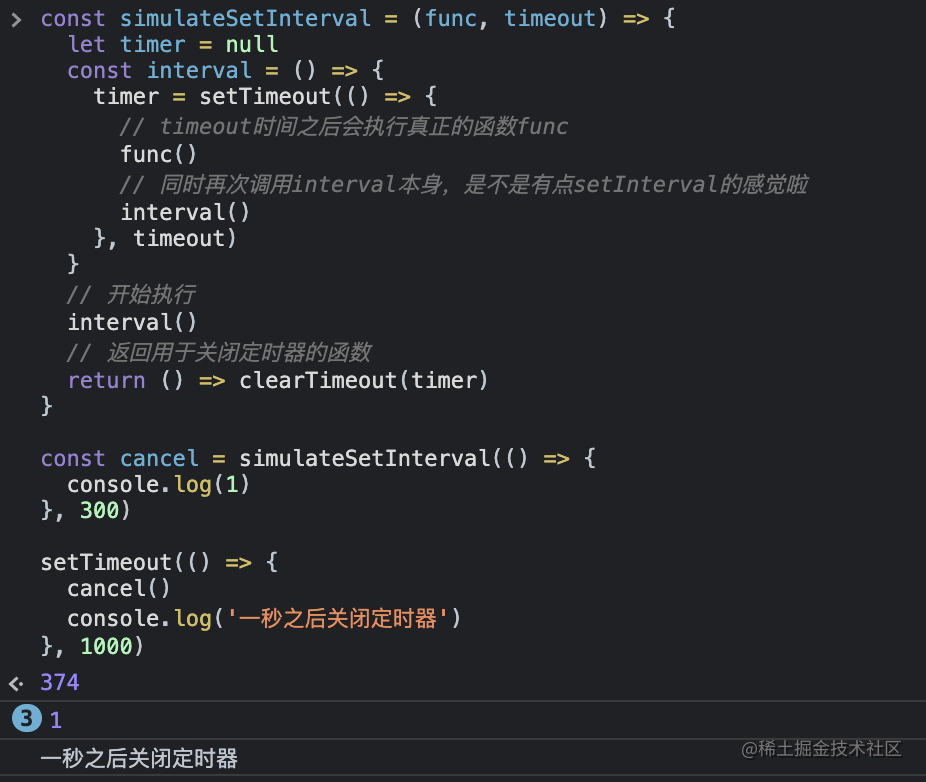
20. setTimeout模拟setInterval
描述: 使用setTimeout模拟实现setInterval的功能
思路: 当然这里不是完全的实现,比如setInterval执行之后得到的是一个数字id,这一点我们就不模拟了,关闭定时器的方法则通过返回一个函数来进行
const simulateSetInterval = (func, timeout) => {
  let timer = null
  const interval = () => {
    timer = setTimeout(() => {
      // timeout时间之后会执行真正的函数func
      func()
      // 同时再次调用interval本身,是不是有点setInterval的感觉啦
      interval()
    }, timeout)
  }
  // 开始执行
  interval()
  // 返回用于关闭定时器的函数
  return () => clearTimeout(timer)
}

const cancel = simulateSetInterval(() => {
  console.log(1)
}, 300)

setTimeout(() => {
  cancel()
  console.log('一秒之后关闭定时器')
}, 1000)
可以看到1被打印出了3次,第1000毫秒的时候定时器被关闭,1也就没有继续打印了。
21. setInterval模拟setTimeout
描述: 使用setInterval模拟实现setTimeout的功能
思路: setTimeout的特性是在指定的时间内只执行一次,我们只要在setInterval内部执行callback之后,把定时器关掉即可
const simulateSetTimeout = (fn, timeout) => {
  let timer = null

  timer = setInterval(() => {
    // 关闭定时器,保证只执行一次fn,也就达到了setTimeout的效果了
    clearInterval(timer)
    fn()
  }, timeout)
  // 返回用于关闭定时器的方法
  return () => clearInterval(timer)
}

const cancel = simulateSetTimeout(() => {
  console.log(1)
}, 1000)

// 一秒后打印出1
22.数组去重的4种方式
业务和面试中都经常会遇到,将数组进行去重是必备的基本技能
利用Set实现(方式1)
const uniqueArray1 = (array) => {
  return [ ...new Set(array) ]
}

// 测试
let testArray = [ 1, 2, 3, 1, 2, 3, 4 ]
console.log(uniqueArray1(testArray)) // [1, 2, 3, 4]
indexOf去重(方式2)
const uniqueArray2 = (array) => {
  let result = []

  array.forEach((it, i) => {
    if (result.indexOf(it) === -1) {
      result.push(it)
    }
  })

  return result
}

// 测试
console.log(uniqueArray2(testArray)) // [1, 2, 3, 4]
indexOf去重(方式3)
const uniqueArray3 = (array) => {
  return array.filter((it, i) => array.indexOf(it) === i)
}

// 测试
console.log(uniqueArray3(testArray)) // [1, 2, 3, 4]
Array.from去重
const uniqueArray4 = (array) => {
  return Array.from(new Set(array))
}

// 测试
console.log(uniqueArray4(testArray)) // [1, 2, 3, 4]
23. 手机号3-3-4分割
手机号按照例如
183-7980-2267进行分割处理
// 适合纯11位手机
const splitMobile = (mobile, format = '-') => {
  return String(mobile).replace(/(?=(\d{4})+$)/g, format)
}
// 适合11位以内的分割
const splitMobile2 = (mobile, format = '-') => {
  return String(mobile).replace(/(?<=(\d{3}))/, format).replace(/(?<=([\d\-]{8}))/, format)
}

console.log(splitMobile(18379802267)) // 183-7980-2267
console.log(splitMobile2(18379876545)) // 183-7987-6545
24. 千分位格式化数字
将123456789变成123,456,789 且要支持小数
// 金额转千分位
const formatPrice = (number) => {
  number = '' + number

  const [ integer, decimal = '' ] = number.split('.')

  return integer.replace(/\B(?=(\d{3})+$)/g, ',') + (decimal ? '.' + decimal : '')
}

console.log(formatPrice(123456789.3343)) // 123,456,789.3343
25. 二分查找
// 704. 二分查找
/**
 *
给定一个 n 个元素有序的(升序)整型数组 nums 和一个目标值 target  ,写一个函数搜索 nums 中的 target,如果目标值存在返回下标,否则返回 -1。


示例 1:

输入: nums = [-1,0,3,5,9,12], target = 9
输出: 4
解释: 9 出现在 nums 中并且下标为 4
示例 2:

输入: nums = [-1,0,3,5,9,12], target = 2
输出: -1
解释: 2 不存在 nums 中因此返回 -1


提示:

你可以假设 nums 中的所有元素是不重复的。
n 将在 [1, 10000]之间。
nums 的每个元素都将在 [-9999, 9999]之间。
 */


const search = (nums, target) => {
  let i = 0
  let j = nums.length - 1
  let midIndex = 0

  while (i <= j) {
    midIndex = Math.floor((i + j) / 2)
    const midValue = nums[ midIndex ]

    if (midValue === target) {
      return midIndex
    } else if (midValue < target) {
      i = midIndex + 1
    } else {
      j = midIndex - 1
    }
  }

  return -1
}

console.log(search([-1,0,3,5,9,12], 9)) // 4
26. 版本比较的两种方式
客户端估计遇到比较版本号的情况会比较多,但是胖头鱼在业务中也遇到过该需求
详细规则
给你两个版本号 version1 和 version2 ,请你比较它们。

版本号由一个或多个修订号组成,各修订号由一个 '.' 连接。每个修订号由 多位数字 组成,可能包含 前导零 。每个版本号至少包含一个字符。修订号从左到右编号,下标从 0 开始,最左边的修订号下标为 0 ,下一个修订号下标为 1 ,以此类推。例如,2.5.33 和 0.1 都是有效的版本号。

比较版本号时,请按从左到右的顺序依次比较它们的修订号。比较修订号时,只需比较 忽略任何前导零后的整数值 。也就是说,修订号 1 和修订号 001 相等 。如果版本号没有指定某个下标处的修订号,则该修订号视为 0 。例如,版本 1.0 小于版本 1.1 ,因为它们下标为 0 的修订号相同,而下标为 1 的修订号分别为 0 和 1 ,0 < 1 。

返回规则如下:

如果 version1 > version2 返回 1,
如果 version1 < version2 返回 -1,
除此之外返回 0。
源码实现
// 比较版本号

const compareVersion = function(version1, version2) {
  version1 = version1.split('.')
  version2 = version2.split('.')

  const len1 = version1.length
  const len2 = version2.length
  let maxLen = len1
  const fillZero = (array, len) => {
    while (len--) {
      array.push(0)
    }
  }

  if (len1 < len2) {
    fillZero(version1, len2 - len1)
    maxLen = len2
  } else if (len1 > len2) {
    fillZero(version2, len1 - len2)
    maxLen = len1
  }

  for (let i = 0; i < maxLen; i++) {
    const a = parseInt(version1[i])
    const b = parseInt(version2[i])
    if ( a === b) {
      // i++
    } else if (a > b) {
      return 1
    } else {
      return -1
    }
  }

  return 0
}

// 也可以不补零
const compareVersion = function(version1, version2) {
  version1 = version1.split('.')
  version2 = version2.split('.')

  const maxLen = Math.max(version1.length, version2.length)

  for (let i = 0; i < maxLen; i++) {
    const a = parseInt(version1[i]??0)
    const b = parseInt(version2[i]??0)
    if ( a === b) {
      // i++
    } else if (a > b) {
      return 1
    } else {
      return -1
    }
  }

  return 0
}

console.log(compareVersion('1.0', '1.0.0'))

// 扩展1比较多个版本号并排序

const compareMoreVersion = (versions) => {
  return versions.sort((a, b) => compareVersion(a, b))
}

console.log(compareMoreVersion(['1.0', '3.1', '1.01']))
27. 解析 url 参数
根据name获取url上的search参数值
const getQueryByName = (name) => {
  const queryNameRegex = new RegExp(`[?&]${name}=([^&]*)(&|$)`)
  const queryNameMatch = window.location.search.match(queryNameRegex)
  // 一般都会通过decodeURIComponent解码处理
  return queryNameMatch ? decodeURIComponent(queryNameMatch[1]) : ''
}

// https://www.baidu.com/?name=%E5%89%8D%E7%AB%AF%E8%83%96%E5%A4%B4%E9%B1%BC&sex=boy

console.log(getQueryByName('name'), getQueryByName('sex')) // 前端胖头鱼 boy
28. 实现获取js数据类型的通用函数
实现一个通用函数判断数据类型
const getType = (s) => {
  const r = Object.prototype.toString.call(s)

  return r.replace(/\[object (.*?)\]/, '$1').toLowerCase()
}

// 测试
console.log(getType()) // undefined
console.log(getType(null)) // null
console.log(getType(1)) // number
console.log(getType('前端胖头鱼')) // string
console.log(getType(true)) // boolean
console.log(getType(Symbol('前端胖头鱼'))) // symbol
console.log(getType({})) // object
console.log(getType([])) // array
29. 字符串转化为驼峰
如下规则,将对应字符串变成驼峰写法
1. foo Bar => fooBar

2. foo-bar---- => fooBar

3. foo_bar__ => fooBar
const camelCase = (string) => {
  const camelCaseRegex = /[-_\s]+(.)?/g

  return string.replace(camelCaseRegex, (match, char) => {
    return char ? char.toUpperCase() : ''
  })
}

// 测试
console.log(camelCase('foo Bar')) // fooBar
console.log(camelCase('foo-bar--')) // fooBar
console.log(camelCase('foo_bar__')) // fooBar
30. 实现reduce
reduce方法对数组中的每个元素执行一个由您提供的reducer函数(升序执行),将其结果汇总为单个返回值 mdn
这个函数稍微复杂一些,我们用一个例子来看一下他是怎么用的。
const sum = [1, 2, 3, 4].reduce((prev, cur) => {
  return prev + cur;
})

console.log(sum) // 10

// 初始设置
prev = initialValue = 1, cur = 2

// 第一次迭代
prev = (1 + 2) =  3, cur = 3

// 第二次迭代
prev = (3 + 3) =  6, cur = 4

// 第三次迭代
prev = (6 + 4) =  10, cur = undefined (退出)
Array.prototype.reduce2 = function (callback, initValue) {
  if (typeof callback !== 'function') {
    throw `${callback} is not a function`
  }

  let pre = initValue
  let i = 0
  const length = this.length
  // 当没有传递初始值时,取第一个作为初始值
  if (typeof pre === 'undefined') {
    pre = this[0]
    i = 1
  }

  while (i < length) {
    if (i in this) {
      pre = callback(pre, this[ i ], i, this)
    }
    i++
  }

  return pre
}

复制代码
const sum = [1, 2, 3, 4].reduce2((prev, cur) => {
return prev + cur;
})
console.log(sum) // 10Recommend
About Joyk
Aggregate valuable and interesting links.
Joyk means Joy of geeK