

使用 SUMO 进行仿真(3)-车流的生成(Route 文件)
source link: https://mathpretty.com/14077.html
Go to the source link to view the article. You can view the picture content, updated content and better typesetting reading experience. If the link is broken, please click the button below to view the snapshot at that time.

摘要在本文中我们会着重介绍了车流的生成。包括生成车流的方式,也会介绍 route 文件的相关内容。生成车流的方式包括直接修改 route 文件,通过 flow 指定起点和终点,通过 trip 同时生成多辆车。
在前面的两篇文章中,我们着重介绍了路网的生成(同时介绍了 node 和 edge 这两个文件的详情)。那么有了路网,就需要生成车流了,于是我们在这里介绍如何生成车流,同时也会介绍 route 文件的相关内容。
生成车流(Route 文件介绍)
只有车流是不够的,还需要路网。在本次实验中,我们还是使用前面介绍的路网,使用 SUMO 进行仿真(2)-Node 和 Edge。
直接通过 rou.xml 文件
SUMO 根据 route 文件来生成车辆。因此最基础的生成车流的方式就是直接写 route 文件。这一小节会生成 rou.xml 文件。
首先定义的 vTpye 表示的是 vehicle 的类型(也就是车流最基础的就是车辆)。定义加速度,减速,长度,最大的速度,车头时距。接着我们定义 route,表示会通过的 edges。最后定义两辆车,车辆的类型和形式的路线。我们将下面的文件保存为 hello.rou.xml。
- <routes>
- <vType id="type1" accel="0.8" decel="4.5" sigma="0.5" length="5" maxSpeed="70"/>
- <route id="route0" color="1,1,0" edges="1si 3o"/>
- <vehicle id="0" type="type1" route="route0" depart="0" color="1,0,0"/>
- <vehicle id="1" type="type1" route="route0" depart="0" color="0,1,0"/>
- </routes>
- 首先我们在最上面定义车辆,使用
vType关键词进行定义。 - 接着我们定义一条路径,也就是使用
route进行定义,表示车辆从哪些边上行驶。这里需要注意的是,routes 中的 edges 一定要是相互连通的,否则会出现类似下面的报错No connection between edge '1fi' and edge '3o'. - 最后我们定义了两辆车,两辆车的类型都是 type1,都在 route0 上行驶。
在有了 route 文件之后,我们只需要新建一个 sumocfg 文件即可,需要指定 net-file 和 route-file,如下所示:
- <configuration>
- <input>
- <net-file value="../hello.net.xml"/>
- <route-files value="hello.rou.xml"/>
- </input>
- </configuration>
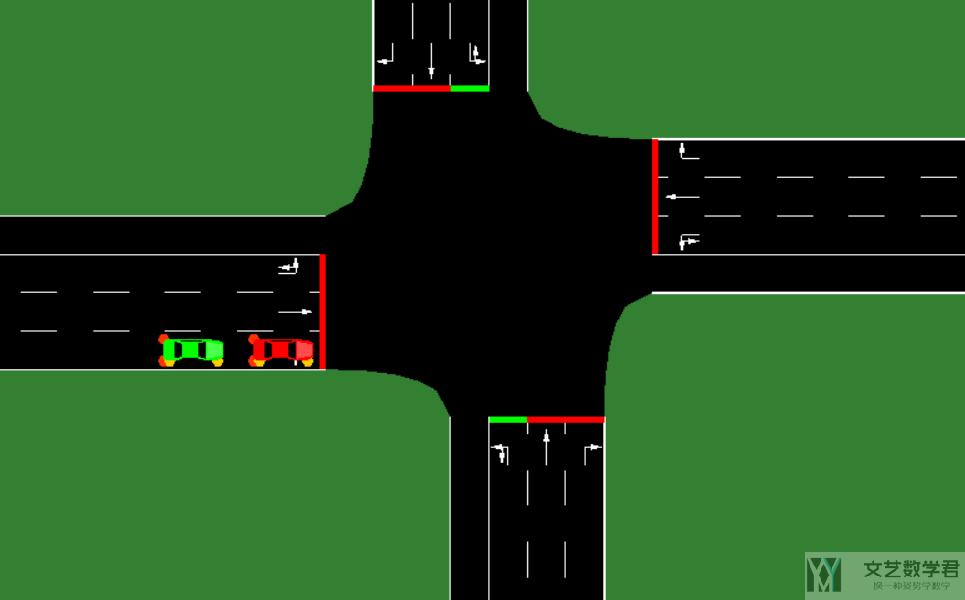
最后运行上面的 sumo config 文件,可以看到有两辆车在指定的路径上行驶。
通过 trip 来定义-直接指定首末位置
上面我们介绍了直接编写 .rou.xml 文件来生成车流。但是上面的方式有一个巨大的问题,需要具体定义每一段行程(只给定起点和重点不是不可以的)。如果只给定起点和终点,可能会出现类似下面的报错,No connection between edge '1fi' and edge '3o'。
那么如果想根据给定的「起点」和「终点」生成车流,可以使用 trip 来完成。下面的实验还是基于上面的 network。关于 trip 的详细信息可以查看 SUMO--Trip Definitions。
.trip.xml 文件主要保存的内容有车辆 id (id),出发时间 (depart),始发道路 id (from) 和到达道路 id (to)。此时我们只需要定义起点和终点,中间的路程是会自动进行补全的。我们新建一个 hello.trip.xml 文件,内容如下所示(一共有 3 辆车,只给定了起点和终点,没有给中间的具体道路):
- <routes>
- <trip id="trip0" depart="0" from="1fi" to="2o"/>
- <trip id="trip1" depart="10" from="1fi" to="3o"/>
- <trip id="trip2" depart="20" from="1fi" to="4o"/>
- </routes>
接着我们将其通过 duarouter 转换为 rou.xml 的文件:
- duarouter --route-files=hello.trip.xml --net-file=../hello.net.xml --output-file=hello.rou.xml
最后的输出格式如下所示。可以看到我们在 trip 中之设置了起点 「1fi」 和终点 「2o」,这里就会自动补全中间的道路,变成「edges="1fi 1si 2o"」。
- <routes xmlns:xsi="http://www.w3.org/2001/XMLSchema-instance" xsi:noNamespaceSchemaLocation="http://sumo.dlr.de/xsd/routes_file.xsd">
- <vehicle id="trip0" depart="0.00">
- <route edges="1fi 1si 2o"/>
- </vehicle>
- <vehicle id="trip1" depart="10.00">
- <route edges="1fi 1si 3o"/>
- </vehicle>
- <vehicle id="trip2" depart="20.00">
- <route edges="1fi 1si 4o"/>
- </vehicle>
- </routes>
最后还是定义 hello.sumocfg 即可进行仿真。
- <configuration>
- <input>
- <net-file value="../hello.net.xml"/>
- <route-files value="hello.rou.xml"/>
- </input>
- </configuration>
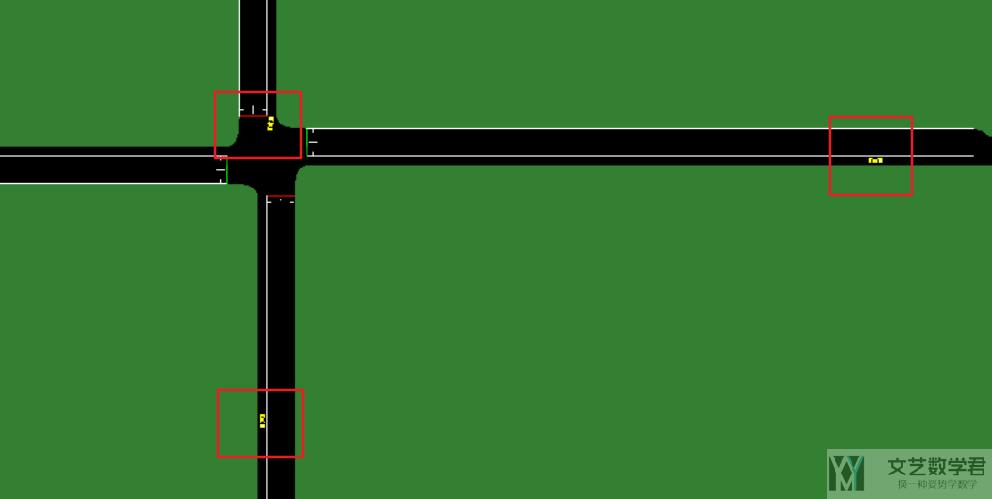
最终仿真的结果如下所示:
通过 flow 同时定义多个车辆(给定起点终点 duarouter)
上面我们每次设置都需要单独对每一辆车进行设置,如果车辆很多就会很麻烦。例如我们希望给定起点和终点,给定这条路线上车辆的数量,一次性生成多个车辆,前面的方法就不适用了。如果我们希望实现这样的功能,这个时候就需要使用 flow。flow 的参数如下所示(flow 是主要设置车辆数量,可以有以下的参数,vehsPerHour、period、probability、number):
- begin, first vehicle departure time;
- end, end of departure interval (if undefined, defaults to 24 hours);
- vehsPerHour, number of vehicles per hour, equally spaced (not together with period or probability);(每小时的车辆数量)
- period, insert equally spaced vehicles at that period (not together with vehsPerHour or probability);
- probability, probability for emitting a vehicle each second (not together with vehsPerHour or period), see also Simulation/Randomness;
- number, total number of vehicles, equally spaced;(给定总的车辆)
通过 flow 中的 period 和 vehsPerHour 定义连续车辆
首先我们看第一个关于 flow 的例子。我们定义了两个 flow,分别是每小时 1000 辆车,和每 5 秒会有一辆车。同时下面使用了两种不同的定义 flow 的方式(具体的如下所示):
- <routes>
- <!-- 定义两个车辆类型 -->
- <vType id="type1" accel="0.8" decel="4.5" sigma="0.5" length="5" maxSpeed="70"/>
- <vType id="type2" accel="1.2" decel="4.5" sigma="0.5" length="7" maxSpeed="120"/>
- <!-- 定义 flow, 每小时 1000 辆车 -->
- <flow id="flow1" color="1,1,0" begin="0" end= "7200" vehsPerHour="1000" type='type1'>
- <route edges="3fi 3si 4o"/>
- </flow>
- <!-- 定义 flow, 每个 5 秒有车 -->
- <flow id="flow2" color="0,1,1" begin="0" end="7200" period="5" type="type2" from="1si" to="2o"/>
- </routes>
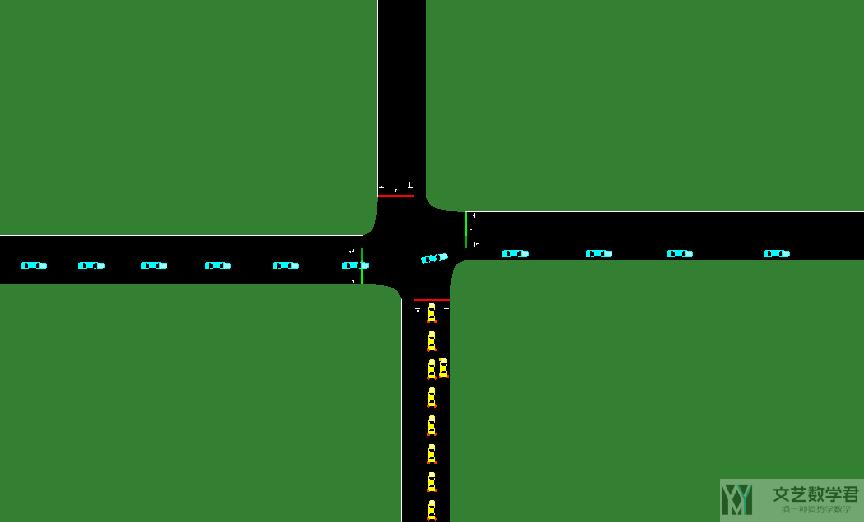
此时的效果如下所示, 从 route(1si 2o) 有连续不断蓝色的车,route(3fi 3si 4o) 是有连续不断的黄色的车,整个过程维持 7200 秒:
通过 flow 中的 number 生成指定数量的车辆
这个例子介绍指定车流的数量。比如我们就想要某个时间段内,某个路径上面有 100 辆车。我们新建一个 hello.trip.xml 文件,内容如下所示(包含两个时间段):
- <routes>
- <!-- 第一个时间段 -->
- <interval begin="0" end="100">
- <flow id="00" from="1si" to="2o" number="50"/>
- </interval>
- <!-- 第二个时间段 -->
- <interval begin="100" end="200">
- <flow id="10" from="1si" to="3o" number="50"/>
- <flow id="11" from="1si" to="4o" number="50"/>
- </interval>
- </routes>
flow 文件除了上面的写法之外,还可以将 begin 和 end 写在 flow 里面。
- <flow id="f2" begin="0" end="100" number="23" from="beg" to="end"/>
我们也可以指定这个 flow 经过哪些点,可以通过 via 来进行指定:
- <flow id="f2" begin="0" end="100" number="23" from="beg" to="end" via="e1 e23 e7"/>
有了上面的文件之后,接着我们将其通过 duarouter 转换为 rou.xml 的文件。
- duarouter --route-files=hello.trip.xml --net-file=../hello.net.xml --output-file=hello.rou.xml --human-readable-time --randomize-flows true --departlane random --seed 30
在上面使用 duarouter 进行转换的时候,我们增加了四个参数:
- --human-readable-time,将 route 中的时间转换为
day:hour:minute:second的格式,而不是只有 second; - --randomize-flows,将车辆 depart time 随机,而不是均匀出现;
- --departlane,车辆起始的车道,我们选择 random;
- --seed,随机数种子,用来控制多次运行最终的结果是相同的;
最后生成的文件如下所示:
- <routes xmlns:xsi="http://www.w3.org/2001/XMLSchema-instance" xsi:noNamespaceSchemaLocation="http://sumo.dlr.de/xsd/routes_file.xsd">
- <vehicle id="00.0" depart="00:00:070.58" departLane="random">
- <route edges="1si 2o"/>
- </vehicle>
- <vehicle id="00.1" depart="00:00:070.91" departLane="random">
- <route edges="1si 2o"/>
- </vehicle>
- </routes>
我们运行仿真,最终的效果如下图所示:
使用 flow 定义时定义车辆类型
上面使用我们使用 flow 来定义车流,我们可以更进一步,定义不同的车辆类型。可以直接在前面加入 vType,下面我们增加了两种类型的车流,然后再 flow 的定义中增加 type 这个属性:
- <routes>
- <!-- 定义车辆类型 -->
- <vType id="type1" accel="2.6" decel="4.5" sigma="0.5" length="5" maxSpeed="70"/>
- <vType id="type2" accel="2.6" decel="4.5" sigma="0.5" length="5" maxSpeed="70"/>
- <!-- 定义车流 -->
- <flow id="221888670#10__01" begin="0" end="60" from="221888670#10" number="8" type="type1"/>
- <flow id="221888670#10__02" begin="0" end="60" from="221888670#10" number="8" type="type2"/>
- <routes>
有了这个 .trip.xml 文件,下面我们就使用 duarouter 转换为 rou.xml 的文件。
通过 TAZ(traffic assignment zone)来进行定义
上面都是指定从某一个 edge 进行出发,我们也可以指定从某些 edges 上进行出发。这里就需要用到 TAZ 的概念(This allows the departure and arrival edges to be selected from a predefined list of edges)。
我们首先定义两个 TAZ,其中 taz 就是由一些 edges 组成的,有点类似与一个小区,由一片区域组成。我们新建一个 hello.taz.xml 文件,文件内容如下所示:
- <additional>
- <taz id="TAZ_1" edges="1fi 4si"/>
- <taz id="TAZ_2" edges="2si 3si"/>
- </additional>
接着我们来生成 trip 文件。新建一个 hello.trip.xml 的文件,写入以下的内容。
- <routes>
- <interval begin="0" end="100">
- <flow id="1" depart="0" fromTaz="TAZ_1" toTaz="TAZ_2" number="50"/>
- </interval>
- </routes>
有了 hello.trip.xml 文件之后,我们使用 duarouter 来生成 hello.rou.xml 文件(有一点需要注意的,生成的 route 不会随机选择 taz 里面的 edge,而是会选择使得 travel time 最少的 edge):
- duarouter --route-files=cross.trip.xml --net-file=cross.net.xml --taz-files=cross.taz.xml --output-file=cross.rou.xml
通过 randomTrips.py 生成车流
上面是手动对车流来进行设置,我们也可以使用 randomTrips 来生成车流。最简单的使用是只需要输入network文件即可, 此时会生成一个 trips.trips.xml 文件。
- python randomTrips.py -n input_net.net.xml
关于更多的内容, 可以通过 help 命令来进行查看.
- python randomTrips.py --help
通过 Turn Probabilities 来生成车辆(jtrrouter)
上面介绍的都是给定起点和终点,给定他们之间的车辆数量从而来进行生成。但是有的时候我们希望只给定起点,和各个路口的转向比(转向概率),从而来生成车流。这个时候就可以使用Turn Definitions来首先定义每一个 edge 的转向比,接着定义 flow 和 Sinks definitions。
首先我们生成turn definition文件,这里会定义 fromEdge 到 toEdge 的概率。我们新建一个 hello.turndefs.xml 文件,写入以下的内容(主要就是定义转弯的概率):
- <edgeRelations>
- <interval begin="0" end="3600">
- <edgeRelation from="1si" to="3o" probability="0.4"/>
- <edgeRelation from="1si" to="2o" probability="0.4"/>
- <edgeRelation from="1si" to="4o" probability="0.2"/>
- </interval>
- </edgeRelations>
关于turn definition文件, 我们还可以使用 generateTurnDefs.py 来进行生成。这样会对整个 network 生成每个 edge 之间的通行概率。
- python "C:\Program Files (x86)\Eclipse\Sumo\tools\turn-defs\generateTurnDefs.py" --connections-file wj.net.xml --turn-definitions-file testflow.turndefs.xml
注意,我们使用上面生成的 turndefs 文件,在生成 route 文件的时候,可能会出现如下的报错:
- no declaration found for element 'edgeRelation'
这个只需要把生成的turn definition文件中的下面的内容去掉即可。(我也是自己尝试出来的, 去掉就可以正常运行)
- xmlns:xsi="http://www.w3.org/2001/XMLSchema-instance" xsi:noNamespaceSchemaLocation="http://sumo.dlr.de/xsd/turns_file.xsd"
接着我们生成 trip 文件。注意,这里的 trip 文件只需要 from 不需要 to。下面是一个简单的例子,将以下的内容写入 hello.trip.xml 文件中:
- <routes>
- <flow id="0" from="1si" begin="0" end="3600" number="1000"/>
- </routes>
同样的,我们可以使用randomTrips.py来生成 trip 文件,这里需要指定参数--jtrrouter,这样可以是的生成的 trip 文件只包含 from,不包含 to。
- python "randomTrips.py" --net-file=wj.net.xml --flows 3 --jtrrouter
最后,我们利用上面生成的turn definition文件和 trip 文件,生成最终的 route 文件。我们利用jtrrouter来生成 route 文件:
- jtrrouter --route-files=hello.trip.xml --turn-ratio-files=hello.turndefs.xml --net-file=../hello.net.xml --accept-all-destinations true --output-file=hello.rou.xml
注意上面需要设置参数,--accept-all-destinations true。否则可能会出现如下的报错。The route starting at edge ... could not be closed。
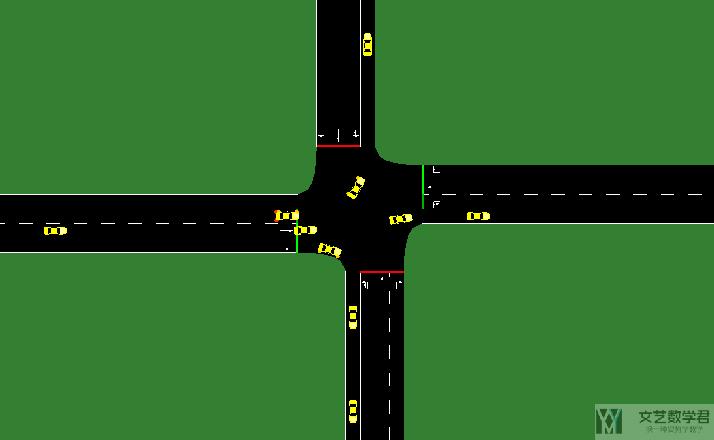
运行上面生成的车流,大致效果如下图(从 1si 进入,之后左转,直行和右转都是有车辆的):
关于 jtrrouter 更多的内容,可以参考链接,jtrrouter Sumo 官方文档
- --allow-loops <BOOL>, Allow to re-use a road; default: false
- --remove-loops <BOOL> Remove loops within the route; Remove turnarounds at start and end of the route; default: false
参考资料:
Recommend
About Joyk
Aggregate valuable and interesting links.
Joyk means Joy of geeK