

How to Build Microservices in Nest.JS
source link: https://hackernoon.com/how-to-build-microservices-in-nestjs
Go to the source link to view the article. You can view the picture content, updated content and better typesetting reading experience. If the link is broken, please click the button below to view the snapshot at that time.

How to Build Microservices in Nest.JS
Skilled full-stack WEB developer. 6+ years of success with high-profile technology companies.
Every time starting a new project I ask myself: “what kind of framework should I pick?”.
For sure, it depends on multiple factors including team expertise, what problem should be solved, which scale is expected, etc…
Ok, most likely it would be microservice-based architecture. Such an approach might feet nearly every case from the points above. But wait, how microservices are different from monolith from a programming standpoint? After thinking a bit I can say those are nearly identical but with a single exception: microservices need somehow to communicate with each other.
Other than that all the best practices and required framework features are the same:
structured project architecture
tools and abstractions set
high performance
extensibility
convenient connection to databases
dependency management between logical blocks
possibility to split logical blocks
easy and convenient testing
developer-friendly
clear documentation and wide community, etc.
There are plenty of frameworks based on NodeJS but I would like to share my experience in building microservices with NestJS.
All the points listed above are covered by the NestJS framework:
it provides support of the most popular transport layers for interservice communication: Redis pub/sub, NATS, MQTT, RabbitMQ, Kafka, gRPC, and others.
It is an Angular inspired framework that provides strongly determined project structure, common design patterns, and best approaches.
It provides various tools including but not limited to cli, project generator, decorators, interfaces, cache, logging, authorization, etc.
it is highly extensible because of its structure and IoC mechanism which allows plugging any library in a very convenient way.
It provides drivers for the most popular databases and the possibility to write your own driver for a special db.
manages dependencies and allows to keep modules independent of each other.
independently of some kind of utils or just boilerplate code.
provides testing tools and techniques which allow writing efficient unit tests.
has a wide community and very clear and detailed documentation.
Let’s play with it a bit and create two microservices with interaction to each other and a BFF which will translate interservice communication protocols to web-friendly protocols.
As a simple example I would propose the following cases:
Example cases
account which is a combination of a user and a profile. Let’s imagine we have a generic users service which is responsible only for authentication. For security reasons, we must not store credentials and personal data in the same db or even manage them in the same service. That’s why we have a dedicated profiles service. It’s just a story but our imaginary client somehow should get an account which contains data both from user and profile. That’s why we need a BFF (backend for frontend) service which will merge data from different microservices and return back to the client.First let’s install nest-cli and generate nest projects:
$ mkdir nestjs-microservices && cd nestjs-microservices
$ npm install -g @nestjs/cli
$ nest new users
$ nest new profiles
$ nest new bff
By default NestJS generates Http server, so let’s update users and profiles to make them communicate through an event based protocol, e.g.: Redis Pub/Sub:
$ npm i --save @nestjs/microservices/src/main.ts
const app = await NestFactory.createMicroservice<MicroserviceOptions>(
    AppModule,
    {
      transport: Transport.REDIS,
      options: {
        url: 'redis://localhost:6379',
      },
    },
  );
  app.listen(() => console.log('Services started'));
A NestJS service consists of modules and modules are split into different parts, but the most important of them are controllers and services. Controllers are responsible for providing an external service API. Let’s define them for users and profiles services.
/users/src/app.controller.ts
@Controller()
export class AppController {
  @MessagePattern({ cmd: 'get_users' })
  getUsers() {
    return this.appService.getUsers();
  }
}
/users/src/app.service.ts
@Injectable()
export class AppService {
  users = [
    { id: '1', login: 'bob' },
    { id: '2', login: 'john' },
  ];

  getUsers(): User[] {
    return this.users;
  }
}
/profiles/src/app.controller.ts
@Controller()
export class AppController {
  @MessagePattern({ cmd: 'get_profiles' })
  getProfiles() {
    return this.appService.getProfiles();
  }
}
/profiles/src/app.service.ts
@Injectable()
export class AppService {
  profiles = [
    { id: '1', name: 'Bob' },
    { id: '2', name: 'John' },
  ];

  getProfiles(): Profile[] {
    return this.profiles;
  }
}
For the sake of simplicity, I’ve used no databases and just defined in-memory collections.
Once services are ready we have to create BFF service which exposes web friendly REST interface:
/bff/src/app.controller.ts
@Controller()
export class AppController {
  constructor(
    @Inject('PUBSUB')
    private readonly client: ClientProxy,
  ) {}

  @Get('accounts')
  async getAccounts(): Promise<Account[]> {
    const users = await this.client
      .send<User[]>({ cmd: 'get_users' }, { page: 1, items: 10 })
      .toPromise();
    const profiles = await this.client
      .send<Profile[]>({ cmd: 'get_profiles' }, { ids: users.map((u) => u.id) })
      .toPromise();

    return users.map<Account>((u) => ({
      ...u,
      ...profiles.find((p) => p.id === u.id),
    }));
  }
}
As you can see there is a dependency injected with token ‘PUBSUB’. Let’s define it as well:
/bff/src/app.module.ts
@Module({
  imports: [
    ClientsModule.register([
      {
        name: 'PUBSUB',
        transport: Transport.REDIS,
        options: {
          url: 'redis://localhost:6379',
        },
      },
    ]),
  ],
  controllers: [AppController],
  providers: [AppService, Pubsub],
})
export class AppModule {}
At this point, case #1 is implemented. Let’s check it out!
Execute the following command against each project:
npm run start:devOnce all three services are started let’s send a request to get accounts:
curl http://localhost:3000/accounts | jq

[
  {
    "id": 1,
    "login": "bob",
    "name": "Bob"
  },
  {
    "id": 2,
    "login": "john",
    "name": "John"
  }
]
I’ve used the following two tools: curl and jq. You can always use your preferred tools or just follow the article and install them using any package manager you’re comfortable with.
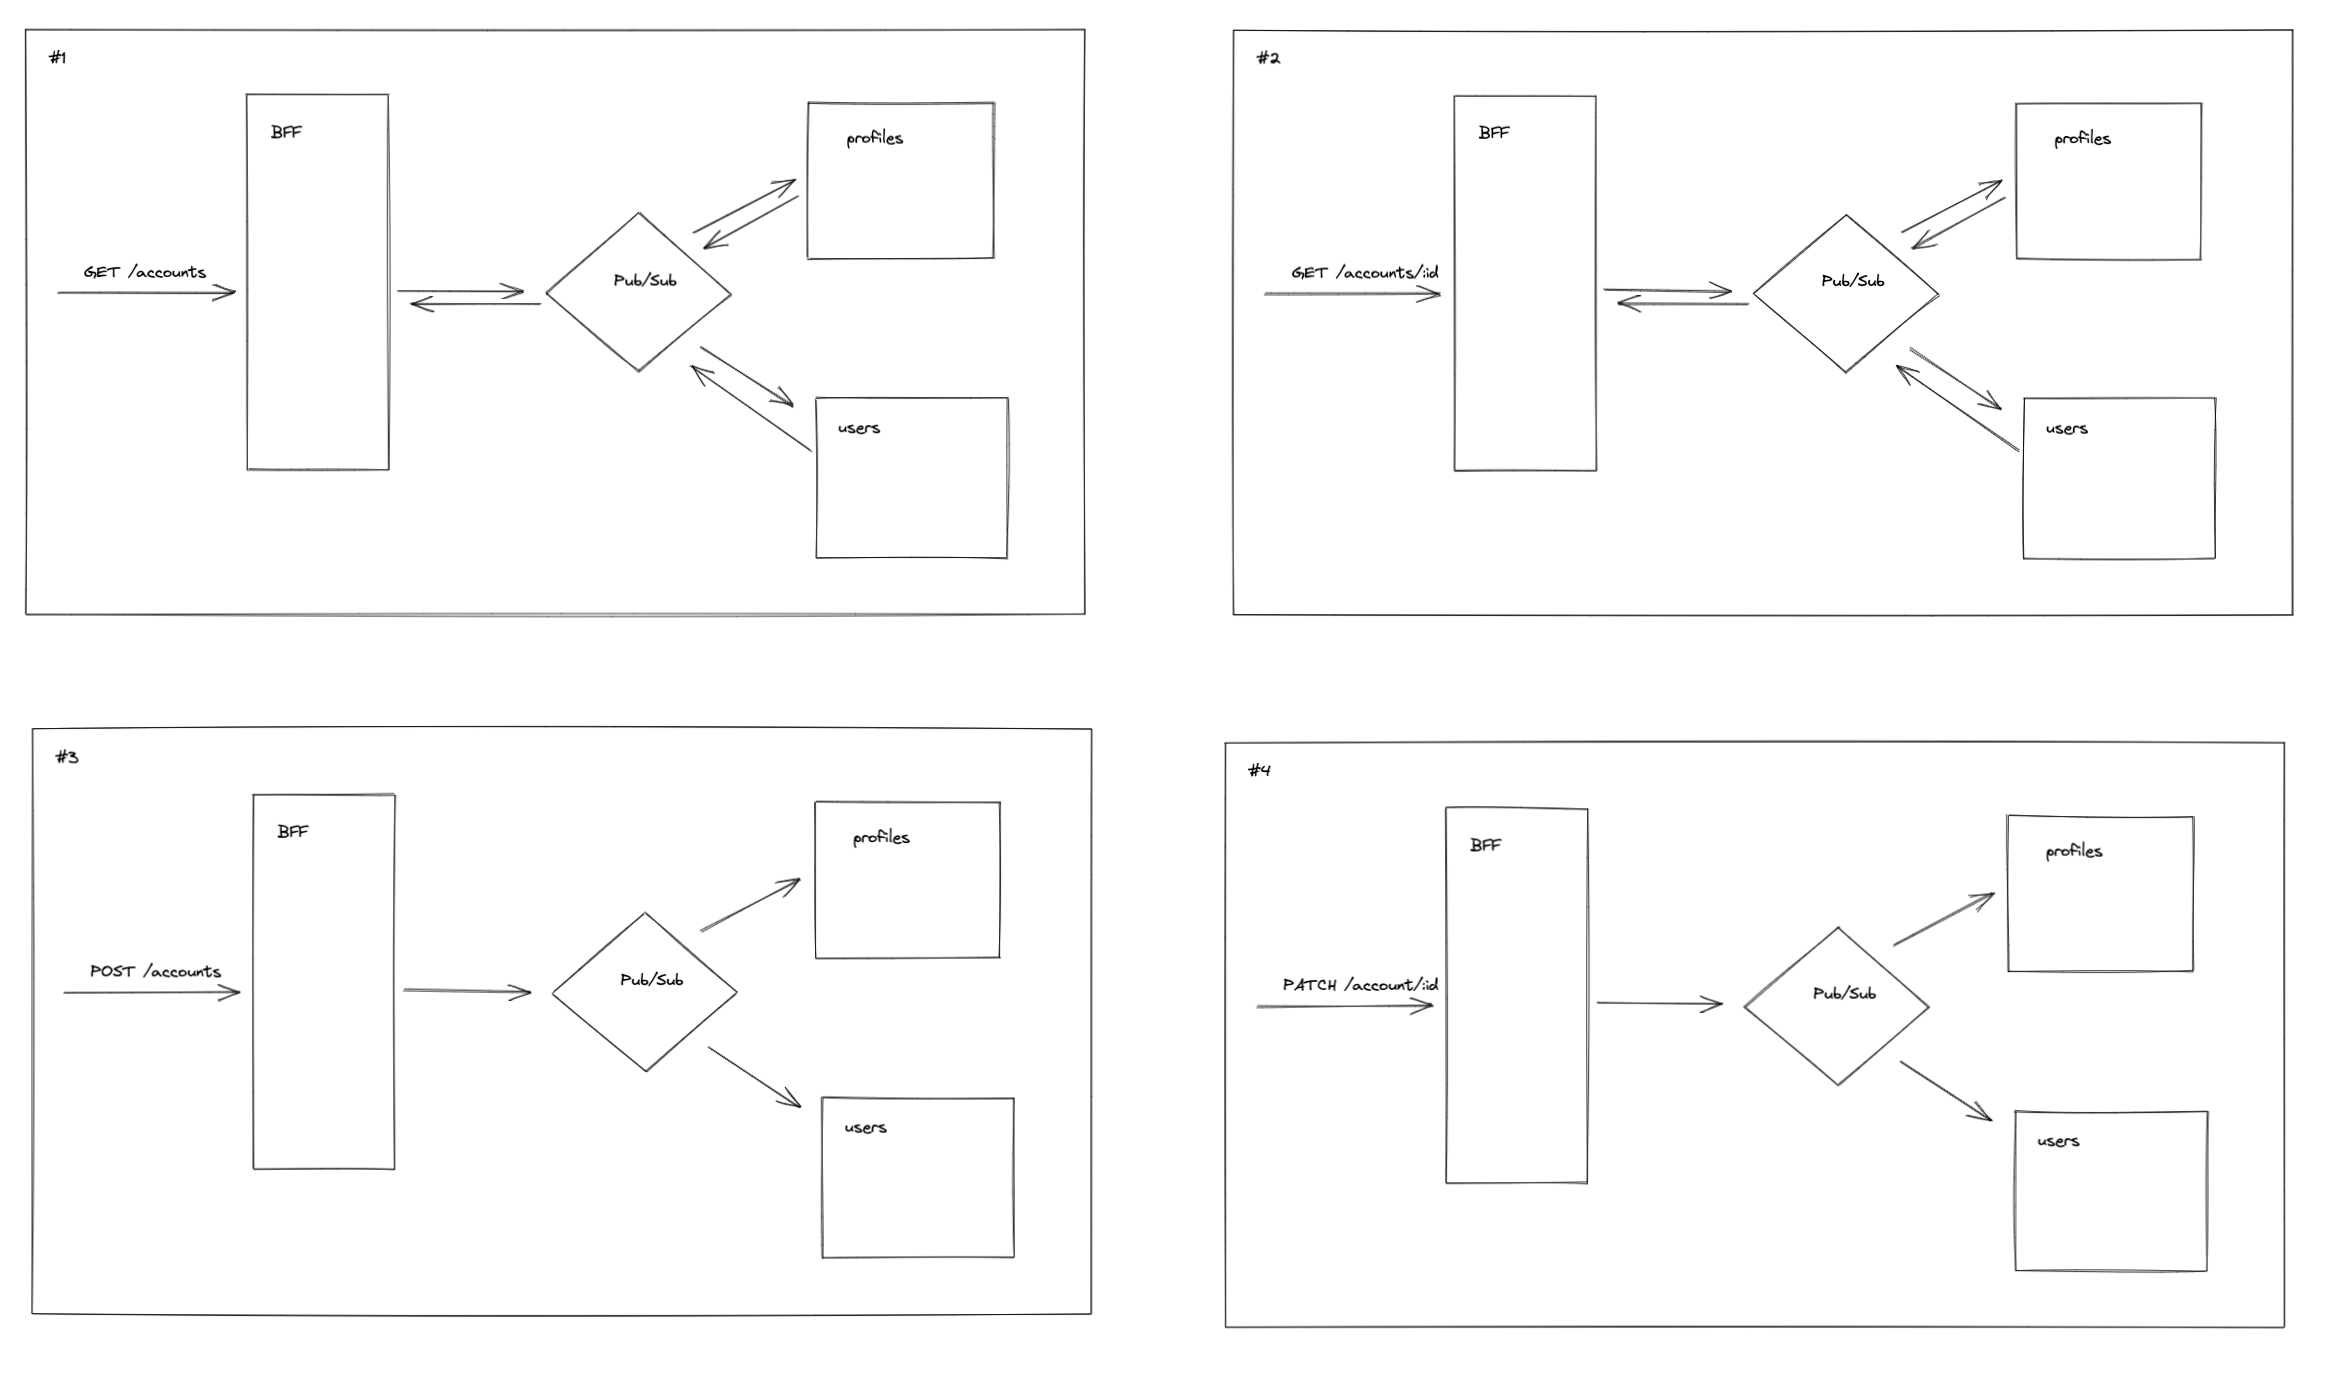
I would draw your attention there are two different message styles: asynchronous and synchronous. As you can see in the example cases, picture #1 and #2 are defined using request-response message style, thus synchronous. It’s chosen because we have to return back data requested by the client. But in cases #3 and #4, you can see just single direction command to save data. This time it’s an asynchronous event-based message style. NestJS provides the following decorators to cover both cases:
@MessagePattern()- for synchronous messages style@EventPattern()- for asynchronous messages style
Cases #2 and #4 are pretty similar to #1 and #3, so I will omit their implementation in this example.
Let’s implement case #3. This time we will use emit() method and @EventPattern() decorator.
/bff/src/app.controller.ts
@Post('accounts')
async createAccount(@Body() account: Account): Promise<void> {
  await this.client.emit({ cmd: 'create_account' }, account);
}
/profiles/src/app.controller.ts
@EventPattern({ cmd: 'create_account' })
createProfile(profile: Profile): Profile {
  return this.appService.createProfile(profile);
}
/profiles/src/app.service.ts
createProfile(profile: Profile): Profile {
  this.profiles.push(profile);
  return profile;
}
/users/src/app.controller.ts
@EventPattern({ cmd: 'create_account' })
createUser(account: Account): User {
  const {id, login} = account;
  return this.appService.createUser({id, login});
}
/users/src/app.service.ts
createProfile(user: User): User {
  this.users.push(user);
  return user;
}
let’s add an account look at the result:
curl -X POST http:/localhost:3000/accounts \
  -H "accept: application/json" -H "Content-Type: application/json" \
  --data "{'id': '3', 'login': 'jack', 'name': 'Jack'}" -i

HTTP/1.1 201 Created
curl http://localhost:3000/accounts | jq
[
{
"id": "1",
"login": "bob",
"name": "Bob"
},
{
"id": "2",
"login": "john",
"name": "John"
},
{
"id": "3",
"login": "jack",
"name": "Jack"
}
]Please check out the full code of described above services: https://github.com/artiom-matusenco/amazing-microservices-with-nestjs.
That’s it! 🙃
But wait… what about monitoring, authorization, tracing, fault tolerance, metrics…?
I would say it’s a good question, and I have a good answer: in the best case, all of this cool stuff has to be offloaded to infrastructure level; microservices should care only about business logic and probably some specific things like analytics tracking.
Conclusion
The NestJS provides the possibility to build lightweight, well-structured and amazing microservices. Out-of-the-box tools and features make development, extension, and maintenance nice and efficient.
References
Recommend
About Joyk
Aggregate valuable and interesting links.
Joyk means Joy of geeK