

使用 Tye 開發工具便利的開發微服務應用程式並部署到 Kubernetes 叢集
source link: https://blog.miniasp.com/post/2021/09/15/Developing-Microservice-using-Project-Tye-and-deploy-to-Kubernetes
Go to the source link to view the article. You can view the picture content, updated content and better typesetting reading experience. If the link is broken, please click the button below to view the snapshot at that time.

微服務是近期相當熱門的主題之一,而在 .NET 領域中,微軟也投入了不少資源進行研究,也推出了許多鮮為人知的好用工具,這篇文章我將介紹 Tye 這兩套微服務開發工具,讓你知道原來用 .NET 開發微服務也可以這麼簡單。
以下我使用 .NET Core 3.1 為基礎進行示範。
示範微服務專案建立的過程
-
先透過
global.json鎖定 .NET Core SDK 版本dotnet new globaljson --sdk-version 3.1.413 -
安裝
tye命令列工具dotnet tool update -g Microsoft.Tye --version "0.10.0-alpha.21420.1" -
建立你的第一個微服務:前端網頁
mkdir microservice && cd microservice dotnet new razor -n frontend -
啟動你的微服務系統(目前只有一個網站)
tye run frontend你可以連到 http://127.0.0.1:8000/ 開啟 Tye Dashboard 主控台頁面,查看微服務架構下的所有服務運作資訊,真是無腦又方便!
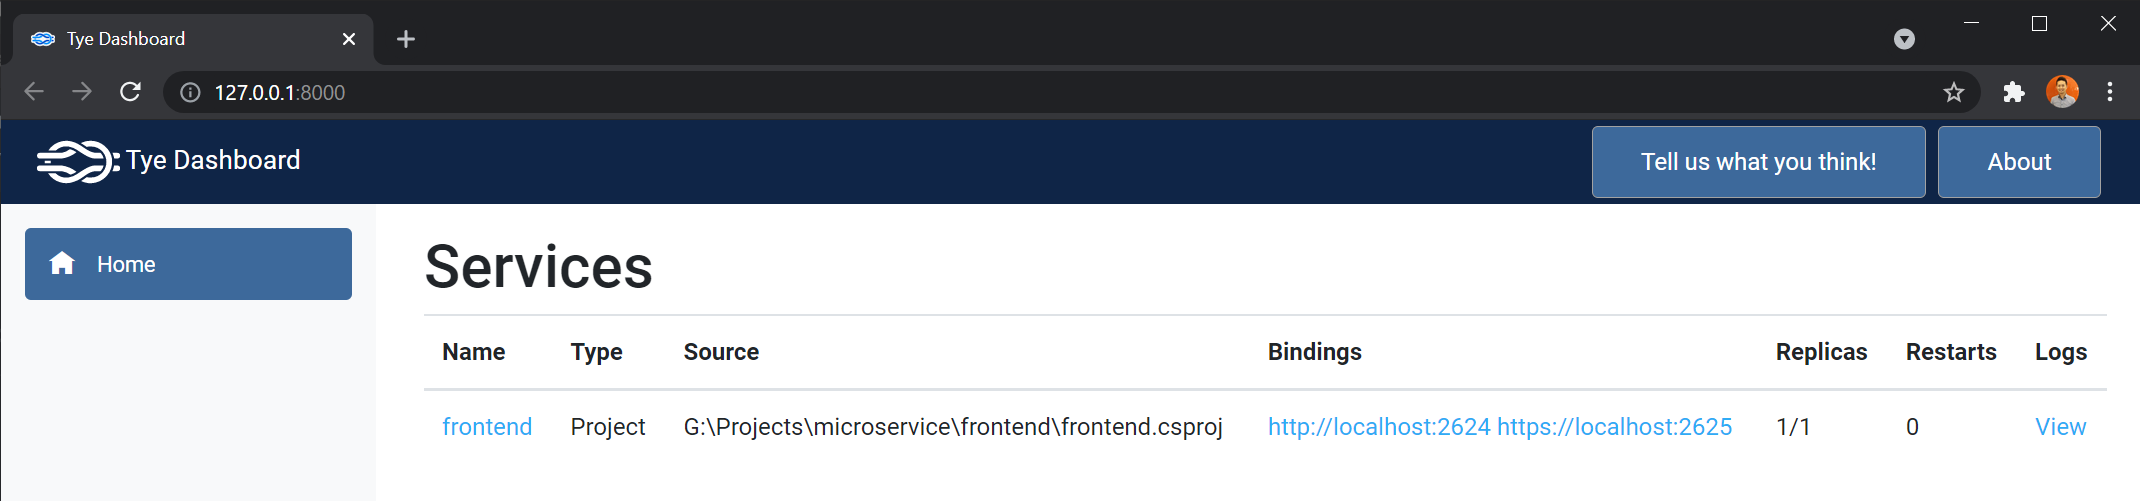
畫面上的 Bindings 欄位,紀錄著該「微服務」的端點,你可以直接透過這些網址連線到該服務,預設他會亂數設定一個可用的 Ports 給你,每次都會不一樣!
-
建立你的第二個微服務:後端 API 專案
dotnet new webapi -n backend -
啟動你的微服務系統(目前有 2 個網站)
由於要透過
tye快速啟動多個專案,因此建議建立一個方案檔,方便後續執行!dotnet new sln dotnet sln add frontend backend此時執行
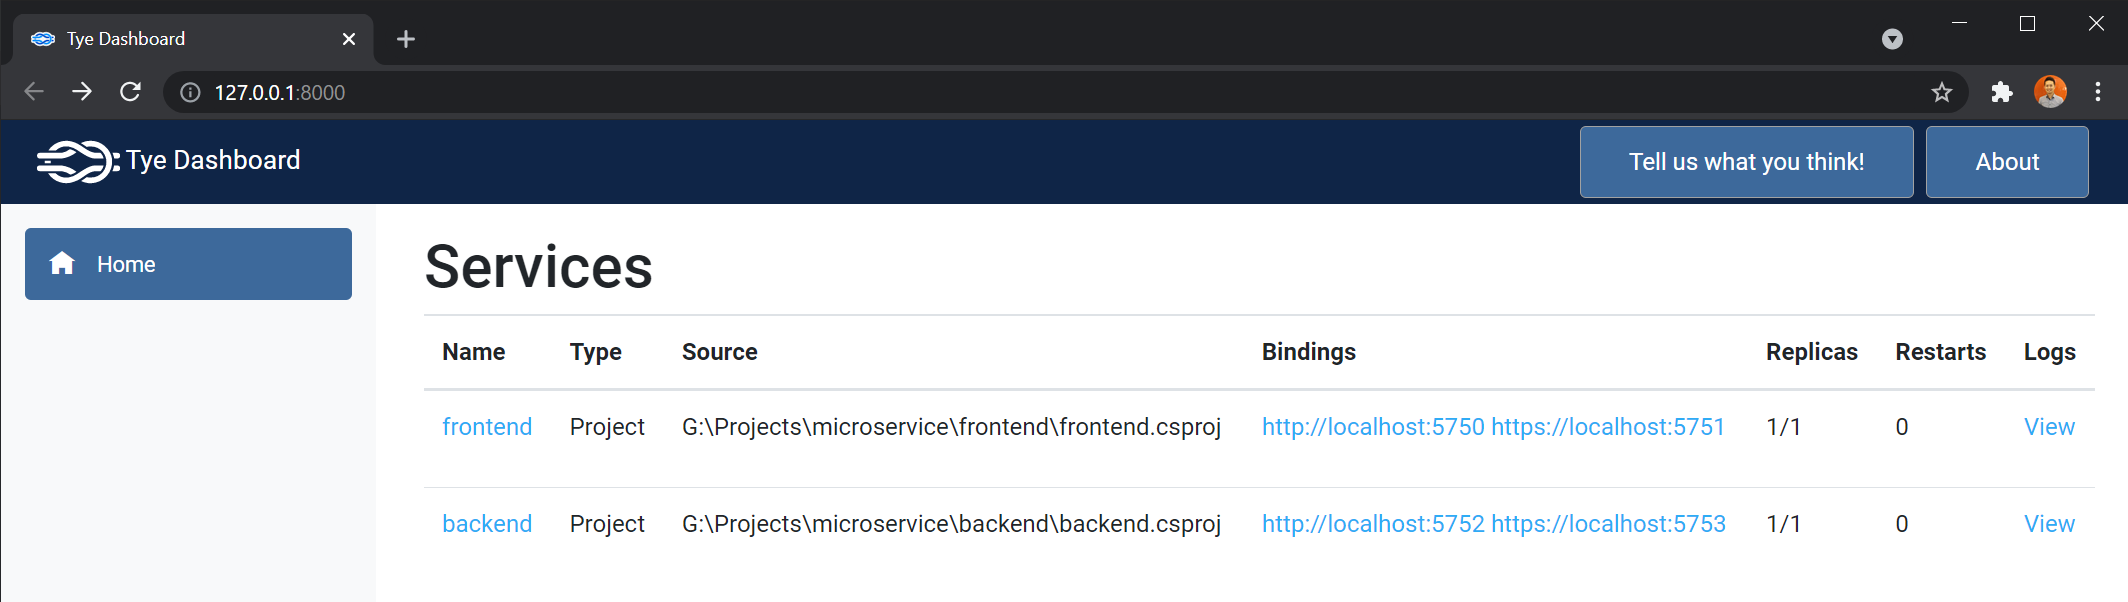
tye run就會讀取microservice.sln方案檔,一次啟動兩個站台:tye run你可以連到 http://127.0.0.1:8000/ 開啟 Tye Dashboard 主控台頁面,查看微服務架構下的所有服務運作資訊!
示範如何從「前端服務」呼叫「後端服務」的 Web API
-
在
frontend專案加入WeatherForecast.cs這個
WeatherForecast類別跟後端的WeatherForecast類別是完全一樣的!using System; namespace frontend { public class WeatherForecast { public DateTime Date { get; set; } public int TemperatureC { get; set; } public int TemperatureF => 32 + (int)(TemperatureC / 0.5556); public string Summary { get; set; } } } -
在
frontend專案加入WeatherClient.cs在開發
WeatherClient的時候,完全不需要知道後端的位址!using System.Net.Http; using System.Text.Json; using System.Threading.Tasks; namespace frontend { public class WeatherClient { private readonly JsonSerializerOptions options = new JsonSerializerOptions() { PropertyNameCaseInsensitive = true, PropertyNamingPolicy = JsonNamingPolicy.CamelCase, }; private readonly HttpClient client; public WeatherClient(HttpClient client) { this.client = client; } public async Task<WeatherForecast[]> GetWeatherAsync() { var responseMessage = await this.client.GetAsync("/weatherforecast"); var stream = await responseMessage.Content.ReadAsStreamAsync(); return await JsonSerializer.DeserializeAsync<WeatherForecast[]>(stream, options); } } } -
在
frontend專案加入 Microsoft.Tye.Extensions.Configuration 套件dotnet add frontend/frontend.csproj package Microsoft.Tye.Extensions.Configuration --version "0.4.0-*" -
在
frontend專案調整Startup.cs相依注入這裡最酷的地方,就是在 Tye 的協助下,開發人員在寫 Code 的時候只需要知道服務名稱(
backend)就好,而不需要知道微服務的確切網址 (端點)!public void ConfigureServices(IServiceCollection services) { services.AddRazorPages(); // 註冊 WeatherClient 服務 services.AddHttpClient<WeatherClient>(client => { client.BaseAddress = Configuration.GetServiceUri("backend"); }); }上述程式的
Configuration.GetServiceUri()API 其實是一個 Microsoft.Tye.Extensions.Configuration 套件中提供的 C# 擴充方法,他會自動讀入 Tye 傳到應用程式的組態,技術細節不是特別重要,重要的是你可以藉此取得微服務的 Uri 位址。其實這個實作非常簡單,直接看原始碼就可以得到相當清楚的解答! -
在
frontend專案調整Pages\Index.cshtml.cspublic WeatherForecast[] Forecasts { get; set; } public async Task OnGet([FromServices]WeatherClient client) { Forecasts = await client.GetWeatherAsync(); } -
在
frontend專案調整Pages\Index.cshtml@page @model IndexModel @{ ViewData["Title"] = "Home page"; } <div class="text-center"> <h1 class="display-4">Welcome</h1> <p>Learn about <a href="https://docs.microsoft.com/aspnet/core">building Web apps with ASP.NET Core</a>.</p> </div> Weather Forecast: <table class="table"> <thead> <tr> <th>Date</th> <th>Temp. (C)</th> <th>Temp. (F)</th> <th>Summary</th> </tr> </thead> <tbody> @foreach (var forecast in @Model.Forecasts) { <tr> <td>@forecast.Date.ToShortDateString()</td> <td>@forecast.TemperatureC</td> <td>@forecast.TemperatureF</td> <td>@forecast.Summary</td> </tr> } </tbody> </table>
-
重新執行 Tye
tye run
你可以連到 http://127.0.0.1:8000/ 開啟 Tye Dashboard 主控台頁面,並且透過
frontend微服務的 Bindings 網址瀏覽到前端網站,前端程式也會呼叫後端微服務的 API 並取得資料!
初始化 Tye 開發環境
由於每次執行 tye run 都會替每一個微服務產生一個亂數的 Ports,其實還挺困擾的,如果想要固定開發環境的參數,就要初始化 Tye 組態設定,將這些參數都固定下來。
-
初始化
tye.yaml設定檔tye initname: microservice services: - name: frontend project: frontend/frontend.csproj - name: backend project: backend/backend.csproj -
替需要固定端點的服務加上 Bindings 資訊
name: microservice services: - name: frontend project: frontend/frontend.csproj bindings: - name: http protocol: http port: 16000 - name: https protocol: https port: 16443 - name: backend project: backend/backend.csproj -
重新執行 Tye
tye run請注意:如果你替每一個服務設定 bindings 的話,程式需要做出微調!
name: microservice
services:
- name: frontend
  project: frontend/frontend.csproj
  bindings:
  - name: http
    protocol: http
    port: 16000
  - name: https
    protocol: https
    port: 16443
- name: backend
  project: backend/backend.csproj
  bindings:
  - name: http
    protocol: http
    port: 17000
  - name: https
    protocol: https
    port: 17443
你在連接後端時,因為有設定 bindings 的關係,你使用
Configuration.GetServiceUri()取得網址時,必須也加上服務名稱:繫結名稱(例如:backend:http) 才能得到正確的網址!public void ConfigureServices(IServiceCollection services) { services.AddRazorPages(); // 註冊 WeatherClient 服務 services.AddHttpClient<WeatherClient>(client => { client.BaseAddress = Configuration.GetServiceUri("backend:http"); }); }
加入 SQL Server 資料庫到開發環境
在初始化 tye.yaml 設定檔之後,你就可以像 Docker Compose 那樣,在一個 YAML 檔案中設定多個不同服務,而且也可以設定 Docker 容器執行!
以下我就來示範如何在現有的 Tye 微服務方案中加入測試用的 SQL Server 資料庫:
-
加入
db服務,並透過image:執行一個 Docker 容器- name: db image: mcr.microsoft.com/mssql/server:2019-latest env: - name: SA_PASSWORD value: "Ver7CompleXPW" - name: ACCEPT_EULA value: "Y" bindings: - port: 1433 connectionString: "Server=${host},${port};Database=MyDB;User Id=sa;Password=Ver7CompleXPW;MultipleActiveResultSets=true"這裡我們將
connectionString放在db服務下,以便其他服務可以取用這個連接字串! -
測試從
backend服務取得連接字串以下就是從
db服務取得連接字串的方法:Configuration.GetConnectionString("db")這個
GetConnectionString()擴充方法的原始碼在此:tye/TyeConfigurationExtensions.cs at main · dotnet/tye -
重新執行 Tye
tye run如果 SQL Server 容器無法啟動,請嘗試執行
net stop winnat && net start winnat並再重新執行一次。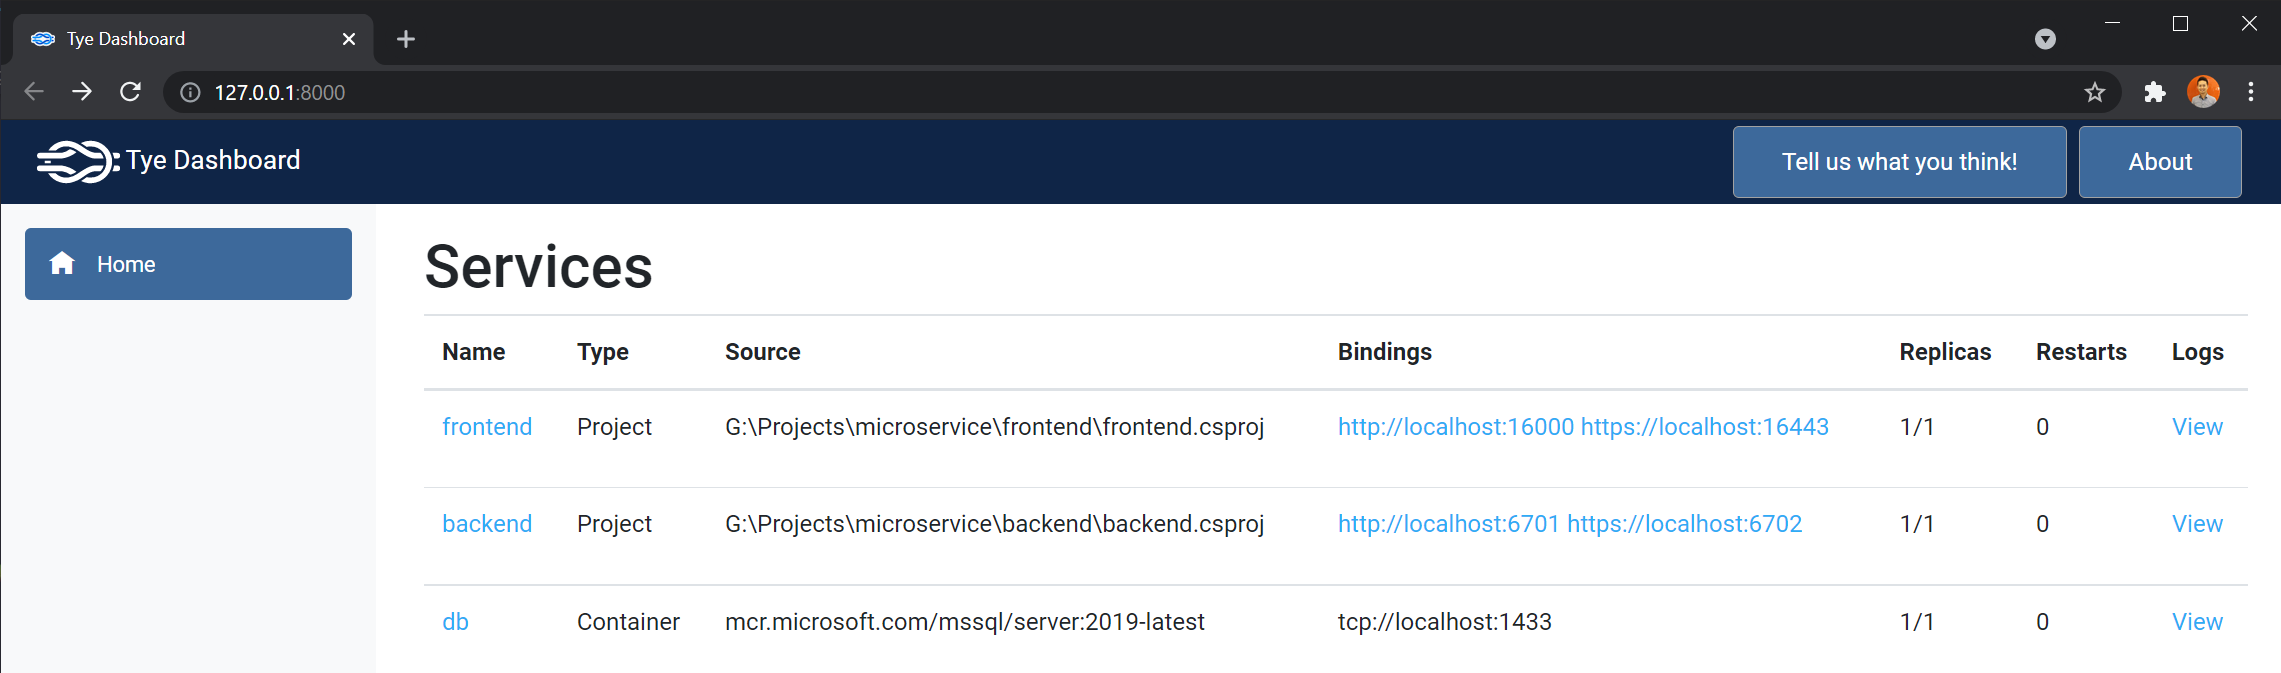
這裡有個地方蠻有趣的,那就是我們的
frontend與backend微服務其實是跑在 本機 (Local Machine),而db卻是跑在容器中。除此之外,Tye 還另外跑了兩個容器,一個名為frontend-proxy_6bc59e6c-1,另一個名為backend-proxy_a7e2c2bc-1,這兩個容器其實是一個 Microsoft.Tye.Proxy (代理伺服器),但是這時其實是完全用不上的,因為我們的程式完全跑在本機,不需要透過這兩個容器(代理伺服器)進行 HTTP 轉發!
部署微服務應用程式到 Kubernetes
-
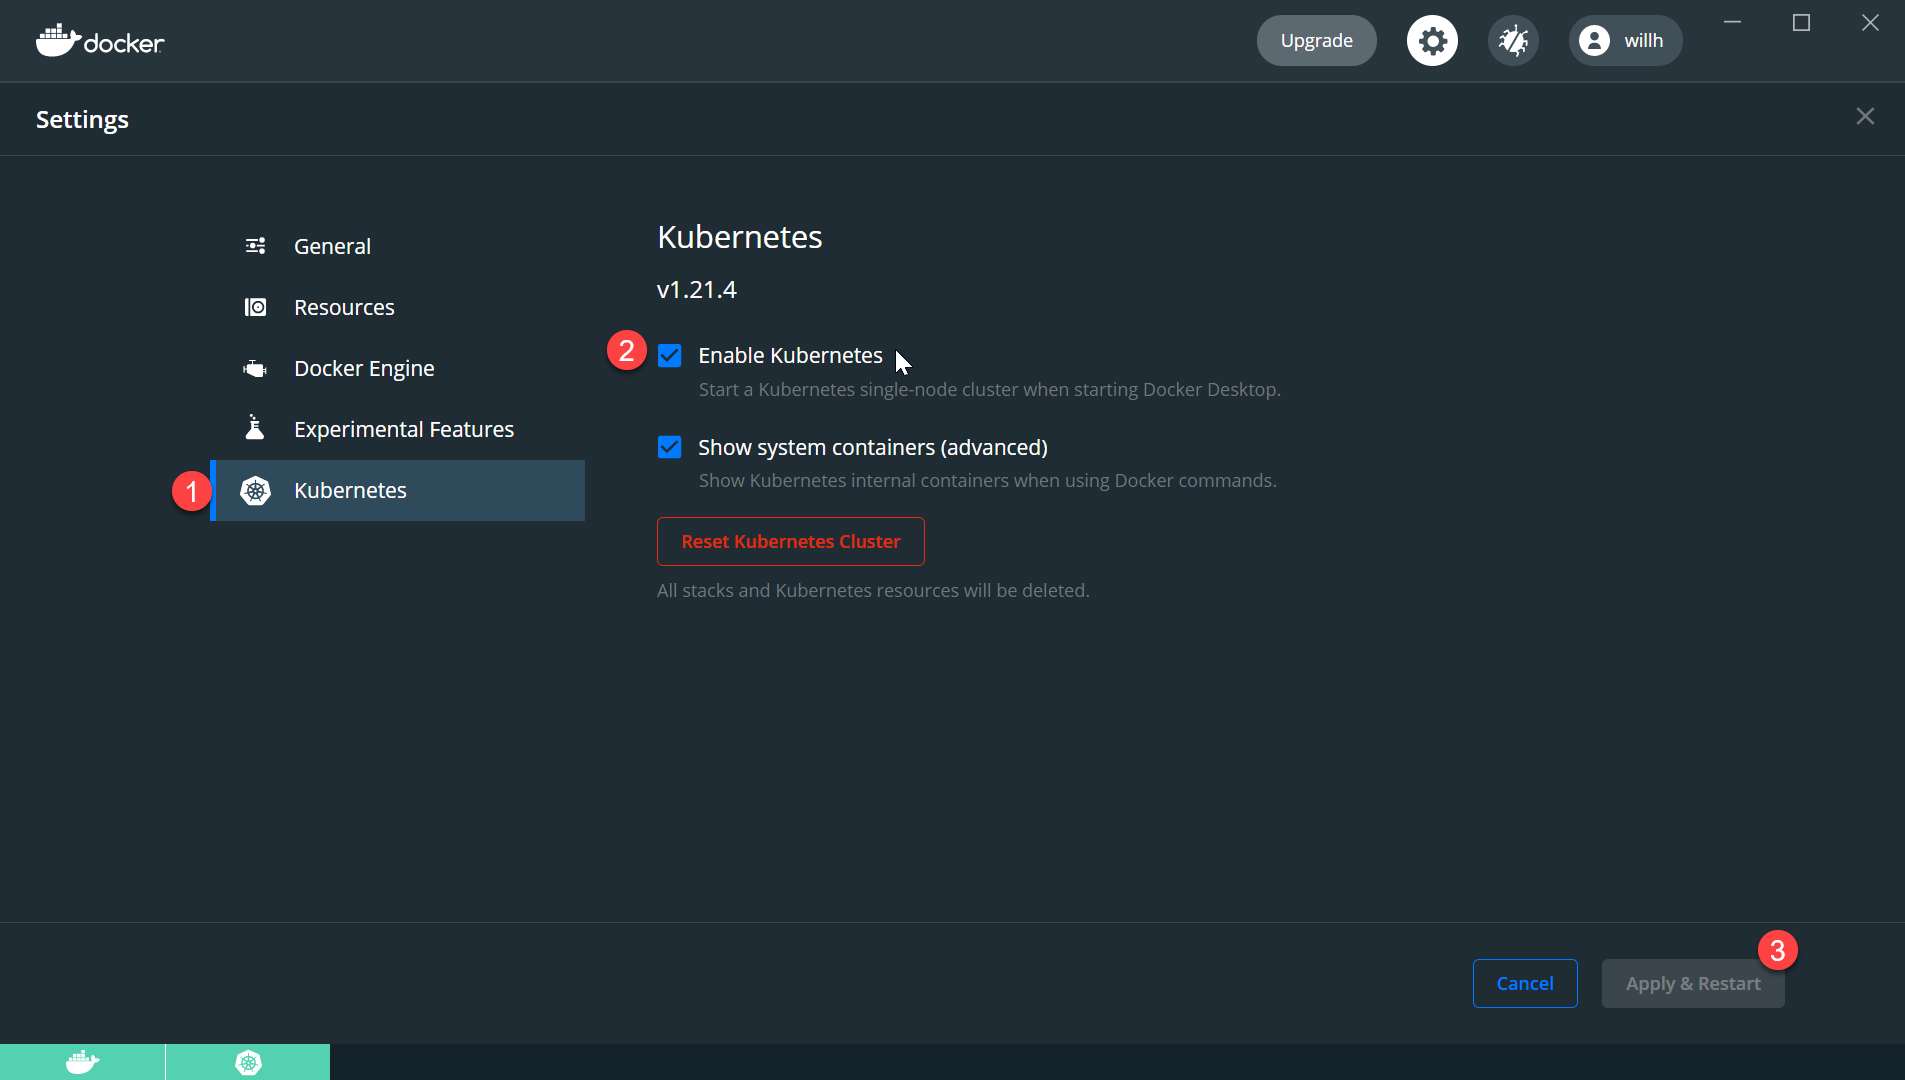
啟用 Docker Desktop 的 Kubernetes 功能
-
建置容器映像
tye build -
設定 registry 位址 (
tye.yaml)我們只要加上
registry: willh就可以將建置好的 image 自動 push 到 Docker Hub 的willh帳號下。如果你要推送到自架的 Registry 的話,直接設定主機名稱即可,例如:
willh.azureacr.ioname: microservice registry: willh services: - name: frontend project: frontend/frontend.csproj bindings: - name: http protocol: http port: 16000 - name: https protocol: https port: 16443 - name: backend project: backend/backend.csproj -
部署至 Kubernetes 叢集
請先確認
kubectl可以成功連至 Kubernetes 叢集tye deploy -
設定 Port Forwarding 讓本機可以連線測試
以下命令
8080是你本機要使用的 Port,而16000則是你在tye.yaml設定的服務 Portkubectl port-forward services/frontend 8080:16000 -n default -
從 Kubernetes 叢集移除已部署的應用程式
tye undeploy
這個簡單的實作學習到了些什麼
首先,透過 Tye 可以非常便利的幫助你管理多個不同的微服務,你不用特別在意網址的部分,只需要知道服務名稱即可完成服務間通訊!
上述例子,你會發現後端 API 的微服務什麼事都不用做,基本上開發完成之後就等著被呼叫就好。那是因為你的 .NET 應用程式其實是透過 Tye 啟動的,而在啟動的時候 Tye 會自動傳入幾個重要的組態設定 (透過環境變數傳入),因此你可以在開發微服務的時候不需要知道這些細節,專心把服務開發好即可。
以下是我在 Razor 頁面中顯示目前微服務取得的所有環境變數的程式碼片段:
@{
    var envs = Environment.GetEnvironmentVariables();
    var sorted = from key in envs.Keys.Cast<string>() orderby key select key;
}

<table class="table table-bordered">
@foreach (string envName in sorted)
{
    <tr>
        <td>@envName</td>
        <td>@envs[envName]</td>
    </tr>
}
</table>
最後,Tye 自動整合了 Kubernetes 的部署能力,真的是開發人員的好朋友,你幾乎可以在不瞭解 Docker 或 Kubernetes 的情況下,就可以完成本機開發與 Kubernetes 叢集部署,相當便利! 👍
- dotnet/tye
- Tye is a tool that makes developing, testing, and deploying microservices and distributed applications easier. Project Tye includes a local orchestrator to make developing microservices easier and the ability to deploy microservices to Kubernetes with minimal configuration.
Recommend
About Joyk
Aggregate valuable and interesting links.
Joyk means Joy of geeK