

Generate documents and send in bulk for e-signature in Microsoft Power Automate
source link: https://medium.com/adobetech/generate-documents-and-send-in-bulk-for-signature-in-microsoft-power-automate-807838092dcf
Go to the source link to view the article. You can view the picture content, updated content and better typesetting reading experience. If the link is broken, please click the button below to view the snapshot at that time.

Generate documents and send in bulk for e-signature in Microsoft Power Automate
Learn how you can dynamically generate documents in bulk from Excel data and also send it for signature in Microsoft 365 with Adobe connectors.
Mail merge has been around since the 80s. However, back in the 80s, most of the ways that people would think of mail merge was to print documents and envelopes in bulk to be packed into envelopes and sent off. This could be for employee notices like bonus letters, offer letters, account statements, and other scenarios.
While there is still plenty of mail sent in modern times, more need is to have documents delivered electronically. In this article, we’ll learn how you can use a list of recipients in a Microsoft Excel sheet and generate documents dynamically using Adobe Document Generation API, which is part of the Adobe PDF Services connector in Microsoft Power Automate. We will also see how you have those documents delivered in bulk using Adobe Sign.
Scenario
In the example below, we want to generate bonus letters to send to employees. We have a list of employees in a spreadsheet that we want to iterate through and send the letters to their managers to sign and the employee to receive. Some of them will be getting a bonus of stock, some will not, so we will use conditional sections with Adobe Document Generation API to only include that in the documents when necessary.
What you are going to need
*Note: you do not need the Adobe Document Generation add-in to tag your documents, but it does make it very easy to tag.
Create Excel file
First, we need to create an Excel file. In this example, we are going to create a file with the following columns:
- Employee First Name
- Employee Last Name
- Employee Email
- Employee Job Title
- Employee Company
- Employee Street
- Employee City
- Employee State
- Employee Zip
- Bonus
- Bonus Shares
- Manager First Name
- Manager Last Name
- Manager Title
- Manager Email
Once you have created all of your fields, you need to turn your sheet into a table, allowing the table to be selectable in Microsoft Power Automate. You can create a table by doing the following:
- Select all of the columns and rows.
- In the Ribbon, switch to Insert section and select Table.

You can also name your table by selecting your table, click Table Design in the ribbon, and set the name title.
Once you do that, you will want to save your Excel file to OneDrive or SharePoint, as this will allow you to reference the list in Microsoft Power Automate.
Create a flow
As the next step, we are going to create our flow. There are several ways in Microsoft Power Automate that you can trigger flows to start. In this example, we are going to make one that is manually triggered.
- Log into Microsoft Power Automate.
- Click Create.
- Select Instant cloud flow.
- In the Choose how to trigger flow list, select Manually trigger a flow.
You should now have a flow that looks like a blank slate like this:

Get a list from Excel
As the first step, we want to get our list of recipients in Microsoft Excel.
- Click on + New step.
- In the search bar, search for Excel.
- Select Excel Online (Business).
- As the action, choose List rows in a table.
You will need to set where your file is located:
- Location: Which SharePoint or OneDrive location your document is stored in.
- Document Library: Which library your document is stored in. If it is OneDrive, then there will be only one option (OneDrive).
- File: If you click the File icon, you can navigate to the location your Excel file is stored.
- Table: If you created a table in your Excel file, it should be listed there. If you don’t see a table listed, then you need to go back and create a table.
This next step is to make it easier to get at the JSON output from the Excel action.
- Click New step.
- Search for Initialize variable.
- Set the Name of the variable. (ex. excelData)
- Set Type to Array.
- For Value, use the Dynamic content panel to select value: List of Items.

As our next step, we want to run our flow to get data references to build our template in Microsoft Word.
- Click Save in the top-right corner.
- Click Test.
- Select Manually and click the Test button.
- Click Continue.
- Click Run Flow.
Once it runs successfully, you can expand the Initialize variable action and see that it returns an array with each row in the Excel table.
Copy one of the items in the output (not the whole array) to your clipboard, as we will use that as our sample data for generating our template in Microsoft Word. The data you copy will look something like this:
{
    "@odata.etag": "",
    "ItemInternalId": "d509d00a-4a36-494e-9468-2741e886651f",
    "Employee First Name": "John",
    "Employee Last Name": "Echostone",
    "Employee Email": "<Email address>",
    "Employee Job Title": "Analyst",
    "Employee Company": "Projected Consultants",
    "Bonus": "2000",
    "Bonus Shares": "100",
    "Manager First Name": "Joe",
    "Manager Last Name": "Meister",
    "Manager Title": "Manager",
    "Manager Email": "<Email address>"
  }
Create a template in Microsoft Word
Now that we have some sample data, we can tag our template in Microsoft Word using Adobe Document Generation add-in. While you do not need the add-in to add fields to your document, it makes it much easier.
- Click Document Generation in the menu.
- Click Get Started.
- In the JSON Data field, paste the sample data.
- Click Generate Tags.
Now, you can use Adobe Document Generation tagger to place fields on your document. Select the place where you to place your tag, select your tag and click Insert Text.
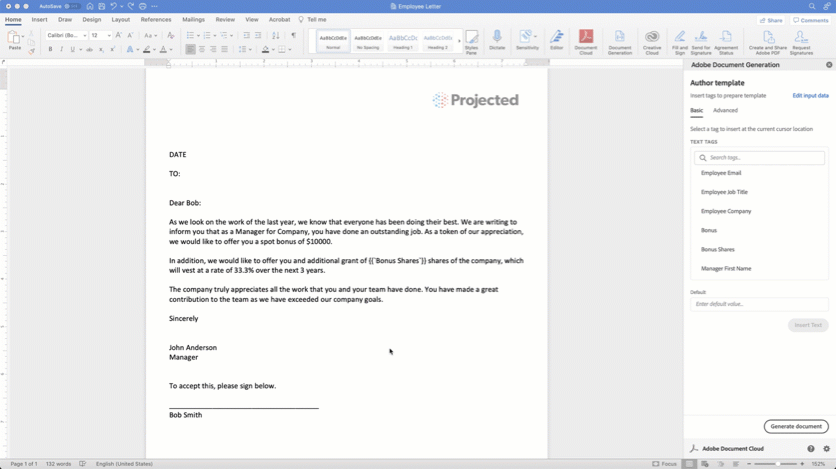
We can then place all of the different tags into the appropriate spots in the letter.
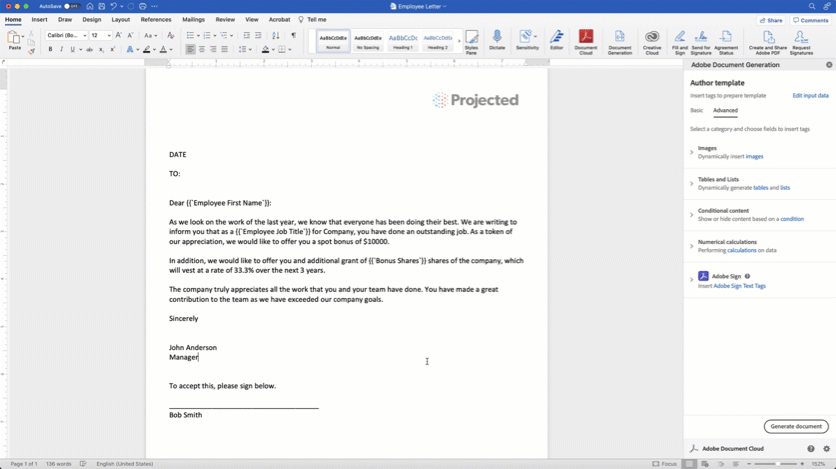
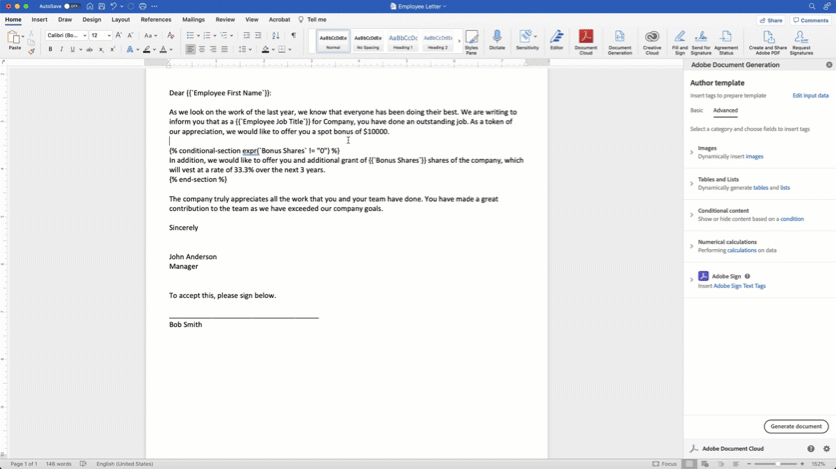
Conditional section
In the second paragraph, we see text around a stock bonus that only applies to certain employees in the list. We can set a conditional section for this paragraph so that the paragraph only shows for certain employees.
To do this:
- Select the paragraph in your document.
- Click on Advanced in Document Tagger.
- Expand the Conditional content section.
- In Select records, choose Bonus Shares.
- Under Select operator, choose !=.
- In Value, set it to 0.
By setting this, we tell the template only to show this section if the Bonus Shares value is not equal to 0.
Add Adobe Sign tags
As the next step, we want to add a signature location for the manager and the employee. We can do this using the Document Tagger.
- Place the cursor where to place the signature for the manager’s signature.
- Click on Advanced in Document Tagger and expand Adobe Sign.
- Set the number of signers to 2.
- Set the Signer to Signer-1.
- Set the Field Type to Signature.
- Click Insert Adobe Sign Tag.
For the second recipient for the employee, move the cursor to the lower signature location. Change the Signer to Signer-2 and click Insert Adobe Sign Tag.
Now that we have the document tagged, save the Word template into OneDrive or SharePoint to reference inside of Microsoft Power Automate.
Get File Contents and Generate documents
Next, we will finish configuring the flow. In this section, we will get our document template and generate documents.
- Click on + New step.
- Search for OneDrive or SharePoint (depending on where you saved the template).
- Select the Get file content action.
- Choose where the file Word template is located.
Next, we want to iterate through each of the rows in the flow.
- Click on + New step.
- Select Control.
- Select Apply to Each.

Inside of the Apply to each loop, use the Dynamic content panel value List of Items.

- Click on Add an action in the Apply to each action.
- Search for Adobe PDF Services.
- Select Adobe PDF Services.
- Select Generate document from Word template action.
- In the Template File Name, set the name of the file. As long as the file name ends with .docx, then you can name it whatever you want.
- Using the Dynamic Content panel, set the variable Merge data field to body/value — Item.
- In File Content, use the Dynamic Content panel to set it to File content.

Next, we want to save a copy of the generated document into OneDrive or SharePoint. In the example below, we are saving the generated documents to OneDrive.
- Click on Add an action after the Generate document step.
- Select OneDrive or SharePoint.
- Select the Create file action.
- In the Folder Path field, set it to the folder you want to save the file.
- Set File Name to the name of the generated file. The Dynamic Content panel is a helpful way of doing this as it allows you to use the Excel fields to name the file. For example: [Employee Last Name]_[Employee First Name].pdf.
- In File Content, set it to Output File Content using the Dynamic Content panel.

Adding Adobe Sign
To deliver agreements for signature using Adobe Sign, we can add Adobe Sign actions to our loop.
- Click on Add an action after Create file action.
- Search for Adobe Sign.
- Select the Upload a document and get a document ID.
- In the File Name, set the file name.
- In File Content, use the Dynamic content panel to select Output File Content.
Next, we need to send the agreement using Adobe Sign.
- Click on Add an action after Upload a document and get a document ID action.
- Search for Adobe Sign.
- Select the Create an agreement from an uploaded document and send for signature.
Next, we need to configure the agreement:
- Agreement Name: Name of your agreement that will get sent out. This shows up in the emails sent by Adobe Sign.
- Document ID: Use the Dynamic content panel to select Document ID from the previous step.
- Participant Email 1: Set this to the Manager Email value using the Dynamic content panel.
- Participant Order Set this to 1.
- Participant Role set this to SIGNER.
We then need to add our second signer. To do this, click on Add new item after the Participant Role. Fill out the information for the employee:
- Participant Email 1: Set the email to Employee Manager Email.
- Participant Order do not touch
- Participant Role set this to SIGNER.
Once you have done this, you have completed the flow. You can now save and Test to run the flow to make sure it iterates correctly.
Additional Ideas
Using Microsoft Power Automate with Adobe Document Generation API and Adobe Sign is a really powerful way to automate many these actions in bulk. Here are a few other additional ideas you can consider when creating your flows.
Use Protect PDF
If you don’t need to get a signature on documents you are generating, you still might want to protect them. Using Protect PDF action in Adobe PDF Services can ensure the data is secured or restrict editing or copying of data in documents and attach them in an email to share.
Parallel Branches
You might want to also consider creating parallel branches in Microsoft Power Automate to make multiple or send multiple agreements at the same time. This is a benefit compared to mail merge on a desktop computer because multiple branches are running simultaneously.
Update Adobe Sign status back into the Excel file
Adobe Sign has triggers that allow you to trigger a flow when actions occur like an agreement is signed, when viewed, etc. You can use these to update a column in Excel so that you can see the latest if documents have been delivered or signed.
Deliver documents using Approvals
Microsoft Teams and Power Automate have approvals, which you can use to send a task for review and approval. This can be useful when generating a document to route it for approval or review to each recipient.
Lookup user information to populate using Office 365 Users connector
Suppose you want to look up profile information or the manager of a user in Microsoft 365. In that case, you can use Office 365 connector in Microsoft Power Automate to collect that info using their email address. This can be useful, so you don’t have to put that information in the Excel file explicitly but instead reference and have the flow lookup that information and spare the columns in Excel.
Use connectors other than Excel
Excel is the first tool that all of us learned for storing structured data and is still the go-to app for many departments. However, one of the great things about Microsoft Power Automate is its integration with other data systems like SharePoint Lists, Microsoft Dataverse, Smartsheets, Office 365 users, and many other connectors. You don’t have to create spreadsheets.
Final Thoughts
The combination of Microsoft Power Automate, Adobe PDF Services, and Adobe Sign creates a powerful combination for automating many different document workflows. It allows you to automate bulk actions and tie them into the apps and services people use every day.
To get started, give Adobe PDF Services API a try and see what document processes you can start automating.
Recommend
About Joyk
Aggregate valuable and interesting links.
Joyk means Joy of geeK