2

Go 语言新手笔记(五)

 2 years ago
source link: https://yanbin.blog/go-language-notes-5/
Go to the source link to view the article. You can view the picture content, updated content and better typesetting reading experience. If the link is broken, please click the button below to view the snapshot at that time.

Go 语言新手笔记(五)

2021-08-15 — Yanbin

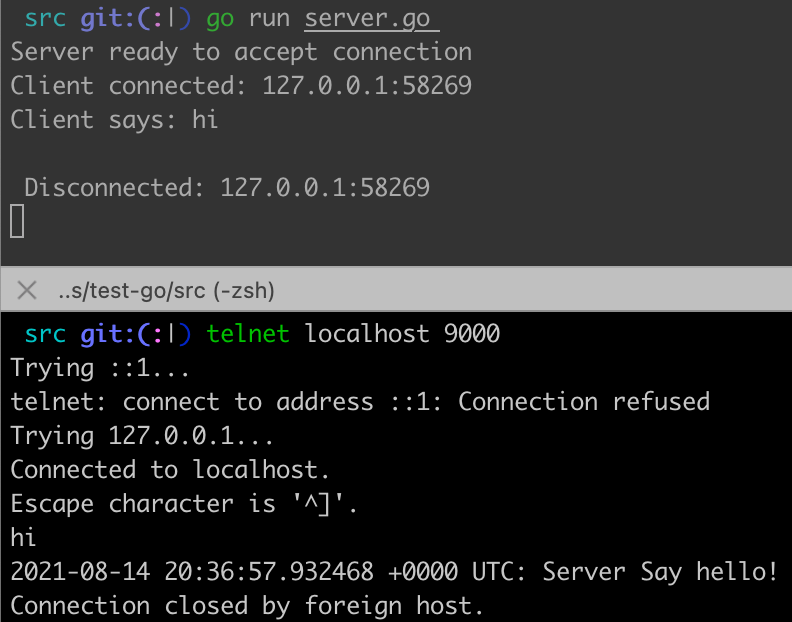
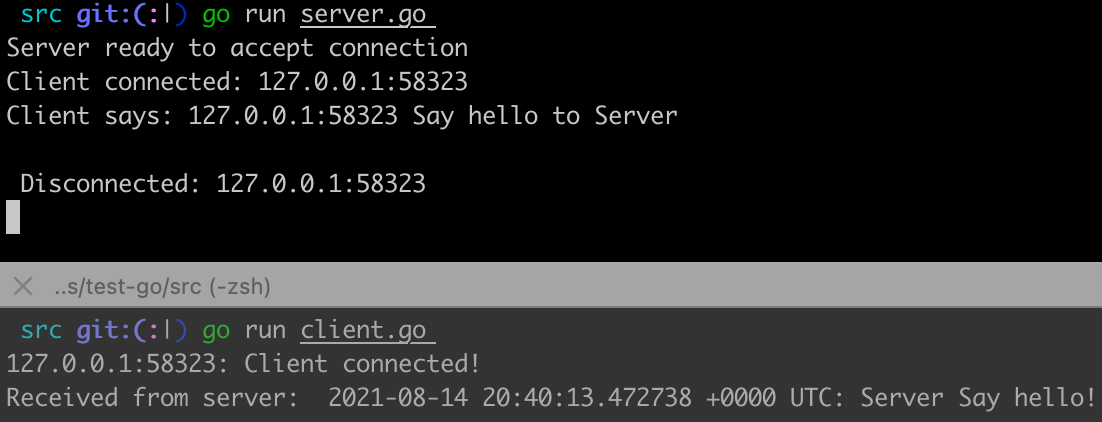
终于来到的 Go 的网络编程了,来写一个 TCP 服务端与客户端的程序。要用到 Go 语言的  net 包,是一个标准的 Listen+Accept 结构, 下面是一个简单的 TCP Server/Client 端的例子,启动了 Server 端口,可以用 telnet 去连接,也可以用 client.go 来连接

server.go

func main() {
  var tcpAddr *net.TCPAddr
  tcpAddr, _ = net.ResolveTCPAddr("tcp4", "localhost:9000")
  tcpListener, _ := net.ListenTCP("tcp4", tcpAddr)
  defer tcpListener.Close()
  fmt.Println("Server ready to accept connection")
    tcpConn, _ := tcpListener.AcceptTCP()
    fmt.Println("Client connected: " + tcpConn.RemoteAddr().String())
    go tcpPipe(tcpConn)  //goroutine
func tcpPipe(conn *net.TCPConn) {
  ipStr := conn.RemoteAddr().String()
  defer func() {
    fmt.Println(" Disconnected: " + ipStr)
    conn.Close()
  reader := bufio.NewReader(conn)
  msg, _ := reader.ReadString('\n')
  fmt.Println("Client says:", msg)
  returnMsg := time.Now().UTC().String() + ": Server Say hello!\n"
  conn.Write([]byte(returnMsg))

go run server.go

启动后用 telnet localhost 9000 连接

go-5-1.png

或者用下面的 client.go 客户端来连接

func main()  {
  tcpAddr, _ := net.ResolveTCPAddr("tcp4", "127.0.0.1:9000")
  conn, _ := net.DialTCP("tcp4", nil, tcpAddr)
  defer conn.Close()
  fmt.Println(conn.LocalAddr().String()+": Client connected!")
  conn.Write([]byte(conn.LocalAddr().String()+" Say hello to Server\n"))
  reader := bufio.NewReader(conn)
  msg,_ := reader.ReadString('\n')
  fmt.Println("Received from server: ", msg)
go-5-2-800x306.png

在 server.go 代码中用到的协程,这是学习 Go 时跳过的内容,现在再返回去了解一下 Go 是怎么作并发处理的。

Go 使用协和,比线程还更轻量级,Go 的协程(goroutine) 是 Go 提供的一种用户态线程。协程由应用程序创建和管理,因此开销低(一般为 4KB)。系统线程与 goroutine 之前可以是 1:1, 1:n, 或 m:n。runtime  几个相关的函数

  1. runtime.NumCPU()                   // 当前 CPU 内核数
  2. runtime.GOMAXPROCS(2)    // 设置运行时最大可执行  CPU 数,默认与 CPU 内核数相同
  3. runtime.NumGoroutine()       // 当前正在运行的 goroutine 数

Go 启动一个 goroutine  非常容易,只要 go function 就行了,循着 Java 中怎么开启线程的方式来试试 Go 的协程

func main() {
  for i := 0; i < 5; i++ {
    go startRoutine(i)
  fmt.Println("dispatched all tasks")
  time.Sleep(time.Second * 6)
func startRoutine(num int) {
  rand.Seed(time.Now().UnixNano())
  slept := rand.Intn(1000)
  time.Sleep(time.Duration(slept) * time.Millisecond)
  fmt.Printf("slept %v ms, done routine: %v\n", slept, num)

执行输出:

dispatched all tasks
slept 185 ms, done routine: 0
slept 242 ms, done routine: 1
slept 285 ms, done routine: 2
slept 344 ms, done routine: 4
slept 621 ms, done routine: 3

通道(channel) 用于进程内不同协程之间进行通信,而非用共享内存,这样能解决数据同步的问题,通道可以带缓冲或不带缓冲(默认不带缓冲),通道有三种,发送的,接收的,和同时发送和接收的。通道用 make() 创建,创建通道要给定通道传递的数据类型

recvChan := make(<-chan int)     // 接收通道,数据要从通道中读出, <-chan int, int 数据从通道左边出来
sendChan := make(chan<- int)    //  发送通道, 数据要写入通道,所以为 chan<- int,int 数据从右边放入通道
sendRecvChan := make(chan int)  // 不指定方向,则为可同时发送和接收的通道,一般用这个

上面创建的都是没有缓冲的通道,来测试一下用发送接收通道传递数据的效果

func main() {
  c := make(chan int)
  go send(c)
  go recv(c)
  time.Sleep(3 * time.Second)
  close(c)
func send(c chan<- int) {
  for i := 0; i < 5; i++ {
    fmt.Println("send ready ", i)
    c <- i
    fmt.Println("sent ", i)
func recv(c <-chan int) {
  for i := range c {
    fmt.Println("received ", i)

send ready 0
sent 0
send ready 1
received 0
received 1
sent 1
send ready 2
sent 2
send ready 3
received 2
received 3
sent 3
send ready 4
sent 4
received 4

送一个,收一个,如果把上面的第四行 go recv(c) 注释掉,再跑一遍,只打印一行

send ready 0

也就是一个数据都无法发送,无缓冲的队列必须有接收方在线才能传递数据。这和 Java 长度为 0 的同步队列 SynchronousQueue 效果上是一样的。看 Java 中 SynchronousQueue 的用法

public class TestSynchronousQueue {
    private static class Producer implements Runnable {
        private final BlockingQueue<String> queue;
        public Producer(BlockingQueue<String> queue) {
            this.queue = queue;
        @Override
        public void run() {
            while (true) {
                    String data = UUID.randomUUID().toString();
                    System.out.println("Send ready: " + data);
                    queue.put(data);
                    System.out.println("Sent: " + data);
                    Thread.sleep(1000);
                } catch (InterruptedException e) {
                    e.printStackTrace();
    private static class Consumer implements Runnable {
        private final BlockingQueue<String> queue;
        public Consumer(BlockingQueue<String> queue) {
            this.queue = queue;
        @Override
        public void run() {
            while (true) {
                    String data = queue.take();
                    System.out.println("Take: " + data);
                    Thread.sleep(2000);
                } catch (InterruptedException e) {
                    e.printStackTrace();
    public static void main(String[] args) {
        final SynchronousQueue<String> synchronousQueue = new SynchronousQueue<>();
        new Thread(new Producer(synchronousQueue)).start();
        new Thread(new Consumer(synchronousQueue)).start();

执行后效果为

Send ready: 1f125ab8-3a2e-48b1-9d60-08cb2f8fb058
Sent: 1f125ab8-3a2e-48b1-9d60-08cb2f8fb058
Take: 1f125ab8-3a2e-48b1-9d60-08cb2f8fb058
Send ready: e9596d7e-d494-4a29-920c-906ed48318ee
Take: e9596d7e-d494-4a29-920c-906ed48318ee
Sent: e9596d7e-d494-4a29-920c-906ed48318ee
Send ready: 5ad8870a-e561-4456-848c-bf718d4ec30b
Take: 5ad8870a-e561-4456-848c-bf718d4ec30b
Sent: 5ad8870a-e561-4456-848c-bf718d4ec30b
Send ready: e7a24bee-5684-4486-b900-b94b6374cc16
Take: e7a24bee-5684-4486-b900-b94b6374cc16
Sent: e7a24bee-5684-4486-b900-b94b6374cc16

如果同样把 new Thread(new Consumer(synchronousQueue)).start() 注释掉,不起动 Consumer,执行后效果如下

Send ready: 39511b79-9d3b-4f27-8fef-07e3d6e95948

也是一条数据也发送不出去,没有接收方在线什么事也做不了。简单测试就是

new SynchronousQueue<String>().offer("a");     //永远返回 false, 因为队列长度为 0

返回到前 Go 的代码,如果换成一个带缓冲的通道,即创建通道 c 时用

c := make(chan int, 4)    //缓冲区大小为 4

go send(c)go recv(c) 全开的情况,输出

send ready 0
sent 0
send ready 1
sent 1
send ready 2
sent 2
send ready 3
sent 3
send ready 4
sent 4
received 0
received 1
received 2
received 3
received 4

可以连续发送和接收

再把  go recv(c) 注释掉,只发送而不接收的情况,输出

send ready 0
sent 0
send ready 1
sent 1
send ready 2
sent 2
send ready 3
sent 3
send ready 4

缓冲满后就不能再发送数据了,这里的缓冲区大小为 4,第 5 个数据放不进去了。

通道关闭后不能再发送数据,再已在通道中的数据还能被接收。

协程间访问共享资源时用锁的方式

var lock sync.Mutex
func foo() {
  lock.lock()
  defer lock.Unlock()    //相当于 Java 的 finally 中释放锁
  // ... 一系列锁保户的操作
go foo()
go foo()

同时只有一个协程能拿到锁。

还有一个读写锁 sync.RWMutex, 用于读多写少的情况下,达到对读的做化,它有下列方法

func (*RWMutex) Lock
func (*RWMutex) Unlock
func (*RWMutex) RLock
func (*RWMutex) RUnlock

sync.WaitGroup 可用来等待所有的协程完成,它的功能和 Java 的 CountDownLatch 是一样的

var wg sync.WaitGroup
for i := 0; i < 5; i++ {
  wg.Add(1)
  go func(t int) {
    defer wg.Done() // 或 wg.Add(-1)
    time.Sleep(3 * time.Second)
    fmt.Println("done task: ", t)
wg.Wait()
fmt.Println("exit")

如果没有 wg.Wait() 则主线程会立即退出导致程序的结果,协程都得不到执行。上面代码执行效果如下

done task: 4
done task: 3
done task: 1
done task: 0
done task: 2
exit

sync.Once.Do(f func()) 保证同一个 sync.Once 变量的  Do() 只会执行一次,不其中的函数是否变换了

var once sync.Once
once.Do(func1)           // 只有这行执行才有效
once.Do(func1)
once.Do(func2)

Go 1.9 新增了同步的字典 sync.Map,在 sync/atomic 包还定义了更多的原子级操作,与锁不同的是这里边的原子操作是由底层硬件支持的,原子操作效率相比系统提供 API 实现的锁更高。


About Joyk


Aggregate valuable and interesting links.
Joyk means Joy of geeK