

Monitoring my home's air quality (CO2, PM2.5, Temp/Humidity) with AirGradient's...
source link: https://www.jeffgeerling.com/blog/2021/airgradient-diy-air-quality-monitor-co2-pm25
Go to the source link to view the article. You can view the picture content, updated content and better typesetting reading experience. If the link is broken, please click the button below to view the snapshot at that time.

Monitoring my home's air quality (CO2, PM2.5, Temp/Humidity) with AirGradient's DIY sensor
September 8, 2021
A few months ago, I found this Hacker News post about the AirGradient DIY Air Quality Monitor. I had already been considering buying an AirThings Wave Plus sensor to monitor my home's CO2 levels, but the high price and limited 'ownership' of the data coming from it turned me off.
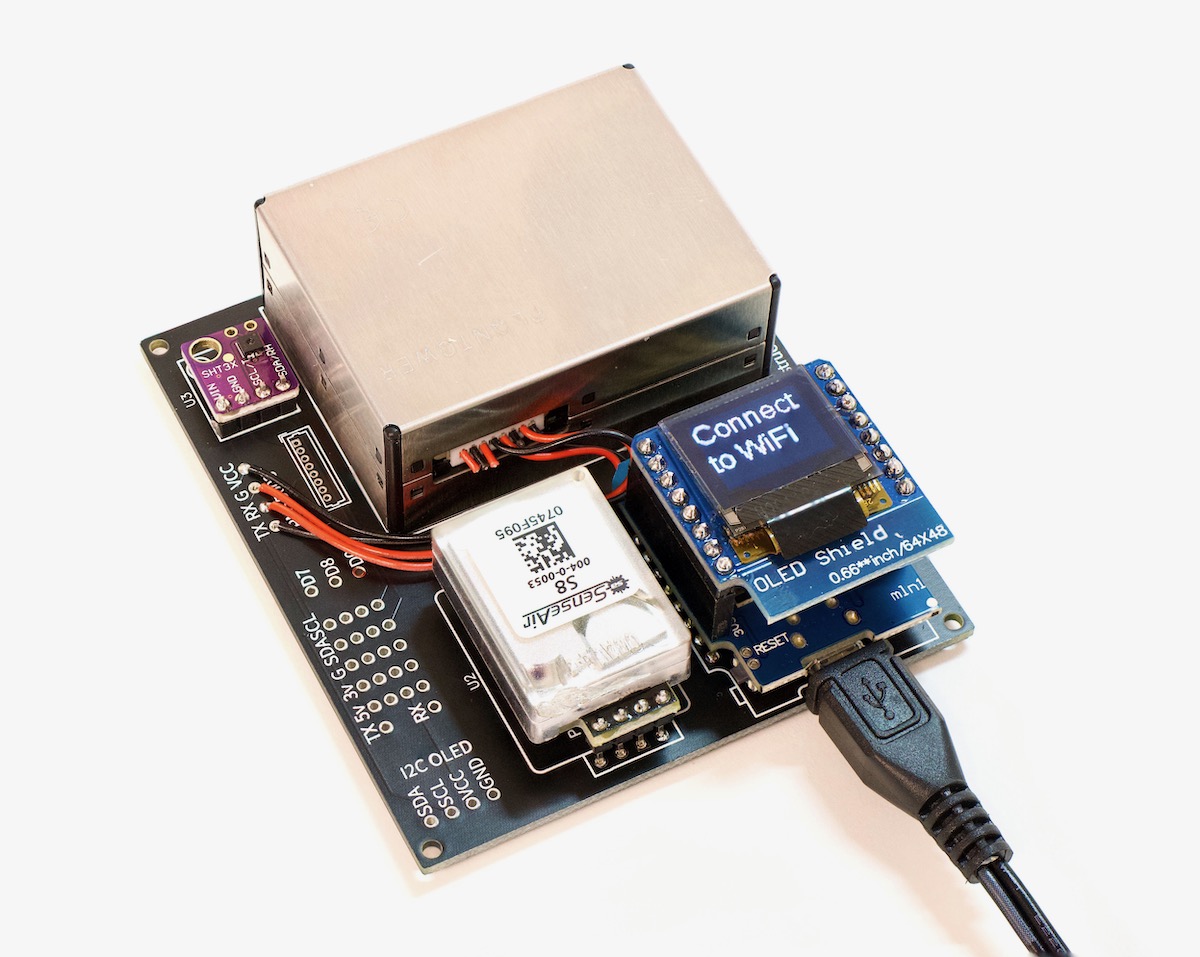
So I built two AirGradient DIY air quality monitor boards (see above), and integrated them into my Prometheus + Grafana home monitoring setup I've been using to monitor other things in my house:
I emailed Achim, the founder of AirGradient, and took him up on his offer for free PCBs if I paid the shipping cost. A couple weeks later I received two fresh PCBs from Thailand. If you don't want to wait for the shipping, or want to make a bunch of sensor boards, you can also download the Gerber files from the AirGradient DIY page and have your own PCBs made.
Parts and Cost
As suggested on the DIY sensor page, I ordered all the components through AliExpress. The prices there were often half what they were from any US supplier, though shipping was a different matter—even though shipping direct from China was a pittance (free, in fact, for most of the components), it took at least a month for all the various components I ordered to arrive.
With most US suppliers, I could get 2-3 day shipping; but, for one example of the price difference: the same SenseAir S8 that cost $30 from AliExpress costs $60 from a US distributor!
Here's the list of all the prices I paid, to get an idea of the total cost (all prices in USD):
Note that when I went to order the Plantower sensor, it was out of stock, so I picked one up from Amazon instead (DEVMO PMS5003 PM2.5 particle sensor) for $35. Steep price difference, but hey, at least I got it!
All-in, the components for this project cost between $60-80, depending on where you get your parts.
Assembly and Soldering
AirGradient's DIY assembly guide is already pretty solid, but if you want even more detail, watch my video on the DIY air quality monitor, where I show each step of the assembly:
The hardest part is the stripping and soldering of the tiny stranded wires that come with the PM2.5 sensor, but I made short work of it with a little Adjustable Wrench Stripper that's designed for stripping smaller-gauge wires.
3D Printed Case
AirGradient also offers a 3D-printable case and wall mount bracket, which seem to fit together well (if not a bit tight) and hold the board in the best orientation for the various sensors to work well.
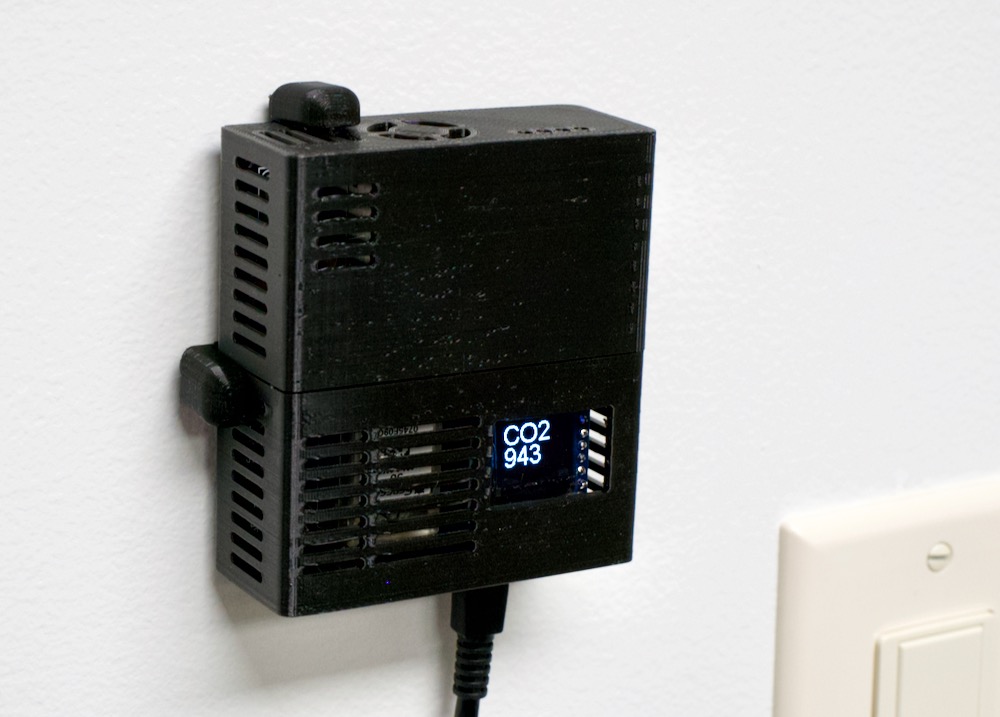
The case is well-ventilated, and my only complaint is the natural convection causes very-slightly-warmed air from the WeMos D1 and CO2 sensor to pass over the temperature and humidity sensor on the top, meaning those readings are always a bit higher than ambient—at least in my office.
Flashing the firmware / AirGradient software
With the hardware put together, I followed the guide for setting up the software on the WeMos D1 Mini. The guide was decent, but I figured I'd go through every step in detail here, especially since I changed a few things to make it easier for me to get air quality data on my local Prometheus instance instead of on AirGradient's servers.
First, the easiest way to flash an ESP8266 is to Install Arduino IDE. On my Mac, since I use Homebrew, it was a simple matter of:
brew install --cask arduino
Then you have to configure Arduino IDE so it can manage an ESP8266 board like the WeMos D1 Mini:
- Open Arduino IDE
- Open the Preferences window
- Add
http://arduino.esp8266.com/stable/package_esp8266com_index.jsonto "Additional Boards Manager URL". - Open "Boards Manager..." from Tools > Board menu.
- Search for the "esp8266" board and install it's latest version.
- Select "LOLIN(WEMOS) D1 R2 Mini" from the Tools > Board > ESP8266 menu.
Optionally, you can test your setup by uploading the Blink sketch:
- Open File > Examples > 01.Basics > Blink.
- Make sure "LOLIN(WEMOS) D1 R2 Mini" is selected in the Tools > Board menu.
- Go to Tools > Port and select the USB serial port where the ESP8266 is plugged in (in my case, "/dev/cu.usbserial-210")
- Click the 'Upload' button (right arrow) to upload the sketch to the board.
After a minute or so, the blue onboard LED (which is under the OLED shield) should start blinking continuously.
Now it's time to flash the AirGradient software to the WeMos D1 Mini:
- Go to Tools > Manage Libraries...
- Search for "AirGradient", and install the latest version.
- Choose "C02_PM_SHT_OLED_WIFI" from the File > Examples > AirGradient Air Quality Sensor menu.
Install the libraries suggested at the top of the file via Tools > Manage Libraries...
- WifiManager by tablatronix
- ESP8266 and ESP32 OLED driver for SSD1306 by ThingPulse
- Optionally enable WiFi at this point by setting the
connectWIFIvariable totrue. - Upload the sketch to the ESP8266.
- After a minute or so, the OLED display should read "Init", then after a delay it will start printing PM2.5, CO2, and Temperature/Humidity numbers, in sequence.
I actually forked the C02_PM_SHT_OLED_WIFI example and maintain my own copy, which points the board at my local Prometheus instance. You can see my forked copy here: AirGradient-DIY.ino.
Getting data into Prometheus
If you just set connectWIFI to true, it would send data to AirGradient's servers (defined in the the APIROOT variable). The payload is simple JSON, so I wrote a script that logs the data from the sensor, and another script running at a /metrics endpoint, which returns the latest data when Prometheus requests it.
Those PHP scripts, along with a README file that explains how to run them in a tiny Docker container, are available in my open source AirGradient Prometheus Exporter project on GitHub.
To get the AirGradient board to send its data to my Internet Pi—where I chose to run the AirGradient exporter—I changed the APIROOT in the Arduino sketch to http://geerli.net:9926/.
I actually have two air quality sensors running now—I set the first one to port
9925, and the second to port9926, and my Internet Pi has two Docker containers running the individual exporter for each port.
I flashed the device using Arduino IDE, then when it showed 'Connect to WiFi' on the screen, I connected directly to the device's 'AIRGRADIENT' WiFi hotspot, then my Mac popped up the connection screen, and I added the credential to connect it to an 802.11 b/g/n access point on my network.
After a few seconds, it connected, then every 9 seconds or so, the sensor POSTS something like the following data to the Raspberry Pi:
10.0.100.74 - - [06/Jul/2021 12:54:59] "POST /sensors/airgradient:1995c6/measures HTTP/1.1" 200 -
INFO:root:POST request,
Path: /sensors/airgradient:1995c6/measures
Headers:
Host: geerli.net:3939
User-Agent: ESP8266HTTPClient
Accept-Encoding: identity;q=1,chunked;q=0.1,*;q=0
Connection: keep-alive
content-type: application/json
Content-Length: 56

Body:
{"wifi":-51,"pm02":5,"rco2":1605,"atmp":32.60,"rhum":37}
The script running in the Prometheus Exporter then stored the data in a file, and when Prometheus calls the /metrics endpoint on the same port, the metrics are transformed into a format Prometheus can understand.
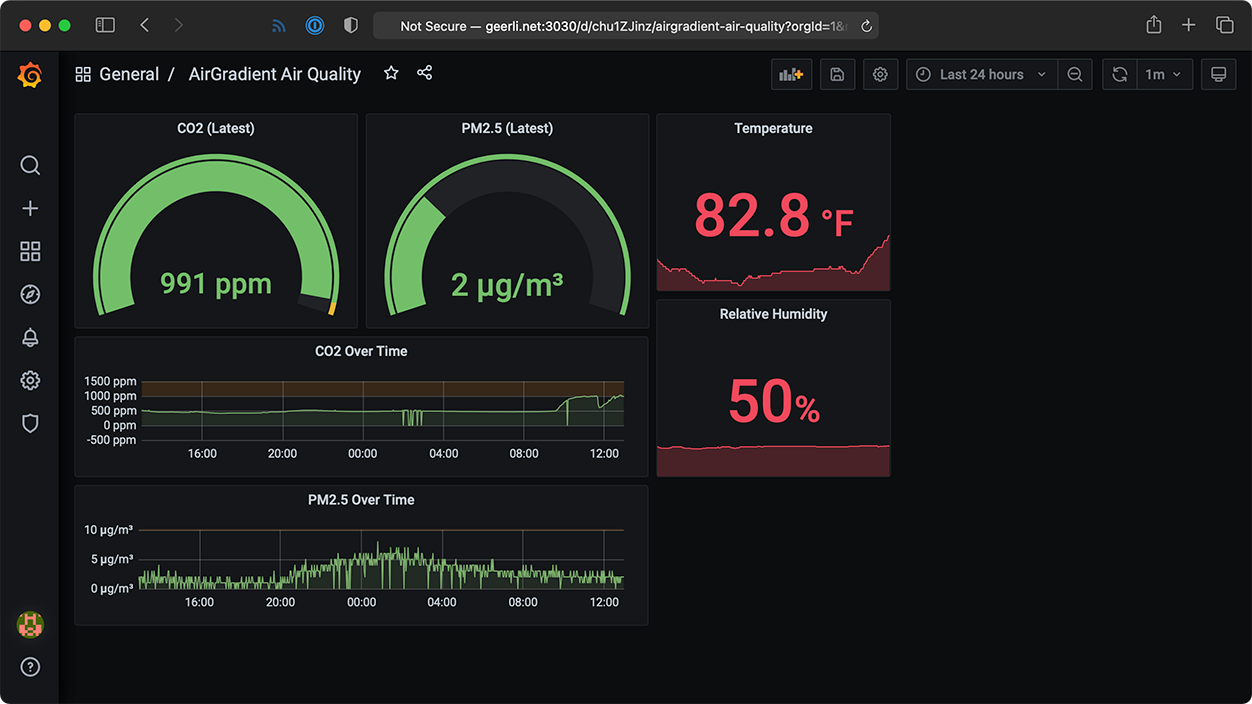
Finally, once I had all that data, I built dashboards in Grafana to display the air quality sensor data over time—one for the board in my basement office, and one for the board upstairs in the main part of my house:
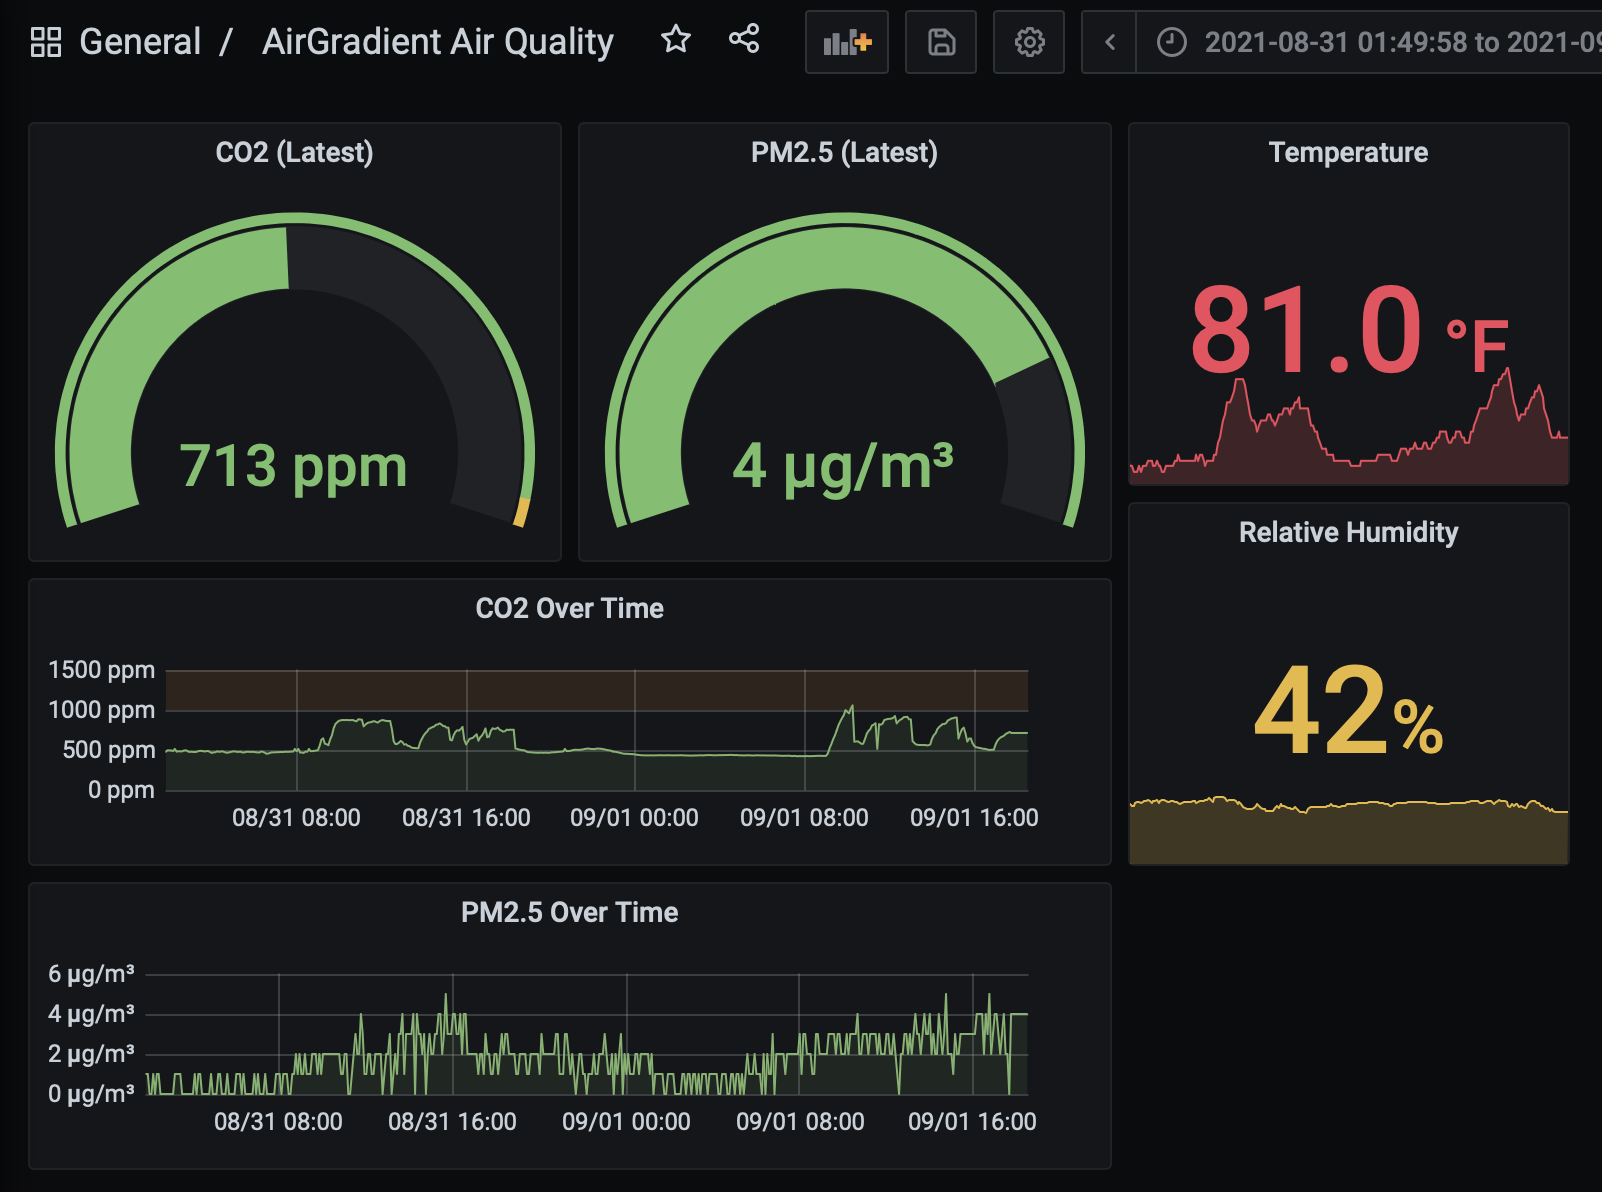
It's easy enough to identify when I was in the office if you look at the CO2 graph above—and I can imagine if there were more people crammed into that 12 sq ft space, it would spike even higher!
The levels top out around 900 ppm when I have my air vent open in the office, but I've observed them going beyond 3000 ppm when I closed the vent and was in the office for more than a couple hours at a time. So... moral of that story is to make sure you have some fresh air circulation!
Conclusion
The sensor package and board layout aren't perfect; the temperature and humidity sensor, in particular, is always a few degrees (F) higher than other known-working thermometers display. And the SenseAir S8 takes a couple weeks before its self-calibration routine finishes—until that's done, CO2 levels will likely show as being at least 200 ppm higher than they actually are.
But after a few weeks, and after adding in a manual temperature adjustment to compensate for that sensor's inaccuracy, the AirGradient has been a very stable and helpful addition to my home environment monitoring.
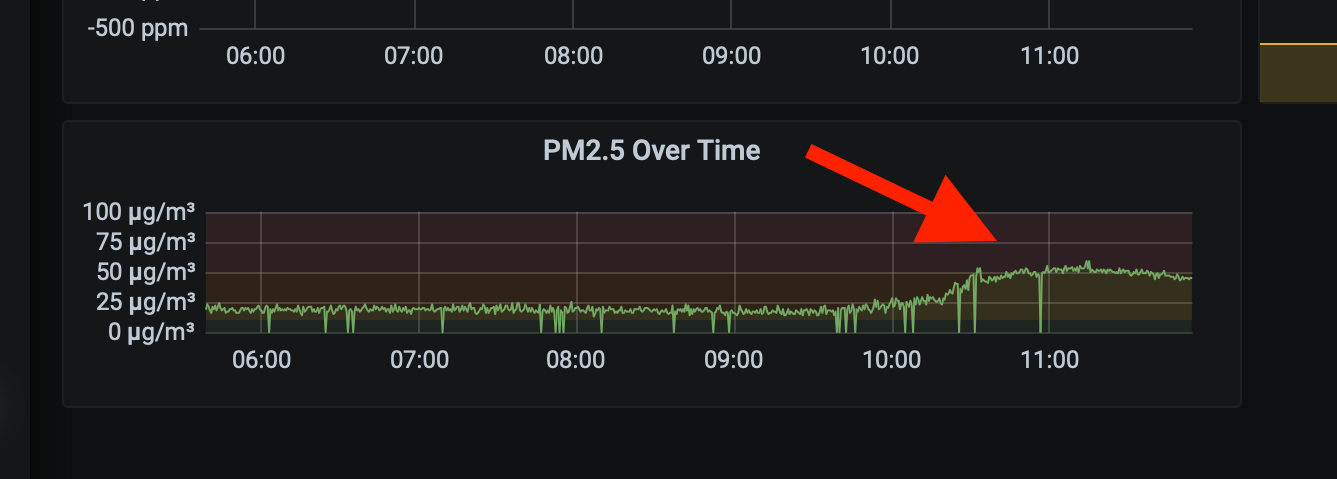
In fact, after having my basement windows replaced, the PM2.5 sensor indicated particulates were above 50 μg/m³, which is an actionable level—if I hadn't opened a window with a fan circulating extra outside air, that level would've remained high for many hours, exposing my family to whatever tiny bits of dust and chemicals lingered in the air.
If you want even more detail about the build process, check out my YouTube video on the AirGradient DIY Air Quality sensor.
Recommend
About Joyk
Aggregate valuable and interesting links.
Joyk means Joy of geeK