

Repository Pattern in ASP.NET Core with Adapter Pattern for Easy Maintenance &am...
source link: https://procodeguide.com/programming/repository-pattern-in-aspnet-core/
Go to the source link to view the article. You can view the picture content, updated content and better typesetting reading experience. If the link is broken, please click the button below to view the snapshot at that time.

In this article, we will learn about Repository Pattern in ASP.NET Core along with Unit of Work Pattern & also learn about why & how to combine Repository Pattern with Adapter Pattern for better implementation & testability of data access layer.
We will also see whether we really need a Repository Pattern in today’s modern application which makes use of ORM that is entity framework core for the data access layer.
Introduction to Repository Pattern
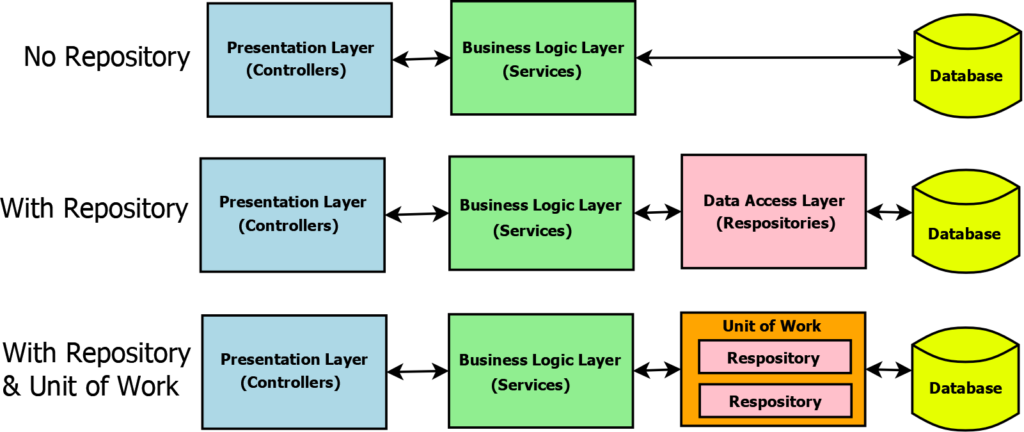
A repository pattern is a design pattern that provides guidance for the implementation of classes called Repositories that holds data access logic. Martin Fowler defines a repository as below
A Repository mediates between the domain and data mapping layers, acting like an in-memory domain object collection.
Repository classes hide all the implementation details of how data is saved or retrieved from the storage source. The repository is an abstraction that even hides the details like where the data is being stored i.e. to a database, file, web service, cloud, etc. The repository encapsulates the CRUD operations for an object so that the business logic classes are not aware of the data access logic and there is a loose coupling between the two.
The repository should implement all the data access logic required by the application i.e. save data, modify, delete, search, view, etc. Repositories can be generic or specific to an object or hybrid depending on the requirements of your application.
Repositories can have their own implementation for data access logic depending on the datastore being used. It can have ORM logic with Entity Framework Core or Dapper, or plain ADO.NET for data access, or file operations logic if data is being stored in files, or logic to send and receive data over Web Service, etc.
Benefits of Repository Pattern
There are a number of benefits of using Repository Pattern as listed below
- A separate respository class for an object can be used from multiple places or even from multiple application if repositories are implemented in a seprate dedicated library. This helps in reducing the duplicate code for queries and data access logic that will be required for data access operations.
- Separte respository layer encapsulates the data access logic so there is no need for business layer to know the details about data access logic. So there is loose coupling between repositories and business logic as both layers can change independent of each other.
- To change datastore at any time in the lifetine of the application maintenance will require change in repositories only.
Repository Pattern – Required or Not?
Any pattern which is applied to the application has Prod & Cons which depends on many aspects of the application being developed. All the aspects like size of applications, nature of data access logic, programming language being used, developer skills, time to market, etc should be considered before deciding whether to use that pattern or not. The same goes with Repository Pattern as well.
If you are working on a very small application that does not have much code or functionality & also if that application will not undergo many changes post-deployment then in that case to keep the code simple you can avoid repositories. You can also directly use DbContext class in the controller or service If you do not want to implement a repository.
Please leave this field empty
Newsletter Subscription
Stay updated! Instantly get notified about my new articles in your mailbox by subscribing via email
But in the case of large & complex applications, you get several benefits by implementing repositories in the application. The repository pattern encapsulates the data access layer logic so it is decoupled from the application and domain layers. Custom repositories add a layer of abstraction that can be mocked easily for unit testing of the components.
Repository & Unit of Work Pattern
Repositories are data access logic implemented for a data entity i.e. for a table in a database. Repository operations normally include CRUD operations and any other special operations for that data entity. The application layer consumes API exposed by the repository to perform database access through the repository.
Now often there is a requirement on the application layer side that database operation for two or more data entities (i.e. tables in a database) should be performed in a single transaction. The single transaction implies that if an operation on any one data entity fails then other operations in that transaction should not happen or should be rolled back if they have been already executed.
Unit of Work Pattern provides this implementation of the Single Transaction feature. Unit of Work will help to combine multiple operations from two or more repositories into a single business transaction. Unit of work pattern will ensure that all CRUD operations within one single transaction are successful and committed only once. If one operation also fails then the entire transaction will be rolled back.
If you are using entity framework core then it already serves as a unit of work. Therefore for entity framework core, there is no need to implement anything for a unit of work pattern. The only thing to ensure is that The DbContext object (exposed as an IUnitOfWork object) should be shared among multiple repositories within the same HTTP request scope.
For further reading, you can refer here
Implement Repository Pattern in ASP.NET Core with Adapter Pattern & Unit of Work
Here is a short & quick video on the implementation of Repository Pattern in ASP.NET Core with Unit of Work
Overall Approach
This will be a lengthy implementation so let’s first take a look at the overall approach so that we understand what code we will be adding for our implementation of repository pattern in ASP.NET Core with adapter pattern.
- For demo purpose we will create Web API which allows client to perform CRUD operations for Students Model their Address and preferred Sport. To implement CRUD operations we will make use of EF Core with Repository Pattern along with Adapter Pattern
- Create the required ASP.NET Core Project – 3 projects for API logic, Data access logic & Shared logic between the Api & Data Access
- Add Models & Database Entities for Students, Address & Sport – Yes we will separate the model for API from the Database Entities with Code first approach
- Add Database Context and EF Core Migrartions to Data Access Project
- Add Repositories to Data Access Project
- Add Unit of Work Service for repositories
- Add Adapter for Student to convert between Model & Database Entity i.e. between Student Model & Student Entity so that we are able to take input using Student Model and then convert to Database Entity for the repsoitory class to perform database operations.
- Add Services layer for Student to be used in Controller
- Add Student Controller in Api project allowing users to add & revtrieve data for Students
- Understand advantages of Adapter Pattern with Repository Pattern.
Let start with creating required projects for demonstration of repository pattern in ASP.NET Core with Entity Framework Core & Adapter Pattern
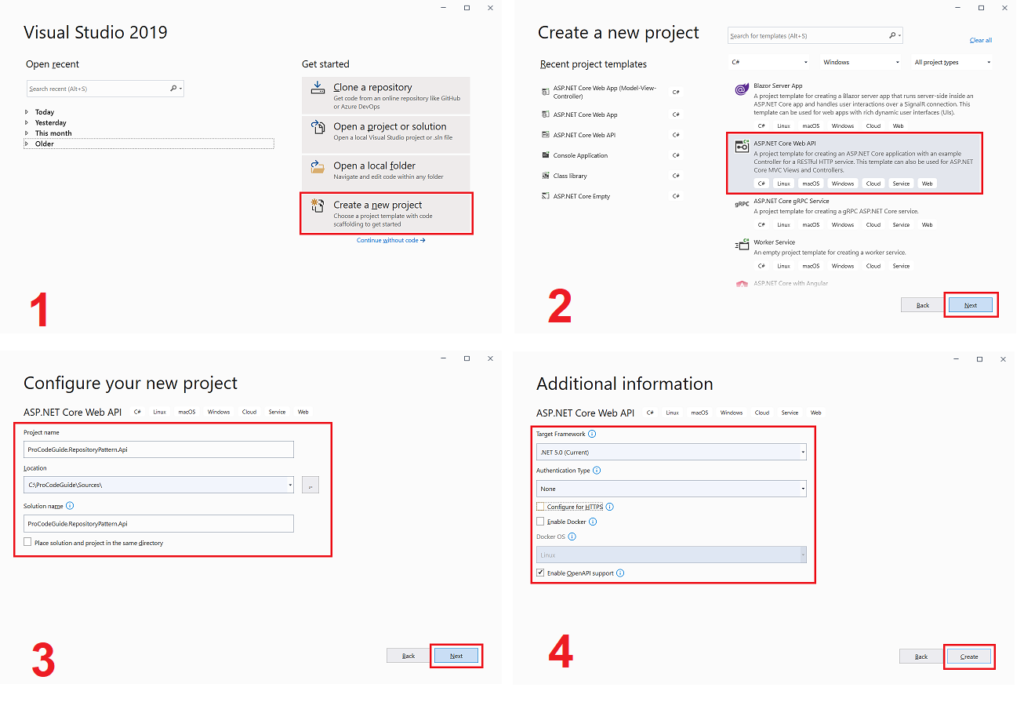
I will be using Visual Studio 2019 Community Edition & .NET Core 5 SDK for all the sample source codes created as part of this article.
Create ASP.NET Core Web API & Data Access Projects
We will be creating the following 3 projects & adding references to the required project for demonstration of repository pattern in ASP.NET Core
- Create ASP.NET Core Web API project to allow users to consume this API to perform CRUD operations for Studentswith address and their preferred sport.
- Create .NET Core Library for Data Access project (DAL) that will hold Repositories and Entity Framework Core Migrations to interact with SQL Server Database with Code First Approach
- Create .NET Core Library for Shared Project that will hold database entities and repository interface that will be used by both API and Data Access project. This project is to hold common code between API & Data Access project
- Add reference for Shared Project to both API & DAL Projects.
- Add reference of DAL project to API project.
Create & name the projects with types, names, and options as shown in the below screens
Project 1 – Create a new project of type ASP.NET Core Web API with the name as ProCodeGuide.RepositoryPattern.API
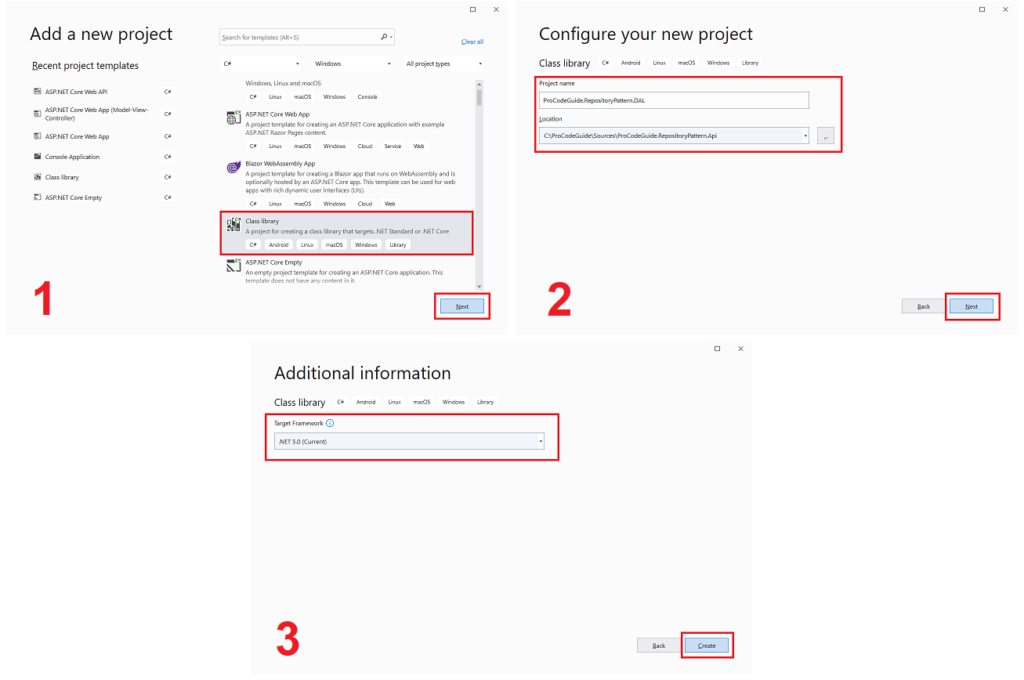
Project 2 – Add a new project to the solution of type .NET Core Class Library with the name as ProCodeGuide.RepositoryPattern.DAL
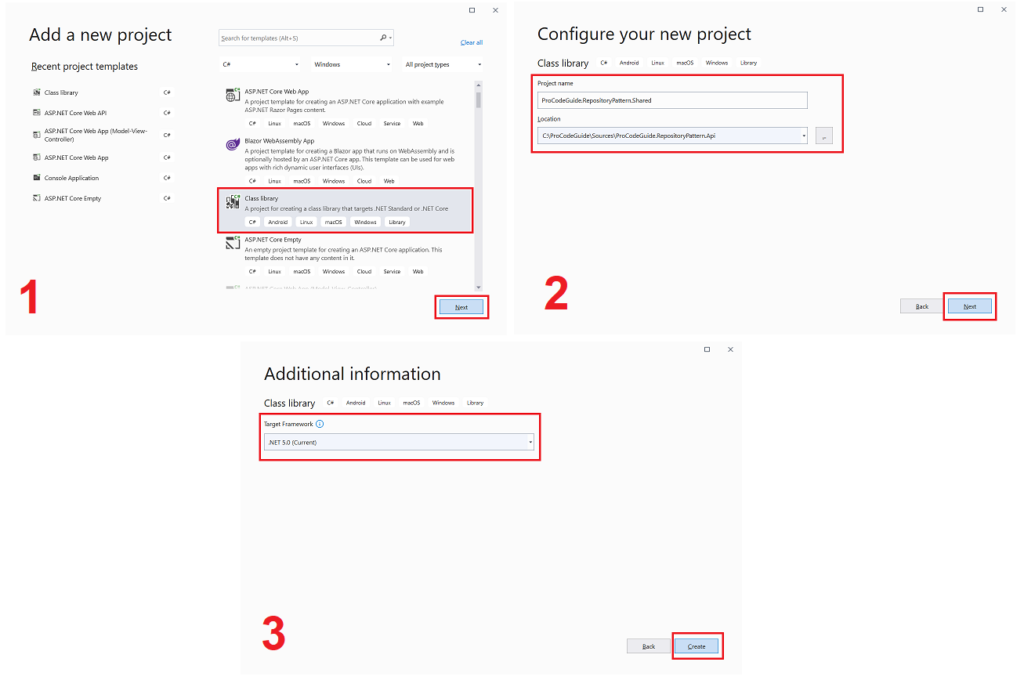
Project 3 – Add a new project to the solution of type .NET Core Class Library with the name as ProCodeGuide.RepositoryPattern.Shared
Add Models & Database Entities
We will add a model for the personal data of Students with their Addresses & preferred Sport in the API project that will be used in Controller for adding a student to the database to demonstrate repository pattern in ASP.NET Core. Add Model for Student in Models\Student.cs
public class Student
{
    public string StudentCode { get; set; }
    public string Name { get; set; }
    public int Age { get; set; }
    public string Address { get; set; }
    public string City { get; set; }
    public string State { get; set; }
    public string PinCode { get; set; }
    public string Country { get; set; }
    public int Grade { get; set; }
    public string PreferredSport { get; set; }
}
Above student data will be stored in multiple tables like Student, StudentAddress & StudentSport so we will add 3 database entities. We will add these Database entities to the Shared project. Add DbEntities\StudentEntity.cs as shown below
public class StudentEntity
{
    public int Id { get; set; }
    public string StudentCode { get; set; }
    public string Name { get; set; }
    public int Age { get; set; }
    public int Grade { get; set; }
    public DateTime CreatedOn { get; set; }
    public DateTime LastModifiedOn { get; set; }
    public string LastModifiedBy { get; set; }
    public bool IsDeleted { get; set; }
}
Add DbEntities\StudentAddressEntity.cs as shown below
public class StudentAddressEntity
{
    public int Id { get; set; }
    public string StudentCode { get; set; }
    public string Address { get; set; }
    public string City { get; set; }
    public string State { get; set; }
    public string PinCode { get; set; }
    public string Country { get; set; }
    public bool IsPrimary { get; set; }
    public bool IsDeleted { get; set; }
}
Add DbEntities\StudentSportEntity.cs as shown below
public class StudentSportEntity
{
    public int Id { get; set; }
    public string StudentCode { get; set; }
    public string Sport { get; set; }
    public bool IsDeleted { get; set; }
}
Configure Entity Framework Core
Let’s install & configure Entity Framework Core to implement CRUD operations for Student Class to demonstrate repository pattern in ASP.NET Core.
Install required packages
We need to install the required entity framework packages. You can run the below-mentioned commands in Package Manager or install required Nuget packages from Nuget Package Manager.
Add below mentioned Nuget packages to DAL Project
Install-Package Microsoft.EntityFrameworkCore
Install-Package Microsoft.EntityFrameworkCore.SqlServer
Add below mentioned Nuget package to API Project
Install-Package Microsoft.EntityFrameworkCore.Tools
Add DbContext Classes
This is the main class that coordinates Entity Framework functionality for a given Database Entities class. You need to derive the class from the entity framework DbContext class and specify the entities included in the data model. This class creates a DbSet property for the Students entity set.
An entity set typically represents a database table and an entity represents a row in the table. The database table will have the same name as the DbSet property name.
Add DbContexts\ApplicationDbContext.cs to the DAL Project as shown below
public class ApplicationDbContext : DbContext
{
    public ApplicationDbContext(DbContextOptions<ApplicationDbContext> options)
        : base(options)
    {
    }

    public DbSet<StudentEntity> Students { get; set; }
    public DbSet<StudentSportEntity> StudentSport { get; set; }
    public DbSet<StudentAddressEntity> StudentAddress { get; set; }
}
Connect Application to the Database
Specify the SQL Server connection string in the appsettings.json file. We are using a local database (localdb) which is a lightweight version of the SQL Server Express database engine. Add below entry to appsetting.json in API project
"ConnectionStrings": {
  "DefaultConnection": "Server=(localdb)\\mssqllocaldb;Database=ProCodeGuide.Repository.API;Trusted_Connection=True;MultipleActiveResultSets=true"
}
Register Database Context in Dependency Injection Container in Startup class
You need to configure the database context as a service in the ConfigureServices method in the startup.cs file (in API Project) so that you can inject this DbContext service, using dependency injection, in the controller, or in any other service classes through the constructor parameter. Project Reference to the DAL project is required to access DbContext from the WebAPI project.
services.AddDbContext<ApplicationDbContext>(options =>
        options.UseSqlServer(
        Configuration.GetConnectionString("DefaultConnection"),
        ef => ef.MigrationsAssembly(typeof(ApplicationDbContext).Assembly.FullName)),
        ServiceLifetime.Scoped);
The DbContext instantiation mode should not be configured as ServiceLifetime.Transient or ServiceLifetime.Singleton.
Add Migrations
To automate the migrations from the entity framework class we need to run the command add-migration command and to create a database from the migrations created we need to run the command update-database in the package manager console.
Run below-mentioned commands in package manager console with default project as DAL project i.e. ProCodeGuide.RepositoryPattern.DAL
add-migration FirstMigration
update-database
This will create the database as per the connection string configured in the appsetting.json file and also create tables in the database as per DbSet objects in DbContext
For complete details on Implementing Entity Framework Core in ASP.NET Core you can read my other article on the same here
So far we have covered how to add model & configure entity framework core to demonstrate repository pattern in ASP.NET Core. Next, we will see how to create repositories for Student tables.
Create Repositories for Student
We will add repositories for Student, StudentAddress & StudenSport database entities, and also we will first add a generic repository so that instead of adding duplicate code to all 3 repositories this generic repository will hold common code for repositories in general to access data.
Then we will add our Student specific repositories and derive these repositories from this generic repository so that we get all the common data access operations in our student-specific repositories and then if there is a need we will add special required operations to these student-specific repositories.
Now please note that we will add Interfaces for repositories (generic & student-specific) in the Shared project so that we are able to access it from API & DAL project. We will implement these repositories i.e. we will add actual repositories classes implementing these interfaces in the DAL project as repositories will hold database-specific logic.
Add below interface in Interfaces\IGenericRepository.cs to the Shared project
public interface IGenericRepository<T> where T : class
{
    void Add(T entity);
    T GetById(int id);
    void Remove(T entity);
    IEnumerable<T> GetAll();
    int Complete();
}
The above interface is a generic interface with T as a specific class that can be used with specific repositories. This generic interface hold common data access operations like
- Add record to the Table (Add)
- Get record from Table by Primary Key Id (GetById)
- Delete specific record from the table (remove)
- Get all records from the table (GetAll)
- Save all changes to database (Complete)
These are the most common operations which will be required by almost all the specific repositories for respective Database Entities so by implementing a generic repository there won’t be a need to duplicate the code for common operations in each specific repository.
We will add the implementation class for Generic Repository that will implement the interface for the generic repository. Add generic repository Repositories\GenericRepository.cs to the DAL project as shown below
public class GenericRepository<T> : IGenericRepository<T> where T : class
{
    protected readonly ApplicationDbContext _dbcontext;
    public GenericRepository(ApplicationDbContext dbcontext)
    {
        _dbcontext = dbcontext;
    }

    public void Add(T entity)
    {
        _dbcontext.Set<T>().Add(entity);
    }

    public T GetById(int id)
    {
        return _dbcontext.Set<T>().Find(id);
    }

    public void Remove(T entity)
    {
        _dbcontext.Set<T>().Remove(entity);
    }

    public IEnumerable<T> GetAll()
    {
        return _dbcontext.Set<T>().ToList();
    }

    public int Complete()
    {
        return _dbcontext.SaveChanges();
    }
}
This repository class implements the IGenericRepsoitory interface and we inject DbContext to this repository to implement database operations. By adding repository we are restricting the use of DbContext to repository class and restricting all the actions related to DbContext in repository classes.
Now let’s add repositories specific to our Database Entities i.e. Student, StudentAddress & Student Sport.
Let’s add the repository for Student Database Entity. This Student Repository interface will be derived from the Generic Repository interface. This way we are inheriting all the basic operations for the student repository from the generic repository
Add Interfaces\IStudentRepository.cs to the Shared project as shown below
public interface IStudentRepository : IGenericRepository<StudentEntity>
{
    StudentEntity GetByStudentCode(string studentCode);
}
Let’s implement the IStudentRepostory. Add a class Repositories\StudentRepository.cs to the DAL project for implementation of Student Repository
public class StudentRepository : GenericRepository<StudentEntity>, IStudentRepository
{
    public StudentRepository(ApplicationDbContext dbContext) : base(dbContext)
    {

    }

    public StudentEntity GetByStudentCode(string studentCode)
    {
        return _dbcontext.Students.Where(student => student.StudentCode.Equals(studentCode)).FirstOrDefault();
    }
}
As seen above there is no need to explicitly implement the common data access operations that are part of the generic repository as those will be implicitly available through inheritance.
In the same way, let’s implement repositories for StudentAddress & StudentSport also.
Add Interfaces\IStudentAddressRepository.cs to the Shared project as shown below
public interface IStudentAddressRepository : IGenericRepository<StudentAddressEntity>
{
    StudentAddressEntity GetByStudentCode(string studentCode);
}
Add a class Repositories\StudentAddressRepository.cs to the DAL project for implementation of StudentAddress Repository
public class StudentAddressRepository : GenericRepository<StudentAddressEntity>, IStudentAddressRepository
{
    public StudentAddressRepository(ApplicationDbContext dbContext) : base(dbContext)
    {

    }

    public StudentAddressEntity GetByStudentCode(string studentCode)
    {
        return _dbcontext.StudentAddress.Where(address => address.StudentCode.Equals(studentCode)).FirstOrDefault(); ;
    }
}
Add Interfaces\IStudentSportRepository.cs to the Shared project as shown below
public interface IStudentSportRepository : IGenericRepository<StudentSportEntity>
{
    StudentSportEntity GetByStudentCode(string studentCode);
}
Add a class Repositories\StudentSportRepository.cs to the DAL project for implementation of StudentSport Repository
public class StudentSportRepository : GenericRepository<StudentSportEntity>, IStudentSportRepository
{
    public StudentSportRepository(ApplicationDbContext dbContext) : base(dbContext)
    {

    }

    public StudentSportEntity GetByStudentCode(string studentCode)
    {
        return _dbcontext.StudentSport.Where(sport => sport.StudentCode.Equals(studentCode)).FirstOrDefault(); ;
    }
}
Now that we have added all the required repositories classes let’s register these repositories in the ConfigureServices method in the startup.cs file (in API Project) so that you can inject these Repositories, using dependency injection, in the controller, or in any other service classes through the constructor parameter. Project Reference to the DAL & Shared project is required to access Repositories (in DAL Project) and their interfaces from the Shared project.
services.AddTransient<IStudentRepository, StudentRepository>();
services.AddTransient<IStudentAddressRepository, StudentAddressRepository>();
services.AddTransient<IStudentSportRepository, StudentSportRepository>();
We saw how to create repositories as part of the demonstration of repository pattern in ASP.NET Core. Next, we need logic to convert between domain model and database entities for which we will make use of adapter pattern and add adapters for the same.
Add Adapter Classes
Now that you have already noticed that for API input we have added Student Model but for the database, we have created Database Entities and used the same in our repository classes. So there will be a need to convert objects between model & data entities.
We will make use of an adapter pattern to convert between these objects as an Adapter Pattern is a structural design pattern that allows objects with incompatible interfaces to collaborate.
Let’s add the below interface for the Student Adapter class. This will be used for conversion of Student Model to Student Database Entities and vice-versa.
Add interface Adapter\IStudentAdapter.cs to the API project as shown below
public interface IStudentAdapter
{
    StudentEntity Adapt(Student student);
    StudentAddressEntity AdaptToStudentAddress(Student student);
    StudentSportEntity AdaptToStudentSport(Student student);
    Student Adapt(StudentEntity studentEntity, StudentAddressEntity studentAddressEntity, StudentSportEntity studentSportEntity);
}
The above interface holds the following operations
- Convert from Student Model to Student Entity
- Convert from Student Model to Student Address Entity
- Convert from Srudent Model to Studen Sport Entity
- Convert and combine from Student Entity, Student Address & Student Sport to Student Model
Let’s add the actual implementation for the Student Adapter class. Add class Adapter\StudentAdapter.cs to the API project as shown below
public class StudentAdapter : IStudentAdapter
{
    public StudentEntity Adapt(Student student)
    {
        return new StudentEntity()
        {
            StudentCode = student.StudentCode,
            Name = student.Name,
            Grade = student.Grade,
            Age = student.Age,
            CreatedOn = DateTime.Now,
            IsDeleted = false,
            LastModifiedOn = DateTime.Now,
            LastModifiedBy = "User 1"
        };
    }

    public StudentSportEntity AdaptToStudentSport(Student student)
    {
        return new StudentSportEntity()
        {
            StudentCode = student.StudentCode,
            Sport = student.PreferredSport,
            IsDeleted = false
        };
    }

    public StudentAddressEntity AdaptToStudentAddress(Student student)
    {
        return new StudentAddressEntity()
        {
            Address = student.Address,
            State = student.State,
            City = student.City,
            Country = student.Country,
            PinCode = student.PinCode,
            StudentCode = student.StudentCode,
            IsPrimary = true,
            IsDeleted = false
        };
    }

    public Student Adapt(StudentEntity studentEntity, StudentAddressEntity studentAddressEntity, StudentSportEntity studentSportEntity)
    {
        return new Student()
        {
            StudentCode = studentEntity.StudentCode,
            Name = studentEntity.Name,
            Age = studentEntity.Age,
            Grade = studentEntity.Grade,

            Address = studentAddressEntity.Address,
            City = studentAddressEntity.City,
            Country = studentAddressEntity.Country,
            PinCode = studentAddressEntity.PinCode,
            State = studentAddressEntity.State,

            PreferredSport = studentSportEntity.Sport
        };
    }
}
Now that we have added the required Adapter class let’s register this adapter as a service in the ConfigureServices method in the startup.cs file (in API Project) so that you can inject this StudentAdapter, using dependency injection, in the controller, or in any other service classes through the constructor parameter.
services.AddTransient<IStudentAdapter, StudentAdapter>();
Add Services for Unit of Work & Student
Unit of Work service is based on the Unit of Work Pattern which holds the available repositories and also implements logic to save changes so that we are able to add data to multiple repositories (tables) with a single commit to ensure data integrity.
In our case of demo application Unit of Work, service will hold repository objects for Student, StudentAddress & StudentSport. Here we will add data to all 3 repositories with saving in Unit of Work which ensures that either record is inserted into all 3 tables or no record to added to any table. As if insert in any one tables failed h=then complete save operation is rolled back.
This means that Unit of Work won’t allow situations as we have a data record in Student table but no data record in StudentAddress or Studentsport tables and other way is also true i.e. it won’t happen that there is a data record in StudentAddress or StudentSport tables but no data record in the Student table.
Add interface Services\IUnitOfWorkService.cs to the API project as shown below
public interface IUnitOfWorkService
{
    int Save();
    IStudentRepository Student { get; set; }
    IStudentAddressRepository StudentAddress { get; set; }
    IStudentSportRepository StudentSport { get; set; }
}
Add implementation for Unit of work interface. Add a new class Services\UnitOfWorkService.cs to the API project as shown below
public class UnitOfWorkService : IUnitOfWorkService
{
    private readonly ApplicationDbContext _dbContext;
    public UnitOfWorkService(ApplicationDbContext dbContext, IStudentRepository studentRepository, IStudentSportRepository studentSportRepository, IStudentAddressRepository studentAddressRepository)
    {
        _dbContext = dbContext;
        Student = studentRepository;
        StudentSport = studentSportRepository;
        StudentAddress = studentAddressRepository;
    }

    public IStudentRepository Student { get; set; }
    public IStudentSportRepository StudentSport { get; set; }
    public IStudentAddressRepository StudentAddress { get; set; }

    public int Save()
    {
        return _dbContext.SaveChanges();
    }
}
Let’s add a service for Students that will make use of both the Student Adapter & Unit of Work service to save & retrieve student data. This service will take the Student model as input and by making use of Student Adapter it will convert the Student model into StudentEntity, StudentAddressEntity & StudentSportEntity which are required by repositories. Next, this service will make use of the Unit of Work service to add data to all 3 repositories and save it to the database in a single transaction.
Add a new interface Services\IStudentService.cs to the API project as shown below.
public interface IStudentService
{
    void Add(Student student);
    Student GetByStudentCode(string studentCode);
    IEnumerable<Student> GetAll();
}
Add implementation for the Student Service interface. Add a new class Services\StudentService.cs to the API project as shown below
public class StudentService : IStudentService
{
    private readonly IStudentAdapter _studentAdapter;
    private readonly IUnitOfWorkService _unitOfWorkService;
    public StudentService(IUnitOfWorkService unitOfWorkService, IStudentAdapter studentAdapter)
    {
        _unitOfWorkService = unitOfWorkService;
        _studentAdapter = studentAdapter;
    }

    public void Add(Student student)
    {
        if (Validate(student))
        {
            _unitOfWorkService.Student.Add(_studentAdapter.Adapt(student));
            _unitOfWorkService.StudentSport.Add(_studentAdapter.AdaptToStudentSport(student));
            _unitOfWorkService.StudentAddress.Add(_studentAdapter.AdaptToStudentAddress(student));

            _unitOfWorkService.Save();
        }
    }

    public IEnumerable<Student> GetAll()
    {
        List<Student> listStudent = new List<Student>();
        foreach (StudentEntity studentEntity in _unitOfWorkService.Student.GetAll())
        {
            listStudent.Add(_studentAdapter.Adapt(studentEntity,
                _unitOfWorkService.StudentAddress.GetByStudentCode(studentEntity.StudentCode),
                _unitOfWorkService.StudentSport.GetByStudentCode(studentEntity.StudentCode)));
        }
        return listStudent;
    }

    public Student GetByStudentCode(string studentCode)
    {
        StudentEntity studentEntity = _unitOfWorkService.Student.GetByStudentCode(studentCode);
        return _studentAdapter.Adapt(studentEntity,
            _unitOfWorkService.StudentAddress.GetByStudentCode(studentEntity.StudentCode),
            _unitOfWorkService.StudentSport.GetByStudentCode(studentEntity.StudentCode));
    }

    public void Remove(Student student)
    {
        _unitOfWorkService.Student.Remove(_studentAdapter.Adapt(student));
        _unitOfWorkService.Save();
    }

    public bool Validate(Student student)
    {
        //Validate Students Data
        return true;
    }
}
Now that we have added the required Services Interfaces and classes let’s register these services in the ConfigureServices method in the startup.cs file (in API Project) so that you can inject these Services using dependency injection in the controller or in any other service classes through the constructor parameter.
services.AddTransient<IUnitOfWorkService, UnitOfWorkService>();
services.AddTransient<IStudentService, StudentService>();
Add Student Controller
Finally let’s add the controller that will make use of Student Service and expose action to add a Student, get all Students & get specific Student by Student Code.
Add Controllers\StudentController.cs in the API project as shown below
[Route("api/[controller]")]
[ApiController]
public class StudentController : ControllerBase
{
    private readonly IStudentService _studentService;
    public StudentController(IStudentService studentService)
    {
        _studentService = studentService;
    }

    [HttpGet]
    public IEnumerable<Student> Get()
    {
        return _studentService.GetAll();
    }

    [HttpGet("{studentCode}")]
    public Student GetByStudentCode(string studentCode)
    {
        return _studentService.GetByStudentCode(studentCode);
    }

    [HttpPost]
    [Route("Add")]
    public void Add([FromBody] Student student)
    {
        _studentService.Add(student);
    }
}
Now that we have added repository pattern in ASP.NET Core WebAPI along with adapter pattern let’s run our code and check results
Let’s run and test the code
Please note that while creating the API project we selected an option for Open API support so swagger is available out of the box and we will use this for Testing.
After running your code for Repository Pattern in ASP.NET Core you should see the below screen. We will first test our Add option (highlighted in the below screen) to save student data in the database.
After selecting Add option and then clicking on the Try it out button you should see the below screen where you need to enter data for the Student object in JSON format.
You should get the below screen after entering data on the above screen for the Student object and clicking on Execute button. Here you should be able to see the response on Add operation i.e. whether the transaction was successful or failed. Below we can see the success response from the API
Next, we will verify the GET option for Students that will return all the data records which are present in the database for the Students. Below is the screen with GET option highlighted.
After selecting the GET option and then clicking on the Try it out button you should see the below screen where you can see that there is no need to enter any data as there are no parameters for GET option as it gets all the data records for Student present in the database.
You should get the below screen after clicking on Execute button. Here if the transaction is successful then you should be able to see the response with all the data records from the Student Database.
Benefits of using Adapter Pattern with Repository Pattern
In Real-world applications, life is not that simple that is there are constantly changing requirements, testing complexities, maintenance issues, performance issues, etc.
For easy maintenance & better testability, it is always good to separate concerns i.e. implement the loose coupling between different types & objects using Principles from Solid Principles.
So keeping our domain models & database entities separate we are able to implement loose coupling between models & database schema. So that both can change independently i.e. change in anyone should not enforce change in others.
Also in real-world applications, there is never a direct mapping between the domain models & your database schema. In the database, data is stored into separate tables based on the type & usage of data. So it is always better to keep models and database entities separate.
This requirement of a single model ending into multiple tables in the database adds extra complexities which make it even more important to test the application properly.
Adapter Pattern allows implementing a wrapper between two objects which allows incompatible objects to talk to each other. The adapter pattern allows objects of one type to be transformed to the format recognized by the other object.
Also, adapter improves coverage for unit testing as Unit testing repositories will only provide verifications like either you get the data or storing/fetching of data fails. But unit testing your services along with adapters allows better test the complexity added by a single Model into multiple tables.
In short, usage of the adapters provides the following benefits
- Loose coupling between domain model & database entities
- Domain Model are independent of the database schema
- Change in domain model or database entities can be managed using adapter classes
- Flexibility between domain model & datatbase entities as change in one does not means change in other
Thus we can achieve easy maintenance for domain model & Database entities. Also, it’s possible to implement better unit testing by testing service layers & adapters instead of testing only repositories that either get/save the data or not.
Summary
In this article, we learned about Repository Pattern in ASP.NET Core with Adapter Pattern. We saw how adapters helped us to collaborate between domain models & database entities that allowed us to implement complex logic which is part of real-world applications.
Please provide your suggestions & questions in the comments section below
Download Source Code
Here you can download complete source code developed as part of this article i.e. Repository Pattern in ASP.NET Core with Adapter Pattern
Hope this article helped. Your help is appreciated!
Recommend
About Joyk
Aggregate valuable and interesting links.
Joyk means Joy of geeK