

How to install WordPress using the One-Click Installer
source link: https://help.dreamhost.com/hc/en-us/articles/215525277-How-to-install-WordPress-using-the-One-Click-Installer
Go to the source link to view the article. You can view the picture content, updated content and better typesetting reading experience. If the link is broken, please click the button below to view the snapshot at that time.

How to install WordPress using the One-Click Installer
The following describes how to install WordPress from your DreamHost panel. It also details the extras features you receive if you choose the free Deluxe install.
This article explains how to install a new WordPress site at DreamHost. View the following article if you need to migrate your site to DreamHost instead.
Before installing
To use the One-Click Installer, your domain must first be Fully Hosted.
This means it can't be Redirected, Mirrored, Parked, or set as DNS Only.
Before installing WordPress, check what files are already in your website's directory.
If there are existing WordPress files
If there are any existing WordPress files in it, they will be renamed with a string of numbers at the end. For example:
- index.php.1353108851
View the following article for instructions on how to remove these files.
If there are non-WordPress files in your directory
If there are any non-WordPress files or directories, these will not be touched by the installation. The new WordPress files will be installed alongside your existing files.
Installing WordPress
In the One-Click Installs panel
- To install WordPress at DreamHost, log into your panel, and navigate to the One-Click Installs page.

- Click Learn More & Install.
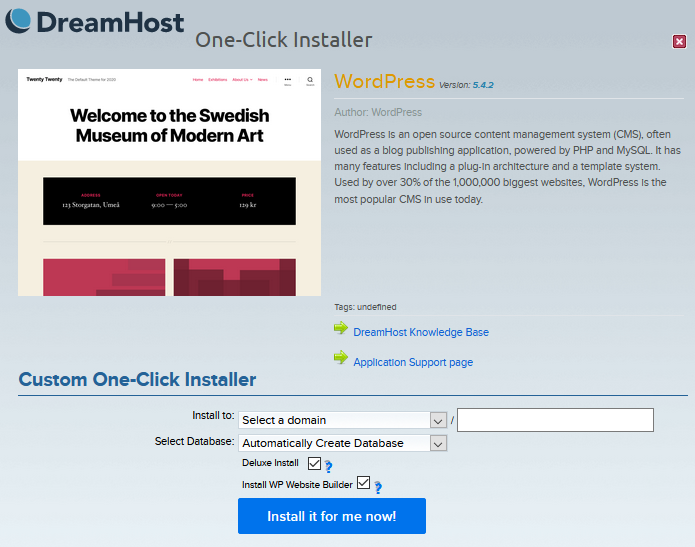
- Enter the following:
- Install to: Select the domain you'd like to install into. The second textbox is if you want to install into a subdirectory (if you do not want it stored in the primary directory). For example, if you want it installed into example.com/blog first select example.com in the first dropdown menu. In the second textbox type in blog.
- Select Database: You probably want 'Automatically Create Database' since this creates a new unique database for your site. You can also choose an existing database if you like.
- Deluxe Install: It's recommended you check this box if you would like the extra features mentioned below. This is a free addition to your install.
- Install WP Website Builder: This adds the WP Website Builder tool to your dashboard to help you build your site.
- Click the Install it for me now! button. Within 15 minutes, an email is sent to you at the primary email listed on your DreamHost account. This email details further steps to take to complete the installation.
In the Websites panel
- Log into your panel and go to the Manage Websites page.
- Find your website and press the Manage button.

- Scroll down to the WordPress section and select the blue Install button.

- Confirm the installation by pressing the Install WordPress button. Within 15 minutes, an email is sent to you at the primary email listed on your DreamHost account. This email details further steps to take to complete the installation.
How to log into your WordPress site
After you've installed WordPress, you'll receive an email to the primary email address on your DreamHost account. This email lists further steps to take to complete the installation.
When WordPress is finally running on your site, you can log into it at:
- example.com/wp-login.php
The Deluxe Install
The free Deluxe Install features several important customizations to make it easy for beginners to get started, including free and open source themes from Automattic, a standard selection of plugins, and a security enhancement.
Themes
Deluxe Installs include the following selection of free and open source themes from Automattic:
- astra
- blocksy
- hello-elementor
- hestia
- oceanwp
- twentyfifteen (also present in regular installs)
- twentyseventeen (also present in regular installs)
- twentysixteen (also present in regular installs)
- ultra
Plugins
DreamHost's One-Click Install also includes the following popular plugins:
- Akismet (also present in regular installs) — Checks your comments and contact form submissions against Askimet's global database of spam to prevent your site from publishing malicious content.
- All in One SEO (AIOSEO) — Properly sets up WordPress SEO, so your websites can rank higher in search engines and uncover new growth opportunities in less than 10 minutes.
- Hello Dolly — When activated you will randomly see a lyric from Hello, Dolly in the upper right of your admin screen on every page.
- Jetpack — Provides easy-to-use, comprehensive WordPress site security including auto real-time backups and easy restores, malware scanning, and spam protection.
- WP Mail SMTP — Fixes your email deliverability by reconfiguring WordPress to use a proper SMTP provider when sending emails. See the general configuration or Gmail configuration articles for more information.
- WP Super Cache (automatically enabled by default) — Generates static HTML files from your dynamic WordPress blog; after an HTML file is generated your webserver will serve that file instead of processing the comparatively heavier and more expensive WordPress PHP scripts.
- WPForms Lite (automatically enabled by default) — Allows you to quickly create beautiful contact forms, feedback forms, subscription forms, payment forms, and other types of forms for your site.
Though these plugins are installed by default for Deluxe installations, you may need to activate them in your WordPress dashboard by going to ‘Plugins' > 'Installed Plugins’.
Security enhancement
Additionally, the One-Click Deluxe Install adds protection against the execution of scripts within your uploads directory.
In more technical terms, this means a .htaccess file with the following contents is automatically added to your /wp-content/uploads/ directory:
### Generated by DreamHost. DO NOT modify!!! ###
SetHandler no-handler
################################################
If your site is compromised through the placing of a malicious script in your uploads directory, the script is returned as a download when accessed. This keeps the script from running and helps to prevent further damage.
DreamHost will continue to add additional security enhancements as they become available.
Install Issues
If the One-Click installation does not complete within 20 minutes or fails with an error, please contact support.
Additionally, if the installation completes but you do not receive the email with the instructions on how to access your new WordPress install, you can always check your "Recent Messages" on the Contact Support page for an archived copy of that email.
Install link does not work
A 404 or "Site Not Found" error can appear on new WordPress setups when you attempt to view the site after changing it over from another hosting option (such as mirroring or redirection). In these cases, the site is still resolving to the old Mirror or Redirection A records, rather than the new Fully Hosted A records. Fortunately, this will resolve once DNS propagation completes, assuming that the site is using DreamHost’s nameservers. See the following article for further information on DNS propagation:
See also
Did this article answer your questions?
Recommend
About Joyk
Aggregate valuable and interesting links.
Joyk means Joy of geeK