

How to Use PowerShell to trigger MSI installation from an MSIX package
source link: https://www.advancedinstaller.com/trigger-msi-from-msix-using-powershell.html
Go to the source link to view the article. You can view the picture content, updated content and better typesetting reading experience. If the link is broken, please click the button below to view the snapshot at that time.

How to Use PowerShell to trigger MSI installation from an MSIX package
Written by Alex Marin · August 12th, 2021
Sometimes we need to have a single distribution package as an MSIX, which includes MSIX supported features along with MSI features that are no longer available (such as old drivers).
Unlike MSI, MSIX doesn't have sequences and doesn't support custom actions -- as we covered in our comprehensive 24 chapter guide for MSIX.
Instead, we can use Package Support Framework (PSF) start scripts as an alternative. Basically, we use the start script to include the MSI in the MSIX and trigger an MSI installation during the launch of the application.
The PSF generates a single setup package that can be distributed as an MSIX. Using PowerShell scripts, you can implement a checkup mechanism to see if the MSI was properly installed.
Let’s have a look at the PowerShell script we need to use, and see how the above scenario can be implemented into the MSIX package with Advanced Installer.
 You can read more about The MSIX Shift and what are its challenges here .
How to Check If Your MSI Is Installed By Using a PowerShell Script?
To get started in triggering an MSI installation from an MSIX package, we will need a Powershell script.
In our example, the following script checks for a registry key to see if the MSI is installed. If it doesn't find it installed, it will trigger the MSI installation. It's important to note that the MSIX app will not be launched until the MSI is installed.
We didn't include any complex processes here ( for example, checking the return code of the MSI to make sure that the installation was successful). However, you can create more complicated scripts if needed.
$workingPath = Get-Location

#Display current location for debugging purposes
[System.Reflection.Assembly]::LoadWithPartialName('System.Windows.Forms')
[System.Windows.Forms.MessageBox]::Show("The path where MSI will be launched from: " + $workingPath)


#check if MSI was installed

$isInstalled = Test-Path -Path "HKLM:\Software\Wow6432Node\Caphyon Sample\MyApp MSI"


if (!$isInstalled){

    [System.Reflection.Assembly]::LoadWithPartialName('System.Windows.Forms')
    [System.Windows.Forms.MessageBox]::Show("The required MSI is missing and it will be installed. The MSIX app will be launched only after MSI installation is finished !")
    Start-Process "msiexec.exe" -Argument "/i `"$workingPath\MyApp MSIX - Copy.msi`"  /qr" -Verb RunAs -Wait

}else{
    [System.Reflection.Assembly]::LoadWithPartialName('System.Windows.Forms')
    [System.Windows.Forms.MessageBox]::Show("The required MSI is already installed. The MSIX app will be launched!")
}
The above script also offers a GUI notifying the user what is happening during the launch of the application -- we think it provides a more user-friendly experience.
If don't want to use a GUI, you can modify the script so that everything happens silently in the background, like this:
$workingPath = Get-Location

#Display current location for debugging purposes


#check if MSI was installed

$isInstalled = Test-Path -Path "HKLM:\Software\Wow6432Node\Caphyon Sample\MyApp MSI"


if (!$isInstalled){

	Start-Process "msiexec.exe" -Argument "/i `"$workingPath\MyApp MSIX - Copy.msi`"  /qr" -Verb RunAs -Wait

}
To be able to install the MSIX package, you need to digitally sign the package.
Including the MSI into the MSIX using Advanced Installer
Now that we have the script, all we have to do is include the MSI into the MSIX and add the PowerShell script that will be executed during the launch of the application.
Try Advanced Installer for free through our 30-days full featured trial. Download it from here.
To achieve this, follow these steps:
1. Navigate to the Files and Folders Page;
2. Add the MSI into the Application Folder (the root of the package);

 In MSIX, the scripts are added in the root of the package, meaning that when we trigger the MSI installation from the script with the $workingPath, the PowerShell script will take the current working location and discover the MSI.
If the MSI is placed in a different folder (for example Program Files), you have to consider that the PowerShell script must be modified to reflect the correct MSI location
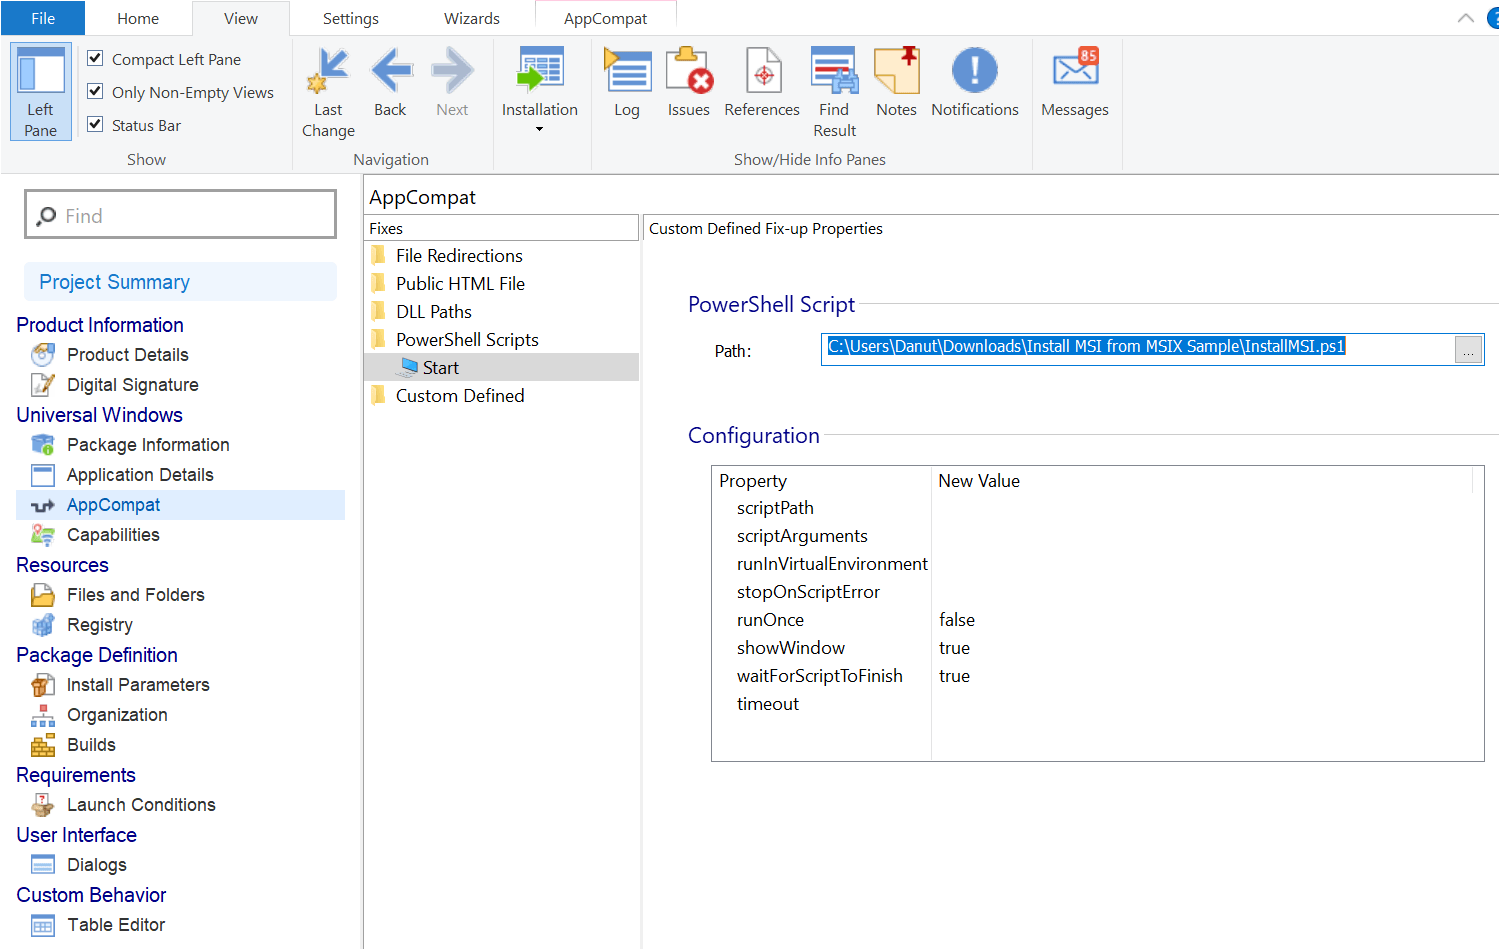
3. Navigate to the AppCompat Page;
4. Add the PowerShell script by clicking on Start PowerShell Script;

5. Configure the script to run, as shown in the below image;
6. Build your package.
After the MSIX package is installed and the user launches the application, the MSI installation will be triggered.
You need to create a different project for the MSI. For example, the MSI contained by the MSIX package will install a single file (updater.exe), no other changes will be made on the machine during the installation.
Let us know if you decide to use this method in your MSIX package.
Recommend
About Joyk
Aggregate valuable and interesting links.
Joyk means Joy of geeK