

Encrypting data with S3cmd – DreamHost Knowledge Base
source link: https://help.dreamhost.com/hc/en-us/articles/360022340471-Encrypting-data-with-S3cmd
Go to the source link to view the article. You can view the picture content, updated content and better typesetting reading experience. If the link is broken, please click the button below to view the snapshot at that time.

Encrypting data with S3cmd
How to encrypt your data
S3cmd can encrypt your data while uploading to DreamObjects. To use this functionality, you must first configure your .s3cfg file as shown in this article:
Configuring your .s3cfg file
Open the file in your user's directory.
[server]$ nano ~/.s3cfg
Add the following lines so you can use encryption. Make sure to create your own password for gpg_passphrase:
check_ssl_certificate = True
check_ssl_hostname = True
gpg_command = /usr/bin/gpg
gpg_decrypt = %(gpg_command)s -d --verbose --no-use-agent --batch --yes --passphrase-fd %(passphrase_fd)s -o %(output_file)s %(input_file)s
gpg_encrypt = %(gpg_command)s -c --verbose --no-use-agent --batch --yes --passphrase-fd %(passphrase_fd)s -o %(output_file)s %(input_file)s
gpg_passphrase = yourpassword
Your configuration is now set up to encrypt data.
Encrypting data while uploading
To encrypt your data while uploading, use the -e flag. In the following example, bucket-name is the name of the bucket you're uploading content in to. textfile.txt is the name of the single file you're uploading:
[server]$  s3cmd -e put testfile.txt s3://bucket-name

upload: '/tmp/tmpfile-zFGwbLHMVEINdHh3615n' -> 's3://bucket-name/testfile.txt'  [1 of 1]
 63 of 63   100% in    0s   129.96 B/s  done
To confirm it is encrypted, navigate to the DreamObjects page. Click the View Objects button under your username. A prompt opens for you to view objects in your bucket.
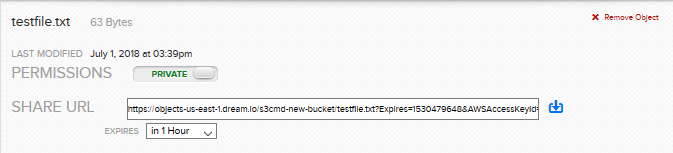
Click the object, copy the URL, and then paste it into a browser.
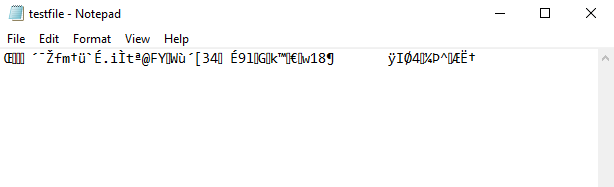
You'll see the data in the file is encrypted.
Decrypting a file
When you use s3cmd to download an encrypted file, it's automatically decrypted for you:
[server]$ s3cmd get s3://bucket-name/encrypted-file.txt
download: 's3://bucket-name/encrypted-file.txt' -> './encrypted-file.txt'  [1 of 1]
 70 of 70   100% in    0s   323.19 B/s  done
If you read the contents of the file, you'll see it's no longer encrypted:
[server]$ cat encrypted-file.txt
Testing a file
Signing an S3 URL to provide limited public access
You can manually set an expiration date for a file to be accessed. To do this, you must first convert the date into a Unix Epoch timestamp.
- Decide on the date you wish to allow the URL to be signed/accessed until.
- Visit Epoch Converter to convert your date to an Epoch Timestamp. It will look like a string of numbers. For example: 1540232086
- Run the following command to sign the URL until this timestamp. (Make sure to change the bucket name and file name to your actual information.)
[server]$ s3cmd signurl s3://my_bucket/my_file.png 1540232086
http://my-bucket.objects-us-east-1.dream.io/my_file.png?AWSAccessKeyId=DHDPTCQ3WFGHPSS5FAXG&Expires=1540232086&Signature=9nf8f9kG%2FqDa76rmET4R%2FpbtaGM%3D
- This outputs the signed URL. You can now share this URL so anyone can access that file until the date you have specified.
You can also sign it for 1 week using this format:
[server]$ s3cmd signurl s3://my_bucket/my_file.png $(echo "`date +%s` + 3600 * 24 * 7" | bc)
Did this article answer your questions?
Recommend
About Joyk
Aggregate valuable and interesting links.
Joyk means Joy of geeK