

How To Set Up WordPress Multisite on Ubuntu 20.04 | DigitalOcean
source link: https://www.digitalocean.com/community/tutorials/how-to-set-up-wordpress-multisite-on-ubuntu-20-04
Go to the source link to view the article. You can view the picture content, updated content and better typesetting reading experience. If the link is broken, please click the button below to view the snapshot at that time.


Introduction
The WordPress multisite feature is a unique way to host and manage a suite of sites in one place, and is useful for projects or positions that call for the operation of several WordPress sites under one host. Multisite offers the ability to create multiple WordPress websites from a single installation of WordPress, with each site having a separate theme, set of plugins, and collection of content (typically posts and pages). This feature helps to reduce the overhead of maintaining and updating several installations of WordPress, while allowing you to host multiple sites which may be unrelated to one another.
In this tutorial, you’ll set up a WordPress multisite on an Ubuntu 20.04 Droplet using subdomains. The WordPress sites that you’ll create will have a subdomain web address like http://wp-site.yourdomain.com, but your subdomain address can be mapped to an external domain like http://wp-site.net so that each site looks independent to users visiting your multisite suite of addresses.
Prerequisites
This tutorial requires you to have a basic knowledge of WordPress multisite. The following articles might be helpful in deepening your understanding of multisites:
Step 1 — Installing WordPress
For this tutorial, you’ll need to have access to a WordPress Droplet running the LEMP stack on Ubuntu 20.04. You can create a WordPress installation on a Droplet in the following ways:
- Use the WordPress 1-Click Install to create a droplet with WordPress installed
- Create a Ubuntu 20.04 droplet and install the LEMP stack, then install WordPress
You can also follow this tutorial using a WordPress installation on a hosting provider, but keep in mind that the steps of this tutorial will reflect a Wordpress multisite setup on a DigitalOcean Droplet.
Before installing WordPress, you’ll need to set up DNS records for each intended WordPress site in your multisite installation. For this tutorial, create the following domain names:
Site 1:
Domain: examplewp.com (Primary domain)
This is the site that is created when WordPress is installed.Site 2:
External Domain: shoppingsite.com
Subdomain: shoppingsite.example.comSite 3:
External Domain: companysite.org
Subdomain: companysite.example.com
The first domain is the primary domain name through which WordPress will be referenced. Make sure to set up DNS for all three domains to point to the IP address of the Droplet hosting WordPress.
While installing, if you’ve chosen to use a Droplet with a LEMP stack, be sure to follow the instructions for setting up your database and users. For DigitalOcean WordPress 1-Click installations, this has already been configured for you.
After installing WordPress on your Droplet, let’s assign file ownership to the user www-data. This is essential for media uploads and for core/plugin/theme updates to work in WordPress.
Log in to your Droplet via the command line, then execute the following command, replacing the highlighted path with the full path to your WordPress installation:
chown -R www-data:www-data /var/www/wordpress/
This command will grant read and write access to the www-data user for media uploads and necessary updates.
In the next step, we’ll further configure the primary domain, then configure our multisite installation from there.
Step 2 — Setting Up DNS Wildcard Records
Let’s continue by adding a DNS wildcard record for the primary domain. Adding a wildcard record allows more WordPress sites to be added to your multisite installation at any time, without needing individual A records. Alternatively, you can choose to add a new A record for each subdomain.
Log in to your DigitalOcean control panel and navigate to the Networking section. Edit the primary domain and create a wildcard A record for this domain pointing to the Droplet’s IP address. A wildcard record is created by entering an asterisk (*) in the hostname input box as shown in the following screenshot.
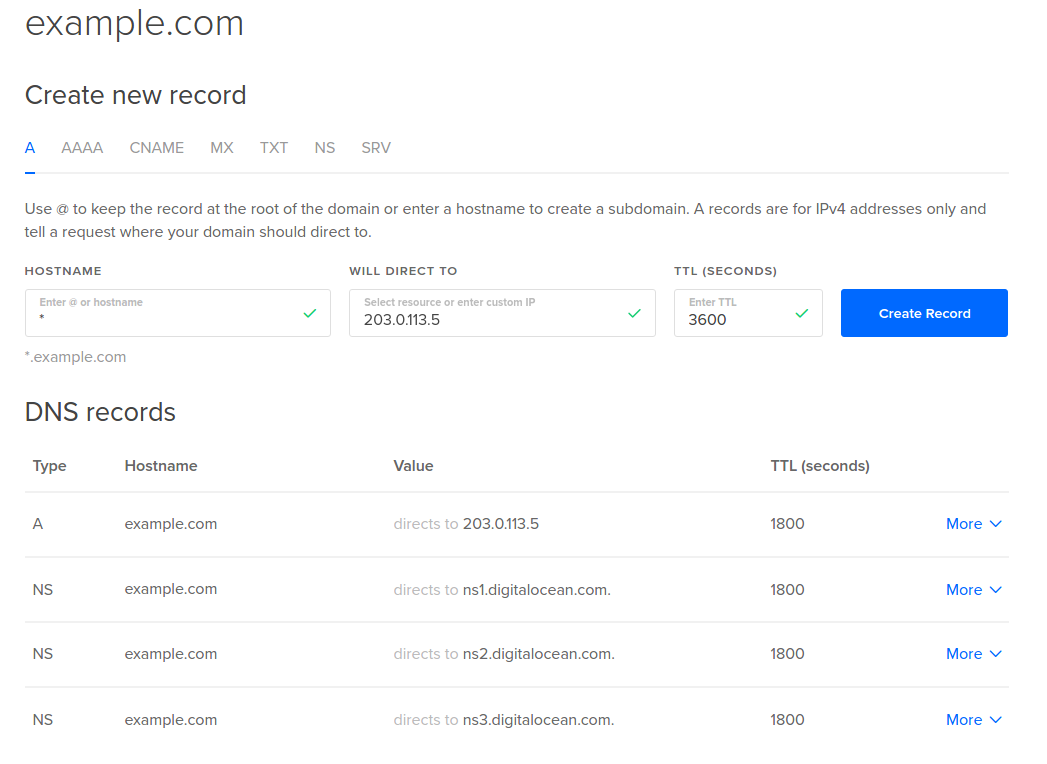
If you host your domain’s DNS on a hosting provider, set the wildcard record using the registrar’s site.
After setting the wildcard record, DNS queries for any random-sub-domain.examplewp.com should return the IP address of your Droplet.
Step 3 — Enable Multisite and Create Additional Sites
In this section, let’s now enable our WordPress multisite and create the two additional sites as mentioned in Step 1.
To begin this process, a PHP constant has to be defined in the wp-config.php file to enable the Network Setup page.
You can edit the wp-config.php file via the command line while logged into your WordPress Droplet. Open the file using your command line editor of choice. Here, we’ll use nano:
nano /var/www/wordpress/wp-config.php
Add the following code before the comment /* That's all, stop editing! Happy blogging. */ or similar text:
/* Multisite settings */
define( 'WP_ALLOW_MULTISITE', true );
Save and close the file. If you’re using nano, you can do that with CTRL+X, then Y and ENTER to confirm.
Next, log in to the WordPress admin panel and navigate to Tools -> Network Setup. Choose the Subdomains option, modify the Network Title as desired, and then click Install.
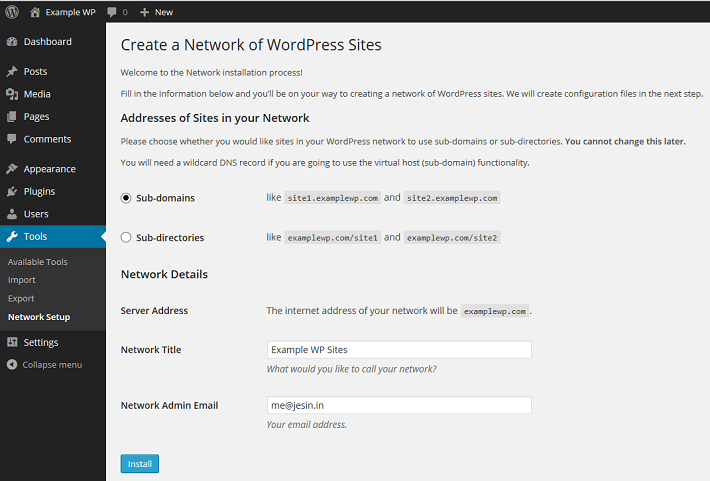
You will be presented with two blocks of code to be added in the wp-config.php and .htaccess files. Because we are using Nginx, we won’t need to use the suggested .htaccess code, so you can ignore that for now.
Copy the wp-config.php code which looks similar to the following:
define('MULTISITE', true);
define('SUBDOMAIN_INSTALL', true);
define('DOMAIN_CURRENT_SITE', 'examplewp.com');
define('PATH_CURRENT_SITE', '/');
define('SITE_ID_CURRENT_SITE', 1);
define('BLOG_ID_CURRENT_SITE', 1);
Next, open the wp-config.php file:
nano /var/www/wordpress/wp-config.php
Include the code snippet you just copied, placing it before the comment that says /* That's all, stop editing! Happy blogging. */ (or a variation of text that advises not to write below it). Save the file when you’re done.
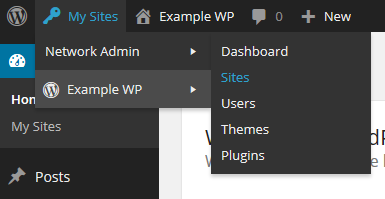
Log out of the WordPress admin panel, and log in again. From the admin toolbar on the top left, navigate to the My Sites > Network Admin > Sites.
Click the Add New button to open the Add New Site form. The following screenshot shows the filled-in details for the shopping site in our example. The Site Address entered will form the subdomain of this site.
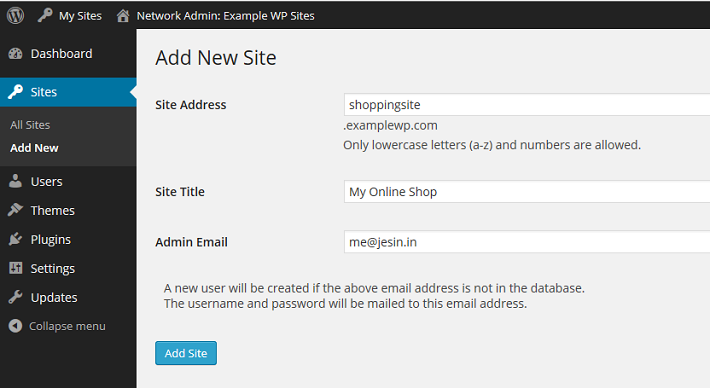
Click Add Site and the created site will be accessible via http://shoppingsite.examplewp.com.
Repeat these steps to create the second site (companysite.examplewp.com in our example).
The following three WordPress sites can now have its own content, theme, and active set of plugins:
examplewp.comshoppingsite.examplewp.comcompanysite.examplewp.com
Step 4 — Setting Up Domain Mapping
In this step, let’s enable multisite to use a separate domain name for each WordPress site by downloading and enabling the WordPress MU Domain Mapping plugin. This third-party plugin allows users of WordPress multisite to map their blog/site to another domain.
To download this plugin,visit My Sites -> Network Admin -> Plugins from your dashboard and select Add New on your primary domain to find the WordPress MU Domain Mapping plugin.

Install the plugin, then click the Network Activate link under the WordPress MU Domain Mapping plugin. Go to Settings -> Domain Mapping and make changes to the Domain Options as follows:
- Uncheck Remote Login
- Check Permanent Redirect
- Uncheck Redirect administration pages to site’s original domain
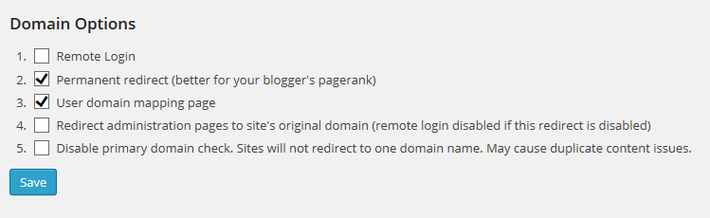
Click Save once done. These settings redirect all requests for subdomains (like companysite.examplewp.com) to their respective external domains (like companysite.org) including the administration pages (/wp-admin).
In the next step, let’s map a domain name to each site based on its site ID. There are many ways to find the ID of a site, but for easier administration you’ll create a simple WordPress Must-use plugin that displays an additional ID column on the Sites page.
Log in to your WordPress Droplet via SSH and create an mu-plugins directory.
mkdir /var/www/wordpress/wp-content/mu-plugins
Create a PHP file inside this directory:
nano /var/www/wordpress/wp-content/mu-plugins/wpms_blogid.php
Next, copy the following content to your wpms_blogid.php file:
<?php
add_filter( 'wpmu_blogs_columns', 'do_get_id' );
add_action( 'manage_sites_custom_column', 'do_add_columns', 10, 2 );
add_action( 'manage_blogs_custom_column', 'do_add_columns', 10, 2 );

function do_add_columns( $column_name, $blog_id ) {
    if ( 'blog_id' === $column_name )
        echo $blog_id;
    return $column_name;
}

function do_get_id( $columns ) {
    $columns['blog_id'] = 'ID';
    return $columns;
}
The Sites -> All Sites section should now show an additional ID column.
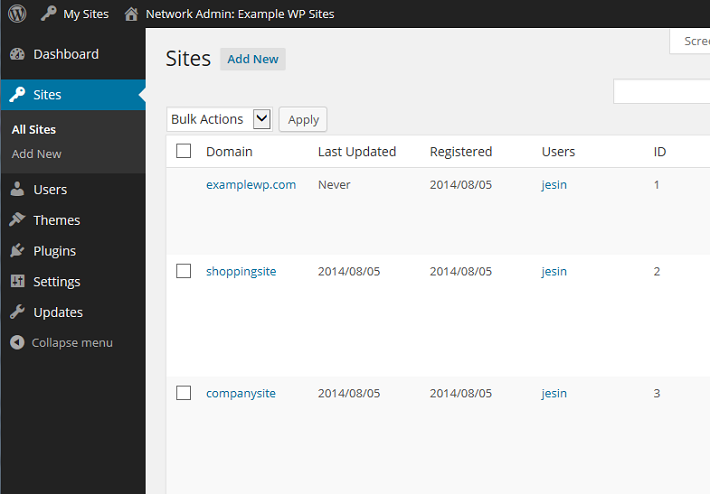
Note down the ID values for each site and go to the Settings -> Domains page. Enter the site ID followed by the external domain for the site. For example, since companysite has an ID of 3, on this page, the Site ID should be 3, and the domain should be companysite.org.
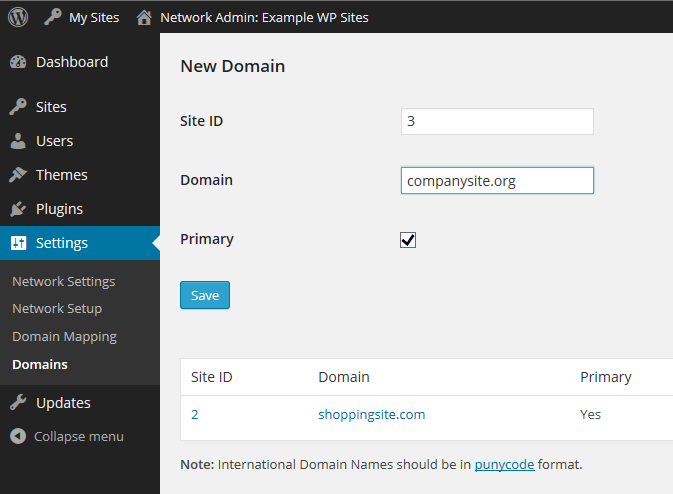
You may add a “www” prefix if you wish to set the site URL as www.companysite.org. Repeat these steps for the other domains. Click Save at the bottom of the page.
Each site will now have its own domain name instead of a subdomain; i.e., entering http://companysite.org in your browser will open the My Online Company site. You can check this now by visiting your additional domain names that are mapped. You should see the site title change in the upper left corner of the page.
Now each site can be maintained separately through its own WordPress admin panel:
- `http://examplewp.com/wp-admin/`
- `http://shoppingsite.com/wp-admin/`
- `http://companysite.org/wp-admin/`
Updates to the core/plugins/themes and installation of plugins/themes should be done from the network admin page of the primary domain:
- `http://examplewp.com/wp-admin/network/`
Conclusion
In this tutorial, you learned how to set up the multisite feature on a WordPress website running on Ubuntu 20.04 with Nginx (LEMP stack). The multisite feature enables you to host multiple WordPress sites on one WordPress installation on your droplet. You also learned how to set up domain mapping, which allows each of your subsites to be reached through a custom domain name.
For an alternate process to install the WordPress multisite feature, visit our tutorial, Setting up WordPress Multisite on Apache.
Recommend
-
62
readme.md Network Media Library Network Media Library is a plugin for WordPress Multisite which provides a central media library that's shared across a...
-
29
前言 本文对MultiSite内部数据结构和流程做一些梳理,加深对RadosGW内部流程的理解。因为MultiSite如何搭建,网上有较多的资料,因此不再赘述。 本文中创建的zonegroup为xxxx,两个zone: master...
-
7
-
5
...
-
8
Tutorial How To Set Up Multiple WordPress Sites Using Multisite WordPress
-
2
Tutorial How To Set Up Visual Studio Code (VS Code) for PHP Development PHP
-
3
-
10
-
5
Tutorial How to Set Up a Website Hit Counter With Redis and PHP on Ubuntu 20.04 Ubuntu
-
8
在 OneIn Stack 下如果需要配置一套 WordPress MU 的话,需要配置 Nginx 相应的转发规则。具体的规则如下: if (!-e $request_filename) { rewrite /wp-admin$ $scheme://$host$uri/ p...
About Joyk
Aggregate valuable and interesting links.
Joyk means Joy of geeK