

How To Set Up Multiple WordPress Sites Using Multisite [Quickstart]
source link: https://www.digitalocean.com/community/tutorials/how-to-set-up-multiple-wordpress-sites-using-multisite-quickstart
Go to the source link to view the article. You can view the picture content, updated content and better typesetting reading experience. If the link is broken, please click the button below to view the snapshot at that time.
![How To Set Up Multiple WordPress Sites Using Multisite [Quickstart]](https://community-cdn-digitalocean-com.global.ssl.fastly.net/variants/KzFwGTp1nwZAqzkTqpUkj5Kt/035575f2985fe451d86e717d73691e533a1a00545d7230900ed786341dc3c882)
Introduction
WordPress is a robust content management platform, powering over 36% of the web currently. With the multisite feature, WordPress administrators can create multiple sites on one server, using a single WordPress installation, right within their dashboard.
In this quickstart, learn how to set up multiple instances of WordPress sites that exist on one server or WordPress Droplet using the multisite feature. If you’d prefer a more in-depth walkthrough of a WordPress multisite set up, see How To Set Up WordPress Multisite with Nginx and LEMP on Ubuntu 20.04.
Prerequisites
The steps in this tutorial require the user to have sudo privileges. Follow our Initial Server Setup with Ubuntu 20.04 to create an administrative system user with sudo privileges.
Before working with WordPress, you’ll need to have it installed on your virtual private server. This quickstart uses a Ubuntu 20.04 Droplet with the LAMP stack installed, with a user having root privileges. You can follow this tutorial with other installations, but keep in mind that the steps may vary depending on your installation.
If you’ve chosen to install WordPress in a similar manner to this tutorial, be sure to stop at the end of step 5 to continue with step 1 of this tutorial.
Step 1 — Configuring Your WordPress Installation
With WordPress installed, we need to take a series of steps in a variety of configuration files.
To begin, let’s modify the WordPress configuration, activating the multisite feature. In your command line after logging into your WordPress server, execute the following command:
sudo nano /var/www/html/wp-config.php
Add the following line above the /* That’s all, stop editing! Happy blogging. */ (or similar text) comment on the wp-config.php file:
/* Multisite */
define('WP_ALLOW_MULTISITE', true);
Then, save the file and exit. You can do so by pressing CTRL+S to save, followed by CTRL+X to exit.
Once done, the WordPress online installation page will be waiting. Access the page by adding /wp-admin/install.php to your site’s domain or IP address (eg. example.com/wp-admin/install.php) and fill out the short online form.
Step 2 — Setting Up Multiple WordPress Sites
Go into your WordPress dashboard and select the section called tools:
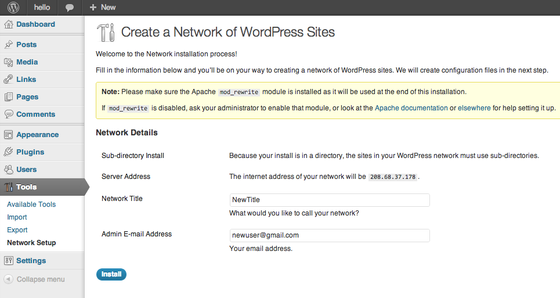
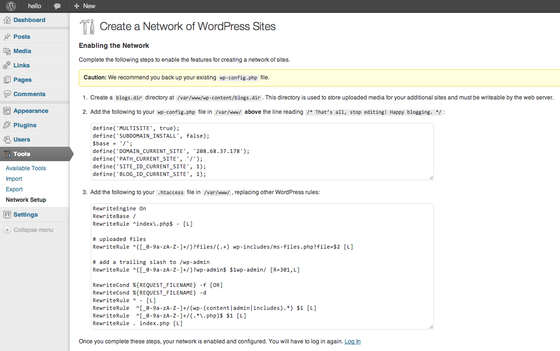
Once you have filled out the required fields, go through the directions on the next page:
Create a directory for your new sites:
sudo mkdir /var/www/wp-content/blogs.dir
Next, you’ll need to alter your WordPress configuration. Make sure to place the following content above the line saying /* That’s all, stop editing! Happy blogging. */ or similar:
sudo nano /var/www/wp-config.php
define('MULTISITE', true);
define('SUBDOMAIN_INSTALL', false);
$base = '/';
define('DOMAIN_CURRENT_SITE', '<b><i>YOUR IP ADDRESS HERE</b></i>');
define('PATH_CURRENT_SITE', '/');
define('SITE_ID_CURRENT_SITE', 1);
define('BLOG_ID_CURRENT_SITE', 1);
After making all of the necessary changes, log into WordPress once more.
Step 3 — Setting Up Your New WordPress Site
After logging into your site again, you will notice that the header bar now has a section called “My Sites” instead of simply displaying your blog’s name:

You can now create new sites by going to My Sites at the top, clicking on Network Admin, and clicking on Sites:

Related Tutorials
Here are a few links to other tutorials that are related to this quickstart guide:
Recommend
About Joyk
Aggregate valuable and interesting links.
Joyk means Joy of geeK