

How to Build Token Refresh Service for the Fitbit API in Azure
source link: https://hackernoon.com/how-to-build-token-refresh-service-for-the-fitbit-api-in-azure-b87x35eb
Go to the source link to view the article. You can view the picture content, updated content and better typesetting reading experience. If the link is broken, please click the button below to view the snapshot at that time.

How to Build Token Refresh Service for the Fitbit API in Azure
@willvelidaWill Velida
Software Engineer and Microsoft Data Platform MVP based in Auckland, New Zealand
We can generate a refresh and access token required to call the Fitbit API programmatically with a simple Timer trigger function.
As part of my personal project, I’m building my own personal health platform in Azure. I like to keep track of a variety of different health metrics, such as daily activity, food intake, and sleep patterns. To collect this data, I use a Fitbit Ionic.
In the past, I used to download a monthly CSV file and just do some basic analysis on it. This was a bit tedious as I’d have to do some manual scrubbing of the data before doing anything with it. This took the time that I didn’t really want to waste, so I wanted to create a pipeline that just calls the Fitbit API to retrieve my data without having to manually clean the file myself.
Using the Fitbit API is relatively straightforward. The challenging part can be ensuring that our refresh tokens and access tokens don’t expire on us. By default, these will expire after 8 hours.
Thankfully, we can use an Azure Function Timer Trigger to request new access tokens and Azure Key Vault to store these tokens securely. This article will show you how to refresh your Access Tokens for the Fitbit API using Azure Functions and Key Vault.
While this example focuses on the Fitbit API, you could apply this method to other API keys.
How refresh tokens and access tokens work for the Fitbit API
Fitbit uses OAuth 2.0 to authorize users and authenticate to the Fitbit API. The OAuth 2.0 framework needs our apps that call the Fitbit API to obtain an Access Token. This is used for making HTTPS requests to the API.
Fitbit supports both Authorization Code Grant and Implicit Grant flows. For my project, I’m using the Authorization Code Grant flow. This is the recommended option for server-to-server communication using an application’s client secret.
Using the Authorization Code Grant Flow, a user will consent to share their Fitbit data with an application with some or all of the scopes. When this consent is given, Fitbit will give us an authorization code as part of a callback URL. Our app will exchange this code for access and refresh tokens (the ones that we will store in Key Vault).
By default, these tokens will expire. The refresh token is used to obtain access to new access and it refreshes the token. Refresh tokens can only be used once, so we need to store the new access token and refresh token pair in Key Vault when these are regenerated.
If you want to learn how to set up an application in Fitbit, obtain a client id and client secret, and generate the authorization code to be able to generate refresh and access tokens, I highly recommend watching the below video (Shoutout to Franchyze923 for this video! Super helpful!)
Introducing our Function
Once you’ve watched that video, you should have a client id, client secret, and a base64 encoded string of your client id and secret concatenated with the colon (Don’t know what I’m on about? Watch the video again 😉)
We’ll need to store this in our Key Vault along with our Refresh Token that we generated earlier.
Before we dive into the code, let’s take a look at what this Function is trying to do end-to-end.
Check the following diagram:
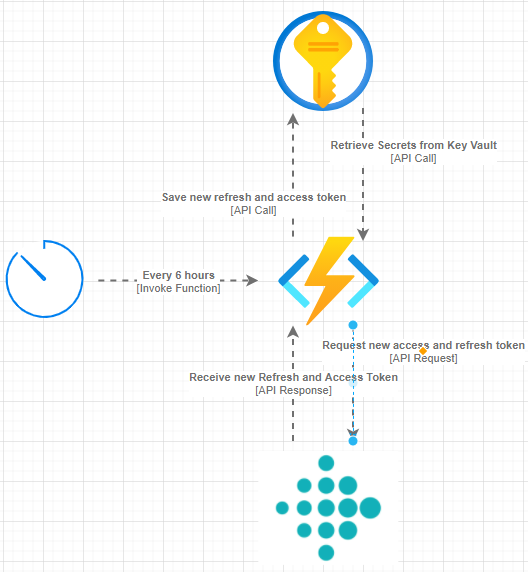
image
Every 6 hours, we want to start a process of refreshing our tokens. We could increase the frequency we refresh our tokens, but 6 hours is fine for my purpose. When we start the function, we want to make a call to the Fitbit API to refresh our tokens.
To do this, I will need my existing refresh token as well as my Fitbit Credentials, which I have stored as secrets in Key Vault. Once we have these, we need to make a request to the Fitbit API using our tokens and credentials to generate new tokens.
Once we have our tokens, we want to save them in Key Vault, so the next time we invoke our function to refresh our tokens again, we will use the updated values.
Let’s dive into the code to make this clearer.
Using HTTP Client to make our call
To make calls to the Fitbit API, we can use the HttpClient library! In order to request a new refresh token, we need to make the following API call:
POST https://api.fitbit.com/oauth2/token
Authorization: Basic Y2xpZW50X2lkOmNsaWVudCBzZWNyZXQ=
Content-Type: application/x-www-form-urlencoded

client_id=22942C&grant_type=authorization_code&redirect_uri=https%3A%2F%2Fexample.com%2Ffitbit_auth&code=<somecode>
We can use the HttpClient library to build our POST request like so:
using Microsoft.Extensions.Configuration;
using MyHealth.Auth.RefreshToken.Models;
using MyHealth.Common;
using Newtonsoft.Json;
using System;
using System.Net.Http;
using System.Net.Http.Headers;
using System.Threading.Tasks;

namespace MyHealth.Auth.RefreshToken.Services
{
    public class RefreshTokenService : IRefreshTokenService
    {
        private readonly IConfiguration _configuration;
        private readonly IKeyVaultHelper _keyVaultHelper;
        private readonly HttpClient _httpClient;

        public RefreshTokenService(
            IConfiguration configuration,
            IKeyVaultHelper keyVaultHelper,
            HttpClient httpClient)
        {
            _configuration = configuration;
            _keyVaultHelper = keyVaultHelper;
            _httpClient = httpClient;
        }

        public async Task<RefreshTokenResponse> RefreshToken()
        {
            try
            {
                var fitbitRefreshTokenSecret = await _keyVaultHelper.RetrieveSecretFromKeyVaultAsync(_configuration["RefreshTokenName"]);
                var fitbitClientCredentials = await _keyVaultHelper.RetrieveSecretFromKeyVaultAsync(_configuration["FitbitCredentials"]);

                _httpClient.DefaultRequestHeaders.Clear();
                UriBuilder uri = new UriBuilder("https://api.fitbit.com/oauth2/token");
                uri.Query = $"grant_type=refresh_token&refresh_token={fitbitRefreshTokenSecret.Value}";
                var request = new HttpRequestMessage(HttpMethod.Post, uri.Uri);
                request.Content = new StringContent("");
                request.Content.Headers.ContentType = new MediaTypeHeaderValue("application/x-www-form-urlencoded");
                request.Headers.Authorization = new AuthenticationHeaderValue("Basic", fitbitClientCredentials.Value);

                var response = await _httpClient.SendAsync(request);
                response.EnsureSuccessStatusCode();

                var content = await response.Content.ReadAsStringAsync();
                var refreshTokenResponse = JsonConvert.DeserializeObject<RefreshTokenResponse>(content);

                return refreshTokenResponse;
            }
            catch (Exception ex)
            {
                throw ex;
            }
        }
    }
}
In this class, we’re doing the following:
Retrieving our existing Refresh Token and Fitbit Credentials from Key Vault. (I simplified these calls using a wrapper for the Key Vault C# SDK).
Clearing our request headers, defining the URI we want to make the POST request to, and then defining query parameters as part of that URI. We need to use our Refresh Token here.
Define the request as a POST request to our URI.
Setting the Content to an empty string, setting the headers and content type to use ‘
application/x-www-form-urlencoded’ and setting our AuthorizationHeaderValue to use Basic authentication and passing in our Fitbit Credentials.We then make our POST Request, ensure that it is successful and deserialize our response into a RefreshTokenResponse object before returning it.
That RefreshTokenResponse is a custom class, I created so that I can use it as a return type. It’s defined as follows:
using Newtonsoft.Json;

namespace MyHealth.Auth.RefreshToken.Models
{
    public class RefreshTokenResponse
    {
        [JsonProperty(PropertyName = "access_token")]
        public string AccessToken { get; set; }
        [JsonProperty(PropertyName = "expires_in")]
        public int ExpiresIn { get; set; }
        [JsonProperty(PropertyName = "refresh_token")]
        public string RefreshToken { get; set; }
        [JsonProperty(PropertyName = "scope")]
        public string Scope { get; set; }
        [JsonProperty(PropertyName = "token_type")]
        public string TokenType { get; set; }
        [JsonProperty(PropertyName = "user_id")]
        public string UserType { get; set; }
    }
}
This class should help deserialize the following sample response into a strong type:
{
  "access_token": "eyJhbGciOiJIUzI1NiJ9.eyJleHAiOjE0MzAzNDM3MzUsInNjb3BlcyI6Indwcm8gd2xvYyB3bnV0IHdzbGUgd3NldCB3aHIgd3dlaSB3YWN0IHdzb2MiLCJzdWIiOiJBQkNERUYiLCJhdWQiOiJJSktMTU4iLCJpc3MiOiJGaXRiaXQiLCJ0eXAiOiJhY2Nlc3NfdG9rZW4iLCJpYXQiOjE0MzAzNDAxMzV9.z0VHrIEzjsBnjiNMBey6wtu26yHTnSWz_qlqoEpUlpc",
  "expires_in": 3600,
  "refresh_token": "c643a63c072f0f05478e9d18b991db80ef6061e4f8e6c822d83fed53e5fafdd7",
  "token_type": "Bearer",
  "user_id": "26FWFL"
}
Now that we have our new access token and refresh token, we can save them to Key Vault.
Saving our secrets in Key Vault
To save our refresh and access tokens, we can simply do the following:
using Microsoft.Extensions.Configuration;
using MyHealth.Auth.RefreshToken.Models;
using MyHealth.Common;
using System;
using System.Threading.Tasks;

namespace MyHealth.Auth.RefreshToken.Services
{
    public class KeyVaultService : IKeyVaultService
    {
        private readonly IConfiguration _configuration;
        private readonly IKeyVaultHelper _keyVaultHelper;

        public KeyVaultService(
            IConfiguration configuration,
            IKeyVaultHelper keyVaultHelper)
        {
            _configuration = configuration;
            _keyVaultHelper = keyVaultHelper;
        }

        public async Task SaveTokensToKeyVault(RefreshTokenResponse refreshedTokens)
        {
            try
            {
                await _keyVaultHelper.SaveSecretToKeyVaultAsync(_configuration["RefreshTokenName"], refreshedTokens.RefreshToken);
                await _keyVaultHelper.SaveSecretToKeyVaultAsync(_configuration["AccessTokenName"], refreshedTokens.AccessToken);
            }
            catch (Exception ex)
            {
                throw ex;
            }
        }
    }
}
Here I’m passing through our RefreshTokenResponse object I got earlier in my RefreshTokenService class and then saving the RefreshToken and AccessToken into Key Vault using the same wrapper from earlier.
Complete Function end-to-end
I’ve broken out these two components into their own classes. It might need some tidying up, but hopefully, the example is easy to follow. We can now inject these services into our Function like so:
using Microsoft.Azure.WebJobs;
using Microsoft.Extensions.Configuration;
using Microsoft.Extensions.Logging;
using MyHealth.Auth.RefreshToken.Models;
using MyHealth.Auth.RefreshToken.Services;
using MyHealth.Common;
using System;
using System.Threading.Tasks;

namespace MyHealth.Auth.RefreshToken.Functions
{
    public class RefreshAccessToken
    {
        private readonly IConfiguration _configuration;
        private readonly IRefreshTokenService _refreshTokenService;
        private readonly IKeyVaultService _keyVaultService;
        private readonly IServiceBusHelpers _serviceBusHelpers;

        public RefreshAccessToken(
            IConfiguration configuration,
            IRefreshTokenService refreshTokenService,
            IKeyVaultService keyVaultService,
            IServiceBusHelpers serviceBusHelpers)
        {
            _configuration = configuration;
            _refreshTokenService = refreshTokenService;
            _keyVaultService = keyVaultService;
            _serviceBusHelpers = serviceBusHelpers;
        }

        [FunctionName(nameof(RefreshAccessToken))]
        public async Task Run([TimerTrigger("0 0 */6 * * *")] TimerInfo myTimer, ILogger log)
        {
            try
            {
                log.LogInformation($"C# Timer trigger function executed at: {DateTime.Now}");

                log.LogInformation("Refreshing Fitbit Refresh and Access Token.");
                RefreshTokenResponse refreshTokenResponse = await _refreshTokenService.RefreshToken();

                log.LogInformation("Refresh and Access Token refreshed. Saving to Key Vault");
                await _keyVaultService.SaveTokensToKeyVault(refreshTokenResponse);
                log.LogInformation("Tokens saved to Key Vault.");
            }
            catch (Exception ex)
            {
                log.LogError($"Exception thrown in {nameof(RefreshAccessToken)}: {ex.Message}");
                await _serviceBusHelpers.SendMessageToQueue(_configuration["ExceptionQueue"], ex);
                throw ex;
            }
        }
    }
}
Wrapping up
Generating a new refresh token manually would be a pain. Thankfully with Azure Function timer triggers, we can generate tokens on a schedule. By storing the access token in Key Vault, we can retrieve the token when we need to make calls to the Fitbit API.
While this example focuses on the Fitbit API, hopefully, you can apply this example to other services that require you to refresh your access token when needed.
If you want to see the code repository for this sample, you can check it out here.
Hopefully, you’ve enjoyed this article. If you have any questions or comments, please feel free to reach out to me on Twitter.
Until next time, Happy coding!
Previously published on dev.to.
Recommend
About Joyk
Aggregate valuable and interesting links.
Joyk means Joy of geeK