
How to save/export an image in Mac Catalyst
source link: https://sarunw.com/posts/how-to-save-export-image-in-mac-catalyst/
Go to the source link to view the article. You can view the picture content, updated content and better typesetting reading experience. If the link is broken, please click the button below to view the snapshot at that time.

How to save/export an image in Mac Catalyst
Table of Contents
App Sandbox
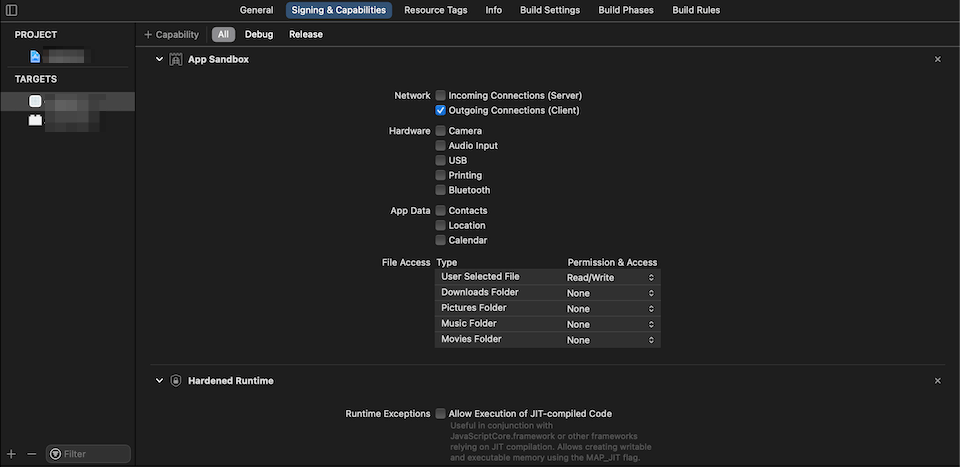
The first thing we do to do is enable Read/Write permission for User Selected File. To do that:
- Click on your app name under "TARGETS".
- Select "Signing & Capabilities" tab.
- Scroll down to "App Sandbox" section.
- Under "File Access", change "Permission & Access" of "User Selected File" from
NonetoRead/Write.
 Set read/write permission for "User Selected File" in App Sandbox
This will give us access to writing files outside of our app sandbox, which is essential for users to select a saving destination for their images.
We now have everything ready. Let's jump into code.
func export(image: UIImage) {
    guard let imageData = image.pngData() else { // 1
        return
    }

let fileManager = FileManager.default // 2

do {
        let fileURL = fileManager.temporaryDirectory.appendingPathComponent("temp.png") // 3

try imageData.write(to: fileURL) // 4

if #available(iOS 14, *) {
            let controller = UIDocumentPickerViewController(forExporting: [fileURL]) // 5
            present(controller, animated: true)
        } else {
            let controller = UIDocumentPickerViewController(url: fileURL, in: .exportToService) // 6
            present(controller, animated: true)
        }
    } catch {
        print("Error creating file")
    }
}
<1> Convert UIImage to Data of png format.
<2> Get a reference of FileManager.
<3> We can't save our image data directly to an external location. So, we have to save it to our app sandbox directory first, then export it out. In this case, I name it temp.png and save it to a temporary directory. The filename (temp) will use to prefill in saving dialog (<5>, <6>).
<4> Save our image to temp URL.
<5>, <6> Create a document picker view controller with an initializer for exporting. In iOS 14, Apple deprecate init(url: URL, in mode: UIDocumentPickerMode) and replacing it with init(forExporting urls: [URL]).
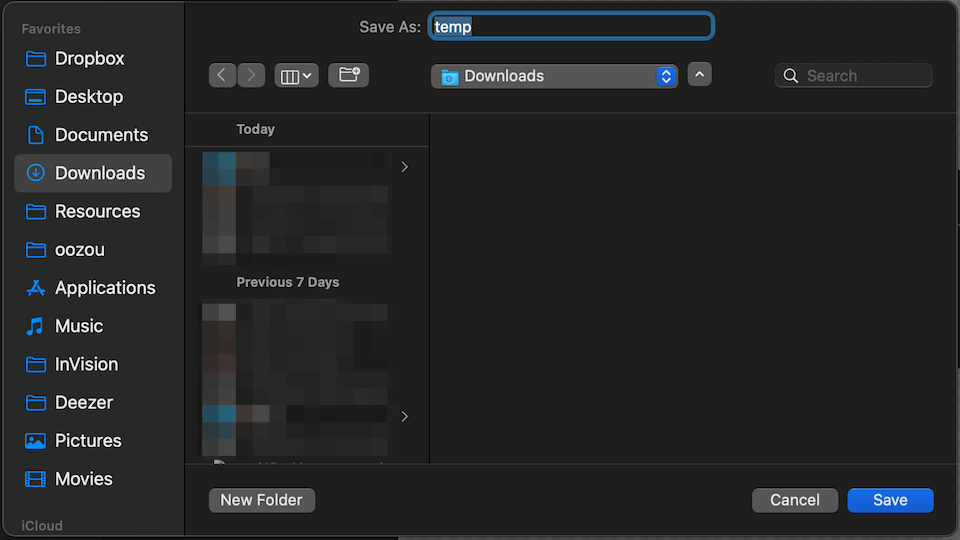
Run this code and try to export an image. You will be presented with a document picker to choose your saving destination.
 A document picker for exporting
The file name defined in step 3 will be used as a default file name in a document picker.
Be a good Mac citizen
After the export, there is no use for our original temp file. We should be a good OS citizen and delete that file for good. In our example, we save a file to a temporary directory, which will be purged automatically by the system. If you don't want to rely on the system purging or save a file in other locations, the following is how you can delete it.
Prior iOS 14
We set a delegate and listen to callbacks. Then we remove our temp file within callback methods.
let controller = UIDocumentPickerViewController(url: fileURL, in: .exportToService)
controller.delegate = self

// MARK: - UIDocumentPickerDelegate
func documentPickerWasCancelled(_ controller: UIDocumentPickerViewController) {
    let fileManager = FileManager.default

let fileURL = fileManager.temporaryDirectory.appendingPathComponent("temp.png")
    do {
        try FileManager.default.removeItem(at: fileURL)
    } catch {
        print("Error deleting file")
    }
}

func documentPicker(_ controller: UIDocumentPickerViewController, didPickDocumentsAt urls: [URL]) {
    let fileManager = FileManager.default

let fileURL = fileManager.temporaryDirectory.appendingPathComponent("temp.png")
    do {
        try FileManager.default.removeItem(at: fileURL)
    } catch {
        print("Error deleting file \(error)")
    }
}
iOS 14
With iOS 14, we don't need to delete the file in documentPicker(_ controller: UIDocumentPickerViewController, didPickDocumentsAt urls: [URL]). Because the original document will be moved (removed from the original location) to the selected destination when we initialize UIDocumentPickerViewController with init(forExporting urls: [URL]). So, we only need to delete the file in cancel callback.
let controller = UIDocumentPickerViewController(forExporting: [fileURL])
controller.delegate = self

// MARK: - UIDocumentPickerDelegate
func documentPickerWasCancelled(_ controller: UIDocumentPickerViewController) {
    let fileManager = FileManager.default

let fileURL = fileManager.temporaryDirectory.appendingPathComponent("temp.png")
    do {
        try FileManager.default.removeItem(at: fileURL)
    } catch {
        print("Error deleting file")
    }
}
Related Resources
You may also like
In iOS, if you want to delete the app's UserDefaults, you can simply delete the app. But that is not the case for macOS and Catalyst app.
CatalystRead more article about Catalyst
or see all available topic
Get new posts weekly
If you enjoy this article, you can subscribe to the weekly newsletter.
Every Friday, you’ll get a quick recap of all articles and tips posted on this site — entirely for free.
Feel free to follow me on Twitter and ask your questions related to this post. Thanks for reading and see you next time.
If you enjoy my writing, please check out my Patreon https://www.patreon.com/sarunw and become my supporter. Sharing the article is also greatly appreciated.
3 lesser-known ways of using Swift enums
Three language features around Swift enumeration that you might not aware of.
Setting default values for NSUserDefaults
NSUserDefaults is a go-to database for saving users' preferences. Learn how to populate it with your default values.
Recommend
About Joyk
Aggregate valuable and interesting links.
Joyk means Joy of geeK
