

Creating a Local Capacitor Plugin to Access Native Functionality (iOS/Swift)
source link: https://www.joshmorony.com/creating-a-local-capacitor-plugin-to-access-native-functionality-ios-swift/
Go to the source link to view the article. You can view the picture content, updated content and better typesetting reading experience. If the link is broken, please click the button below to view the snapshot at that time.

One of the biggest issues and limitations faced by Ionic developers, and other “hybrid” application developers, is the reliance upon third-party solutions for accessing native functionality.
Tools like Capacitor (as well as Cordova) provide us with a way to access Native APIs and run native code from within the browser environment that most of the mobile application is contained within. Typically, we are able to do the vast majority of our work using web code - however, if you do not know how to write and run some native code yourself, you could find yourself getting stuck and relying on solutions created by other people.
In this tutorial, we are first going to highlight how relying on a third-party for native functionality can cause issues and roadblocks. We will then walk through how we can, reasonably simply, write and run our own Native iOS code from an Ionic application using Capacitor. Although understanding Native iOS code (Swift) will obviously be a big benefit here, Swift is similar enough to JavaScript/TypeScript such that with a few searches and some sample code to reference, you will likely be able to build out your own simple solutions even if you have no Swift knowledge.
Before We Get Started
This will be an advanced tutorial and I will be assuming that you already have a basic understanding of using Capacitor, and a reasonably solid understanding of whatever you are using to build your Ionic applications. This particular example will be using StencilJS with Ionic, but if you are using Angular, React, Vue or something else that will be of little consequence.
The Problem with Core APIs
The issue with relying on the core set of Native APIs maintained by Capacitor/Cordova is that they are limited in scope, and you would typically just find “core” functionality like:
- Camera
- Splash Screen
- Storage
- Push Notifications
- Keyboard
- Filesystem
- Geolocation
This is to be expected, because the amount of “native stuff” you might want to do is almost limitless, and it’s just not feasible for a project to provide (and maintain) a way to access everything you might ever want to use.
The Problem with Community Plugins
If we find ourselves wanting to use something that isn’t covered by one of the Core API’s, we can then turn to community published/maintained plugins. These are plugins that the general community (not the Ionic/Capacitor team) have built and shared for others to use. You will generally find that the community creates a much broader range of plugins to access native functionality.
The issue with community plugins is that these are most often built and maintained by people volunteering their time to help others. There are no guarantees that the plugin you find will work or that if there are any issues or updates required that the person who created it will be willing or able to fix it.
There is also no guarantee that you will even find a community plugin that offers the functionality you are looking for.
The Solution
Join my mailing list and I'll start sending you some curated Ionic tutorials.
You'll also get instant access to all of the bonus content for the blog, and you can easily unsubscribe at any time.
A lot of the time, probably in the majority of cases for most people, you can build what you need using one of the two options above. But, if you find yourself in a position where neither of those options are working, your application development could come to a quick halt.
If you really want to take charge of your application, and not have to worry about relying on others to provide the solution you need, it is important to understand how to write and run your own native code through Capacitor. The general concept is actually quite simple - although the implementation itself does require a bit of work.
Capacitor acts as a messenger between your web code and the native platform (iOS in this case). If we want to execute some native code, then we just add that native code to the native project that Capacitor creates for us, and then we make a call to that native code from our web code through Capacitor. In general, a method to execute some native code in a Capacitor plugin would look something like this:
SomePlugin.swift
@objc func myMethod(_ call: CAPPluginCall){

  // get anything passed in from the web code from Capacitor's "call"

  // do whatever native stuff you need

  // pass data back to the web code through Capacitor's "call"

}
No matter what you are building, this same basic concept will usually apply:
- Pass in data to the native code through Capacitor
- Execute the native code
- Pass data back to the web code through Capacitor
We are going to walk through building out a solution using this concept. What we will be building is a “simple” way to add some native code to your project that you can run. This will not be a “proper” plugin in the sense that it could be easily installed into another project, or published as your own community plugin, this is just a quick way to write and access native code in an individual project.
If you would like a little more context as to how Capacitor “plugins” work before we begin, I would recommend watching this video: Exploring the Source Code: Understanding Capacitor’s Storage API
Accessing HealthKit with Ionic
The solution that we are going to attempt to build out is a way to access data from HealthKit. Specifically, I needed to access statistics for the total distance run/walked from a particular start date for an application that I am currently building.
There is no default Capacitor API to do this, and although it may be possible to find an existing Capacitor/Cordova plugin that does this, we can also just build it out ourselves. In this case, we don’t need a full plugin that provides access to every aspect of HealthKit - we just need to pull in that little bit of data, and that won’t take that much code. Building out this solution ourselves means that:
- We know the plugin will do exactly what we need
- We don’t need to worry about finding a community plugin that offers the functionality we need
- We can easily make modifications to our own plugin whenever required
- We don’t have to worry about whether anybody is around to maintain the plugin
- We can reduce bulk by only including what we specifically need, rather than having to include plugins that include a bunch of functionality we don’t need
If you are not already familiar with Swift it is going to be a bit harder to figure out what you need to do, but by referencing the HealthKit Documentation (or whatever you want to use) and a few Google searches you will likely be able to piece together the native code that you need.

After doing a bit of reading about HealthKit, I was able to determine that:
- I would need to first get permission from the user before being able to access HealthKit data
- I would need to perform some kind of query to retrieve the data I wanted
We will implement this in full in a moment, but with a general understanding of what a Capacitor plugin would look like, we might guess that our solution in Swift would end up looking something like this:
DistancePlugin.swift
import Capacitor
import HealthKit

@objc(DistancePlugin)
public class DistancePlugin: CAPPlugin {

    @objc func authorize(_ call: CAPPluginCall) {

      // Check if health kit is available

      // Request permission

    }

    @objc func getDistance(_ call: CAPPluginCall){

      // Pass in date from web code

      // run query

      // Pass result back to web code

    }
}
Again, if you are not already familiar with Swift, then filling in these blanks will likely mean finding some example snippets through Google searches. You will need to be able to do this to implement your own plugins, but we will walk through the complete implementation for this particular plugin now.
1. Enabling HealthKit
First, we will need to enable HealthKit in our iOS project and add usage descriptions. I will assume at this point that you already have a project created with Capacitor integrated and the iOS platform added.
To enable HealthKit, you will need to open the project in XCode:
npx cap open iosYou will then need to go to the Signing & Capabilities tab, and add the HealthKit capability by clicking the + button in the top right.
NOTE: You will need to change the Bundle identifier to something else if you are currently using the default Ionic identifier. Change the Bundle identifier to something unique and then click Try again on the provisioning profile.
You will also need to add usage descriptions in your Info.plist file that describes how you intend to use the information from HealthKit. To do this you will need to open:
App > Info.plistWithin this file, you will need to Right Click and select Add Row. You will then need to select:
Privacy - Health Update Usage DescriptionJoin my mailing list and I'll start sending you some curated Ionic tutorials.
You'll also get instant access to all of the bonus content for the blog, and you can easily unsubscribe at any time.
and then in the value field, you will need to add a description like:
To track distance walked or runYou will need to then repeat this process again for:
Privacy - Health Share Usage DescriptionOnce you have added both, you should see entries like this:

If you do not know what entries you need to add for the functionality you are using (it may be that you don’t need to add anything to our Info.plist) and are not able to find it in the documentation, just try running your application. You will likely see an error triggered in the XCode logs that will state what permission is missing from your Info.plist file.
2. Creating the Plugin
There are a few steps we need to take to create and expose our plugin to Capacitor. First, we will create the plugin file itself.
Create a new file at App/DistancePlugin.swift by right-clicking App (in the XCode project explorer) and selecting New file… (this should be at the same level as the AppDelegate.swift file)
Choose an iOS Swift file and name it DistancePlugin.swift
Add the following code to the file:
import Foundation
import Capacitor
import HealthKit

var healthStore: HKHealthStore = HKHealthStore();

@objc(DistancePlugin)
public class DistancePlugin: CAPPlugin {

    @objc func authorize(_ call: CAPPluginCall) {

        if HKHealthStore.isHealthDataAvailable() {

            let allTypes = Set([HKObjectType.quantityType(forIdentifier: .stepCount)!,
                                HKObjectType.quantityType(forIdentifier: .distanceWalkingRunning)!])

            healthStore.requestAuthorization(toShare: allTypes, read: allTypes) { (success, error) in

                if !success {
                    call.reject("Could not get permission")
                    return
                }

                call.resolve();

            }

        } else {
            call.reject("Health data not available")
        }

    }

    @objc func getDistance(_ call: CAPPluginCall){

        guard let start = call.options["startDate"] as? String else {
            call.reject("Must provide start date")
            return
        }

        let dateFormatter = DateFormatter();
        dateFormatter.dateFormat = "yyyy/MM/dd";


        let now = Date()
        let startDate = dateFormatter.date(from: start);

        let distanceQuantityType = HKQuantityType.quantityType(forIdentifier: .distanceWalkingRunning)!
        let predicate = HKQuery.predicateForSamples(withStart: startDate, end: now, options: HKQueryOptions.strictStartDate)

        let query = HKStatisticsQuery(quantityType: distanceQuantityType, quantitySamplePredicate: predicate, options: .cumulativeSum) { _, result, _ in

            guard let result = result, let sum = result.sumQuantity() else {
                call.reject("Could not query data");
                return
            }

            let totalDistance = sum.doubleValue(for: HKUnit.meter())

            call.resolve([
                "totalDistance": totalDistance
            ])
        }

        healthStore.execute(query)

    }
}
This is the final implementation of the plugin we are creating, I will briefly talk through what it is doing but this specific implementation isn’t really the focus of this tutorial.
First, it is important that we have these two imports:
import Capacitor
import HealthKit
as this will expose both Capacitor and HealthKit functionality to this file. We are also creating a global instance of HKHealthStore that we will be able to access through this plugin:
var healthStore: HKHealthStore = HKHealthStore();This store only needs to be created once and can be reused. We then have our two methods: authorize and getDistance. We can do whatever native stuff we like in these methods, as long as they eventually call call.resolve in the successful case, or call.reject in the unsuccessful case, which will then pass back whatever is necessary to Capacitor (and then to our web code).
The authorize method first checks if HealthKit is available, and then it requests permission from the user for the distanceWalkingRunning data. It is important that you only request information you actually need access to. The user needs to individually allow each bit of data that you are requesting.
The getDistance method allows a startDate to be passed in from our web code to Capacitor. We then run a query that will return the total sum of the distance walked or run in meters from the startDate to the current date. This result is then passed back through Capacitor to our web code.
3. Register the Plugin with Capacitor
In order for this plugin to be accessible by Capacitor and our web code, there is another step we need to take. You will need to create another new file along with DistancePlugin.swift.
This time, using the New File… dialog in XCode, you will need to create a new Objective-C file and give it the same name as your plugin file, e.g. DistangePlugin. After you have created this file, you should have two files inside of App like this:
DistancePlugin.swiftDistancePlugin.m
When you create this new file, XCode will prompt you to create a “Bridging Header” which will create an App-Bridging-Header.h file (you should do this).
Add the following code to DistancePlugin.m:
#import <Foundation/Foundation.h>
#import <Capacitor/Capacitor.h>

CAP_PLUGIN(DistancePlugin, "DistancePlugin",
           CAP_PLUGIN_METHOD(authorize, CAPPluginReturnPromise);
           CAP_PLUGIN_METHOD(getDistance, CAPPluginReturnPromise);
           )
This defines our DistancePlugin and its methods, and it will now be available on:
Capacitor.Plugins.DistancePlugin.authorize()4. Using the Plugin
Now, all we need to do is make use of this plugin, which we do in a similar way to any normal Capacitor plugin. This plugin will be exposed through the Capacitor web runtime, so our implementation will look a little different because we won’t be importing the plugin like a normal Capacitor plugin.
This example is for StencilJS, but the same basic concept will apply regardless:
import { Component, h } from "@stencil/core";
import { Plugins } from "@capacitor/core";

const { DistancePlugin } = Plugins;

@Component({
  tag: "app-home",
  styleUrl: "app-home.css"
})
export class AppHome {
  async getDistance() {
    let result = await DistancePlugin.authorize();

    let data = await DistancePlugin.getDistance({ startDate: "2019/07/01" });
    console.log(data);
  }

  render() {
    return [
      <ion-header>
        <ion-toolbar color="primary">
          <ion-title>Home</ion-title>
        </ion-toolbar>
      </ion-header>,

      <ion-content class="ion-padding">
        <ion-button onClick={() => this.getDistance()} expand="block">
          Get Distance
        </ion-button>
      </ion-content>
    ];
  }
}
If you run the application on an iOS device, you should be able to click the Get Distance button to return the total distance walked/run since 2019/07/01 or whatever date you want to supply.
The first time you execute this code, the authorisation screen will display:
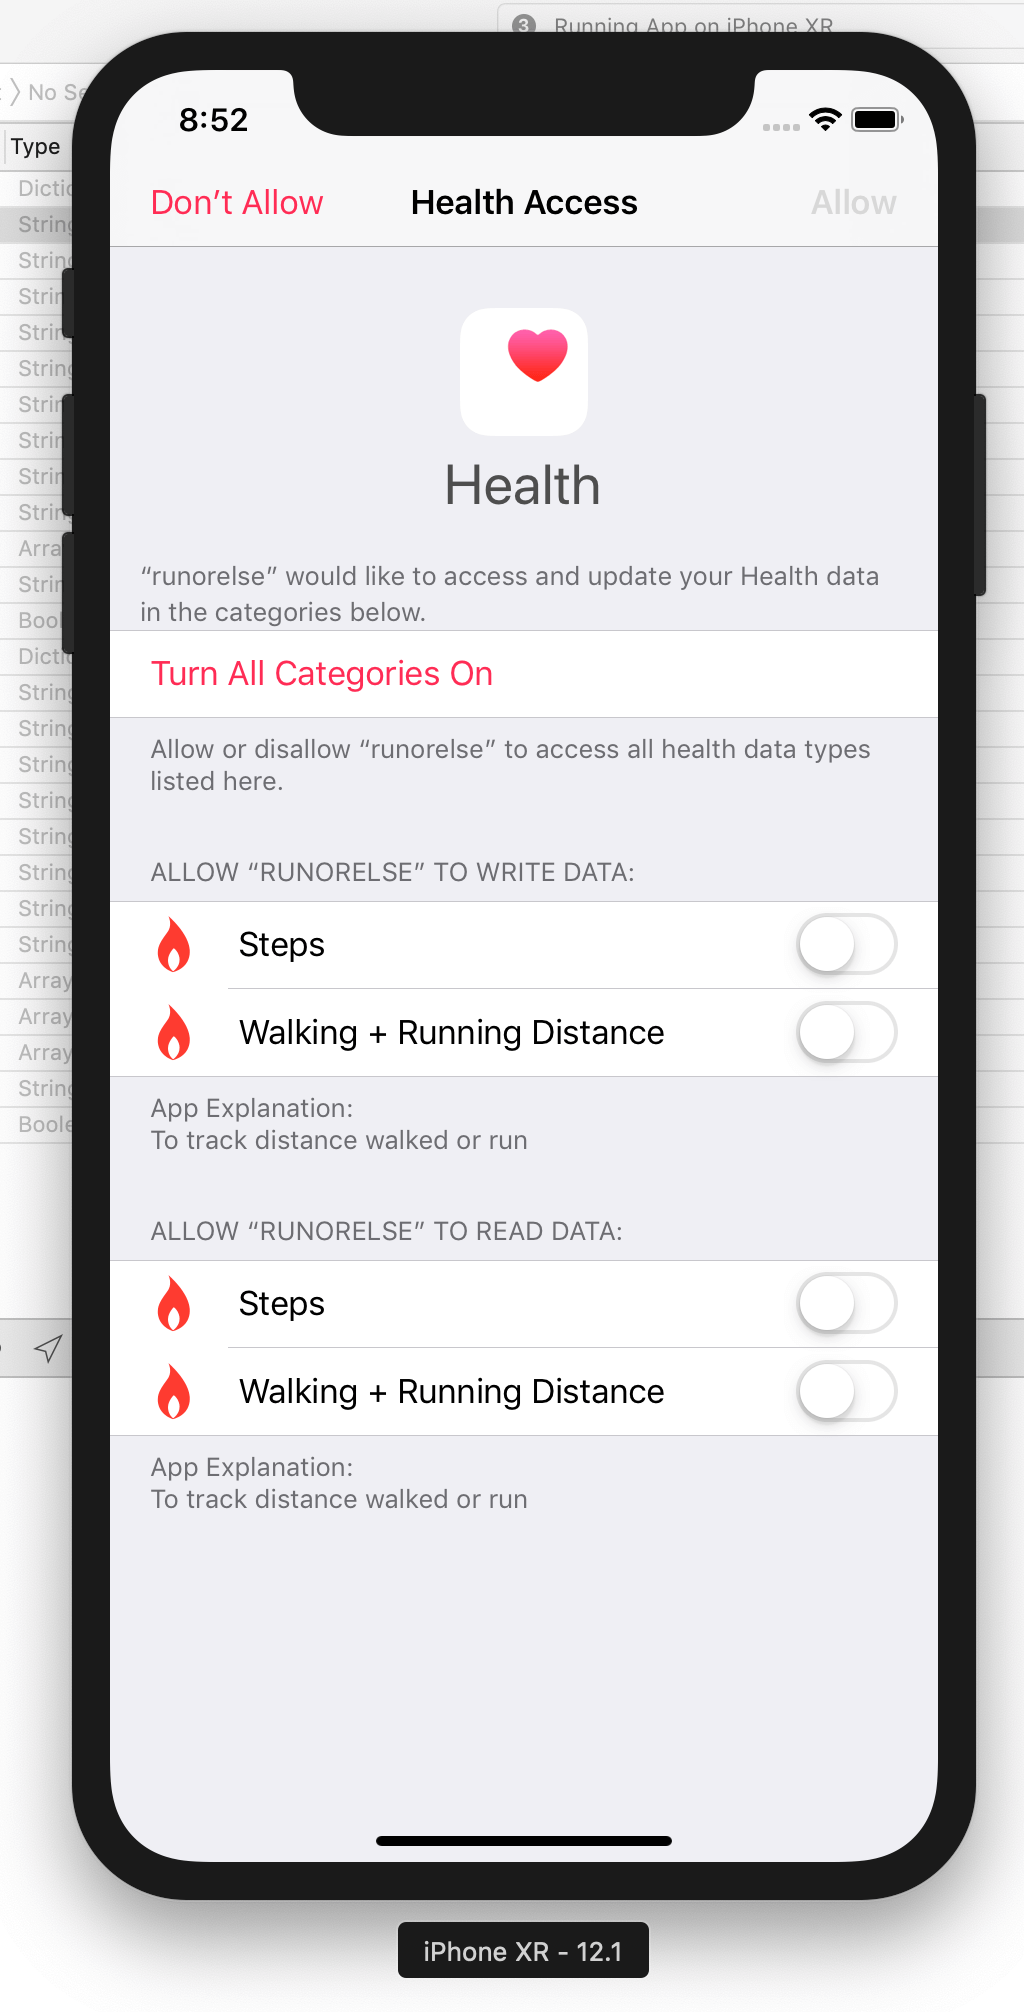
But on subsequent attempts to get the distance data, the authorisation screen will not be shown again, and the resulting data will be logged immediately, e.g:
{"totalDistance":8940.4301789706806}Summary
The general process for exposing any native functionality you want through Capacitor is reasonably straight-forward, the difficult part is most likely going to be piecing together the Swift/Objective-C code you need to make what you want work. With some practice, as with anything, you will become more familiar with the Swift (or Java/Kotlin for Android) and it will become easier to do.
Remember that with Capacitor, the native project you are working with is no different to any other standard native iOS project. When searching for information, you do not need to search ”how to do X with Capacitor” you can just search ”how to do X with iOS/Swift” and you should find plenty of results. The only thing that is really specific to Capacitor here is the concept of using call to pass data between the web code and the native code.
Eventually, you will never have to worry about finding yourself in a position where there isn’t already a plugin available to do what you need, as you will have full and confident control over the underlying native project that your Ionic application uses.
If you would like to see how to do this for Android, check out this video: Running Native iOS/Android Code with Ionic.
Recommend
About Joyk
Aggregate valuable and interesting links.
Joyk means Joy of geeK