

Netty使用指导
source link: https://www.longdw.com/1098.html
Go to the source link to view the article. You can view the picture content, updated content and better typesetting reading experience. If the link is broken, please click the button below to view the snapshot at that time.

Netty使用指导
Netty是一个异步事件驱动的网络框架,它能快速开发可维护的高性能的协议服务&客户程序。
Netty是一个NIO 客户端-服务器端框架,能够快速并且很容易的开发像协议服务端和客户端这样的网络应用程序。它大大简化了网络编程比如TCP和UDP socket server。
“快速和容易”并不是说会受到应用程序的可维护性或稳定性问题的影响。Netty是经过精心设计的,它从很多协议的实践中吸取经验如:FTP,SMTP,HTTP。结果Netty成功的找到了一种方便开发的方法,并且在性能,稳定性和灵活性方面并没有做任何妥协。
如今我们使用通用的应用程序或者类库来互相通信。比如我们经常使用HTTP client库从web服务器上获取数据,通过web服务器来执行远程调用。但通用协议或者它的实现有时候扩展性并不好。比如我们不会用通用的HTTP服务器来处理大文件、电子邮件消息、实时消息通讯,比如金融信息和多人游戏数据。我们需要一个高度优化的协议来处理一些特殊的场景。例如你可能希望实现一个优化了的基于AJAX的聊天应用程序、流媒体或大文件传输的HTTP服务。你甚至可以设计并实现一个全新的协议来准确的实现你的需求。另一个不可避免的情况就是你需要处理一个老的定制化的协议,来确保跟旧系统间的互操作性。在这种情况下,重要的是我们如何才能快速实现协议而不牺牲最终应用的稳定性和性能。
Netty项目致力于提供一个异步的事件驱动的网络应用程序框架和工具,能够快速的开发可维护性的高性能和高扩展性协议的服务端和客户端。
换句话说,Netty是一个NIO客户-服务端框架,它能够快速而简单的开发网络应用程序。大大简化了像TCP和UDP这样的网络程序的开发。
有些读者可能已经找到了其他网络应用框架声称有同样的优势,你可能想问Netty和它们之间有啥不同。答案就是它所建立的哲学理念。Netty的设计目的就是让你从第一天开始就可以在API和实现方面获得最舒适的体验。这不是什么有形的东西,但你会意识到,当你阅读了本指南并且使用了Netty,这种设计思想将使你的工作变得更加容易。
本章将围绕Netty的核心概念,使用简单的例子来让你快速入门。在本章结束时,你将能够马上在Netty上写一个客户端和服务端。
如果你更喜欢自上而下的学习方法,你可能希望从第2章架构预览开始,然后再回到这里。
运行这一章节例子的最低要求仅两个:最新版本的Netty和JDK1.6或以上版本。最新版本的Netty可以在项目下载页上找到。要下载正确的JDK版本,请参考你喜欢的JDK供应商的网站。
当你阅读时,你可能对本章介绍的类有疑问。每当你想要了解更多的时候你可以查阅API参考。为了方便大家,文档中所有的类名都会链接到API参考。另外,请主动联系Netty项目社区以便让我们知道是否有错误的信息或者语法和拼写错误,或者你有更好的点子来帮助我们改善文档。
写一个Discard Server
世界上最简单的协议不是’Hello,World!’,而是
DISCARD。这个协议会丢弃任何接收到的数据而没有任何响应的。
要实现
DISCARD协议,你只需要忽略所有接收到的数据即可。让我们直接从实现handler开始吧,handler处理Netty生成的I/O事件。
package io.netty.example.discard;

import io.netty.buffer.ByteBuf;

import io.netty.channel.ChannelHandlerContext;
import io.netty.channel.ChannelInboundHandlerAdapter;

/**
 * Handles a server-side channel.
 */
public class DiscardServerHandler extends ChannelInboundHandlerAdapter { // (1)

    @Override
    public void channelRead(ChannelHandlerContext ctx, Object msg) { // (2)
        // Discard the received data silently.
        ((ByteBuf) msg).release(); // (3)
    }

    @Override
    public void exceptionCaught(ChannelHandlerContext ctx, Throwable cause) { // (4)
        // Close the connection when an exception is raised.
        cause.printStackTrace();
        ctx.close();
    }
}
1.
ChannelInboundHandlerAdapter实现了ChannelInboundHandler,DiscardServerHandler继承了ChannelInboundHandlerAdapter。你可以重写ChannelInboundHandler提供的各种事件处理方法。目前,你仅需要继承ChannelInboundHandlerAdapter而不是自己实现handler接口。
2.我们在这里实现了channelRead()事件处理方法。每当从客户端接收到新数据时,此方法就会被调用并携带接收到的消息。这个例子中,接收的消息类型是
ByteBuf。
3.要实现
DISCARD协议,handler必须忽略接收到的消息。ByteBuf是一个引用计数对象(reference-counted),必须通过调用release()方法来显式的释放它。请记住,处理传入到handler中的引用计数对象是handler的责任。通常,channelRead()方法像下面这样实现:
@Override
public void channelRead(ChannelHandlerContext ctx, Object msg) {
    try {
        // Do something with msg
    } finally {
        ReferenceCountUtil.release(msg);
    }
}
4.当由于I/O错误或因为处理事件时抛出异常,调用带有Throwable参数的exceptionCaught()方法。大多数情况下,捕获的异常需要打印出来,并且相关的channel需要在这里关闭。尽管此方法的时间会有所不同,这取决于你要如何处理异常情况。比如你可能希望在关闭之前发送一个带有错误码的相应消息。
到目前为止都还不错。我们已经实现了DISCARD服务器端的前半部分。剩下的就是写一个
main()方法,用DiscardServerHandler来启动服务。
package io.netty.example.discard;

import io.netty.bootstrap.ServerBootstrap;

import io.netty.channel.ChannelFuture;
import io.netty.channel.ChannelInitializer;
import io.netty.channel.ChannelOption;
import io.netty.channel.EventLoopGroup;
import io.netty.channel.nio.NioEventLoopGroup;
import io.netty.channel.socket.SocketChannel;
import io.netty.channel.socket.nio.NioServerSocketChannel;

/**
 * Discards any incoming data.
 */
public class DiscardServer {

    private int port;

    public DiscardServer(int port) {
        this.port = port;
    }

    public void run() throws Exception {
        EventLoopGroup bossGroup = new NioEventLoopGroup(); // (1)
        EventLoopGroup workerGroup = new NioEventLoopGroup();
        try {
            ServerBootstrap b = new ServerBootstrap(); // (2)
            b.group(bossGroup, workerGroup)
             .channel(NioServerSocketChannel.class) // (3)
             .childHandler(new ChannelInitializer<SocketChannel>() { // (4)
                 @Override
                 public void initChannel(SocketChannel ch) throws Exception {
                     ch.pipeline().addLast(new DiscardServerHandler());
                 }
             })
             .option(ChannelOption.SO_BACKLOG, 128)          // (5)
             .childOption(ChannelOption.SO_KEEPALIVE, true); // (6)

            // Bind and start to accept incoming connections.
            ChannelFuture f = b.bind(port).sync(); // (7)

            // Wait until the server socket is closed.
            // In this example, this does not happen, but you can do that to gracefully
            // shut down your server.
            f.channel().closeFuture().sync();
        } finally {
            workerGroup.shutdownGracefully();
            bossGroup.shutdownGracefully();
        }
    }

    public static void main(String[] args) throws Exception {
        int port = 8080;
        if (args.length > 0) {
            port = Integer.parseInt(args[0]);
        }

        new DiscardServer(port).run();
    }
}
1.
NioEventLoopGroup是一个处理I/O操作的event loop(可以理解为消息队列)。Netty为不同类型的传输提供了各种EventLoopGroup实现。我们在这个例子中实现了一个服务端的应用,因此需要使用两个NioEventLoopGroup。第一个通常叫做’boss’,用来接收传入的连接。第二个通常叫做’worker’,当’boss’接收连接并将接收的连接注册到work之后,处理接收的连接的通信量。使用了多少线程以及它们和创建的Channel是如何映射的,这取决于EventLoopGroup的实现,甚至可以通过构造方法来配置。
2.
ServerBootstrap是一个用来设置服务端的helper类。你也可以直接使用一个Channel来设置服务端。但是要注意,这种做法很冗余,大多数情况不需要这么做。
3.这里,我们明确指定使用
NioServerSocketChannel类来实例化一个新的Channel,用来接收传入的连接。
4.此处指定的handler将始终由新的接收的Channel来计算。
ChannelInitializer是一个特殊的handler,目的是用来帮助用户设置一个新的Channel。你很可能希望通过添加一些handlers比如DiscardServerHandler来配置新Channel的ChannelPipeline,以实现你的网络应用程序。随着应用程序变得复杂,很可能你会向pipeline中添加更多的handler,并最终将这个匿名类提取到顶层类中。
5.你也可以设置特定于Channel实现的参数。我们正在写一个TCP/IP服务,因此我们可以设置socket options,比如tcpNoDelay和keepAlive。请查阅ChannelOption的api文档和具体的ChannelConfig实现,以获得支持的ChannelOptions的概述。
6.不知道你注意到option()和childOption()没有?option()用于接收传入连接的
NioServerSocketChannel。childOption()用于由parent ServerChannel来接收的Channel,也就是这个例子中的NioSocketChannel。
7.我们现在准备出发了。剩下的就是绑定端口和启动服务。这里,我们绑定到机器中所有NICs(网络接口卡)的8080端口。你现在可以根据你的需要多次调用bind()方法(使用不同的绑定地址)
恭喜你!你刚已经完成了你的第一个基于Netty之上的服务。
查看接收的数据
既然我们已经编写了我们的第一个服务,那么接下来我们就需要测试它是否能真的工作。
最简单的测试方法就是使用telnet命令。例如,你可以在命令行中输入
telnet localhost 8080并键入一些内容。
但是,我们能说服务正常工作吗?我们不能确切的知道,因为它是一个discard服务。你不会得到任何响应。为了证明它真的工作了,让我们修改服务端来打印接收到的内容。
我们已经知道每当接收到数据,channelRead()方法都会执行到。让我们放些代码到
DiscardServerHandler的channelRead()方法里面去:
@Override
public void channelRead(ChannelHandlerContext ctx, Object msg) {
    ByteBuf in = (ByteBuf) msg;
    try {
        while (in.isReadable()) { // (1)
            System.out.print((char) in.readByte());
            System.out.flush();
        }
    } finally {
        ReferenceCountUtil.release(msg); // (2)
    }
}
1.这种低效的循环实际上可以简化为:
System.out.println(in.toString(io.netty.util.CharsetUtil.US_ASCII))
2.或者,你可以在这里执行
in.release()。
如果你再次运行telnet命令,你会看到服务端打印它所接收到的数据。
discard服务的完整代码位于发布的io.netty.example.discard包下。
编写Echo服务
到目前为止,我们一直在消耗数据而没有任何回应。然而服务端通常应该响应请求。让我们学习如何通过实现ECHO协议来给客户端写一个响应消息,这样任何接收到的数据都会被送回去。
和我们上一章节实现的discard服务唯一的不同就是用回送收到的数据代替了通过命令行来打印接收到的数据。因此,再次修改channelRead()方法就够了:
@Override
public void channelRead(ChannelHandlerContext ctx, Object msg) {
    ctx.write(msg); // (1)
    ctx.flush(); // (2)
}
1.
ChannelHandlerContext提供了各种操作来使你可以触发各种I/O事件和操作。这里,我们调用了write(Object)方法一次不差地写入接收到的消息。请注意我们并没有像上面的DISCARD例子一样释放接收到的消息。因为当它被写到线路上时,Netty会释放。
2.
ctx.write(Object)并不会将消息写到线路上。它内部会先缓存起来,然后通过ctx.flush()将数据flush到线路上。或者为了方便起见,你也可以调用ctx.writeAndFlush(msg)方法。
如果你再次运行telnet命令,你将会看到你任何发送给服务端的数据,它都给你返回来。
echo服务端完整的代码位于发布的io.netty.example.echo包下。
写一个Time服务
本章节要实现的协议是TIME协议。不同于我们上个例子中发送的一个包含32位整数的消息,当消息发送后就关闭了连接并且不接收任何请求。这个例子中,你将会学到如何构造和发送消息,以及如何在完成时关闭连接。
因为我们将要忽略任何接收到的消息,但是会在连接建立后立即发送一个消息,这次我们不能使用channelRead()方法了。取而代之的是我们应该重写channelActive()方法。下面是实现:
package io.netty.example.time;

public class TimeServerHandler extends ChannelInboundHandlerAdapter {

    @Override
    public void channelActive(final ChannelHandlerContext ctx) { // (1)
        final ByteBuf time = ctx.alloc().buffer(4); // (2)
        time.writeInt((int) (System.currentTimeMillis() / 1000L + 2208988800L));

        final ChannelFuture f = ctx.writeAndFlush(time); // (3)
        f.addListener(new ChannelFutureListener() {
            @Override
            public void operationComplete(ChannelFuture future) {
                assert f == future;
                ctx.close();
            }
        }); // (4)
    }

    @Override
    public void exceptionCaught(ChannelHandlerContext ctx, Throwable cause) {
        cause.printStackTrace();
        ctx.close();
    }
}
1.如前所述,当连接建立并准备生成traffice时,将调用channelActive()方法。让我们在这个方法里写一个代表当前时间的32位的整数。
2.发送一个新消息,我们需要分配一个包含消息的新缓冲区。我们将要写一个32位的整数,因此我们需要一个容量至少是4字节的ByteBuf。通过
ChannelHandlerContext.alloc()来获得当前的ByteBufAllocator,并分配一个新的缓冲区。
3.跟平时一样,我们写入构造的消息。
但是等等,flip在哪里?在NIO中我们难道不应该在发送消息之前调用java.nio.ByteBuffer.flip()吗?ByteBuf没有这样的方法,因为它有两个指针;一个是为了读操作一个是为了写操作。当你向ByteBuf中写入一些内容时,writer索引会增加,而reader索引不变。reader索引和writer索引分别表示消息的开始和结束位置。
相反,如果不调用flip方法,NIO buffer是没法提供一个清晰的方法来确定消息内容的开始和结束。如果你忘了flip缓冲区,你会有麻烦的,因为这样胡导致发送不了数据或者发送不正确的数据。这种错误不会在Netty中出现,因为我们针对不同的操作类型有不同的指针。你会发现你的工作变得更加容易,当你习惯了它——没有flip out的生活!
另外一点需要注意的是ChannelHandlerContext.write()(和writeAndFlush())方法返回了一个ChannelFuture。ChannelFuture代表一个尚未发生的I/O操作。这就意味着,所有的请求操作可能都没有执行,因为在Netty中所有的操作都是异步的。例如下面代码可在发消息之前就关闭了连接。
Channel ch = ...;
ch.writeAndFlush(message);
ch.close();
因此你需要在ChannelFuture完成之后调用close()方法,由write()方法返回,当写入操作完成后它会通知监听者。请注意,close()也不是立马就会关闭,它也会返回一个ChannelFuture。
4.当写请求完成时我们如何获得通知?这很简单,向返回的ChannelFuture中添加一个ChannelFutureListener就好了。这里我们创建了新的匿名ChannelFutureListener,它在操作完成时关闭了Channel。
或者你可以通过预定义监听来简化代码:
f.addListener(ChannelFutureListener.CLOSE);
要测试我们的time服务是否像我们预期的那样工作,你可以使用UNIX rdate命令
$ rdate -o <port> -p <host>
<port>就是main()中指定的端口数字,<host>通常是localhost。
写一个Time客户端
不同于DISCARD和ECHO服务端,我们需要给TIME协议一个客户端,因为一个人不能将32位的二进制数据翻译成日历上的日期。这一章节,我们讨论如何确保服务端正确的工作,并且学会如何使用Netty来写一个客户端。
在Netty中,服务端和客户端最大并且唯一不同点就是使用了不同的Bootstrap和Channel实现。请看下面代码:
package io.netty.example.time;

public class TimeClient {
    public static void main(String[] args) throws Exception {
        String host = args[0];
        int port = Integer.parseInt(args[1]);
        EventLoopGroup workerGroup = new NioEventLoopGroup();

        try {
            Bootstrap b = new Bootstrap(); // (1)
            b.group(workerGroup); // (2)
            b.channel(NioSocketChannel.class); // (3)
            b.option(ChannelOption.SO_KEEPALIVE, true); // (4)
            b.handler(new ChannelInitializer<SocketChannel>() {
                @Override
                public void initChannel(SocketChannel ch) throws Exception {
                    ch.pipeline().addLast(new TimeClientHandler());
                }
            });

            // Start the client.
            ChannelFuture f = b.connect(host, port).sync(); // (5)

            // Wait until the connection is closed.
            f.channel().closeFuture().sync();
        } finally {
            workerGroup.shutdownGracefully();
        }
    }
}
1.Bootstrap和ServerBootstrap类似,只是它适用于nonserver channels,例如只有客户端或无连接的channel。
2.如果你指定了唯一一个EventLoopGroup,它将同时作为boss group和work group。不过boss worker并不用于客户端。
3.NioSocketChannel代替了NioServerSocketChannel,用来创建客户端Channel。
4.注意我们在这里并没有像我们使用ServerBootstrap那样来使用childOption(),因为客户端SocketChannel没有父类。
5.我们应该调用connetct()方法来代替bind()方法。
如你所见,它与服务端代码并没有什么不同。那么ChannelHandler的实现呢?它应该从服务端接收32位整数,并将其转换为为刻度的格式,打印已转换的时间,并关闭连接:
package io.netty.example.time;

import java.util.Date;

public class TimeClientHandler extends ChannelInboundHandlerAdapter {
    @Override
    public void channelRead(ChannelHandlerContext ctx, Object msg) {
        ByteBuf m = (ByteBuf) msg; // (1)
        try {
            long currentTimeMillis = (m.readUnsignedInt() - 2208988800L) * 1000L;
            System.out.println(new Date(currentTimeMillis));
            ctx.close();
        } finally {
            m.release();
        }
    }

    @Override
    public void exceptionCaught(ChannelHandlerContext ctx, Throwable cause) {
        cause.printStackTrace();
        ctx.close();
    }
}
1.在TCP/IP中,Netty将对方发送的数据读入一个ByteBuf中。
这看起来很简单并且看起来和服务端例子没什么不同。但是,此处的handler有时候会拒绝工作继而引发IndexOutOfBoundsException。我们将在下一章节讨论为什么会这样。
处理基于流的传输
套接字缓冲区的一个小警告
像TCP/IP这样基于流的传输,接收到的数据存储在套接字接收缓冲区中。不幸的是,基于流传输的缓冲区不是packets队列而是bytes队列。这就意味着,即使你将两条消息作为两个独立的packets发送,操作系统也不会将它们视为两条消息,而只是一堆字节。所以无法保证你读的内容和远程写的内容一致。例如,我们假设操作系统的TCP/IP堆栈接收到三个数据包:
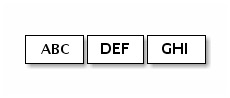
由于基于流协议的这个特性,在你的应用程序中读取数据时有很高的可能性被分成下面的片段:
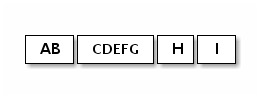
因此不管是服务端还是客户端,接收部分,都应该将接收到的数据整理成一个或多个应用程序逻辑应用程序逻辑容易理解的有意义的帧。上述例子中,接收到的数据应该像下面这样被framed:
第一种解决方案
让我们回到TIME客户端例子中。这里我们有同样的问题。32位的整数是非常少量的数据,而且不太可能经常被拆分。但是,问题是它可以被拆分,并且拆分的可能性会随着通信量的增加而增加。
最简单的解决办法就是创建一个内部累积缓冲区,等待所有4个字节都被接收到内部缓冲区。下面是修改过的TimeClientHandler实现,它修复了这个问题:
package io.netty.example.time;

import java.util.Date;

public class TimeClientHandler extends ChannelInboundHandlerAdapter {
    private ByteBuf buf;

    @Override
    public void handlerAdded(ChannelHandlerContext ctx) {
        buf = ctx.alloc().buffer(4); // (1)
    }

    @Override
    public void handlerRemoved(ChannelHandlerContext ctx) {
        buf.release(); // (1)
        buf = null;
    }

    @Override
    public void channelRead(ChannelHandlerContext ctx, Object msg) {
        ByteBuf m = (ByteBuf) msg;
        buf.writeBytes(m); // (2)
        m.release();

        if (buf.readableBytes() >= 4) { // (3)
            long currentTimeMillis = (buf.readUnsignedInt() - 2208988800L) * 1000L;
            System.out.println(new Date(currentTimeMillis));
            ctx.close();
        }
    }

    @Override
    public void exceptionCaught(ChannelHandlerContext ctx, Throwable cause) {
        cause.printStackTrace();
        ctx.close();
    }
}
1.ChannelHandler有两个生命周期监听方法:handlerAdded()和handlerRemoved()。你可以执行任何初始化任务,只要它不阻塞很长时间。
2.首先,所有接收到的数据都应该累积到buf中。
3.然后,handler必须检查buf是否有足够的数据,这个例子中是4个字节,然后继续执行实际的业务逻辑。因此,当跟多的数据到达时,Netty会再次调用channelRead()方法,最终会累积所有4个字节的数据。
第二种解决方案
尽管第一个解决方案解决了TIME客户端的问题,但是修改的handler看起来并不清晰。假设有一个更复杂的协议,它是由多个字段(如可变长度的字段)组成。你的ChannelInboundHandler实现将会迅速变得难以维护。
估计你已经注意到,你可以向ChannelPipeline添加多个ChannelHandler,因此,你可以将一个单一的ChannelHandler拆分为多个模块化的ChannelHandler以降低应用程序的复杂度。例如,你可以将TimeClientHandler拆分为两个handlers:
·TimeDecoder用来处理数据拆分的问题,以及
·TimeClientHandler原始版本的实现。
幸运的是,Netty提供了一个可扩展类,帮助你完成TimeDecoder的开发:
package io.netty.example.time;

public class TimeDecoder extends ByteToMessageDecoder { // (1)
    @Override
    protected void decode(ChannelHandlerContext ctx, ByteBuf in, List<Object> out) { // (2)
        if (in.readableBytes() < 4) {
            return; // (3)
        }

        out.add(in.readBytes(4)); // (4)
    }
}
1.ByteToMessageDecoder实现了ChannelInboundHandler,它使处理拆分的问题变得容易。
2.每当接收到新的数据,ByteToMessageDecoder调用decode()方法,并且传入一个内部维护的累计缓冲区。
3.当累积缓冲区中没有足够的数据时,decode()决定不向out中添加任何内容。当接收到更多的数据时,ByteToMessageDecoder将再次调用decode()。
4.当
decode()向out中添加一个object时,意味着解码器成功地解码了一条消息。ByteToMessageDecoder将丢弃累积缓冲区中读取的部分。请记住你不需要解码多个消息。ByteToMessageDecoder会保持调用decode()方法直到没有任何数据添加到out中。
由于我们我们有了另一个handler要插入到ChannelPipeline中,我们应该修改TimeClient中的ChannelInitializer实现:
b.handler(new ChannelInitializer<SocketChannel>() {
    @Override
    public void initChannel(SocketChannel ch) throws Exception {
        ch.pipeline().addLast(new TimeDecoder(), new TimeClientHandler());
    }
});
如果你是一个喜欢创新的人,你可能想尝试一下ReplayingDecoder,它能够更加简化解码器。不过你需要查阅API参考以获得更多的信息。
public class TimeDecoder extends ReplayingDecoder<Void> {
    @Override
    protected void decode(
            ChannelHandlerContext ctx, ByteBuf in, List<Object> out) {
        out.add(in.readBytes(4));
    }
}
此外,Netty提供了很多现成的解码器,使你能够非常轻松的实现大多数协议,帮助你避免最终使用庞大而单一的无法维护的handler实现。请查阅下面的包以获得更多的示例:
·io.netty.example.factorial 关于二进制协议
·io.netty.example.telnet 基于文本行的协议。
用POJO代替ByteBuf
到目前为止,我们回顾一下所有的示例都使用ByteBuf作为协议消息的主要数据结构。这一章节,我们将使用POJO代替ByteBuf来改进TIME协议客户端和服务端示例。
在ChannelHandlers中使用POJO的好处很明显;通过将从ByteBuf中提取信息的代码从handler中分离出来,handler就会变得更易于维护和重用。在TIME客户端和服务端实例中,我们仅读取了一个32位的整数,直接使用ByteBuf并不是主要问题。但是,在你实现真实的协议时,你会发现分离是很有必要的。
首先,让我们定义一个新的类型UnixTime。
package io.netty.example.time;

import java.util.Date;

public class UnixTime {

    private final long value;

    public UnixTime() {
        this(System.currentTimeMillis() / 1000L + 2208988800L);
    }

    public UnixTime(long value) {
        this.value = value;
    }

    public long value() {
        return value;
    }

    @Override
    public String toString() {
        return new Date((value() - 2208988800L) * 1000L).toString();
    }
}
我们现在可以修改TimeDecoder来生成一个UnixTime代替ByteBuf。
@Override
protected void decode(ChannelHandlerContext ctx, ByteBuf in, List<Object> out) {
    if (in.readableBytes() < 4) {
        return;
    }

    out.add(new UnixTime(in.readUnsignedInt()));
}
使用更新的解码器,TimeClientHandler不再使用ByteBuf:
@Override
public void channelRead(ChannelHandlerContext ctx, Object msg) {
    UnixTime m = (UnixTime) msg;
    System.out.println(m);
    ctx.close();
}
是不是非常简单明了?可以在服务端使用同样的技术。我们这次先更新TimeServerHandler:
@Override
public void channelActive(ChannelHandlerContext ctx) {
    ChannelFuture f = ctx.writeAndFlush(new UnixTime());
    f.addListener(ChannelFutureListener.CLOSE);
}
现在唯一缺少的部分是编码器,它是ChannelOutboundHandler的实现,它将UnixTime转换回ByteBuf。比写解码器简单多了,因为编码消息时不需要处理数据包拆分和组装的问题。
package io.netty.example.time;

public class TimeEncoder extends ChannelOutboundHandlerAdapter {
    @Override
    public void write(ChannelHandlerContext ctx, Object msg, ChannelPromise promise) {
        UnixTime m = (UnixTime) msg;
        ByteBuf encoded = ctx.alloc().buffer(4);
        encoded.writeInt((int)m.value());
        ctx.write(encoded, promise); // (1)
    }
}
1.这这几行代码中还有几个重要的事情。
首先,我们传递了原始的ChannelPromise,以便当编码的数据实际写入到线路上时,Netty将其标记为成功或者失败。
其次,我们没有调用
ctx.flush()。这里有一个单独的handler方法 void flush(ChannelHandlerContext ctx),用于重写flush()操作。
为了进一步简化,你可以使用MessageToByteEncoder:
public class TimeEncoder extends MessageToByteEncoder<UnixTime> {
    @Override
    protected void encode(ChannelHandlerContext ctx, UnixTime msg, ByteBuf out) {
        out.writeInt((int)msg.value());
    }
}
最后剩下的任务就是在TimeServerHandler之前将TimeEncoder插入到服务端的ChannelPipeline中,这只是一个简单的练习。
关闭应用程序
关闭一个Netty应用往往只需要简单的通过shutdownGracefully()方法来关闭你构建的所有EventLoopGroup。在EventLoopGroup完全终止并且对应的Channel都关闭时,Netty返回一个Future来通知你。
在本章中,我们简要介绍了Netty,并演示了如何在Netty之上编写一个完全工作的网络应用程序。在接下来的章节中有关于Netty的更详细的信息。我们还鼓励您查看io.Netty.example包中的Netty示例。
转载请注明出处!!!
今天翻译完才发现已经有大佬翻译过了:https://www.w3cschool.cn/netty4userguide/52ki1iey.html
本篇文章的目的是学习Netty和锻炼自己阅读英文文档的能力,共勉。
Recommend
About Joyk
Aggregate valuable and interesting links.
Joyk means Joy of geeK