

如何制作一个可以自动更新的Github个人主页
source link: https://zxs.io/article/1735
Go to the source link to view the article. You can view the picture content, updated content and better typesetting reading experience. If the link is broken, please click the button below to view the snapshot at that time.

如何制作一个可以自动更新的Github个人主页
Github近期上线一个新的功能,就是你在自己账号下创建一个和自己用户名同名的仓库,并在仓库下创建一个README.md文件,这个文件就会被展示在你的Github个人主页。源于markdown的强大描述能力,你可以在你的Github首页展示各种各样的信息,甚至有人直接将自己个人简历挂上面,极大丰富了Github的可玩性。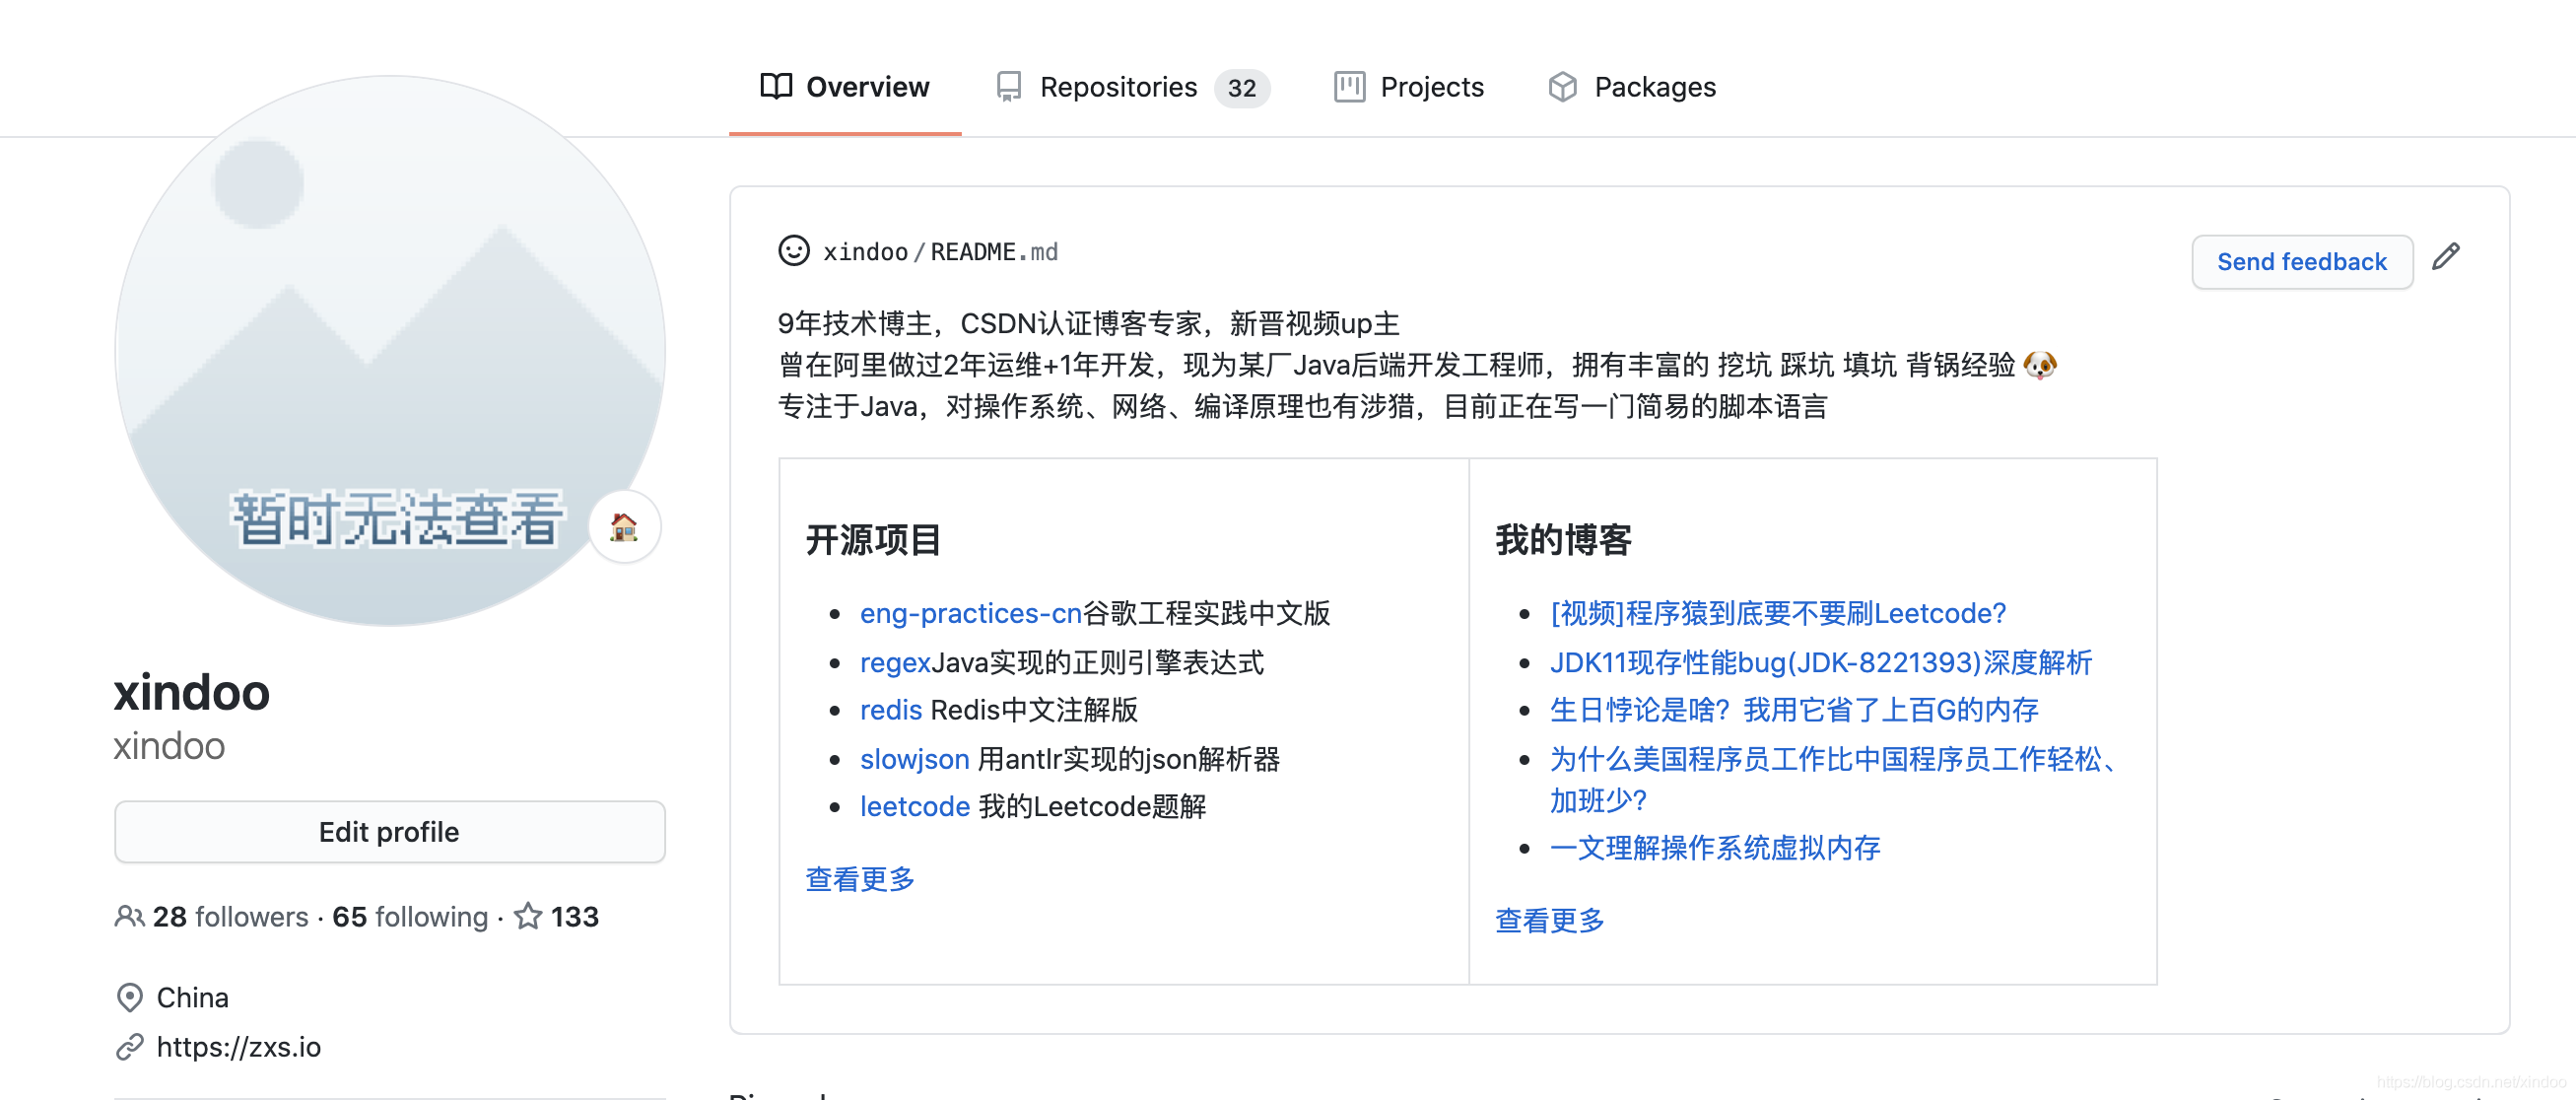
比如我的Github账号是xindoo ,我直接建个xindoo代码库,然后写个README.md文件介绍自己,最终展示效果如上图,大家也可以直接到我Github主页查看。不过我个人设计的就比较简陋了,但依赖于Markdown的能力,你可以充分发挥自己主观能动性,在README嵌入更多好玩的东西,比如给你看下Github前端小姐姐的主页,对比之下我直男的身份算是藏不住了。
不过如何制作一个好看的个人主页不是今天的主要内容,我主要是想教大家如何制作一个动态更新的主页。比如我自己的主页有一栏是我最新博文列表,我每写一篇新博文都要手动更新一次README.md? 当然不,我的主页是会自动定期更新上去的,怎么做到的???
思路很简单,首页动态更新的本质其实就是更新README.md文件,先问一个问题 Readme.md一定要手写吗? 用程序生成不好吗!!只要有个定时任务能自动抓取我博客首页的内容,然后更新README.md并push到github上就行,自己手头有服务器的人可能立马想到写一个crontab定时任务就能搞定,没服务器也不急,你接着往后看。
稍微有点编码水平的人用程序生成一个README.md并不难,拿我的主页来说吧,稍微有点难度的就是如何抓取我最新的博客。 其实本质上就是个简易的爬虫,CSDN目前并没有反扒机制,所以实现难度并不大,代码如下,我用了urllib3抓取html源码,并用了etree的xpath解析出了博客标题和地址。
# -*- coding: utf-8 -*-
import urllib3
from lxml import etree
import html
import re

blogUrl = 'https://xindoo.blog.csdn.net/'

headers={'User-Agent': 'Mozilla/5.0 (Macintosh; Intel Mac OS X 10_15_6) AppleWebKit/537.36 (KHTML, like Gecko) Chrome/84.0.4147.89 Safari/537.36'}

def addIntro(f):
    txt = '''
9年技术博主,CSDN认证博客专家,新晋视频up主
曾在阿里做过2年运维+1年开发,现为某厂Java后端开发工程师,拥有丰富的 挖坑 踩坑 填坑 背锅经验 🐶
专注于Java,对操作系统、网络、编译原理也有涉猎,目前正在写一门简易的脚本语言
'''
    f.write(txt)

def addProjectInfo(f):
    txt ='''
### 开源项目
- [eng-practices-cn](https://github.com/xindoo/eng-practices-cn)谷歌工程实践中文版
- [regex](https://github.com/xindoo/regex)Java实现的正则引擎表达式
- [redis](https://github.com/xindoo/redis) Redis中文注解版
- [slowjson](https://github.com/xindoo/slowjson) 用antlr实现的json解析器
- [leetcode](https://github.com/xindoo/leetcode) 我的Leetcode题解

[查看更多](https://github.com/xindoo/)
    '''
    f.write(txt)

def addBlogInfo(f):
    http = urllib3.PoolManager(num_pools=5, headers = headers)
    resp = http.request('GET', blogUrl)
    resp_tree = etree.HTML(resp.data.decode("utf-8"))
    html_data = resp_tree.xpath(".//div[@class='article-item-box csdn-tracking-statistics']/h4")
    f.write("\n### 我的博客\n")
    cnt = 0
    for i in html_data:
        if cnt >= 5:
            break
        title = i.xpath('./a/text()')[1].strip()
        url = i.xpath('./a/@href')[0]
        item = '- [%s](%s)\n' % (title, url)
        f.write(item)
        cnt = cnt + 1
    f.write('\n[查看更多](https://xindoo.blog.csdn.net/)\n')

f = open('README.md', 'w+')
addIntro(f)
f.write('<table><tr>\n')
f.write('<td valign="top" width="50%">\n')

addProjectInfo(f)
f.write('\n</td>\n')
f.write('<td valign="top" width="50%">\n')
addBlogInfo(f)
f.write('\n</td>\n')
f.write('</tr></table>\n')
f.close 有了上面代码,你只需要在你服务器设置个crontab,执行这段python代码,然后git commit -a"update" git push 就可以拥有我和同款的Github首页了。
你没有自己的服务器也没关系,Github给你免费的服务器让你用,这就是Github之前推出的Actions功能,我理解它的本质就是Github给你提供了免费的容器,你可以在容器里执行某些workflow,当然也可以运行一些自定义的代码,更多Actions的内容可以参考下阮一峰老师的GitHub Actions 入门教程,当然你也可以直接看Actions的官方文档。
为了实现无服务器的自动更新,我们只需要让上面这段python运行在github Actions之上就可以了,你只需要在你代码仓库 ->Actions -> 新建Workflow,github会自动帮你在你仓库下面创建 .github/workflows/${FILENAME}.yml 文件,你只需要按格式要求修改书写文件即可,具体书写方式参考上述文档,这里不再展开。
最后给大家看下我的workflow文件,你也可以直接在我github仓库查看该文件xindoo/.github/workflows/build.yml
# This is a basic workflow to help you get started with Actions

name: build readme

# Controls when the action will run. Triggers the workflow on push or pull request
# events but only for the master branch
on:   # 触发时机
  push:
    branches: [ master ]  # master有更新
  schedule:
    - cron:  '0 */6 * * *'  # 每6小时运行一次
# A workflow run is made up of one or more jobs that can run sequentially or in parallel
jobs:
  # This workflow contains a single job called "build"
  build:
    # The type of runner that the job will run on
    runs-on: ubuntu-latest   # 使用最新版ubuntu镜像

    # Steps represent a sequence of tasks that will be executed as part of the job
    steps:
    # Checks-out your repository under $GITHUB_WORKSPACE, so your job can access it
    - uses: actions/checkout@v2

    - name: Setup Python  # 安装python环境
      uses: actions/[email protected]

    - name: Install Python dependencies  # 安装python爬虫依赖包
      run: python -m pip install urllib3 lxml

    - name: Run python   # 生成新的README.md文件
      run: python generateReadme.py

    - name: Record time
      run: echo `date` > date.log

    - name: Commit and push if changed   # 将README.md更新到仓库
      run: |
        git diff
        git config --global user.email "[email protected]"
        git config --global user.name "zxs"
        git add -A
        git commit -m "Updated Readme" || exit
        git push
创作不易,如果觉得我的文章对你有帮助,欢迎点赞+关注,我会分享更多有趣又有深度的内容。
Recommend
About Joyk
Aggregate valuable and interesting links.
Joyk means Joy of geeK