

Using Blazor WebAssembly, SignalR and C# 9 to create Full-stack Real time Applic...
source link: https://www.dotnetcurry.com/aspnet-core/realtime-app-using-blazor-webassembly-signalr-csharp9
Go to the source link to view the article. You can view the picture content, updated content and better typesetting reading experience. If the link is broken, please click the button below to view the snapshot at that time.

Using Blazor WebAssembly, SignalR and C# 9 to create Full-stack Real time Applications
Posted by: Daniel Jimenez Garcia , on 4/27/2021, in Category ASP.NET Core
During the Build 2020 event, Microsoft described their journey towards One .NET. This vision can be summarized as being able to use .NET to build any type of application that runs anywhere.
Blazor is recognized as an important piece of that vision, enabling full-stack web applications using .NET.
After the WebAssembly hosting model for Blazor graduated from its experimental phase, teams finally have a way to run .NET in the browser. Using Blazor, allows you to develop across your frontend and backend applications using the same language and much of the same tooling.
In this article, we will put Blazor WebAssembly under test by building a small real time application where users can create and participate in surveys. The application will leverage SignalR for its real time functionality across both frontend and backend.
And given that .NET 5 and C# 9 are just released, we will use the latest ASP.NET libraries and check out some of the new language features like record types.
Editorial Note: New to C# 9.0? Make sure to read C# 9 – Making your code simpler.
Building small sample applications can be a great exercise for anyone to explore whether Blazor delivers on its promise. Some of you will find using the same language and tooling makes you more productive and reduces friction. Others might miss tools, libraries and developer features taken for granted in the JavaScript ecosystem.
Hopefully this article will let you form your own idea or prompt you to try it out and explore for yourself!
You can download the article code from GitHub.
Note: Much of this article applies to Blazor Server as well. If you are considering Blazor Server, just introduce into your evaluation its own benefits and downsides. For more info check the official docs.
Getting started with Blazor WebAssembly
To begin with, there is some foundational work we need to go through in order to get a working solution with a Blazor WebAssembly frontend and an ASP.NET Core backend.
The very first thing we need is to create a solution with the necessary projects. This is straightforward enough using the standard ASP.NET templates. We will use the hosted model of Blazor WebAssembly since that gives us both frontend and backend projects out of the box.
Run the following command to create the new solution, which we will name BlazorSurveys:
dotnet new blazorwasm --hosted --output BlazorSurveysThis will create a new folder aptly named BlazorSurveys, containing the new solution and the generated .NET projects. I would also recommend initializing a git repository, so you can safely make changes, stage/commit them and go back in your history if necessary:
cd BlazorSurveysdotnet new gitignoregit initYou should have a solution with three different projects, BlazorSurveys.Client, BlazorSurveys.Server and BlazorSurveys.Shared. Each is found in the respective Client, Server and Shared folders.

Figure 1, generated solution
Make sure everything is working fine by building and running the solution by using either of the following commands from the solution root folder:
# manually build and run the appdotnet run -p Server# automatically rebuild and restart the app with code changesdotnet watch -p Server run
Figure 2, running the generated project greets you with its default home page
These commands just scratch the surface on how to run Blazor WebAssembly projects during development. For more information, and particularly if you want to learn about how to debug the Client project, check the official documentation.
Are you a .NET, C#, Cloud or Web Developer looking for a resource covering New Technologies, in-depth Tutorials and Best Practices?
Well, you are in luck! We at DotNetCurry release a FREE digital magazine once every few months aimed at Developers, Architects and Technical Managers. This magazine covers ASP.NET Core, Xamarin, C#, Patterns and Practices, .NET Core, ASP.NET MVC, Azure, DevOps, ALM, TypeScript, Angular, React, Vuejs and much more.
Subscribe to this magazine for FREE and receive the current and upcoming editions, right in your Inbox. No Spam Policy.
Note we use the Server project as the startup project. Blazor WebAssembly generates a set of static files, namely its DLLs and the necessary HTML/JS/CSS files to start the application, style it and interact with browser APIs. Browsers need to load these static files from a web server. Since we chose the hosted model of the WebAssembly template, the Server project has a double purpose in our solution:
- It provides the ASP.NET Core web API and SignalR hubs that the Client application interacts with.
- It also hosts the static files resulting from the Client application, including the index HTML page loaded at the root path as in https://localhost:5001, and the HTML/JS files referenced by the index page.
For a deeper discussion on how Blazor WebAssembly works and its startup process, check out my previous article (Blazor – Getting Started) in the DotNetCurry magazine.
Defining the Blazor and SignalR Web application
The application we are going to build in this exercise is a web application where users can create and participate in surveys. A survey is defined as a question, a list of options that can be chosen as the answer, and an expiration date.

Figure 3, the home page provides a summary of all the surveys in the system
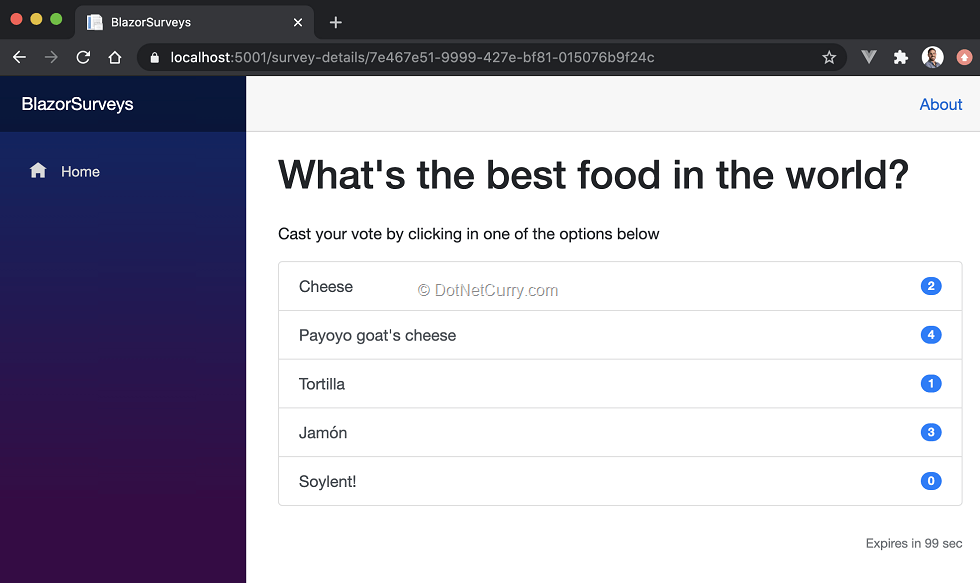
Figure 4, An example of one of the current surveys
Surveys can be a very complex field, with entire companies like SurveyMonkey and Qualtrics dedicated to it. Let’s define a simple and manageable scope for the purposes of this article.
Our aim will be to create an application where users can:
- See a list with all the surveys in the system
- Create a new survey
- See the status of a survey, including how many users selected each option
- Participate in any of the open surveys (i.e., not yet expired) by selecting or voting for one of its answers
The real time elements of the application will provide a little extra functionality for our users:
- When browsing the list of surveys, any newly created survey will immediately show up
- When viewing the status of a given survey, the number of votes for each option will be automatically updated as other users cast their vote
This should give us enough of a real-world application feeling while allowing us to focus on the elements we want to explore like Blazor and SignalR. Of course, you are welcome to implement any other features you might want or be interested into, like authentication, charts, multiple questions per survey, question types other than multiple choice, etc.
Adding the shared models
Now that we have a better idea on what we are trying to build, we can start writing some code. We will begin by shifting our attention to the BlazorSurveys.Shared project in the Shared folder.
A shared project between the client and server projects is a fitting place for code used by both client and server. Since we are using Blazor, we can now define model classes that will be:
- Used as input by the REST API provided by the server project
- Used as output by the same REST API
- Used as page/component models by the pages and components defined in the client project
The model classes provide a basic shared contract between the client and the server. It is one of the benefits you get out of the box when using Blazor, having strongly typed models shared by both your client and server code.
Note the models provide a contract in a looser way than alternatives like gRPC. We are only defining shared models, there is no shared definition of the methods or endpoints provided by the server REST API. This means the compiler will guarantee you only access valid properties, and these will have the expected types. However, the compiler won’t be able to guarantee that you call the right HTTP endpoint, nor that you use the right type for its input(s) and output!
You can actually use gRPC within your Blazor WebAssembly application, with the same general limitations that using gRPC from the browser has. For more information on using gRPC from Blazor WebAssembly check the official documentation.
For a general introduction to gRPC, check my previous article (gRPC with ASP.NET Core 3.0) in the DotNetCurry magazine.
Exploring immutable record types as models
The new C# 9 record types are a very interesting addition, which lets us easily define immutable classes. These are like normal classes, except the compiler enforces their immutability. i.e., you cannot change the values of their properties once an instance is created. If you want to modify them in some way, you need to create a new instance.
Read more about record types from the C# main designer and program manager, Mads Torgersen.
While the benefits of immutability are outside the scope of this article, the new record types are a good candidate to implement read operations in our REST API like retrieving a list of surveys or the full details of a given survey. And since this is a Blazor application, they are also good candidates as the page models for read-only pages such as the survey listing or survey details.
Let’s define the survey model as an immutable record type. Add a new file to the Shared project and define the following types:
public record Survey{public Guid Id { get; init; } = Guid.NewGuid();public string Title { get; init; }public DateTime ExpiresAt { get; init; }public List<string> Options { get; init; } = new List<string>();public List<SurveyAnswer> Answers { get;init; } = new List<SurveyAnswer>();}public record SurveyAnswer{public Guid Id { get; init; } = Guid.NewGuid();public Guid SurveyId { get; init; }public string Option { get; init; }}As you can see, defining a model using a record type is not much different from using a normal class. However, the compiler will ensure the values are never modified after initialization.
Now let’s do the same, providing a simpler version of the survey model. We will use this model when listing all the existing surveys, rather than using the full survey model with all of its properties.
public record SurveySummary{public Guid Id { get; init; }public string Title { get; init; }public DateTime ExpiresAt { get; init; }public List<string> Options { get; init; }}Our API controller will have to convert between the Survey and the SurveySummary models. To keep things simple, add a mapping method like the following to the Survey record:
public SurveySummary ToSummary() => new SurveySummary{Id = this.Id,Title = this.Title,Options = this.Options,ExpiresAt = this.ExpiresAt};Mutable models and client-side form binding
The final model we need to create will be used for the add survey page and API. Rather than defining the model using a record type, we will use a standard class.
This will allow us to use the form bindings that Blazor provides out of the box, so we can bind specific properties of this model to HTML form inputs. If we were to use a record type and associate one of its properties with an HTML input field (like a textbox), we would get an Exception every time the user modified the value.
In addition, this lets us tailor the model to the UX for adding a survey. For example, we can ask users to define the survey duration in minutes, rather than asking them to enter a DateTime for the expiration date.
Add to the Shared project a new AddSurveyModel class like the following one:
public class AddSurveyModel{public string Title { get; set; }public int? Minutes { get; set; }public List<OptionCreateModel> Options { get; init; } = new List<OptionCreateModel>();public void RemoveOption(OptionCreateModel option) => this.Options.Remove(option);public void AddOption() => this.Options.Add(new OptionCreateModel());}public class OptionCreateModel{public string OptionValue { get; set; }}This should look very familiar if you have ever created a model for an ASP.NET Core web API or MVC controller. However, you might be missing some validation attributes. Don’t worry we will come back to forms validation later in the article.
Note the main limitation of record types prevents us from using them together with client-side form binding. We could actually define a record type and use it in the server-side controller, while the client-side page could use its own mutable model class bound to the form fields.
This would allow us to keep the API and server-side immutable, while getting the benefit of client-side form binding. The downside would be having to maintain two models rather than a single one, even if the page model could be private to the Blazor component.
For the purposes of this application, I find this would be an overkill. However, in a larger application you might be interested in keeping the API and your controller using immutable record types. Even in the client-side you might want to adopt a read only immutable store using the Flux pattern and a library like Fluxor.
Creating the ASP.NET Core Server application
In this section, we will update the generated server project, so it implements both a standard REST API and a SignalR hub for real time functionality.
If you have trouble or if you are already familiar with server side ASP.NET and SignalR, feel free to download the source code from Github.
Adding the REST API
Now that we have our models defined, let’s implement a very simple SurveyController class that provides the necessary REST API to manage the list of surveys and their answers. This is no different from any other API implemented with ASP.NET Core, so I won’t spend much time on it. If you are new to it, check existing resources like this tutorial from the official docs.
We will add a standard web API controller class, decorated with the [ApiController] attribute and inheriting from ControllerBase. For the purposes of the article, it will contain an in-memory list of surveys rather than a connection to a database. Feel free to replace this with a persistent database, for example using Entity Framework Core as in the tutorial linked above.
[ApiController][Route("api/[controller]")]public class SurveyController: ControllerBase{private static ConcurrentBag<Survey> surveys = new ConcurrentBag<Survey> {// feel free to initialize here some sample surveys like:new Survey {Id = Guid.Parse("b00c58c0-df00-49ac-ae85-0a135f75e01b"),Title = "Are you excited about .NET 5.0?",ExpiresAt = DateTime.Now.AddMinutes(10),Options = new List<string>{ "Yes", "Nope", "meh" },Answers = new List<SurveyAnswer>{new SurveyAnswer { Option = "Yes" },new SurveyAnswer { Option = "Yes" },new SurveyAnswer { Option = "Yes" },new SurveyAnswer { Option = "Nope" },new SurveyAnswer { Option = "meh" }}},new Survey { … omitted … },};}The controller needs to implement the following methods, each exposing its own HTTP endpoint that the client can send a request to:
- getting a summary of all the surveys, exposed as GET /api/survey
- getting the full details of a single survey, exposed as GET /api/survey/{id}
- adding a new survey, exposed as PUT /api/survey/{id}
- answering a survey, exposed as POST /api/survey/{id}
The implementation can be as simple as:
[HttpGet()]public IEnumerable<SurveySummary> GetSurveys() {return surveys.Select(s => s.ToSummary());}[HttpGet("{id}")]public ActionResult GetSurvey(Guid id){var survey = surveys.SingleOrDefault(t => t.Id == id);if (survey == null) return NotFound();return new JsonResult(survey);}[HttpPut()]public async Task<Survey> AddSurvey([FromBody]AddSurveyModel addSurveyModel){var survey = new Survey{Title = addSurveyModel.Title,ExpiresAt = DateTime.Now.AddMinutes(addSurveyModel.Minutes.Value),Options = addSurveyModel.Options.Select(o => o.OptionValue).ToList()};surveys.Add(survey);return survey;}[HttpPost("{surveyId}/answer")]public async Task<ActionResult> AnswerSurvey(Guid surveyId, [FromBody]SurveyAnswer answer){var survey = surveys.SingleOrDefault(t => t.Id == surveyId);if (survey == null) return NotFound();// WARNING: this isn’t thread safe since we store answers in a List!survey.Answers.Add(new SurveyAnswer{SurveyId = surveyId,Option = answer.Option});return new JsonResult(survey);}You should now have a functional API. If you want to make sure it works as expected, you can build and run the application, then test the API using a tool such as Postman. See the official docs for examples on testing different methods like Get or Put.
Defining the SignalR Hub
Let’s now update the server project with a SignalR hub. As with the API controller before, since this is a standard Hub, I won’t spend much time on it. If you want to read more, check the official docs.
Add a new Hubs folder and create a new SurveyHub.cs file inside. Inside, create a new ISurveyHub interface. This interface defines the methods that our server-side controller will call, and the client-side will listen to. In our case, we want to notify clients when a survey is either added or updated:
public interface ISurveyHub{Task SurveyAdded(SurveySummary survey);Task SurveyUpdated(Survey survey);}Next create a SurveyHub class that inherits from the base SignalR’s Hub class. Note we don’t have to implement the ISurveyHub interface, the interface is only necessary to provide a strongly typed interface to our server-side code.
public class SurveyHub: Hub<ISurveyHub>{}Let’s make our hub a little bit more interesting by defining two methods that clients can invoke rather than listen to. We will use them so clients can tell the server when they are viewing a particular survey. The server will subscribe those clients to the update events for that particular survey.
public async Task JoinSurveyGroup(Guid surveyId){await Groups.AddToGroupAsync(Context.ConnectionId, surveyId.ToString());}public async Task LeaveSurveyGroup(Guid surveyId){await Groups.RemoveFromGroupAsync(Context.ConnectionId, surveyId.ToString());}This will let us send the survey updated events exclusively to clients that are currently viewing that survey. When implementing the client, we just need to make sure the client-side code invokes these two hub methods when entering/leaving the survey details page.
Let’s finish setting up the Hub by adding the necessary services and endpoint to the server application. Update the ConfigureServices method of the Startup class to include the SignalR services:
services.AddSignalR();..and update the Configure method, mapping the Hub to the /surveyhub endpoint:
app.UseEndpoints(endpoints =>{endpoints.MapRazorPages();endpoints.MapControllers();endpoints.MapHub<SurveyHub>("/surveyhub");endpoints.MapFallbackToFile("index.html");});Before moving on to the next section, check the official docs on how to enable response compression for the octet-stream MIME type, which will result in smaller SignalR messages sent between your client and server.
Emitting SignalR events from the controller
In order to emit events from the controller, we can use an instance of IHubContext<SurveyHub, ISurveyHub>. This will let us call the events we defined in the ISurveyHub interface, which SignalR will then propagate to any active clients.
Update the SurveyController class so an instance of the Hub context is injected via its constructor:
public class SurveyController: ControllerBase{private readonly IHubContext<SurveyHub, ISurveyHub> hubContext;…public SurveyController(IHubContext<SurveyHub, ISurveyHub> surveyHub){this.hubContext = surveyHub;}}Then modify the AddSurvey method so an event is sent to the clients. We can do so through the hubContext.Clients.Allproperty, which will expose the methods we defined in ISurveyHub:
public async Task<Survey> AddSurvey([FromBody]AddSurveyModel addSurveyModel){var survey = new Survey{ … omitted … };surveys.Add(survey);await this.hubContext.Clients.All.SurveyAdded(survey.ToSummary());return survey;}Now let’s also send an event whenever an answer is added to a survey. However rather than sending the event to all the connected clients, we will only send it to the clients that are currently viewing that survey. These are the clients who joined the SignalR group with the group name matching the survey Id:
public async Task<ActionResult> AnswerSurvey(Guid surveyId, [FromBody]SurveyAnswer answer){// … omitted …await this.hubContext.Clients.Group(surveyId.ToString()).SurveyUpdated(survey);return new JsonResult(answer);}With these changes, we have all the main elements of our server-side and shared code ready!
Creating the ASP.NET Core client application
It is time to switch focus to the client side and Blazor WebAssembly. For many, this will be the most interesting section of the article!
The final source code is available in Github.
Defining a strongly typed HTTP client
At the beginning of the article, we created a few model classes and records which would be shared between the client and server. As discussed, this would give us strongly typed models shared between the client and server projects. However, it would be up to the developer to keep the client- side code calling the REST API methods in sync with its implementation in the SurveyController.
We can improve the situation by creating a strongly typed HttpClient that encapsulates the REST API methods. This way we ensure there is a single class that needs to be manually kept in sync with changes to the interface of the REST API.
Add a new file SurveyHttpClient to the Shared project. Arguably, you could add this to the Client project as well. I like the idea of encapsulating the API as a strongly typed class that any .NET client could use, not just the Blazor application. Almost as if we were defining an HTTP interface!
There, implement a class that encapsulates the usage of an HttpClient calling each of the REST API methods provided by the SurveyController:
public class SurveyHttpClient{private readonly HttpClient http;public SurveyHttpClient(HttpClient http){this.http = http;}public async Task<SurveySummary[]> GetSurveys(){return await this.http.GetFromJsonAsync<SurveySummary[]>("api/survey");}public async Task<Survey> GetSurvey(Guid surveyId){return await this.http.GetFromJsonAsync<Survey>($"api/survey/{surveyId}");}public async Task<HttpResponseMessage> AddSurvey(AddSurveyModel survey){return await this.http.PutAsJsonAsync<AddSurveyModel>("api/survey", survey);}public async Task<HttpResponseMessage> AnswerSurvey(Guid surveyId, SurveyAnswer answer){return await this.http.PostAsJsonAsync<SurveyAnswer>($"api/survey/{surveyId}/answer", answer);}}We have essentially created a simple library that can be used by any piece of .NET code that wants to interact with our REST API. This includes our Blazor WebAssembly project.
As an added benefit, if you ever make a breaking change to the REST API, you won’t need to scan your Blazor application for usages of the HttpClient which call the method you modified!
To use it in the client project, you first need to install some extension methods via the following NuGet package:
cd Clientdotnet add package Microsoft.Extensions.Http --version 5.0.0Then update the Main method of the Program class. We need to register the typed HttpClient as part of the services, so we can later inject it into any razor component.
var baseAddress = new Uri(builder.HostEnvironment.BaseAddress);builder.Services.AddScoped(sp => new HttpClient { BaseAddress = baseAddress });builder.Services.AddHttpClient<SurveyHttpClient>(client => client.BaseAddress = baseAddress);You can now inject an instance of the strongly typed HttpClient into any of the Razor components of the client project, via the standard @inject directive. For example, a given Razor component could load the list of surveys from the server using:
@inject SurveyHttpClient SurveyHttpClient… template omitted …@code {private SurveySummary[] surveys;protected override async Task OnInitializedAsync(){surveys = await SurveyHttpClient.GetSurveys();}}We will use this pattern multiple times through the rest of the article.
Note you might want to consider features like error handling as part of your centralized HTTP client code. I would suggest exploring a library like Polly, which lets you implement policies like retries or circuit breakers.
Establishing the SignalR connection
There is one final bit of plumbing needed before we start building the client UX. We need to add the necessary code for the client to establish a SignalR connection to the Hub we defined in the server.
The first step is adding the SignalR client library to the Client project:
dotnet add package Microsoft.AspNetCore.SignalR.Client --version 5.0.0Note this is the general SignalR client library for any .NET application, not just Blazor applications!
Now we need to add the code to initialize and establish the SignalR connection. This is achieved using the HubConnectionBuilder class to configure the connection, and calling its StartAsync method.
We need to be careful not to block the initialization of the Blazor app until the SignalR connection is established. If we did so, users would see the blank loading page until the SignalR connection is established. And they would get stuck in that loading page in case it is unable to establish the connection. Since the SignalR connection does not provide any crucial functionality, this would be too restrictive.
With this in mind, let’s update the Main method of the Program class in order to register a singleton HubConnection instance. We will use the HubConnectionBuilder to create the connection, but we won’t start it yet.
builder.Services.AddSingleton<HubConnection>(sp => {var navigationManager = sp.GetRequiredService<NavigationManager>();return new HubConnectionBuilder().WithUrl(navigationManager.ToAbsoluteUri("/surveyhub")).WithAutomaticReconnect().Build();});Instead, we will start the connection as part of the App.razor component. In its most basic form, this would mean calling the StartAsync method of the connection as in:
@inject HubConnection HubConnection…@code {protected override void OnInitialized(){ HubConnection.StartAsync()}}This code is far too simplistic!
The first issue is obvious when you compile. You will get a warning since we are not awaiting an async method! To a certain extent, that’s what we want – initialize in a fire and forget fashion that doesn’t block initializing the rest of the application. However, the code can be more explicit about it and disable the warning on that line.
More important is what happens when the initialization fails or when the connection gets lost. As it stands, the code performs a single attempt to establish the connection.
In fact, the automatic reconnect configured as part of the HubConnectionBuilder:
- does not apply at all when initializing the connection
- will only retry a given number of times. After the last attempt, it will give up and is up to the application developer to write some logic that restarts the connection process.
We can improve this initial attempt by wrapping the StartAsync in a method that retries the initial connection attempt. Even better, we can handle the connection closed event and attempt the same connection initialization:
Add a new @code section to the existing App.razor component with the following contents:
private CancellationTokenSource cts = new CancellationTokenSource();protected override void OnInitialized(){// launch the signalR connection in the background.#pragma warning disable CS4014ConnectWithRetryAsync(cts.Token);// Once initialized the retry logic configured in the HubConnection will automatically attempt to reconnect// However, once it reaches its maximum number of attempts, it will give up and needs to be manually started again// handling this event we can manually attempt to reconnectHubConnection.Closed += error =>{return ConnectWithRetryAsync(cts.Token);};}private async Task<bool> ConnectWithRetryAsync(CancellationToken token){// Keep trying to until we can start or the token is canceled.while (true){try{await HubConnection.StartAsync(token);return true;}catch when (token.IsCancellationRequested){return false;}catch{// Try again in a few seconds. This could be an incremental interval await Task.Delay(5000);}}}public async ValueTask DisposeAsync(){cts.Cancel();cts.Dispose();await HubConnection.DisposeAsync();}For more information, see the official docs on how to handle the lost connection.
Listing all the surveys in the Index page
Let’s begin building the UX of our sample application. The first step will be replacing the existing Index.razor component with one that lists the surveys in the application.
The component has an array of SurveySummary which is retrieved from the server using the SurveyHttpClient. They are then rendered using a bootstrap card per survey:
@page "/"@using BlazorSurveys.Shared@inject SurveyHttpClient SurveyHttpClient@inject NavigationManager NavigationManager<h1 class="mb-4">Real-Time surveys with Blazor and SignalR</h1><button class="btn btn-primary mb-4" @onclick="AddSurvey"><i class="oi oi-plus" /> Add Survey</button>@if (surveys == null){<p><em>Loading...</em></p>} else {<div class="row row-cols-1 row-cols-md-2">@foreach (var survey in surveys.OrderBy(s => s.ExpiresAt)){<div class="col mb-4"><div class="card"><div class="card-body"><h5 class="card-title">@survey.Title</h5><button class="btn btn-link pl-0" @onclick="@(() => GoToSurvey(survey.Id))">View survey</button></div></div></div>}</div>}@code {private SurveySummary[] surveys;protected override async Task OnInitializedAsync(){surveys = await SurveyHttpClient.GetSurveys();}private void AddSurvey(){NavigationManager.NavigateTo("add-survey");}private void GoToSurvey(Guid surveyId){NavigationManager.NavigateTo($"survey-details/{surveyId}");}}Both the “Add survey” and “View survey” buttons have an event handler for their click event. These use the NavigationManager to navigate to pages we haven’t yet created, so they will fail if you click them! We will add these pages in the next section.
Listening to the survey added SignalR event
We now have a page that retrieves and displays all the surveys. Let’s enhance the page so it listens to the SurveyAdded SignalR event and automatically displays in real time any survey added by another user.
With all the plumbing we have done, this is a matter of calling the On method on the HubConnection class. The event handler can add the survey to the component’s current list and notify Blazor of the change via the StateHasChanged method. The only caveat is to remember cleaning our event handler when the component is removed!
@using Microsoft.AspNetCore.SignalR.Client@inject HubConnection HubConnection@implements IDisposable… omitted …protected override async Task OnInitializedAsync(){surveys = await SurveyHttpClient.GetSurveys();HubConnection.On<SurveySummary>("SurveyAdded", survey =>{surveys = surveys.Where(s => s.Title != survey.Title).Append(survey).ToArray();StateHasChanged();});}public void Dispose(){HubConnection.Remove("SurveyAdded");}As you can see, we add an event handler for the SurveyAdded event as part of the component’s initialized lifecycle event. This event handler is removed as part of the Dispose method when the component is removed. The event handler receives an instance of the SurveySummary model, as we defined in the ISurveyHub previously in the server project.
Render a live expiration time using a shared component and a shared IExpirable interface
When we defined the survey model, we added an ExpiresAt property. It would be useful if we use this property to display how much time remains before the survey expires. Even better, it would be great if we could live update this information.
Let’s define a new IExpirable interface in the shared project. This interface contains an ExpiresAt property, and we’ll use it to define three calculated properties:
- IsExpired, returning true if the survey is already expired
- ExpiresInMin, returning the number of minutes from the current time until the defined expiration time
- ExpiresInSec, same as ExpiresInMin but in seconds
Nothing particularly remarkable, except for the fact the calculated properties are directly added to the interface taking advantage of a feature added in C# 8.
public interface IExpirable{DateTime ExpiresAt { get; }bool IsExpired => DateTime.Now > ExpiresAt;int ExpiresInMin => (int)Math.Ceiling((decimal)ExpiresInSec / 60);int ExpiresInSec => (int)Math.Ceiling(ExpiresAt.Subtract(DateTime.Now).TotalMilliseconds / 1000);}Now that we have this interface, make sure to update both the SurveySummary and Survey models to implement it. No other changes are needed in these record types, since they both already defined an ExpiresAt property.
You can go back to the SurveyController for a brief change and ensure that answers are only added to surveys that haven’t expired. In the AnswerSurvey method, add the following guard:
if (((IExpirable)survey).IsExpired) return StatusCode(400, "This survey has expired");Back to the client project, add a new SurveyExpiration.razor component. The component will receive an instance of IExpirable as parameter and will render how long until it expires.
@using BlazorSurveys.Shared<p @attributes="ExtraAttributes">@if (Expirable.IsExpired){<strong>This survey has already expired!</strong>} else if(Expirable.ExpiresInMin > 2) {<small class="text-muted">Expires in @Expirable.ExpiresInMin min</small>} else {<small class="text-muted">Expires in @Expirable.ExpiresInSec sec</small>}</p>@code {[Parameter]public IExpirable Expirable { get; set; }[Parameter(CaptureUnmatchedValues = true)]public Dictionary<string, object> ExtraAttributes { get; set; }}Note the usage of the ExtraAttributes. This allows users of this component to provide their own HTML attributes like class, which will be added to the root <p> element of the component.
We can immediately take advantage of this component by using it from the Index.razor component. Update its template so the component is added at the end of the current card-body element:
<div class="card-body">…<SurveyExpiration Expirable=survey class="card-text float-right" /></div>This is very clean and a great usage of the IExpirable interface across client and server code. The only problem is that the displayed expiration time isn’t updated as time goes by. i.e., we won’t see the number of minutes/seconds remaining decreasing in real time.
Let’s fix that by adding an old-fashioned Timer to the SurveyExpiration component. The Timer will fire every second and will notify Blazor that it has to re-render the component because the state has changed. We are effectively calling StateHasChanged every second, forcing Blazor to check the new value of the interface calculated properties and re-render the UX.
@using System.Threading… omitted …private Timer timer;protected override void OnInitialized(){timer = new Timer((object stateInfo) =>{StateHasChanged();}, null, TimeSpan.FromSeconds(1), TimeSpan.FromSeconds(1));}public async ValueTask DisposeAsync(){await timer.DisposeAsync();}If you now run the application, you will see how the time remaining is live updated until the survey eventually expires.

Figure 5, survey expiration time displayed and updated in real time
Answering a survey
To participate on a survey, we need to build a page that shows the full details of a survey. At the very least, users need to see the available options so they can choose one of them.
Begin by adding a new SurveyDetails.razor page. This new page will receive the Id of the survey to display as a parameter from the URL, it will load it from the server using the REST API and will display its full details.
@page "/survey-details/{Id:guid}"@using BlazorSurveys.Shared@inject SurveyHttpClient SurveyHttpClient@if (survey is null){<p><em>Loading...</em></p>} else {<h1 class="mb-4">@survey.Title</h1><p>Cast your vote by clicking in one of the options below</p><ul class="list-group mb-4">@foreach (var option in survey.Options){<button class="list-group-item list-group-item-action d-flex justify-content-between align-items-center">@option<span class="badge badge-primary badge-pill">@(survey.Answers.Where(a => a.Option == option).Count())</span></button>}</ul><SurveyExpiration Expirable=survey class="text-right" />}@code {[Parameter]public Guid Id { get; set; }private Survey survey;protected override async Task OnInitializedAsync(){survey = await SurveyHttpClient.GetSurvey(Id); }}It is not too different from the previous Index component; except we load a single Survey from the server rather than a list of SurveySummary. We then use a bootstrap’s list group to render each option as an actionable item that users can click on.
Note how we also reuse the same SurveyExpiration component in order to show how long until the survey expires.
To vote on a survey, we will need to use the AnswerSurvey method of the SurveyHttpClient. Add an event handler to each option’s button, passing along that particular option:
@onclick="@(async () => await OnAnswer(option))"Inside the code directive, implement the OnAnswer method as:
private async Task OnAnswer(string option){if (((IExpirable)survey).IsExpired) return;await SurveyHttpClient.AnswerSurvey(Id, new SurveyAnswer{Option = option});}That’s it, users can now click on one of the options and vote on it. Note users can keep voting as many times as they want! Feel free to implement some functionality to ensure users can only participate once per survey.
Listening to the survey updated SignalR event
Now that users can answer a survey, let’s leverage our SignalR hard work to ensure users can see votes from other users in real time.
If you remember, the server is already sending a SurveyUpdated event whenever a new answer is added. We can then update the SurveyDetails component to subscribe to that event in a similar way the Index component subscribed to the SurveyAdded event.
The only caveat is that the event will only be sent to clients who registered themselves within the SignalR group for that particular survey. We then need to ensure the SurveyDetails page calls the JoinSurveyGroup method of the Hub when initialized, as well as the LeaveSurveyGroup method when disposed:
@using Microsoft.AspNetCore.SignalR.Client@inject HubConnection HubConnection@implements IAsyncDisposable… omitted …protected override async Task OnInitializedAsync(){survey = await SurveyHttpClient.GetSurvey(Id);// TODO: error handling, for example when not connected to the serverawait HubConnection.InvokeAsync("JoinSurveyGroup", Id);HubConnection.On<Survey>("SurveyUpdated", survey =>{this.survey = survey;StateHasChanged();});}public async ValueTask DisposeAsync(){HubConnection.Remove("SurveyUpdated");// TODO: error handling, for example when not connected to the serverawait HubConnection.InvokeAsync("LeaveSurveyGroup", Id);}Once you have these changes, open the same survey in two separate browser windows. Note how answering in one of the windows is automatically reflected in the other.

Figure 6, survey answers are propagated to clients in real time
Adding a new survey
It’s time to add the last page of our application, one where users can define new surveys.
Add a new AddSurvey.razor page, where an instance of the AddSurveyModel is edited using Blazor data binding and its forms components. Once the form is submitted, the model will be sent to the server using the AddSurvey method provided by the SurveyHttpClient.
@page "/add-survey"@using BlazorSurveys.Shared@using Microsoft.AspNetCore.Components.Forms@inject SurveyHttpClient SurveyHttpClient@inject NavigationManager NavigationManager<EditForm EditContext="@editContext" OnSubmit="@OnSubmit"><DataAnnotationsValidator /><ValidationSummary /><div class="form-group"><label for="inputTitle">Title</label><InputText id="inputTitle" class="form-control" @bind-Value="survey.Title" /></div><div class="form-group"><label for="inputMinutes">Minutes</label><InputNumber id="inputMinutes" class="form-control" @bind-Value="survey.Minutes" /></div><label>Options</label>@foreach (var option in survey.Options){<div class="input-group mb-3"><InputText class="form-control" @bind-Value="option.OptionValue" /><div class="input-group-append"><button class="btn btn-outline-primary" type="button" @onclick="@(() => survey.RemoveOption(option))">Remove</button></div></div>}<p><button class="btn btn-primary" type="button" @onclick="@(() => survey.AddOption())"><i class="oi oi-plus" /> Add Option</button></p><p><button type="submit" class="btn btn-primary float-right">Submit</button></p></EditForm>@code {private AddSurveyModel survey = new AddSurveyModel();private EditContext editContext;protected override void OnInitialized(){editContext = new EditContext(survey);}private async Task OnSubmit(){if (!editContext.Validate()) return;var response = await SurveyHttpClient.AddSurvey(survey);if (response.IsSuccessStatusCode){NavigationManager.NavigateTo("");}}}You should now be able to add a new survey. And with all the infrastructure we have already added, the SurveyAdded event will be fired and received by any client currently viewing the list of surveys. Make sure you try adding a survey with two browser windows open, where one of them stays on the Index page!

Figure 7, adding a new survey

Figure 8, the new survey propagates to other clients in real time
Forms validation
Let’s finish our application by updating and customizing the validation of the AddSurveyModel. To begin with, add some data annotation attributes like [Required] to the properties of the model class.
Once you have done so, let’s add a model rule, rather than an individual property rule. Let’s make sure that an AddSurveyModel is only considered valid if it has at least two options. This can be achieved by implementing the IValidatableObject interface:
public class AddSurveyModel: IValidatableObject{[Required][MaxLength(50)]public string Title { get; set; }…public IEnumerable<ValidationResult> Validate(ValidationContext validationContext){if (this.Options.Count < 2 ){yield return new ValidationResult("A survey requires at least 2 options.");}}}Now re-run the application and attempt to submit the form without entering any values. The <ValidationSummary /> component will automatically display the failed validations, including the model level one. And the new survey won’t be submitted to the server unless it’s valid, due to the if (!editContext.Validate()) return; guard inside the OnSubmit method.
The SurveyController automatically implements server-side validation since it is decorated with the [ApiController] attribute. You can test this by commenting out the client-side guard and submitting an invalid model. You will notice the server replies with a 400 Invalid response, including the details of the failed validations.
This is great, we have both client and server-side validation completely in sync with very little effort!
Validation in nested models
However, the Blazor implementation is limited to top-level properties in the model. This means adding a [Required] property to the OptionCreateModel has no effect in our client-side validation!
In order to validate nested models client side, we need to install another NuGet package which is still in the experimental phase. Install it in both the Client and Shared projects:
dotnet add package Microsoft.AspNetCore.Components.DataAnnotations.Validation --version 3.2.0-rc1.20223.4You then have to annotate the nested model with the [ValidateComplexType] annotation. In our case, this means adding the annotation to the Options list:
[ValidateComplexType]public List<OptionCreateModel> Options { get; init; } = new List<OptionCreateModel>();Finally, replace the <DataAnnotationsValidator /> component in the Razor component with <ObjectGraphDataAnnotationsValidator />.
For more information, see the official docs.
Customizing validation styles
Since Blazor ships with Bootstrap wired out of the box, we can customize the validation component to use Bootstrap styling.
The very first thing you want to add is your own FieldCssClassProvider. We will use this class to specify which class names should be added to invalid HTML input elements. To use bootstrap styles, we want this to be the class name is-invalid when invalid.
private class BootstrapFieldClassProvider : FieldCssClassProvider{public override string GetFieldCssClass(EditContext editContext, in FieldIdentifier fieldIdentifier){var isValid = !editContext.GetValidationMessages(fieldIdentifier).Any();return isValid ? "" : "is-invalid";}}This class is wired to the editContext as part of the OnInitialized method of the component:
editContext.SetFieldCssClassProvider(new BootstrapFieldClassProvider());Then we can display each individual field error message right next to that field, as opposed to the validation summary displayed at the top of the page. This can be achieved using the editContext.GetValidationMessages method to check if there are failed validations for a specific field, and if so display them using the expected bootstrap style:
<div class="form-group"><label for="inputTitle">Title</label><InputText id="inputTitle" class="form-control" @bind-Value="survey.Title" />@if(editContext.GetValidationMessages(() => survey.Title).Any()){<div class="invalid-feedback">@editContext.GetValidationMessages(() => survey.Title).First()</div>}</div>The problem is that this can be very verbose once you have a few fields in the form. You could explore component libraries or roll your own!
Finally, we can update the validation summary displayed at the top, so it uses a bootstrap alert box:
<div class="@(editContext.GetValidationMessages().Any() ? "alert alert-danger pb-0" : "")"><ValidationSummary class="alert alert-danger" /></div>You will also want to comment out the following rule inside app.css since it overrides the default bootstrap font color for alert boxes:
.validation-message {// color: red;}With these changes, your form validation will be styled using Bootstrap.

Figure 9, form validation using Bootstrap styling
Make sure to check the official docs on forms validation!
Conclusion
There is a lot to like in Blazor.
Enabling developers to create a web application with real time functionality using only .NET and C# can be a huge win for many teams and developers. Not just that, you get to leverage the best .NET framework with its latest .NET 5 release, as well as all the improvements made to the language up to C# 9.
Blazor can be a huge enabler for all of those who avoided the JavaScript ecosystem and all the nuances of modern web development. However, if you bit the JavaScript bullet a while ago and invested in the current web development skills and tools, its benefits might be less obvious.
I am really curious to see if Blazor can become an alternative to JavaScript with widespread appeal. In my opinion, it is almost there. I think it needs a little bit more time to receive features I now take for granted, to improve its performance and to grow an ecosystem of useful libraries and components.
One of the main features I miss while developing is stateful hot reload. That very short feedback loop as I change the code, is something I find very hard to renounce. Note this has been known since the early days of Blazor as you can see in its issue, hopefully it will make the cut for the .NET 6 planning currently happening in the open. Hopefully this will land together with AoT compilation for better performance and even source maps for easier debugging!
I am also aware of how much I came to rely on flux data stores like Vuex. I have used it in all the latest web applications I created using Vue.js and I found it the key ingredient to manage complex apps with many components. I should start exploring Blazor alternatives like Fluxor!
Finally, although the JavaScript ecosystem can be daunting to get into, once you become familiar with it you realize there are many truly useful tools and libraries. Blazor hasn’t had the time nor the developer adoption to get there yet. I know you can interop from Blazor to JavaScript, which means you could use libraries from the JavaScript ecosystem. However, the Blazor magic breaks the moment you start adding JavaScript code and libraries into your Blazor application.
I understand these are very subjective points. What for me is a major pain point might be not so much for others. It’s also likely the level of comfort with today’s JavaScript and web development will drive much of your position towards Blazor. The good news is that most of these issues are solvable by either Microsoft or preferably by growing a community around Blazor.
And it’s the latter what will ultimately determine the fate of Blazor!
You can download the article code from GitHub.
This article was technically reviewed by Damir Arh.
This article has been editorially reviewed by Suprotim Agarwal.
C# and .NET have been around for a very long time, but their constant growth means there’s always more to learn.
We at DotNetCurry are very excited to announce The Absolutely Awesome Book on C# and .NET. This is a 500 pages concise technical eBook available in PDF, ePub (iPad), and Mobi (Kindle).
Organized around concepts, this Book aims to provide a concise, yet solid foundation in C# and .NET, covering C# 6.0, C# 7.0 and .NET Core, with chapters on the latest .NET Core 3.0, .NET Standard and C# 8.0 (final release) too. Use these concepts to deepen your existing knowledge of C# and .NET, to have a solid grasp of the latest in C# and .NET OR to crack your next .NET Interview.
Click here to Explore the Table of Contents or Download Sample Chapters!
Recommend
About Joyk
Aggregate valuable and interesting links.
Joyk means Joy of geeK