

Prototyping interactions between physical and visual interfaces
source link: https://uxdesign.cc/prototyping-physical-interactions-with-visual-interfaces-in-2021-d0a305658c5e
Go to the source link to view the article. You can view the picture content, updated content and better typesetting reading experience. If the link is broken, please click the button below to view the snapshot at that time.

Prototyping interactions between physical and visual interfaces

When it comes to prototyping physical interactions with visual interfaces, Arduino and Processing are probably one of the first things that come to mind. But so is how tedious it can be to handle data streams between Arduino and Processing or how adventurous it is to mock up GUIs in Processing
The year is 2021, and today we can leverage modern web technologies to rapid prototype frontends that respond to our Arduino sensors. In this article, I’d like to show you one approach to using Johnny-Five and a modern JavaScript framework of your choice to prototype user interfaces, quickly validate your ideas, or just toy around.
This way of JavaScript-fueled prototyping comes with some sweet advantages:
- Speed. When it comes to prototyping, time is often the most limiting factor. Save time by quickly bootstrapping visual interfaces with a markup language you already know: HTML and CSS.
- Device agnostic. Build a prototype once and serve it to all browser-enabled devices in your local network.
- More actual prototyping. Spend less time convincing your Arduino to spit out your sensor data and more time actually prototyping with the data. Through abstractions provided by the Johnny-Five library, we can initialize, listen and talk to our board with just a few lines of code.
How it works
The prototype setup consists of a NodeJS backendand React frontend.
The backend is a NodeJS server that communicates with our microcontroller using Johnny-Five, a JavaScript IoT and Robotics library. The data from our microcontroller is then exchanged between the NodeJS backend and the React frontend using WebSockets. Our React frontend, an ‘ordinary’ React web app, translates the data changes into a reactive user interface.

Heads up
For this article, I’ll assume that you’re familiar with basic Arduino prototyping, common web technologies and have worked with JavaScript, JavaScript frameworks, and the Node/NPM ecosystem before. If you have not, you can still tag along, but I won’t go into detail because there are too many core concepts that would’ve to need to be covered.
If you feel lost, I recommend getting a little bit familiar with JavaScript and NodeJS first and also look into NPM, NodeJS’s package manager. I also recommend getting familiar with ReactJS or any other JS framework you might use (ex. VueJS)
Prototyping interactions between physical and visual interfaces
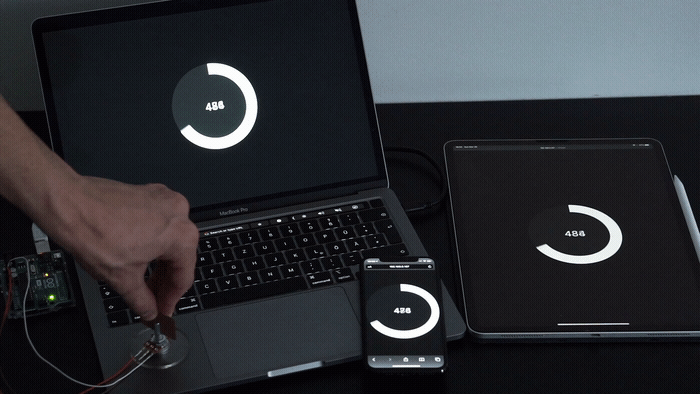
To see how such a js-enabled prototyping setup looks like in practice, we’ll build a simple web app with a tachometer that reacts to the input of a potentiometer. While simple enough, this will show the core principles and can be easily modified or extended for more advanced prototypes.
The finished code is available on GitHub, together with more advanced examples — but more to that later.
What you’ll need
For your first prototyping session, you’ll need…
- 💻 a host machine, ex. your laptop or desktop pc
- 🟦 a microcontroller, we’ll use an Arduino
- 🕹 ️a sensor, we’ll use a potentiometer
- 🌀 the usual: jump wires to connect the sensor to your board, a USB cable to connect your board to your host machine, a code editor, and your favorite command line
Prerequisite
- Make sure that NodeJS is installed on your host machine.
- Make also sure that your Arduino board is flashed with the StandardFirmata firmware. This will ensure that our Node backend can make sense of what our Arduino is talking about. Use your Arduino IDE to check or flash your board (Connect your board, then
File > Examples > Firmata > StandardFirmataPlus) or refer to the Johnny-Five docs - Install Johnny-Five’s global dependencies (which depend on your OS, refer to the Johnny-Five docs)
🧰 Setting up the backend
We will start with setting up the backend of our prototype. This means that we hook up our microcontroller to our host machine and create a NodeJS server file that will talk and listen to our board.
- Initialize project. Create a new directory in which our prototype will live and initialize your project using
npm init

2. Install dependencies. Install Johnny-Five locally npm i johnny-five
3. Creating the server. Create a server.js file. This is where our NodeJS-Johnny-Five server will live.
In the server file, we want to accomplish two things: First, we want to create a NodeJS server instance in that our server lives. Second, we want to initialize our Arduino board using Johnny-Five and tell our node app what kind of data is to be expected.
Let’s break this down:
- First, we create an HTTP server instance and specify the port. By default, the IP will be localhost.
- We then initialize Johnny-Five and pull out the
BoardandSensorclass from the J5 library: we always needBoardto initialize our board. Since we’re working with a Potentiometer, we also need Johnny-FivesSensorAPI. - After the board has been initialized, we tell our node app that we expect a
Sensorobject on pin A0. Which pin you choose is entirely on your own. - The
Sensor.on("change", ())method listens for data changes on our specified pin A0. When a data change event is emitted, we will console log the raw value (refer to the Sensor API to see what data you can pull) - Finally, we will spin up our server using the server’s
listen()method.
Now, we should be able to start our server by running node server from our project directory — but, we haven’t connected our Arduino yet.
4. Hook up Arduino. Connect the potentiometer to your Arduino board (make sure to use the pin specified in the code or refer to the Fritzing schematic) and connect your Arduino to your machine’s USB port.

5. Do a test run. Start your node server by running node server in your terminal. You should see your specified output in your server’s console.

6. Troubleshooting. If you can’t get your board or server running right away, there are unfortunately a multitude of possible causes. If the problem is with the serial connection between your machine and your board, usually J5 will give you ample information about this in the console. One cause could be that your Arduino firmware is not correct (see step 0 or refer to the J5 setup guide) or you have not installed all dependencies.
🖼️ Setting up the frontend
Next, we will create our React frontend. This will be the visual interface that reacts to our Arduino input.
- Scaffold a React app. Let’s start by scaffolding a minimum viable react app
npm i react react-dom && npm i -D @babel/core @babel/preset-env @babel/preset-react babel-loader webpack webpack-cli webpack-dev-server html-webpack-plugin
This will install React, Babel (for transpiling our React’s JSX code), and Webpack (to bundle our React app for development).
💭 You are completely free to set up the React app however you want (e.g. using create-react-app). I personally prefer the approach mentioned above to create a more barebones React app without unit testing etc.
2. After installing all dependencies, let’s continue by creating the necessary files for your React app.
🗃️ Create a ./src directory and create the app’s entry files.
This is where our React app will live in.
🔧 Create a Babel .babelrc config file.
This will configure Babel for our project.
🔧 Create a webpack config file.
In the webpack config, we specify our app’s entry file and how to deal with js(x) files.
📝 Lastly, modify your package.json file and add a serve and build script.
We add a --host 0.0.0.0 flag to our serve script to make our app accessible externally — so we can prototype our app across different devices.
Serve your react app and make sure that everything works by running npm run serve and navigating to your React app in your browser (usually at localhost:8080).
Your project structure now should look like this:

To save the tedious task of setting up a React app every time, I recommend creating your own customized boilerplate and storing it in a git repository so you can clone it for future prototyping sesh’s.
🤝 Connecting the frontend and backend
Now that we have created some frontend boilerplate and a backend, it’s time to connect our React app to our NodeJS server in order to display the Potentiometer’s real-time value.
For this, we’re going to use Socket.IO, a WebSockets implementation for JavaScript. First, install socket.io and socket.io-client, a client wrapper that makes life a lot easier: npm i socket.io socket.io-client
Next, we have to do two things:
- We have to create a socket server instance — luckily, we can do this in our NodeJS server we already have. This allows us to broadcast the Poti’s value to all connected clients.
- We have to tell our React app, the client, what a socket server is and how it can listen to what the socket server broadcasts.
Creating a socket server instance
Let’s modify our server.js and initialize a socket server instance.
Two things changed:
- First, we initialized a socket server instance. We also added a CORS rule so every device is allowed to communicate with our server.
- Second, we added a
io.emitin ourpoti.on('change')handler. This will broadcast a custompoti_changeevent and the current Poti value to all connected clients.
Listening to our socket server
Now all that’s left to do is to tell our React app that it has to listen to our socket server’s poti_change event.
Open your src/index.js file and make some changes to it:
Let’s break this down:
- First, we import the socket.io client wrapper
socketIOClient - We specify the address of our socket server (which is our node server). Enter
ipconfigin your terminal to get your machine’s local IP address. The port we specified in our server.js if you remember. - Next, we bind our socket client instance to a constant for easier usage
Within our App function, we added the useState and useEffect hooks. This allows us to store the received Poti value and continuously listen to broadcast events from our socket server. If you look inside our useEffect hook, you can see that we listen to a poti_change event. This is the custom event we specified in our server.js .
Every time our app receives an poti_change event, it’ll update the Poti value in our app.
Et voilà! All that is left to do is to display the value. If everything is hooked up correctly, spin up your node server and serve your React app
node server & npm run serve
and navigate to your React app in your browser with any browser-enabled device within your local network (ex. your phone, tablet or just your local machine).

💄 Styling the interface
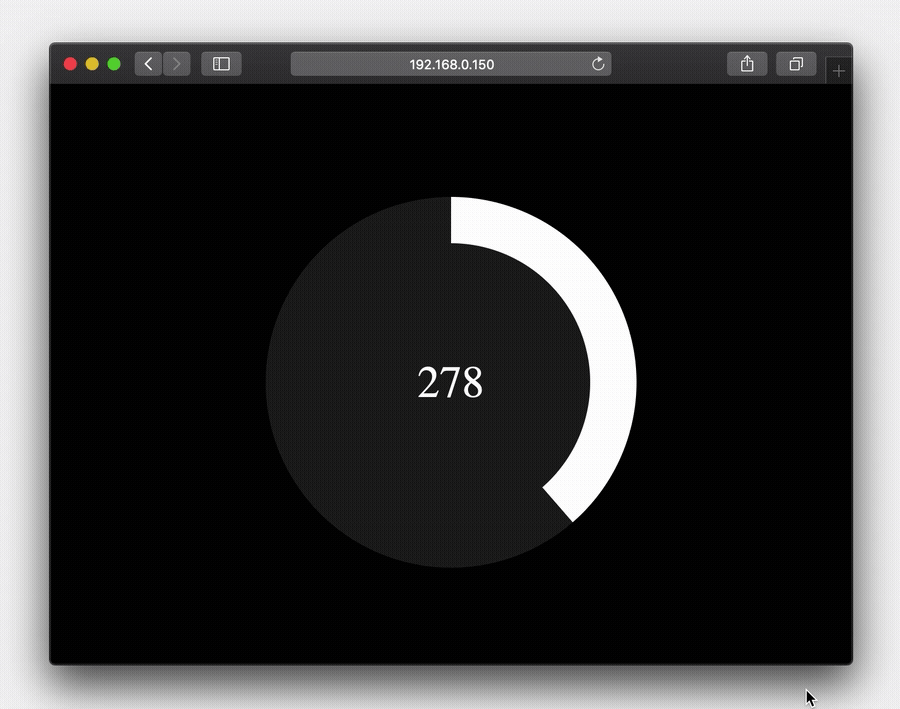
Now that our React app ‘has access’ to the Poti value emitted from our board, we can do virtually anything with it. For the sake of this prototype, let’s throw together some lines of CSS and build a reactive tachometer.
Open your index.js file and add some styling and spice to your app.
🚀 Deploying the project?
Deploying our project to the web is per se not possible because we’re relying on the serial communication of our host machine. If you want to ‘deploy’ your project for e.g. external demos or user testing, there are different approaches you could take:
- You could make your socket server instance accessible from the web and point your React app at the public address
- If you want to keep things local, you could use a Raspberry Pi as the host machine and run the node server on your RPi
Each approach comes with different caveats, and I might save it for another article to go over them.
Wrapping up
The beauty of this kind of prototyping is that it abstracts away the tedious aspects of prototyping (ex. juggling data streams).
In just eight lines of code, we can listen to our Arduino’s data stream and pass the data to our web app for it to consume and process it — and in the whole thing, we don’t even have to touch code on the Arduino side once.
Since the entire visual interface lives in a website, we have the full range of web tools such as JS and CSS frameworks at our disposal.
For future prototyping sessions, it’s a good idea to tweak the folder structure to your liking and a create template, and store it in a git repository. That way, you can quickly scaffold a project and start building and prototyping.
The finished code is available on GitHub.
Where to go from here
In our example, the potentiometer and sensor API was just one way to bring a physical interaction into our web app. The Johnny-Five API documentation and example section give a good overview of what components are supported and how they can be used.
I’d like to conclude this article with two more examples of what other prototypes might look like. All of the examples, including the Poti prototype, are hosted on GitHub.
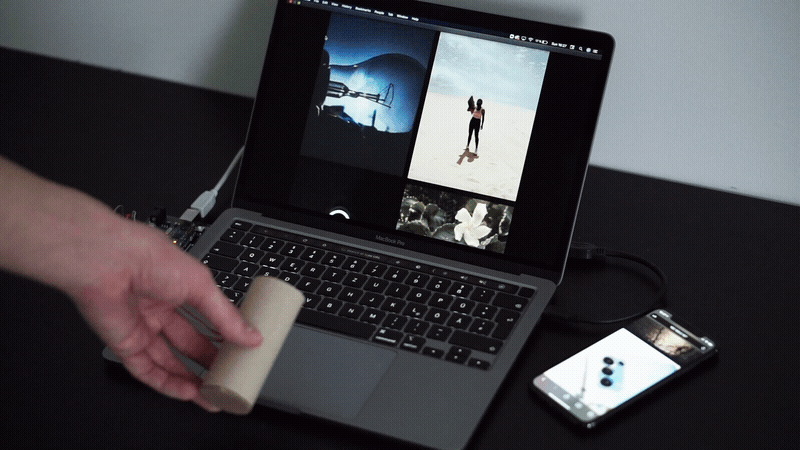
🌀 Prototyping outside the box
Instead of making a single element within the app react to our data, we can make the whole page reactive instead. This way, new input modalities could be prototyped. In this example, I’ve used a 3-axis accelerometer and made the whole page react to it. Or in other words: the root div of the page has a transform: translateY CSS property whose value depends on the accelerometer’s tilt value.
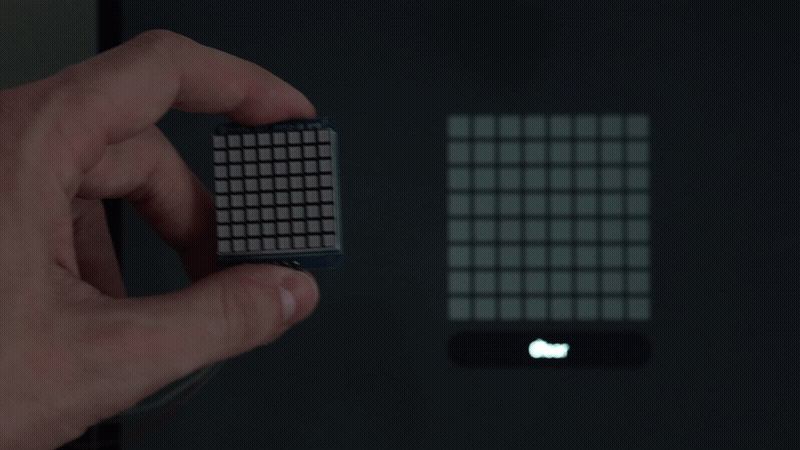
🔃 Bidirectional communication
In our frontend code, we are not restricted to just reading data. We can write data, too! Our socket server allows for bidirectional communication; this means that we can modify data in our frontend and emit it to our node backend, which in turn hands it over to our Arduino board and sensor.
In the example above, I hooked up an 8x8 LED matrix to an 8x8 array of checkboxes. Each checkbox controls a single LED in the matrix and et voilà, we have a small digital pixel editor that reaches out into the physical world.
I hope this article opens the door for a modern approach to physical prototyping. If you have questions, recommendations or just want to share what you’ve built, I’d love to hear about it — don’t hesitate to shoot me a message.
Cheers 👋
📚 Resource list
Recommend
About Joyk
Aggregate valuable and interesting links.
Joyk means Joy of geeK